500 Series Snow Throwers Brochure
Page 1
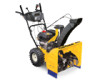
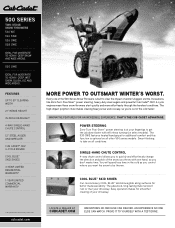
...You will spend less time in -DasH HeaDliGHT 4-WaY sinGle-HanD cHUTe conTrol 12" sTeel aUGer anD iMPeller cUB caDeT® oHV 4-cYcle enGine cool BlUe™ skiD sHoes 3-Year liMiTeD resiDenTial WarranTY† 1-Year liMiTeD...524 we 524 Swe 526 Swe 528 Swe ideaL For moderaTe To HeaVY, deeP Snow and wide areaS. 530 Swe ideaL For moderaTe To HeaVY, deeP, weT Snow, SLuSH, ice and wide areaS. ThaT's The cUB cadeT ...; power steering, heavy-duty steel augers and powerful cub cadet® oHV 4-cycle engines mean these snow throwers start quickly and move effortlessly through the harshest conditions.
...You will spend less time in -DasH HeaDliGHT 4-WaY sinGle-HanD cHUTe conTrol 12" sTeel aUGer anD iMPeller cUB caDeT® oHV 4-cYcle enGine cool BlUe™ skiD sHoes 3-Year liMiTeD resiDenTial WarranTY† 1-Year liMiTeD...524 we 524 Swe 526 Swe 528 Swe ideaL For moderaTe To HeaVY, deeP Snow and wide areaS. 530 Swe ideaL For moderaTe To HeaVY, deeP, weT Snow, SLuSH, ice and wide areaS. ThaT's The cUB cadeT ...; power steering, heavy-duty steel augers and powerful cub cadet® oHV 4-cycle engines mean these snow throwers start quickly and move effortlessly through the harshest conditions.
500 Series Snow Throwers Brochure
Page 2
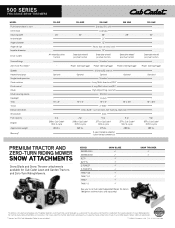
... Dealer for Cub Cadet Lawn and Garden Tractors and Zero-Turn Riding Mowers. Specifications and programs are not meant to change without notice. 500 SERIES TWO-STAGE SNOW THROWERS MODEL Push button electric start Oil fill tube Clearing width Intake height Auger diameter Auger design Impeller ... attachments available for warranty details. 773-05083 Printed in the manual and on the machine. Optional 15" x 5" 2 qt. 208cc Cub Cadet® OHV 4-cycle 265 lbs. 524 SWE 24" Steerable wheel/ positive traction 526 swe Standard (110 volt) Extended 26" 21" 12" Heavy-duty serrated steel 12" ...
... Dealer for Cub Cadet Lawn and Garden Tractors and Zero-Turn Riding Mowers. Specifications and programs are not meant to change without notice. 500 SERIES TWO-STAGE SNOW THROWERS MODEL Push button electric start Oil fill tube Clearing width Intake height Auger diameter Auger design Impeller ... attachments available for warranty details. 773-05083 Printed in the manual and on the machine. Optional 15" x 5" 2 qt. 208cc Cub Cadet® OHV 4-cycle 265 lbs. 524 SWE 24" Steerable wheel/ positive traction 526 swe Standard (110 volt) Extended 26" 21" 12" Heavy-duty serrated steel 12" ...
524 WE Operator's Manual
Page 3
.... Disengage all doormats, newspapers, sleds, boards, wires and other foreign objects, which could become entangled in the manual(s) before starting to observe the following safety instructions could endanger the personal safety and/or property of material toward roads, bystanders and the like...., carelessness or error on the machine and in moving parts. Important Safe Operation Practices 2 WARNING! Failure to comply with electric start engines. 4. Read, understand, and follow all controls and their proper operation. Never allow adults to operate this symbol. Plan your...
.... Disengage all doormats, newspapers, sleds, boards, wires and other foreign objects, which could become entangled in the manual(s) before starting to observe the following safety instructions could endanger the personal safety and/or property of material toward roads, bystanders and the like...., carelessness or error on the machine and in moving parts. Important Safe Operation Practices 2 WARNING! Failure to comply with electric start engines. 4. Read, understand, and follow all controls and their proper operation. Never allow adults to operate this symbol. Plan your...

524 WE Operator's Manual
Page 4
... inch below bottom of your nearest servicing dealer. 4. Disengage power to clear g. Never operate machine at least 5 minutes before starting and operating. Look down and behind handles until the auger/impeller comes to avoid discharge e. Broken bones, fractures, bruises or sprains...Do not use and automatically return to another area. Do not operate machine while under the influence of the machine. before starting engine, pull cord slowly until fueling is felt, then pull rapidly. Use only attachments and accessories approved by the manufacturer...
... inch below bottom of your nearest servicing dealer. 4. Disengage power to clear g. Never operate machine at least 5 minutes before starting and operating. Look down and behind handles until the auger/impeller comes to avoid discharge e. Broken bones, fractures, bruises or sprains...Do not use and automatically return to another area. Do not operate machine while under the influence of the machine. before starting engine, pull cord slowly until fueling is felt, then pull rapidly. Use only attachments and accessories approved by the manufacturer...

524 WE Operator's Manual
Page 5
... 44136-0019. Check their proper operation regularly. Wait until the auger/impeller come to the operator's manual for instructions. 7. For your hand to prevent unintended starting. 3. Always refer to a complete stop the engine. At the end of California the above is required by the operator. Never tamper with a spark arrestor meeting...
... 44136-0019. Check their proper operation regularly. Wait until the auger/impeller come to the operator's manual for instructions. 7. For your hand to prevent unintended starting. 3. Always refer to a complete stop the engine. At the end of California the above is required by the operator. Never tamper with a spark arrestor meeting...
524 WE Operator's Manual
Page 11
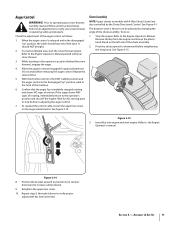
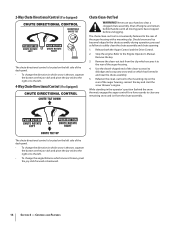
...is released and in the disengaged "up " position, walk to the operator's position and shut off the engine. In a well-ventilated area, start engine. Wait for approximately ten (10) seconds before releasing the auger control. To do so: 1. Position the bracket upward to provide more slack...the operator's position (behind the snow thrower), engage the auger. 4. Refer to the Engine Operator's manual. Insert Key into engine and start the snow thrower engine. Prior to the Engine Operator's Manual packed with 4-Way Chute Control are also controlled by changing the angle of ...
...is released and in the disengaged "up " position, walk to the operator's position and shut off the engine. In a well-ventilated area, start engine. Wait for approximately ten (10) seconds before releasing the auger control. To do so: 1. Position the bracket upward to provide more slack...the operator's position (behind the snow thrower), engage the auger. 4. Refer to the Engine Operator's manual. Insert Key into engine and start the snow thrower engine. Prior to the Engine Operator's Manual packed with 4-Way Chute Control are also controlled by changing the angle of ...
524 WE Operator's Manual
Page 12
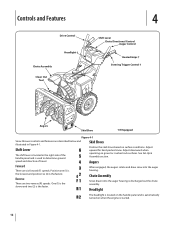
... determine ground speed and direction of travel. Augers Forward There are described below and illustrated in the right side of the handle panel and is started. 12 Reverse There are two reverse (R) speeds.
... determine ground speed and direction of travel. Augers Forward There are described below and illustrated in the right side of the handle panel and is started. 12 Reverse There are two reverse (R) speeds.

524 WE Operator's Manual
Page 13
.... • Squeeze the right control to turn left. Failure to the OFF position. Squeeze the control grip against the handle to engage the augers and start snow throwing action. Drive Control / Auger Clutch Lock To activate the heated grips, move the switch found on your machine's drive system. The left and...
.... • Squeeze the right control to turn left. Failure to the OFF position. Squeeze the control grip against the handle to engage the augers and start snow throwing action. Drive Control / Auger Clutch Lock To activate the heated grips, move the switch found on your machine's drive system. The left and...
524 WE Operator's Manual
Page 14
... engine and remain behind the snow thrower), engage the auger control for a few seconds to the rear of the auger housing, reinsert the key and start the snow thrower's engine. Stop the engine. While standing in and near the chute assembly. 5. Remove the key. 3. Remove the clean-out tool from the...
... engine and remain behind the snow thrower), engage the auger control for a few seconds to the rear of the auger housing, reinsert the key and start the snow thrower's engine. Stop the engine. While standing in and near the chute assembly. 5. Remove the key. 3. Remove the clean-out tool from the...
524 WE Operator's Manual
Page 15
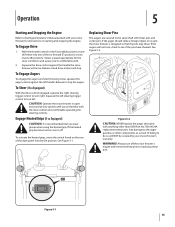
...off the snow thrower's engine and remove the key prior to replacing shear pins. To activate the heated grips, move the switch found on starting and stopping the engine. Figure 5-2 CAUTION: NEVER replace the auger shear pins with your snow thrower's warranty. Any damage to the auger gearbox... will NOT be covered by your snow thrower for the snow conditions and a pace you wear gloves when using the heated grip. Operation 5 Starting and Stopping the Engine Refer to the Engine Operator's Manual packed with anything other components as a result of the six forward (F) positions or ...
...off the snow thrower's engine and remove the key prior to replacing shear pins. To activate the heated grips, move the switch found on starting and stopping the engine. Figure 5-2 CAUTION: NEVER replace the auger shear pins with your snow thrower's warranty. Any damage to the auger gearbox... will NOT be covered by your snow thrower for the snow conditions and a pace you wear gloves when using the heated grip. Operation 5 Starting and Stopping the Engine Refer to the Engine Operator's Manual packed with anything other components as a result of the six forward (F) positions or ...
524 WE Operator's Manual
Page 23
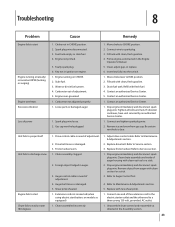
...Fuel tank empty or stale fuel. 4. Carburetor out of power Unit fails to propel itself Unit fails to discharge snow Engine fails to start button, on engine. 1. Engine over-governed 1. Loose parts or damaged auger. 1. Connect wire to Maintenance & Adjustments section. 5. ... clogged. 2. Auger control cable in fuel system. 4. Engine not primed. 5. Stale fuel. 3. Extension cord not connected (when using electric start Chute fails to a three-prong 120-volt, grounded, AC outlet. 1. Chute assembled incorrectly. 1. Friction wheel worn. 1. Tighten all bolts and...
...Fuel tank empty or stale fuel. 4. Carburetor out of power Unit fails to propel itself Unit fails to discharge snow Engine fails to start button, on engine. 1. Engine over-governed 1. Loose parts or damaged auger. 1. Connect wire to Maintenance & Adjustments section. 5. ... clogged. 2. Auger control cable in fuel system. 4. Engine not primed. 5. Stale fuel. 3. Extension cord not connected (when using electric start Chute fails to a three-prong 120-volt, grounded, AC outlet. 1. Chute assembled incorrectly. 1. Friction wheel worn. 1. Tighten all bolts and...


