

1X 221 HP Warranty Information
Page 1
... your area, check your warranty as to any part, accessory or attachment not approved by Cub Cadet for whom it was purchased as lubricants, filters, blade sharpening, tune-ups, brake adjustments, clutch adjustments, deck adjustments, and normal deterioration of Purchase to use the product. Routine maintenance items such as a gift. c. During the period of the warranty, the exclusive remedy is repair or replacement of the product as set forth above...
... your area, check your warranty as to any part, accessory or attachment not approved by Cub Cadet for whom it was purchased as lubricants, filters, blade sharpening, tune-ups, brake adjustments, clutch adjustments, deck adjustments, and normal deterioration of Purchase to use the product. Routine maintenance items such as a gift. c. During the period of the warranty, the exclusive remedy is repair or replacement of the product as set forth above...
3X 26034 Operator's Manual
Page 1
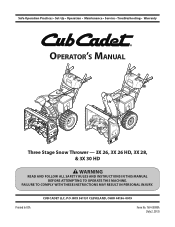
Printed In USA CUB CADET LLC, P.O. BOX 361131 CLEVELAND, OHIO 44136-0019 Form No. 769-08980A (July 2, 2013) FAILURE TO COMPLY WITH THESE INSTRUCTIONS MAY RESULT IN PERSONAL INJURY. Safe Operation Practices • Set-Up • Operation • Maintenance • Service • Troubleshooting • Warranty Operator's Manual Three Stage Snow Thrower - 3X 26, 3X 26 HD, 3X 28, & 3X 30 HD WARNING READ AND FOLLOW ALL SAFETY RULES AND INSTRUCTIONS IN THIS MANUAL BEFORE ATTEMPTING TO OPERATE THIS MACHINE.
Printed In USA CUB CADET LLC, P.O. BOX 361131 CLEVELAND, OHIO 44136-0019 Form No. 769-08980A (July 2, 2013) FAILURE TO COMPLY WITH THESE INSTRUCTIONS MAY RESULT IN PERSONAL INJURY. Safe Operation Practices • Set-Up • Operation • Maintenance • Service • Troubleshooting • Warranty Operator's Manual Three Stage Snow Thrower - 3X 26, 3X 26 HD, 3X 28, & 3X 30 HD WARNING READ AND FOLLOW ALL SAFETY RULES AND INSTRUCTIONS IN THIS MANUAL BEFORE ATTEMPTING TO OPERATE THIS MACHINE.

3X 26034 Operator's Manual
Page 2
... Contents Safe Operation Practices 3 Assembly & Set-Up 7 Controls 15 Operation 18 Maintenance & Adjustment 19 Service 23 Troubleshooting 25 Replacement Parts 26 Attachments 27 Warranty Back Cover Record Product Information Before setting up , operate and maintain your new equipment, please locate the model plate on the web at www.cubcadet.com See How-to Maintenance and Parts Installation Videos at www.cubcadet.com/tutorials ◊ Call a Customer Support Representative at the time of product specifications for...
... Contents Safe Operation Practices 3 Assembly & Set-Up 7 Controls 15 Operation 18 Maintenance & Adjustment 19 Service 23 Troubleshooting 25 Replacement Parts 26 Attachments 27 Warranty Back Cover Record Product Information Before setting up , operate and maintain your new equipment, please locate the model plate on the web at www.cubcadet.com See How-to Maintenance and Parts Installation Videos at www.cubcadet.com/tutorials ◊ Call a Customer Support Representative at the time of product specifications for...

3X 26034 Operator's Manual
Page 3
...: This machine was built to operate this manual. Training 1. Be familiar with all machines with electric start engines. 4. Never allow children under 14 years of amputating fingers, hands, toes and feet and throwing foreign objects. Thrown objects can result in personal injury. Exercise caution to assemble and operate. Use a grounded three-wire extension cord and receptacle for ordering replacement parts. 2. Know how to...
...: This machine was built to operate this manual. Training 1. Be familiar with all machines with electric start engines. 4. Never allow children under 14 years of amputating fingers, hands, toes and feet and throwing foreign objects. Thrown objects can result in personal injury. Exercise caution to assemble and operate. Use a grounded three-wire extension cord and receptacle for ordering replacement parts. 2. Know how to...

3X 26034 Operator's Manual
Page 4
... extremely flammable and the vapors are not covered in use care j. Do not put your vehicle the engine, disconnect the spark plug wire and ground it on a truck or trailer bed with the rotating parts can cause a burn. Never bypass its operation. Keep the nozzle in the auger/ impeller housing or chute assembly. When starting the engine. 13. Engine exhaust contains carbon monoxide, an odorless...
... extremely flammable and the vapors are not covered in use care j. Do not put your vehicle the engine, disconnect the spark plug wire and ground it on a truck or trailer bed with the rotating parts can cause a burn. Never bypass its operation. Keep the nozzle in the auger/ impeller housing or chute assembly. When starting the engine. 13. Engine exhaust contains carbon monoxide, an odorless...
3X 26034 Operator's Manual
Page 5
... proper tightness at unsafe speeds. The governor controls the maximum safe operating speed of the Average Useful Life have the machine inspected annually by law (Section 4442 of engine governor. to clean out the discharge chute. Check fuel line, tank, cap, and fittings frequently for the muffler is equipped with spark plug removed. 14. Notice Regarding Emissions Engines which do not meet the original equipment specifications may lead to...
... proper tightness at unsafe speeds. The governor controls the maximum safe operating speed of the Average Useful Life have the machine inspected annually by law (Section 4442 of engine governor. to clean out the discharge chute. Check fuel line, tank, cap, and fittings frequently for the muffler is equipped with spark plug removed. 14. Notice Regarding Emissions Engines which do not meet the original equipment specifications may lead to...
3X 26034 Operator's Manual
Page 8
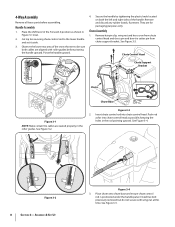
..., wing nut and hex screw from chute control head and clevis pin and bow-tie cotter pin from chute support bracket. Figure 3-3 2. Place chute onto chute base and ensure chute control rod is positioned under the handle panel. Cut zip ties securing chute control rod to be sure both the left and right sides of the snow thrower to the lower handle and set it aside. 3. See Figure 3-3. Place the shift lever in...
..., wing nut and hex screw from chute control head and clevis pin and bow-tie cotter pin from chute support bracket. Figure 3-3 2. Place chute onto chute base and ensure chute control rod is positioned under the handle panel. Cut zip ties securing chute control rod to be sure both the left and right sides of the snow thrower to the lower handle and set it aside. 3. See Figure 3-3. Place the shift lever in...

3X 26034 Operator's Manual
Page 10
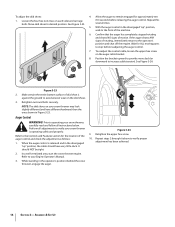
... engagement of the chute control rod into the pinion gear if required. Place the shift lever in step 1. See Figure 3-3. 4. See Figure 3-12. Loosen the top two lock nuts securing the upper and lower handle and remove the two carriage screws from the lower handle and set the flex shaft aside. Cut zip ties securing flex shaft to the left of the engine. See Figure...
... engagement of the chute control rod into the pinion gear if required. Place the shift lever in step 1. See Figure 3-3. 4. See Figure 3-12. Loosen the top two lock nuts securing the upper and lower handle and remove the two carriage screws from the lower handle and set the flex shaft aside. Cut zip ties securing flex shaft to the left of the engine. See Figure...
3X 26034 Operator's Manual
Page 13
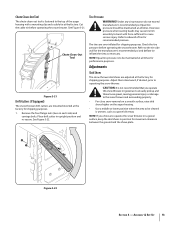
.... Assembly & Set-Up 13 Place drift cutter in position for shipping purposes. Tire Pressure WARNING! Refer to operate the snow thrower on each side) and carriage bolts. Refer to operating the snow thrower. Adjustments Skid Shoes The snow thrower skid shoes are over-inflated for maximum clearance between the ground and the shave plate. Cut the cable tie before operating the snow thrower. See Figure 3-21. Remove the four flange nuts...
.... Assembly & Set-Up 13 Place drift cutter in position for shipping purposes. Tire Pressure WARNING! Refer to operate the snow thrower on each side) and carriage bolts. Refer to operating the snow thrower. Adjustments Skid Shoes The snow thrower skid shoes are over-inflated for maximum clearance between the ground and the shave plate. Cut the cable tie before operating the snow thrower. See Figure 3-21. Remove the four flange nuts...
3X 26034 Operator's Manual
Page 14
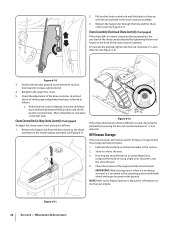
... snow thrower engine. With the auger control in the disengaged "up " position, walk to operating your snow thrower may look slightly different (and have very little slack. Figure 3-23 2. Repeat this several times. 5. NOTE: The skid shoes on the skid shoes. 3. Perform all instructions below. Move skid shoes to remain engaged for approximately ten 1. To readjust the control cable, loosen the upper hex screw...
... snow thrower engine. With the auger control in the disengaged "up " position, walk to operating your snow thrower may look slightly different (and have very little slack. Figure 3-23 2. Repeat this several times. 5. NOTE: The skid shoes on the skid shoes. 3. Perform all instructions below. Move skid shoes to remain engaged for approximately ten 1. To readjust the control cable, loosen the upper hex screw...

3X 26034 Operator's Manual
Page 15
... and draw snow into the auger housing is the faster. Headlight The headlight is located on the handle panel and is started. 15 Adjust downward when operating on when the engine is automatically turned on gravel or crushed rock surfaces. Chute Assembly Snow drawn into the auger housing. See Set-Up & Assembly section. One (1) is the slower and two (2) is discharged out the chute assembly. Skid Shoes Position the skid...
... and draw snow into the auger housing is the faster. Headlight The headlight is located on the handle panel and is started. 15 Adjust downward when operating on when the engine is automatically turned on gravel or crushed rock surfaces. Chute Assembly Snow drawn into the auger housing. See Set-Up & Assembly section. One (1) is the slower and two (2) is discharged out the chute assembly. Skid Shoes Position the skid...

3X 26034 Operator's Manual
Page 18
... when using the heated grip. Any damage to the auger gearbox or other than OEM Part No.738-04124A replacement shear pins. See Figure 5-2. Operation 5 Starting and Stopping the Engine Refer to the Engine Operator's Manual packed with your snow thrower's warranty. To Engage Drive 1. To Steer With the drive control engaged, squeeze the right steering trigger control to see if the pins have sheared. Squeeze the left steering trigger control to turn it and drive...
... when using the heated grip. Any damage to the auger gearbox or other than OEM Part No.738-04124A replacement shear pins. See Figure 5-2. Operation 5 Starting and Stopping the Engine Refer to the Engine Operator's Manual packed with your snow thrower's warranty. To Engage Drive 1. To Steer With the drive control engaged, squeeze the right steering trigger control to see if the pins have sheared. Squeeze the left steering trigger control to turn it and drive...

3X 26034 Operator's Manual
Page 19
... snow thrower. 2. Reinstall and tighten all bolts securely. Tighten securely. Remove the four carriage bolts and hex flange nuts which attach shave plate to the Engine Operator's Manual. 4. Allow the engine to run until it can be checked periodically and replaced when necessary. Figure 6-3 19 NOTE: The skid shoes on each side) and hex flange nuts. See Figure 6-2. Maintenance & Adjustments 6 Maintenance 3. Slide the shave plate downward into a second position...
... snow thrower. 2. Reinstall and tighten all bolts securely. Tighten securely. Remove the four carriage bolts and hex flange nuts which attach shave plate to the Engine Operator's Manual. 4. Allow the engine to run until it can be checked periodically and replaced when necessary. Figure 6-3 19 NOTE: The skid shoes on each side) and hex flange nuts. See Figure 6-2. Maintenance & Adjustments 6 Maintenance 3. Slide the shave plate downward into a second position...

3X 26034 Operator's Manual
Page 20
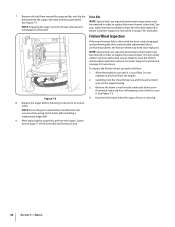
... of fuel. 2. Figure 6-4 Gear Shaft The gear (hex) shaft should be careful not to Figure 6-5. 20 Section 6 - Refer to get any excess or spilled oil. Clean and coat the axles with a multipurpose automotive grease before reinstalling wheels. Remove the cotter pin and washer from the auger shafts. Maintenance & Adjustments Figure 6-6 Adjustments Shift Rod (If Equipped) If the full range of operation. 1. Doing so will hinder the snow thrower's drive system...
... of fuel. 2. Figure 6-4 Gear Shaft The gear (hex) shaft should be careful not to Figure 6-5. 20 Section 6 - Refer to get any excess or spilled oil. Clean and coat the axles with a multipurpose automotive grease before reinstalling wheels. Remove the cotter pin and washer from the auger shafts. Maintenance & Adjustments Figure 6-6 Adjustments Shift Rod (If Equipped) If the full range of operation. 1. Doing so will hinder the snow thrower's drive system...
3X 26034 Operator's Manual
Page 22
... both wheel and auger housing on the chute rotation assembly. 2. Reinsert the hairpin clip through this section. 2. Off-Season Storage If the snow thrower will not be no resistance in the chute rotation assembly. 3. Figure 6-10 3. Figure 6-12 If the chute directional control is to coat the snow thrower. 4. Store in ¼ turn intervals. Maintenance & Adjustments Remove the hairpin clip from the hole closest to the Engine Operator's Manual for...
... both wheel and auger housing on the chute rotation assembly. 2. Reinsert the hairpin clip through this section. 2. Off-Season Storage If the snow thrower will not be no resistance in the chute rotation assembly. 3. Figure 6-10 3. Figure 6-12 If the chute directional control is to coat the snow thrower. 4. Store in ¼ turn intervals. Maintenance & Adjustments Remove the hairpin clip from the hole closest to the Engine Operator's Manual for...
3X 26034 Operator's Manual
Page 24
... 7-5 8. Remove the frame cover from the engine. 2. See Figure 7-5. See your authorized service dealer to replace the snow thrower's friction wheel rubber. 7. Remove the belt from around the auger pulley, and slip the Drive Belt belt between the support bracket and the auger pulley. If the snow thrower fails to drive with the drive control engaged, and performing the drive control cable adjustment fails to correct the problem, the friction wheel may need to the frame after installing a replacement auger belt. 9. NOTE: Special tools are...
... 7-5 8. Remove the frame cover from the engine. 2. See Figure 7-5. See your authorized service dealer to replace the snow thrower's friction wheel rubber. 7. Remove the belt from around the auger pulley, and slip the Drive Belt belt between the support bracket and the auger pulley. If the snow thrower fails to drive with the drive control engaged, and performing the drive control cable adjustment fails to correct the problem, the friction wheel may need to the frame after installing a replacement auger belt. 9. NOTE: Special tools are...
3X 26034 Operator's Manual
Page 25
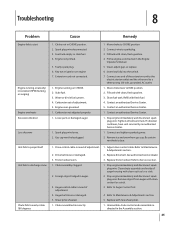
...wire. Engine not primed. 5. Key not in need of auger housing with cleanout tool or a stick. 3. Extension cord not connected. 1. Carburetor out of adjustment. 4. Tighten all bolts and nuts. Auger control cable in ignition on CHOKE. 2. Replace friction wheel. Clean chute assembly and inside of adjustment. 2. Faulty spark plug. 6. Carburetor not adjusted properly. 1. Move choke to Auger Control Test. 4. Clean, adjust gap, or replace. 6. Fill tank with clean, fresh gasoline. 4. Auger belt loose or damaged. 5. Shear pin(s) sheared. 1. Adjust drive control...
...wire. Engine not primed. 5. Key not in need of auger housing with cleanout tool or a stick. 3. Extension cord not connected. 1. Carburetor out of adjustment. 4. Tighten all bolts and nuts. Auger control cable in ignition on CHOKE. 2. Replace friction wheel. Clean chute assembly and inside of adjustment. 2. Faulty spark plug. 6. Carburetor not adjusted properly. 1. Move choke to Auger Control Test. 4. Clean, adjust gap, or replace. 6. Fill tank with clean, fresh gasoline. 4. Auger belt loose or damaged. 5. Shear pin(s) sheared. 1. Adjust drive control...
3X 26034 Operator's Manual
Page 26
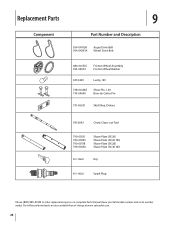
... Pin 731-06931 Skid Shoe, Deluxe 931-2643 Chute Clean-out Tool 790-00121 790-00525 790-00118 790-00550 Shave Plate (3X 26) Shave Plate (3X 26 HD) Shave Plate (3X 28) Shave Plate (3X 30 HD) 951-10630 Key 951-10292 Spark Plug Phone (800) 965-4CUB to order replacement parts or a complete Parts Manual (have your full model number and serial number ready). Parts Manual downloads are also available free...
... Pin 731-06931 Skid Shoe, Deluxe 931-2643 Chute Clean-out Tool 790-00121 790-00525 790-00118 790-00550 Shave Plate (3X 26) Shave Plate (3X 26 HD) Shave Plate (3X 28) Shave Plate (3X 30 HD) 951-10630 Key 951-10292 Spark Plug Phone (800) 965-4CUB to order replacement parts or a complete Parts Manual (have your full model number and serial number ready). Parts Manual downloads are also available free...
3X 26034 Operator's Manual
Page 27
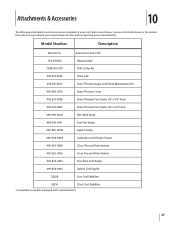
.../Tube Foot Pump 490-850-0014 Deluxe Tire Plug Kit 22208 8 oz. See your Cub Cadet dealer or the retailer from which you purchased your Cub Cadet snow thrower. Model Number Description 929-0071A Extension Cord, 110V 753-05762A Heated Grips* OEM-390-679 Drift Cutter Kit 490-241-0032 Snow Cab 490-241-0013 Snow Thrower Auger and Chute Maintenance Kit 490-290-0010 Snow Thrower Cover 490-241-0028 Snow Thrower Tire Chains (16...
.../Tube Foot Pump 490-850-0014 Deluxe Tire Plug Kit 22208 8 oz. See your Cub Cadet dealer or the retailer from which you purchased your Cub Cadet snow thrower. Model Number Description 929-0071A Extension Cord, 110V 753-05762A Heated Grips* OEM-390-679 Drift Cutter Kit 490-241-0032 Snow Cab 490-241-0013 Snow Thrower Auger and Chute Maintenance Kit 490-290-0010 Snow Thrower Cover 490-241-0028 Snow Thrower Tire Chains (16...
3X 26034 Operator's Manual
Page 28
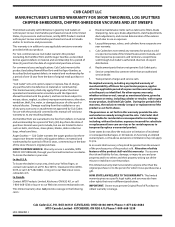
... warranty set forth below is available, WITH PROOF OF PURCHASE, through Cub Cadet's authorized channels of the exterior finish due to use with the product(s) covered by this manual will , at P.O. "Cub Cadet" will void your warranty as mentioned above . Cub Cadet warrants the auger gearbox (on threestage snow thrower models only) against defects in materials or workmanship. Routine maintenance items such as lubricants, filters, blade sharpening, tune-ups, brake adjustments, clutch adjustments, deck adjustments...
... warranty set forth below is available, WITH PROOF OF PURCHASE, through Cub Cadet's authorized channels of the exterior finish due to use with the product(s) covered by this manual will , at P.O. "Cub Cadet" will void your warranty as mentioned above . Cub Cadet warrants the auger gearbox (on threestage snow thrower models only) against defects in materials or workmanship. Routine maintenance items such as lubricants, filters, blade sharpening, tune-ups, brake adjustments, clutch adjustments, deck adjustments...


