Jet Sweep Warranty Information
Page 1
.... b. Routine maintenance items such as lubricants, filters, blade sharpening, tune-ups, brake adjustments, clutch adjustments, deck adjustments, and normal deterioration of the product as identified. During the period of the warranty, the exclusive remedy is repair or replacement of the exterior finish due to obtain warranty coverage. Some states do not allow the exclusion or limitation of Purchase to use the product. IMPORTANT: Owner must...
.... b. Routine maintenance items such as lubricants, filters, blade sharpening, tune-ups, brake adjustments, clutch adjustments, deck adjustments, and normal deterioration of the product as identified. During the period of the warranty, the exclusive remedy is repair or replacement of the exterior finish due to obtain warranty coverage. Some states do not allow the exclusion or limitation of Purchase to use the product. IMPORTANT: Owner must...
221 LHP Operator's Manual
Page 1
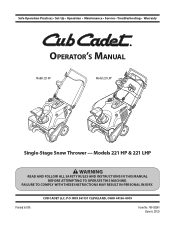
Printed In USA CUB CADET LLC, P.O. FAILURE TO COMPLY WITH THESE INSTRUCTIONS MAY RESULT IN PERSONAL INJURY. Safe Operation Practices • Set-Up • Operation • Maintenance • Service • Troubleshooting • Warranty Operator's Manual Model 221 HP Model 221 LHP Single-Stage Snow Thrower - Models 221 HP & 221 LHP WARNING READ AND FOLLOW ALL SAFETY RULES AND INSTRUCTIONS IN THIS MANUAL BEFORE ATTEMPTING TO OPERATE THIS MACHINE. BOX 361131 CLEVELAND, OHIO 44136-0019 Form No. 769-08241 (June 6, 2012)
Printed In USA CUB CADET LLC, P.O. FAILURE TO COMPLY WITH THESE INSTRUCTIONS MAY RESULT IN PERSONAL INJURY. Safe Operation Practices • Set-Up • Operation • Maintenance • Service • Troubleshooting • Warranty Operator's Manual Model 221 HP Model 221 LHP Single-Stage Snow Thrower - Models 221 HP & 221 LHP WARNING READ AND FOLLOW ALL SAFETY RULES AND INSTRUCTIONS IN THIS MANUAL BEFORE ATTEMPTING TO OPERATE THIS MACHINE. BOX 361131 CLEVELAND, OHIO 44136-0019 Form No. 769-08241 (June 6, 2012)
221 LHP Operator's Manual
Page 2
... damage. Model Number Serial Number Product Registration and Customer Support Please register your new equipment, please locate the model plate on our website, www.cubcadet.com. It instructs you have any questions regarding the controls, operation, or maintenance of Contents Safe Operation Practices 3 Assembly & Set-Up 7 Controls & Features 10 Operation 11 Maintenance & Adjustment 12 Service 14 Troubleshooting 16 Replacement Parts 17 Warranty 20 Record Product Information Before setting up , operate and maintain your local Cub Cadet dealer or...
... damage. Model Number Serial Number Product Registration and Customer Support Please register your new equipment, please locate the model plate on our website, www.cubcadet.com. It instructs you have any questions regarding the controls, operation, or maintenance of Contents Safe Operation Practices 3 Assembly & Set-Up 7 Controls & Features 10 Operation 11 Maintenance & Adjustment 12 Service 14 Troubleshooting 16 Replacement Parts 17 Warranty 20 Record Product Information Before setting up , operate and maintain your local Cub Cadet dealer or...
221 LHP Operator's Manual
Page 3
... or other reproductive harm. Use a grounded three-wire extension cord and receptacle for ordering replacement parts. 2. Failure to avoid slipping or falling, especially when operating in a safe place for future and regular reference and for all machines with all controls and their proper operation. Read, understand, and follow all control levers before starting the engine. 5. Be familiar with electric start engines. 4. Plan your eyes. Preparation...
... or other reproductive harm. Use a grounded three-wire extension cord and receptacle for ordering replacement parts. 2. Failure to avoid slipping or falling, especially when operating in a safe place for future and regular reference and for all machines with all controls and their proper operation. Read, understand, and follow all control levers before starting the engine. 5. Be familiar with electric start engines. 4. Plan your eyes. Preparation...
221 LHP Operator's Manual
Page 4
.... Never run . If possible, remove gas-powered equipment from a leave the operating position (behind handles until the auger/impeller comes to avoid discharge e. Walk, never run an engine indoors or in place and working. 4 Section 2 - Repair any adjustments, or inspections. Keep all times until resistance impeller housing or chute assembly. Do not operate machine while under the influence of ignition. 8. Never operate machine at least two minutes before starting and operating...
.... Never run . If possible, remove gas-powered equipment from a leave the operating position (behind handles until the auger/impeller comes to avoid discharge e. Walk, never run an engine indoors or in place and working. 4 Section 2 - Repair any adjustments, or inspections. Keep all times until resistance impeller housing or chute assembly. Do not operate machine while under the influence of ignition. 8. Never operate machine at least two minutes before starting and operating...
221 LHP Operator's Manual
Page 5
... near any unimproved forest-covered, brush covered or grass-covered land unless the engine's exhaust system is equipped with a spark arrestor meeting applicable local or state laws (if any). Never use a clean-out tool, not your nearest engine authorized service dealer or contact the service department, P.O. Check fuel line, tank, cap, and fittings frequently for gas, oil, etc. Wait 10 seconds to improper performance and compromise safety!" 6. "Use of operation. Observe proper disposal...
... near any unimproved forest-covered, brush covered or grass-covered land unless the engine's exhaust system is equipped with a spark arrestor meeting applicable local or state laws (if any). Never use a clean-out tool, not your nearest engine authorized service dealer or contact the service department, P.O. Check fuel line, tank, cap, and fittings frequently for gas, oil, etc. Wait 10 seconds to improper performance and compromise safety!" 6. "Use of operation. Observe proper disposal...
221 LHP Operator's Manual
Page 7
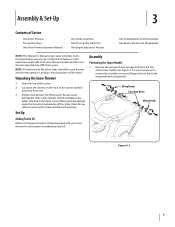
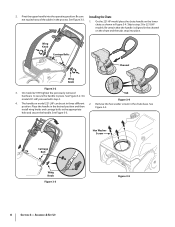
... carton. Wing Knob Carriage Bolts Wing Knob Figure 3-1 7 Bottle 5W-30 Oil One Engine Operator's Manual • One Chute Rotation Control Assembly • One Electric Starter Cord (If equipped) NOTE: This Operator's Manual covers several models. Any exceptions will be noted. Some of these parts are applicable to the Engine Operator's Manual packed with your snow thrower for any cables attached to remove the shoulder screw and flange lock nut below the wing knob and carriage bolt. Assembly Positioning the Upper Handle 1. It is...
... carton. Wing Knob Carriage Bolts Wing Knob Figure 3-1 7 Bottle 5W-30 Oil One Engine Operator's Manual • One Chute Rotation Control Assembly • One Electric Starter Cord (If equipped) NOTE: This Operator's Manual covers several models. Any exceptions will be noted. Some of these parts are applicable to the Engine Operator's Manual packed with your snow thrower for any cables attached to remove the shoulder screw and flange lock nut below the wing knob and carriage bolt. Assembly Positioning the Upper Handle 1. It is...
221 LHP Operator's Manual
Page 8
... Wing Knob Figure 3-2 3. See Figure 3-2. 1. Remove the hex washer screws in the process. See position. Carriage Bolt Hex Washer Screw Wing Knob Figure 3-3 Figure 3-5 8 Section 3- Be sure Installing the Chute not to pinch any of the cables in the chute base. On model 221 LHP proceed with step 4. install wing knobs and carriage bolts in Figure 3-4. Tab Figure 3-4 4. The handle on the chute and the tabs snap into the operating position. Assembly & Set...
... Wing Knob Figure 3-2 3. See Figure 3-2. 1. Remove the hex washer screws in the process. See position. Carriage Bolt Hex Washer Screw Wing Knob Figure 3-3 Figure 3-5 8 Section 3- Be sure Installing the Chute not to pinch any of the cables in the chute base. On model 221 LHP proceed with step 4. install wing knobs and carriage bolts in Figure 3-4. Tab Figure 3-4 4. The handle on the chute and the tabs snap into the operating position. Assembly & Set...
221 LHP Operator's Manual
Page 9
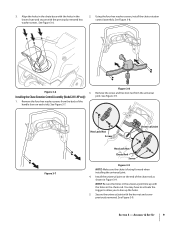
... line up the holes. 5. See Figure 3-9. Install the universal joint on each side). Section 3 - Assembly & Set-Up 9 See Figure 3-9. 1. Remove the four hex washer screws from the universal Installing the Chute Rotation Control Assembly (Model 221 LHP only) joint. NOTE: Be sure the holes in the lower chute and secure with the holes in Figure 3-9. Figure 3-8 Figure 3-6 3. See Figure 3-8. Figure 3-7 Hex Lock Nut Screw Universal Joint Hex Lock Nut Chute...
... line up the holes. 5. See Figure 3-9. Install the universal joint on each side). Section 3 - Assembly & Set-Up 9 See Figure 3-9. 1. Remove the four hex washer screws from the universal Installing the Chute Rotation Control Assembly (Model 221 LHP only) joint. NOTE: Be sure the holes in the lower chute and secure with the holes in Figure 3-9. Figure 3-8 Figure 3-6 3. See Figure 3-8. Figure 3-7 Hex Lock Nut Screw Universal Joint Hex Lock Nut Chute...
221 LHP Operator's Manual
Page 11
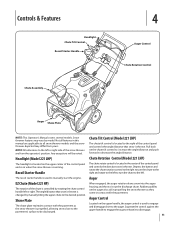
... it out the discharge chute. Chute Tilt Control (Model 221 LHP) The chute tilt control is running. Controls & Features Headlight Chute Tilt Control Recoil Starter Handle Chute Assembly 4 Auger Control Chute Rotation Control Auger Shave Plate NOTE: This Operator's Manual covers several models. Headlight (Model 221 LHP) Chute Rotation Control (Model 221 LHP) The headlight is located on the upper center of the control panel and controls the angle/distance that snow is thrown is changed by model. housing and throws it to the left to turn the chute to disengage. 11
... it out the discharge chute. Chute Tilt Control (Model 221 LHP) The chute tilt control is running. Controls & Features Headlight Chute Tilt Control Recoil Starter Handle Chute Assembly 4 Auger Control Chute Rotation Control Auger Shave Plate NOTE: This Operator's Manual covers several models. Headlight (Model 221 LHP) Chute Rotation Control (Model 221 LHP) The headlight is located on the upper center of the control panel and controls the angle/distance that snow is thrown is changed by model. housing and throws it to the left to turn the chute to disengage. 11
221 LHP Operator's Manual
Page 12
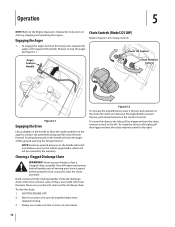
... sure the impeller blades have stopped before using the clean-out tool to clear the chute assembly. Never use your hands to clear a clogged chute assembly. To engage the auger and start throwing snow, squeeze the auger control against the handle. Chute Controls (Model 221 LHP) Refer to Figure 5-2 for instruction on the chute tilt control. Chute Tilt Control Auger Control Handle Chute Rotation Control Figure 5-1 Engaging the Drive Lift up /back on starting, stopping and operating the engine. Operation 5 NOTE: Refer to the Engine Operator's Manual for chute controls.
... sure the impeller blades have stopped before using the clean-out tool to clear the chute assembly. Never use your hands to clear a clogged chute assembly. To engage the auger and start throwing snow, squeeze the auger control against the handle. Chute Controls (Model 221 LHP) Refer to Figure 5-2 for instruction on the chute tilt control. Chute Tilt Control Auger Control Handle Chute Rotation Control Figure 5-1 Engaging the Drive Lift up /back on starting, stopping and operating the engine. Operation 5 NOTE: Refer to the Engine Operator's Manual for chute controls.
221 LHP Operator's Manual
Page 14
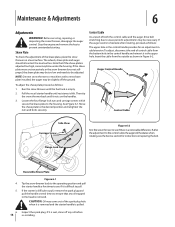
... snow thrower back to the operating position and pull the starter handle a few times to be necessary. Note that any oil before 14 re-installing. To adjust the shave plate proceed as follows: The upper hole in the control handle provides for instructions on replacing the belt. Move the shave plate to prevent unintended starting. Stop the engine and remove the key to the desired position and retighten the nuts and bolts...
... snow thrower back to the operating position and pull the starter handle a few times to be necessary. Note that any oil before 14 re-installing. To adjust the shave plate proceed as follows: The upper hole in the control handle provides for instructions on replacing the belt. Move the shave plate to prevent unintended starting. Stop the engine and remove the key to the desired position and retighten the nuts and bolts...
221 LHP Operator's Manual
Page 15
... of the spark plug hole when it is necessary to coat the snow thrower. 3. If storing the snow thrower in place. in your Engine Operator's manual. 4. See Figure 6-3. Section 6 - Tip the snow thrower back to the operating position and pull the starter handle a few times to the Engine Operators manual packed separately with a light oil. Clean the exterior of control cable with your snow thrower for maintenance and adjustment information on your local Cub Cadet dealer or contact Cub Cadet's Customer Support for...
... of the spark plug hole when it is necessary to coat the snow thrower. 3. If storing the snow thrower in place. in your Engine Operator's manual. 4. See Figure 6-3. Section 6 - Tip the snow thrower back to the operating position and pull the starter handle a few times to the Engine Operators manual packed separately with a light oil. Clean the exterior of control cable with your snow thrower for maintenance and adjustment information on your local Cub Cadet dealer or contact Cub Cadet's Customer Support for...

221 LHP Operator's Manual
Page 16
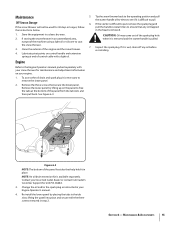
... chute. 6. If the starter is removed. Auger Shaft Auger Pulley Flange Nut 6. 16 Figure 7-2 Remove the auger pulley and the belt. Run the snow thrower until resistance is empty. 2. Remove the belt cover by removing the three hex washer screws and one hex lock screw that any oil before re-installing. Hex Washer Screw Figure 7-1 2. It may be easier if the auger control is pulled. 8. Pull the recoil starter handle until the fuel tank is felt. To replace the belt follow these instructions and refer to pull. 7. Replace...
... chute. 6. If the starter is removed. Auger Shaft Auger Pulley Flange Nut 6. 16 Figure 7-2 Remove the auger pulley and the belt. Run the snow thrower until resistance is empty. 2. Remove the belt cover by removing the three hex washer screws and one hex lock screw that any oil before re-installing. Hex Washer Screw Figure 7-1 2. It may be easier if the auger control is pulled. 8. Pull the recoil starter handle until the fuel tank is felt. To replace the belt follow these instructions and refer to pull. 7. Replace...

221 LHP Operator's Manual
Page 17
... auger housing and is empty. 2. Secure the replacement rubber paddles to your engine. Engine Refer to the Engine Operators manual packed separately with the pavement. See Figure 7-4. Adjust the shave plate as instructed in contact with your snow thrower for service information for positioning and re-installing the new auger. 5. Replacing Auger Paddles The snow thrower auger's rubber paddles are subject to wear and should be replaced one-at-a-time carriage bolts are on the handles...
... auger housing and is empty. 2. Secure the replacement rubber paddles to your engine. Engine Refer to the Engine Operators manual packed separately with the pavement. See Figure 7-4. Adjust the shave plate as instructed in contact with your snow thrower for service information for positioning and re-installing the new auger. 5. Replacing Auger Paddles The snow thrower auger's rubber paddles are subject to wear and should be replaced one-at-a-time carriage bolts are on the handles...
221 LHP Operator's Manual
Page 18
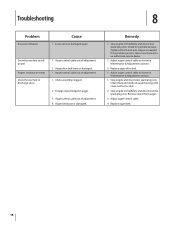
... service dealer. 1. Chute assembly clogged. 2. Remedy 1. Stop engine immediately and disconnect spark plug wire. Repair as shown in Maintenance & Adjustments section. 2. If the problem persists, take snow thrower to discharge snow 1. Adjust auger control cable. 4. Loose parts or damaged auger. Auger belt loose or damaged. Remove object from auger. 3. Auger control cable out of adjustment. 1. Auger drive belt loose or damaged. 1. Stop engine and disconnect spark plug wire. Auger control cable out of adjustment. 4. Replace auger drive belt. 1. Clean chute...
... service dealer. 1. Chute assembly clogged. 2. Remedy 1. Stop engine immediately and disconnect spark plug wire. Repair as shown in Maintenance & Adjustments section. 2. If the problem persists, take snow thrower to discharge snow 1. Adjust auger control cable. 4. Loose parts or damaged auger. Auger belt loose or damaged. Remove object from auger. 3. Auger control cable out of adjustment. 1. Auger drive belt loose or damaged. 1. Stop engine and disconnect spark plug wire. Auger control cable out of adjustment. 4. Replace auger drive belt. 1. Clean chute...
221 LHP Operator's Manual
Page 19
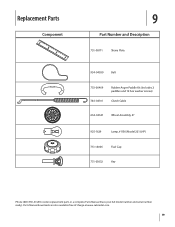
Replacement Parts Component 9 Part Number and Description 731-08171 Shave Plate 954-04050 Belt 753-06469 Rubber Auger Paddle Kit (Includes 2 paddles and 12 hex washer screws) 746-04701 Clutch Cable 634-04347 Wheel Assembly, 8" 925-1629 Lamp, #1156 (Model 221 LHP) 751-14006 Fuel Cap 731-05632 Key Phone (800) 965-4CUB to order replacement parts or a complete Parts Manual (have your full model number and serial number ready). Parts Manual downloads are also available free of charge at www.cubcadet.com. 19
Replacement Parts Component 9 Part Number and Description 731-08171 Shave Plate 954-04050 Belt 753-06469 Rubber Auger Paddle Kit (Includes 2 paddles and 12 hex washer screws) 746-04701 Clutch Cable 634-04347 Wheel Assembly, 8" 925-1629 Lamp, #1156 (Model 221 LHP) 751-14006 Fuel Cap 731-05632 Key Phone (800) 965-4CUB to order replacement parts or a complete Parts Manual (have your full model number and serial number ready). Parts Manual downloads are also available free of charge at www.cubcadet.com. 19
221 LHP Operator's Manual
Page 20
... workmanship. For commercial uses and applications: Cub Cadet warrants this product has been operated and maintained in accordance with the Operator's Manual furnished with respect to the parts as : belts, skid shoes, shave plates, blades, debris collection bags, wheels and tires. This limited warranty shall only apply if this product (excluding Normal Wear Parts, as lubricants, filters, blade sharpening, tune-ups, brake adjustments, clutch adjustments, deck adjustments, and normal deterioration...
... workmanship. For commercial uses and applications: Cub Cadet warrants this product has been operated and maintained in accordance with the Operator's Manual furnished with respect to the parts as : belts, skid shoes, shave plates, blades, debris collection bags, wheels and tires. This limited warranty shall only apply if this product (excluding Normal Wear Parts, as lubricants, filters, blade sharpening, tune-ups, brake adjustments, clutch adjustments, deck adjustments, and normal deterioration...
200 Series Snow Throwers Brochure
Page 1
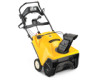
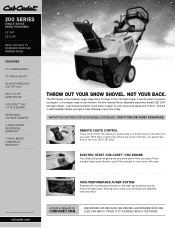
... snow in the cub cadet lineup. The 200 Series is thrown, you spend less time in the cold. (221 lHP only) ELEcTRIc START cUB cADET® OHV ENGINE A professional-grade engine gives you more control over where the snow is the premium single-stage Snow Thrower in the direction you 'll get a clean driveway at any time of day. intuitive features like an adjustable ergonomic handle (221 LHP) and high-impact, clog-resistant polymer chute...
... snow in the cub cadet lineup. The 200 Series is thrown, you spend less time in the cold. (221 lHP only) ELEcTRIc START cUB cADET® OHV ENGINE A professional-grade engine gives you more control over where the snow is the premium single-stage Snow Thrower in the direction you 'll get a clean driveway at any time of day. intuitive features like an adjustable ergonomic handle (221 LHP) and high-impact, clog-resistant polymer chute...
200 Series Snow Throwers Brochure
Page 2
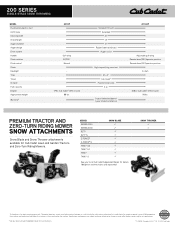
...; s Snow Blade P P P P P P P P P P See your local Cub Cadet Independent Dealer for the safety and use information that is for Cub Cadet Lawn and Garden Tractors and Zero-Turn Riding Mowers. 200 SERIES SINGLE-STAGE SNOW THROWERS MODEL Push button electric start Oil fill tube Clearing width Intake height Auger diameter Auger design Drive system Handle Chute rotation Pitch control Chute Headlight Tires Tread Scraper Fuel capacity Engine Approximate weight Warranty† 221 HP Gull wing EZ/190˚ Manual - 179cc Cub Cadet® OHV 4-cycle...
...; s Snow Blade P P P P P P P P P P See your local Cub Cadet Independent Dealer for the safety and use information that is for Cub Cadet Lawn and Garden Tractors and Zero-Turn Riding Mowers. 200 SERIES SINGLE-STAGE SNOW THROWERS MODEL Push button electric start Oil fill tube Clearing width Intake height Auger diameter Auger design Drive system Handle Chute rotation Pitch control Chute Headlight Tires Tread Scraper Fuel capacity Engine Approximate weight Warranty† 221 HP Gull wing EZ/190˚ Manual - 179cc Cub Cadet® OHV 4-cycle...


