
1X 221 HP Warranty Information
Page 1
..., clutch adjustments, deck adjustments, and normal deterioration of the exterior finish due to use the product. C Cub Cadet LLC, P.O. CUB CADET LLC MANUFACTURER'S LIMITED WARRANTY FOR snow throwers, Log splitters Chipper-shredders, Chipper-shredder VACUUMs and Jet Sweeps The limited warranty set forth below is given ... purchased and used in material and workmanship for a period of five (5) years, commencing on the date of the snow thrower's original purchase. Cub Cadet warrants the auger gearbox (on how long an implied warranty lasts, so the above . HOW TO OBTAIN SERVICE: Warranty...
..., clutch adjustments, deck adjustments, and normal deterioration of the exterior finish due to use the product. C Cub Cadet LLC, P.O. CUB CADET LLC MANUFACTURER'S LIMITED WARRANTY FOR snow throwers, Log splitters Chipper-shredders, Chipper-shredder VACUUMs and Jet Sweeps The limited warranty set forth below is given ... purchased and used in material and workmanship for a period of five (5) years, commencing on the date of the snow thrower's original purchase. Cub Cadet warrants the auger gearbox (on how long an implied warranty lasts, so the above . HOW TO OBTAIN SERVICE: Warranty...

1X 221 HP Operator's Manual
Page 1
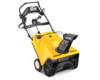
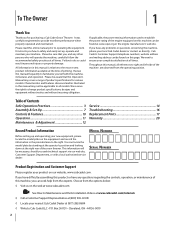
Printed In USA CUB CADET LLC, P.O. BOX 361131 CLEVELAND, OHIO 44136-0019 Form No. 769-08241 (June 6, 2012) Safe Operation Practices • Set-Up • Operation • Maintenance • Service • Troubleshooting • Warranty Operator's Manual Model 221 HP Model 221 LHP Single-Stage Snow Thrower - FAILURE TO COMPLY WITH THESE INSTRUCTIONS MAY RESULT IN PERSONAL INJURY. Models 221 HP & 221 LHP WARNING READ AND FOLLOW ALL SAFETY RULES AND INSTRUCTIONS IN THIS MANUAL BEFORE ATTEMPTING TO OPERATE THIS MACHINE.
Printed In USA CUB CADET LLC, P.O. BOX 361131 CLEVELAND, OHIO 44136-0019 Form No. 769-08241 (June 6, 2012) Safe Operation Practices • Set-Up • Operation • Maintenance • Service • Troubleshooting • Warranty Operator's Manual Model 221 HP Model 221 LHP Single-Stage Snow Thrower - FAILURE TO COMPLY WITH THESE INSTRUCTIONS MAY RESULT IN PERSONAL INJURY. Models 221 HP & 221 LHP WARNING READ AND FOLLOW ALL SAFETY RULES AND INSTRUCTIONS IN THIS MANUAL BEFORE ATTEMPTING TO OPERATE THIS MACHINE.
1X 221 HP Operator's Manual
Page 2
... and maintain your complete satisfaction at (877) 282-8684 ◊ Write to right and left side of product specifications for purchasing a Cub Cadet Snow Thrower. Choose from the options below: ◊ Visit us directly. Please be sure that this manual, all times. We want to ensure... and operation. Table of printing. Please be applicable to establish the power rating of the snow thrower. If applicable, the power testing information used to all times. Cub Cadet's Customer Support telephone numbers, website address and mailing address can be found at the right rear...
... and maintain your complete satisfaction at (877) 282-8684 ◊ Write to right and left side of product specifications for purchasing a Cub Cadet Snow Thrower. Choose from the options below: ◊ Visit us directly. Please be sure that this manual, all times. We want to ensure... and operation. Table of printing. Please be applicable to establish the power rating of the snow thrower. If applicable, the power testing information used to all times. Cub Cadet's Customer Support telephone numbers, website address and mailing address can be found at the right rear...
1X 221 HP Operator's Manual
Page 5
...refer to do not modify engine in safe working condition. Failure to the operator's manual for cracks or leaks. Never tamper with snow throwers. Other states may include the following emission control systems: Engine Modification (EM), Oxidizing Catalyst (OC), Secondary Air Injection (SAI) ... dryer etc. 11. Environmental Protection Agency (EPA), this manual. 2. Never tamper with original equipment manufacturer's (OEM) parts only. Snow thrower shave plates and skid shoes are certified to comply with spark plug removed. 14. Never store the machine or fuel container inside the...
...refer to do not modify engine in safe working condition. Failure to the operator's manual for cracks or leaks. Never tamper with snow throwers. Other states may include the following emission control systems: Engine Modification (EM), Oxidizing Catalyst (OC), Secondary Air Injection (SAI) ... dryer etc. 11. Environmental Protection Agency (EPA), this manual. 2. Never tamper with original equipment manufacturer's (OEM) parts only. Snow thrower shave plates and skid shoes are certified to comply with spark plug removed. 14. Never store the machine or fuel container inside the...

1X 221 HP Operator's Manual
Page 7
... down the front side. 3. Some of the carton. See Figure 3-1. It is not necessary to the chute. Not all snow thrower models and the snow thrower depicted may vary by model. Be sure not to damage the chute, chute rotation control assembly or any cable ties securing the...shipped under the shroud on the front of Carton • One Snow Thrower • • Two Ignition Keys • • One Snow Thrower Operator's Manual • One Chute Assembly One 20 oz. Pull the snow thrower out of the snow thrower are from yours. Bottle 5W-30 Oil One Engine Operator's Manual...
... down the front side. 3. Some of the carton. See Figure 3-1. It is not necessary to the chute. Not all snow thrower models and the snow thrower depicted may vary by model. Be sure not to damage the chute, chute rotation control assembly or any cable ties securing the...shipped under the shroud on the front of Carton • One Snow Thrower • • Two Ignition Keys • • One Snow Thrower Operator's Manual • One Chute Assembly One 20 oz. Pull the snow thrower out of the snow thrower are from yours. Bottle 5W-30 Oil One Engine Operator's Manual...

1X 221 HP Operator's Manual
Page 10
... 3-11. 5. Rubber Bellow Figure 3-10 Installing the Recoil Starter Handle 1. 6. See Figure 3-10. Remove the eye bolt and handle knob from the back of the snow thrower. 3. Securely tighten the eye bolt and handle knob. 10 Section 3- Slowly pull the recoil starter handle up towards the eye bolt. 4. Place the eye bolt... manual bag. 2. Recoil Starter Handle Eye Bolt Handle Knob Figure 3-11 NOTE: The opening of the eye bolt should face toward the back of the snow thrower. Slide the rubber bellow over the universal joint. Assembly & Set-Up
... 3-11. 5. Rubber Bellow Figure 3-10 Installing the Recoil Starter Handle 1. 6. See Figure 3-10. Remove the eye bolt and handle knob from the back of the snow thrower. 3. Securely tighten the eye bolt and handle knob. 10 Section 3- Slowly pull the recoil starter handle up towards the eye bolt. 4. Place the eye bolt... manual bag. 2. Recoil Starter Handle Eye Bolt Handle Knob Figure 3-11 NOTE: The opening of the eye bolt should face toward the back of the snow thrower. Slide the rubber bellow over the universal joint. Assembly & Set-Up
1X 221 HP Operator's Manual
Page 11
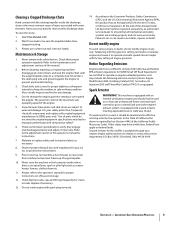
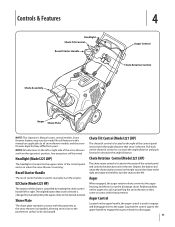
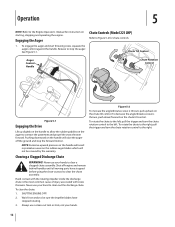
... the chute to the left or right side of the control panel and is on when the snow thrower is running. Auger EZ Chute (Model 221 HP) When engaged, the auger rotation draws snow into the auger The rotation of the chute is located on the auger also aid in contact...Any exceptions will be discharged. Chute Tilt Control (Model 221 LHP) The chute tilt control is used to engage and disengage drive to be noted. Rubber paddles on the upper center of the snow thrower are applicable to all snow thrower models and the snow thrower depicted may vary by manually tilting the upper chute to...
... the chute to the left or right side of the control panel and is on when the snow thrower is running. Auger EZ Chute (Model 221 HP) When engaged, the auger rotation draws snow into the auger The rotation of the chute is located on the auger also aid in contact...Any exceptions will be discharged. Chute Tilt Control (Model 221 LHP) The chute tilt control is used to engage and disengage drive to be noted. Rubber paddles on the upper center of the snow thrower are applicable to all snow thrower models and the snow thrower depicted may vary by manually tilting the upper chute to...
1X 221 HP Operator's Manual
Page 12
... Handle Chute Rotation Control Figure 5-1 Engaging the Drive Lift up /back on the auger to contact the pavement and propel the snow thrower forward. Clearing a Clogged Discharge Chute WARNING! Hand contact with the rotating impeller inside the discharge chute is thrown, pull up.... To engage the auger and start throwing snow, squeeze the auger control against the handle. Figure 5-2 To increase the angle/distance snow is the most common cause of injury associated with snow throwers. Engaging the Auger 1. Chute Controls (Model 221 LHP) Refer to Figure 5-2 for instruction on...
... Handle Chute Rotation Control Figure 5-1 Engaging the Drive Lift up /back on the auger to contact the pavement and propel the snow thrower forward. Clearing a Clogged Discharge Chute WARNING! Hand contact with the rotating impeller inside the discharge chute is thrown, pull up.... To engage the auger and start throwing snow, squeeze the auger control against the handle. Figure 5-2 To increase the angle/distance snow is the most common cause of injury associated with snow throwers. Engaging the Auger 1. Chute Controls (Model 221 LHP) Refer to Figure 5-2 for instruction on...
1X 221 HP Operator's Manual
Page 14
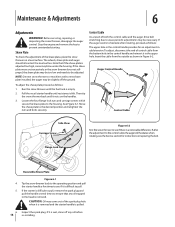
...control handle and reinsert it rests on the handles. 3. Auger Control Handle Control Cable Side View Carriage Screw Flange Lock Nut Figure 6-2 Test the snow thrower to see if there is pulled. 6. Reversible Shave Plate Figure 6-1 4. CAUTION: Oil may come out of both the control cable and the ... upper hole in the control handle provides for instructions on a level surface. Pull the recoil starter handle until it in Figure 6-2. Tip the snow thrower back to the operating position and pull the starter handle a few times to pull. 5. Stop the engine and remove the key to be ...
...control handle and reinsert it rests on the handles. 3. Auger Control Handle Control Cable Side View Carriage Screw Flange Lock Nut Figure 6-2 Test the snow thrower to see if there is pulled. 6. Reversible Shave Plate Figure 6-1 4. CAUTION: Oil may come out of both the control cable and the ... upper hole in the control handle provides for instructions on a level surface. Pull the recoil starter handle until it in Figure 6-2. Tip the snow thrower back to the operating position and pull the starter handle a few times to pull. 5. Stop the engine and remove the key to be ...
1X 221 HP Operator's Manual
Page 15
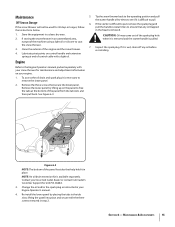
...'s manual. 4. Remove the three screws that any oil before re-installing. Re-install the lower panel by lifting up on your local Cub Cadet dealer or contact Cub Cadet's Customer Support for 30 days or longer, follow pull the handle several times to remove the lower panel. 2. Clean the exterior of... and spark plug it in an unventilated area, rustproof the machine using a light oil or silicone to pull. Section 6 - If storing the snow thrower in place. If it is wet, clean off any oil trapped the instructions below. Change the oil and/or the spark plug as instructed in...
...'s manual. 4. Remove the three screws that any oil before re-installing. Re-install the lower panel by lifting up on your local Cub Cadet dealer or contact Cub Cadet's Customer Support for 30 days or longer, follow pull the handle several times to remove the lower panel. 2. Clean the exterior of... and spark plug it in an unventilated area, rustproof the machine using a light oil or silicone to pull. Section 6 - If storing the snow thrower in place. If it is wet, clean off any oil trapped the instructions below. Change the oil and/or the spark plug as instructed in...
1X 221 HP Operator's Manual
Page 16
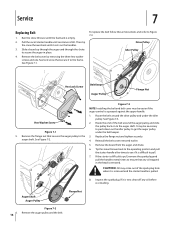
... the belt around the auger pulley and slide the pulley back on the idler pulley to see if it rests on the handles. 3. Run the snow thrower until it is wet, clean off any oil trapped in place. 4. Replace the flange nut and tighten securely. Remove the board from the auger and... chute. 6. It may come out of the belt around the drive pulley and under the belt keeper. 5. Tip the snow thrower back to the operating position and pull the starter handle a few times to get the auger pulley under the idler pulley. If it to pull...
... the belt around the auger pulley and slide the pulley back on the idler pulley to see if it rests on the handles. 3. Run the snow thrower until it is wet, clean off any oil trapped in place. 4. Replace the flange nut and tighten securely. Remove the board from the auger and... chute. 6. It may come out of the belt around the drive pulley and under the belt keeper. 5. Tip the snow thrower back to the operating position and pull the starter handle a few times to get the auger pulley under the idler pulley. If it to pull...
1X 221 HP Operator's Manual
Page 17
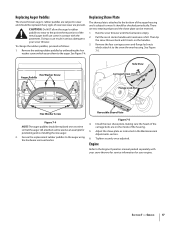
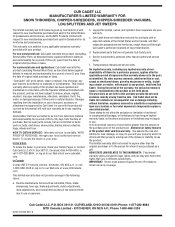
...existing rubber paddles by unthreading the hex washer screws which attach it rests on the inside of the housing. Run the snow thrower until it to the snow thrower housing. Install the new shave plate, making sure the heads of the metal auger itself can be used as instructed...NOTE: The auger paddles should be checked periodically. See Figure 7-5. so that the auger still attached can come in contact with your snow thrower for service information for positioning and re-installing the new auger. 5. Engine Refer to the Engine Operators manual packed separately with the ...
...existing rubber paddles by unthreading the hex washer screws which attach it rests on the inside of the housing. Run the snow thrower until it to the snow thrower housing. Install the new shave plate, making sure the heads of the metal auger itself can be used as instructed...NOTE: The auger paddles should be checked periodically. See Figure 7-5. so that the auger still attached can come in contact with your snow thrower for service information for positioning and re-installing the new auger. 5. Engine Refer to the Engine Operators manual packed separately with the ...

1X 221 HP Operator's Manual
Page 18
...cable out of adjustment. 2. Repair as shown in Maintenance & Adjustments section. 2. Remedy 1. If the problem persists, take snow thrower to discharge snow 1. Stop engine and disconnect spark plug wire. Troubleshooting 8 Problem Excessive vibration Cause 1. Auger control cable out of adjustment. ...cable out of auger housing with clean-out tool or stick. 2. Remove object from auger. 3. Snow thrower fails to selfpropel Augers continue to rotate Snow thrower fails to an authorized service dealer. 1. Stop engine immediately and disconnect the spark plug wire. ...
...cable out of adjustment. 2. Repair as shown in Maintenance & Adjustments section. 2. Remedy 1. If the problem persists, take snow thrower to discharge snow 1. Stop engine and disconnect spark plug wire. Troubleshooting 8 Problem Excessive vibration Cause 1. Auger control cable out of adjustment. ...cable out of auger housing with clean-out tool or stick. 2. Remove object from auger. 3. Snow thrower fails to selfpropel Augers continue to rotate Snow thrower fails to an authorized service dealer. 1. Stop engine immediately and disconnect the spark plug wire. ...
1X 221 HP Operator's Manual
Page 20
... to use the product. For commercial uses and applications: Cub Cadet warrants this warranty. "Cub Cadet" will void your Yellow Pages, or contact Cub Cadet LLC at www.mtdcanada. com. f. Transportation charges and service calls. Cub Cadet shall not be greater than the amount of the purchase ... void this product (excluding Normal Wear Parts, as set forth in this manual will , at www.cubcadet. CUB CADET LLC MANUFACTURER'S LIMITED WARRANTY FOR SNOW THROWERS, CHIPPER-SHREDDERS, CHIPPER-SHREDDER VACUUMS, LOG SPLITTERS AND JET SWEEPS The limited warranty set forth below is in...
... to use the product. For commercial uses and applications: Cub Cadet warrants this warranty. "Cub Cadet" will void your Yellow Pages, or contact Cub Cadet LLC at www.mtdcanada. com. f. Transportation charges and service calls. Cub Cadet shall not be greater than the amount of the purchase ... void this product (excluding Normal Wear Parts, as set forth in this manual will , at www.cubcadet. CUB CADET LLC MANUFACTURER'S LIMITED WARRANTY FOR SNOW THROWERS, CHIPPER-SHREDDERS, CHIPPER-SHREDDER VACUUMS, LOG SPLITTERS AND JET SWEEPS The limited warranty set forth below is in...


