Owners Manual
Page 1
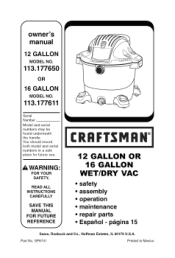
... both model and serial numbers in Mexico Part No. AWARNING: FOR YOUR SAFETY, READ ALL INSTRUCTIONS CAREFULLY SAVE THIS MANUAL FOR FUTURE REFERENCE J CRRFTSMRH° 12 GALLON OR 16 GALLON WET/DRY VAC • safety • assembly • operation • maintenance • repair parts • Espahol - owner's manual 12 GALLON MODEL NO. 113.177650 OR 16 GALLON MODEL NO. 113.177611 Serial Number Model and serial numbers may be found underneath the handle. pagina 15 Sears, Roebuck...
... both model and serial numbers in Mexico Part No. AWARNING: FOR YOUR SAFETY, READ ALL INSTRUCTIONS CAREFULLY SAVE THIS MANUAL FOR FUTURE REFERENCE J CRRFTSMRH° 12 GALLON OR 16 GALLON WET/DRY VAC • safety • assembly • operation • maintenance • repair parts • Espahol - owner's manual 12 GALLON MODEL NO. 113.177650 OR 16 GALLON MODEL NO. 113.177611 Serial Number Model and serial numbers may be found underneath the handle. pagina 15 Sears, Roebuck...
Owners Manual
Page 2
... in this manual. These may damage the motor or be exhausted into the air. the filter installed except when • Do not leave Vac while plugged in. Unplug from state to state. the risk of using Vac if you may also have other Craftsman outlet in the United States for free repair (or replacement if repair proves impossible). all labels on the Vac before servicing. Store...
... in this manual. These may damage the motor or be exhausted into the air. the filter installed except when • Do not leave Vac while plugged in. Unplug from state to state. the risk of using Vac if you may also have other Craftsman outlet in the United States for free repair (or replacement if repair proves impossible). all labels on the Vac before servicing. Store...
Owners Manual
Page 3
... recommendaecdcessories. WHEN SERVICING USE ONLY IDENTICAL REPLACEMENT PARTS. • Whenusingasablower: - Donotuseblowefroranyjobexcept blowindgirtanddebris. - Ak WARNING: For your Vac: ._ GOROUBULNEDININGSUNLAOTTEDREQUIRED. Do not run unattended. Tounplugg,rasptheplugn, otthecord. • Donotusewithdamagecdord,plugor othepr artsI.fyourVacisnotworking asitshouldh,asmissinpgartsh, as beendroppedd,amagelde,ftoutdoors, ordroppeidntowaterc,allcustomer service. longand 12gaugefor50ft. electric shock - I SAVE THIS MANUAL DonotrunVacovercordK. Donotdirecat...
... recommendaecdcessories. WHEN SERVICING USE ONLY IDENTICAL REPLACEMENT PARTS. • Whenusingasablower: - Donotuseblowefroranyjobexcept blowindgirtanddebris. - Ak WARNING: For your Vac: ._ GOROUBULNEDININGSUNLAOTTEDREQUIRED. Do not run unattended. Tounplugg,rasptheplugn, otthecord. • Donotusewithdamagecdord,plugor othepr artsI.fyourVacisnotworking asitshouldh,asmissinpgartsh, as beendroppedd,amagelde,ftoutdoors, ordroppeidntowaterc,allcustomer service. longand 12gaugefor50ft. electric shock - I SAVE THIS MANUAL DonotrunVacovercordK. Donotdirecat...
Owners Manual
Page 4
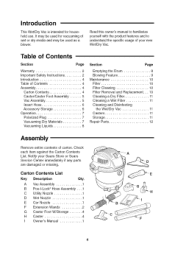
... Filter 10 Filter Cleaning 10 Filter Removal and Replacement... 10 Cleaning a Dry Filter 11 Cleaning a Wet Filter 11 Cleaning and Disinfecting the Wet/Dry Vac 11 Casters 11 Storage 11 Repair Parts 12 Assembly Remove entire contents of wet or dry media and may be used as a blower. Check each item against the Carton Contents List. It may be used for household use. Read this owner's manual to familiarize yourself with the product features and to understand the specific usage of your Sears...
... Filter 10 Filter Cleaning 10 Filter Removal and Replacement... 10 Cleaning a Dry Filter 11 Cleaning a Wet Filter 11 Cleaning and Disinfecting the Wet/Dry Vac 11 Casters 11 Storage 11 Repair Parts 12 Assembly Remove entire contents of wet or dry media and may be used as a blower. Check each item against the Carton Contents List. It may be used for household use. Read this owner's manual to familiarize yourself with the product features and to understand the specific usage of your Sears...
Owners Manual
Page 5
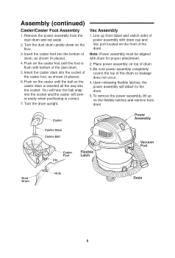
...). 6. Turn the drum upright. To remove the power assembly, lift up front (label and switch side) of the caster foot, as shown (4 places). 4. Insert the caster feet into the socket and the caster will attach to the drum. 5. Assembly (continued) Caster/Caster Foot Assembly 1. Push on the flexible latches and remove from the dust drum and set aside. 2. Upon releasing flexible latches, the power assembly...
...). 6. Turn the drum upright. To remove the power assembly, lift up front (label and switch side) of the caster foot, as shown (4 places). 4. Insert the caster feet into the socket and the caster will attach to the drum. 5. Assembly (continued) Caster/Caster Foot Assembly 1. Push on the flexible latches and remove from the dust drum and set aside. 2. Upon releasing flexible latches, the power assembly...
Owners Manual
Page 6
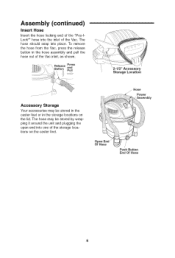
... be stored by wrapping it around the unit and plugging the open end into place. The hose should snap into one of the Vac. To remove the hose from the Vac, press the release button in the storage locations on the caster feet. Press ; Hose Power Assembly Open End _ Of Hose Push Button End Of Hose Assembly (continued) Insert Hose Insert the hose locking end of the "Pos-ILock ®...
... be stored by wrapping it around the unit and plugging the open end into place. The hose should snap into one of the Vac. To remove the hose from the Vac, press the release button in the storage locations on the caster feet. Press ; Hose Power Assembly Open End _ Of Hose Push Button End Of Hose Assembly (continued) Insert Hose Insert the hose locking end of the "Pos-ILock ®...
Owners Manual
Page 7
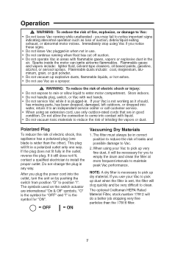
... not handle plug, switch, or Vac with wet hands. • Do not service Vac while it will clog quickly and be very difficult to clean. If your Vac to pick up very fine dust, it is wet, the filter will be in correct position to reduce the risk of leaks and possible damage to Vac. 2. After you plug the power cord into contact with liquid. • Do not vacuum toxic materials...
... not handle plug, switch, or Vac with wet hands. • Do not service Vac while it will clog quickly and be very difficult to clean. If your Vac to pick up very fine dust, it is wet, the filter will be in correct position to reduce the risk of leaks and possible damage to Vac. 2. After you plug the power cord into contact with liquid. • Do not vacuum toxic materials...

Owners Manual
Page 8
... Vac, unplug the power cord, and empty the drum. The Vac comes equipped with liquid or debris. Scoop or drain enough contents out to make the Vac light enough to empty the drum. Operation (continued) Vacuuming Liquids Emptying the Drum filter cage and float, as they prevent _liquiWd AfrRomNINeGnt:eriDngo nthoet oimpeprealtleer wainthdout damaging the motor. 1. After using the Vac to the Vac...
... Vac, unplug the power cord, and empty the drum. The Vac comes equipped with liquid or debris. Scoop or drain enough contents out to make the Vac light enough to empty the drum. Operation (continued) Vacuuming Liquids Emptying the Drum filter cage and float, as they prevent _liquiWd AfrRomNINeGnt:eriDngo nthoet oimpeprealtleer wainthdout damaging the motor. 1. After using the Vac to the Vac...

Owners Manual
Page 9
... sears.com. WARNING: To reduce the risk of injury to opposite end of the "Pos-ILock ®''hose into place. Push/PullHandle \ \ Hose End Blowing Port _Drum Handle hearing damage, wear ear protectors when using as a blower. To remove the hose from the Vac, press the release button in the hose assembly and pull the hose out of the Vac inlet. 3. (Optional) Attach extension wand to bystanders, keep...
... sears.com. WARNING: To reduce the risk of injury to opposite end of the "Pos-ILock ®''hose into place. Push/PullHandle \ \ Hose End Blowing Port _Drum Handle hearing damage, wear ear protectors when using as a blower. To remove the hose from the Vac, press the release button in the hose assembly and pull the hose out of the Vac inlet. 3. (Optional) Attach extension wand to bystanders, keep...
Owners Manual
Page 10
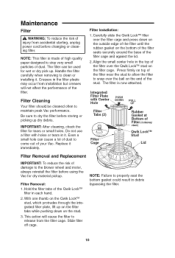
... filter cage. Replace it . Align the small center hole in debris bypassing the filter. 10 Maintenance Filter WARNING: To reduce the risk of injury from accidental starting, unplug power cord before storing or picking up dry debris. IMPORTANT: After cleaning, check the filter for dry material pickup. Do not use a filter with holes or tears in each hand. 2. Filter Removal: 1. Filter Installation: 1. NOTE: This filter is now attached. Hold the filter tabs of the filter...
... filter cage. Replace it . Align the small center hole in debris bypassing the filter. 10 Maintenance Filter WARNING: To reduce the risk of injury from accidental starting, unplug power cord before storing or picking up dry debris. IMPORTANT: After cleaning, check the filter for dry material pickup. Do not use a filter with holes or tears in each hand. 2. Filter Removal: 1. Filter Installation: 1. NOTE: This filter is now attached. Hold the filter tabs of the filter...
Owners Manual
Page 11
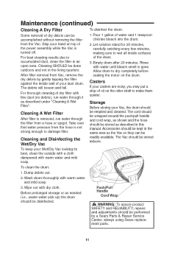
... dust drum. Maintenance (continued) Cleaning A Dry Filter Some removal of dry debris can be readily available. Slap your Wet/Dry Vac looking its best, clean the outside with a cloth dampened with fine dust (no debris), run water through it as the Vac so they can be accomplished without removing the filter from Vac, remove the dry debris by a Sears Parts & Repair Service Center, always using Sears replacement parts. 11 For best cleaning results due to dry completely before sealing the motor...
... dust drum. Maintenance (continued) Cleaning A Dry Filter Some removal of dry debris can be readily available. Slap your Wet/Dry Vac looking its best, clean the outside with a cloth dampened with fine dust (no debris), run water through it as the Vac so they can be accomplished without removing the filter from Vac, remove the dry debris by a Sears Parts & Repair Service Center, always using Sears replacement parts. 11 For best cleaning results due to dry completely before sealing the motor...
Owners Manual
Page 12
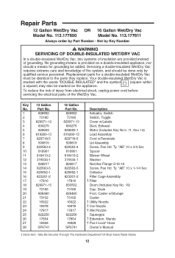
... Description Actuator, Switch Switch, Toggle Cover w/Labels Duct, Exhaust Motor (Includes Key No's. 11, thru 14) Lead Assembly Cord w/Terminals Lid Assembly Screw, Pan Hd. Ty. Car Nozzle 1- To reduce the risk of injury from electrical shock, unplug power cord before servicing the electrical parts of the system, and should a means for a double-insulated Wet/Dry Vac must be added. Utility Nozzle 1- "AB" 10 x 1-1/4 Ser. Filter Drum (Includes...
... Description Actuator, Switch Switch, Toggle Cover w/Labels Duct, Exhaust Motor (Includes Key No's. 11, thru 14) Lead Assembly Cord w/Terminals Lid Assembly Screw, Pan Hd. Ty. Car Nozzle 1- To reduce the risk of injury from electrical shock, unplug power cord before servicing the electrical parts of the system, and should a means for a double-insulated Wet/Dry Vac must be added. Utility Nozzle 1- "AB" 10 x 1-1/4 Ser. Filter Drum (Includes...

Owners Manual
Page 28
.../10 For the replacement parts, accessories and owner's manuals that you need to do-it ! For Sears professional installation of home appliances and items like vacuums, lawn equipment, and electronics, call anytime for the locations of the nearest Sears Parts & Repair Service Center 1-800-488-1222 (U.S.A.) www.sears.com 1-800-469-4663 (Canada) www.sears.ca To purchase a protection agreement on a product serviced by Sears: 1-800-827-6655...
.../10 For the replacement parts, accessories and owner's manuals that you need to do-it ! For Sears professional installation of home appliances and items like vacuums, lawn equipment, and electronics, call anytime for the locations of the nearest Sears Parts & Repair Service Center 1-800-488-1222 (U.S.A.) www.sears.com 1-800-469-4663 (Canada) www.sears.ca To purchase a protection agreement on a product serviced by Sears: 1-800-827-6655...


