

Operation Manual
Page 1
LEHR | ALL RIGHTS RESERVED 2008-2009 OPERATOR'S MANUAL PROPANE POWERED LINE TRIMMER 16.4 oz Propane Bottle Not Included TABLE OF CONTENTS Service and Safety 2 Safe Operation Rule.s 3 Understanding Your Trimme...r 4 Assembly 5 Oil Information 6 Understanding Propan.e 7 Installing the Propane Canist.e..r 8 Installing Attachment.s 9 Starting / Stopping 10 Operation 11 Maintenance 12 Cleaning and Storage 19 Troubleshooting 19 Speci¯cations 20...
LEHR | ALL RIGHTS RESERVED 2008-2009 OPERATOR'S MANUAL PROPANE POWERED LINE TRIMMER 16.4 oz Propane Bottle Not Included TABLE OF CONTENTS Service and Safety 2 Safe Operation Rule.s 3 Understanding Your Trimme...r 4 Assembly 5 Oil Information 6 Understanding Propan.e 7 Installing the Propane Canist.e..r 8 Installing Attachment.s 9 Starting / Stopping 10 Operation 11 Maintenance 12 Cleaning and Storage 19 Troubleshooting 19 Speci¯cations 20...
Operation Manual
Page 2
...constructed, equipped and maintained for fuel leaks. SERVICE AND SAFETY S LEHR ECO-TRIMMER IMPORTANT SAFETY INSTRUCTIONS DU 4-CYCLE PROPANE TRIMMER READ ALL INSTRUCTION BEFORE OPERATING • Ne For service call 1-866-941-LEHR in the United States, to in obtain a list of authorized ... equipment manufacturer replacement line. p WARNING: u WHEN SERVICING, USE ONLY IDENTICAL REPLACEMENTPARTS. Replace parts that certain internal combustion engines operated on U.S. PLEASE READ THESE TO ENSURE THE SAFETY OF THE OPERATOR AND ANY BY ST ANDERS. sh THIS PRODUCT...
...constructed, equipped and maintained for fuel leaks. SERVICE AND SAFETY S LEHR ECO-TRIMMER IMPORTANT SAFETY INSTRUCTIONS DU 4-CYCLE PROPANE TRIMMER READ ALL INSTRUCTION BEFORE OPERATING • Ne For service call 1-866-941-LEHR in the United States, to in obtain a list of authorized ... equipment manufacturer replacement line. p WARNING: u WHEN SERVICING, USE ONLY IDENTICAL REPLACEMENTPARTS. Replace parts that certain internal combustion engines operated on U.S. PLEASE READ THESE TO ENSURE THE SAFETY OF THE OPERATOR AND ANY BY ST ANDERS. sh THIS PRODUCT...

Operation Manual
Page 3
... cutting attachment shield must be in daylight or good artificial light. These are marked as a trimmer. arrestor. OTHER SAFETY WARNINGS • Never store a unit with loose or damaged parts....operation is idling. Do not operate the unit with propane canister attached inside a closed room or build - Stop the unit, switch the engine to instruct other • Always hold the unit ... SAVE THESE INSTRUCTIONS LEHR | ALL RIGHTS RESERVED 2008-2009 3 Do not oper ate unit without both handles or grips. The cutting attachment remains stationary when the engine is dusty. &#...
... cutting attachment shield must be in daylight or good artificial light. These are marked as a trimmer. arrestor. OTHER SAFETY WARNINGS • Never store a unit with loose or damaged parts....operation is idling. Do not operate the unit with propane canister attached inside a closed room or build - Stop the unit, switch the engine to instruct other • Always hold the unit ... SAVE THESE INSTRUCTIONS LEHR | ALL RIGHTS RESERVED 2008-2009 3 Do not oper ate unit without both handles or grips. The cutting attachment remains stationary when the engine is dusty. &#...

Operation Manual
Page 6
... oil ll hole (Fig. 7). 4-Cycle Motor Oil Fig. 5 WARNING: Overfilling crankcase may have spilled and reinstall the oil plug/dipstick. 6 LEHR | ALL RIGHTS RESERVED 2008-2009 It can cause premature engine wear and failure. Fig. 6 3. Remove the oil plug / dipstick from air filter, and smoke to the unit, put oil in the...
... oil ll hole (Fig. 7). 4-Cycle Motor Oil Fig. 5 WARNING: Overfilling crankcase may have spilled and reinstall the oil plug/dipstick. 6 LEHR | ALL RIGHTS RESERVED 2008-2009 It can cause premature engine wear and failure. Fig. 6 3. Remove the oil plug / dipstick from air filter, and smoke to the unit, put oil in the...

Operation Manual
Page 7
...PROPANE IS HIGHLY FLAMMABLE, AND ITS VAPORS CAN EXPLODE IF IGNITED. These sources can ignite leaking gas. Read and follow appliance instructions. AFTER USE 1. Replace cap to smell it is invisible, has no smell and can ignite leaking gas. 4. LEHR... they can kill you experience headache, drowsiness, or nausea, turn o the engine. Smell for bubbles. The user should be recycled with a "Green Key"...and get fresh air quickly. 2. CARBON MONOXIDE HAZARD Burning propane makes Carbon Monoxide (CO). HANDLING & STORAGE 1. Turn trimmer o and let cool. 2. Never put in containers ...
...PROPANE IS HIGHLY FLAMMABLE, AND ITS VAPORS CAN EXPLODE IF IGNITED. These sources can ignite leaking gas. Read and follow appliance instructions. AFTER USE 1. Replace cap to smell it is invisible, has no smell and can ignite leaking gas. 4. LEHR... they can kill you experience headache, drowsiness, or nausea, turn o the engine. Smell for bubbles. The user should be recycled with a "Green Key"...and get fresh air quickly. 2. CARBON MONOXIDE HAZARD Burning propane makes Carbon Monoxide (CO). HANDLING & STORAGE 1. Turn trimmer o and let cool. 2. Never put in containers ...

Operation Manual
Page 8
... clamp as far as it until snug. Make sure the engine is suf cient. Insert the threaded end of fuel line components are the correct size. to the trimmer and potentially result in a dangerous leak. TOR ONTO A PROPANE CANISTER THAT HAS IMPROPER OR DAMAGED THREADS. Hand WARNING: THIS.... 9B). clamp. Un-latch the bottle clamp and push canister against the guard exposing the propnae connector. Make sure the engine is being screwed in accordance 2. Fig. 9A Canister Clamp 8 LEHR | ALL RIGHTS RESERVED 2008-2009 WARNING: PROPANE IS EXTREMELY FLAMMABLE. VAPOR MAY EXPLODE.
... clamp as far as it until snug. Make sure the engine is suf cient. Insert the threaded end of fuel line components are the correct size. to the trimmer and potentially result in a dangerous leak. TOR ONTO A PROPANE CANISTER THAT HAS IMPROPER OR DAMAGED THREADS. Hand WARNING: THIS.... 9B). clamp. Un-latch the bottle clamp and push canister against the guard exposing the propnae connector. Make sure the engine is being screwed in accordance 2. Fig. 9A Canister Clamp 8 LEHR | ALL RIGHTS RESERVED 2008-2009 WARNING: PROPANE IS EXTREMELY FLAMMABLE. VAPOR MAY EXPLODE.
Operation Manual
Page 9
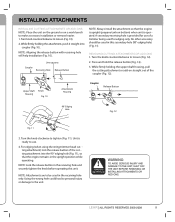
..., push it straight into the 90° edging hole (Fig. 11), so that the engine is upright (propane tank on bottom) when unit is ready to make accessory installation or removal easier. 1. Turn... and hold the release button (Fig. 12). 3. For edging (when using the string trimmer head cut ting attachment) lock the release button of the cut ting attachment into coupler (...that the engine remains in the upright position while operating. Turn knob counterclockwise to the unit. REMOVING CUTTING ATTACHMENTS OR ADD-ONS 1. LEHR | ALL RIGHTS RESERVED 2008-2009 9 Upper Shaft Housing Knob...
..., push it straight into the 90° edging hole (Fig. 11), so that the engine is upright (propane tank on bottom) when unit is ready to make accessory installation or removal easier. 1. Turn... and hold the release button (Fig. 12). 3. For edging (when using the string trimmer head cut ting attachment) lock the release button of the cut ting attachment into coupler (...that the engine remains in the upright position while operating. Turn knob counterclockwise to the unit. REMOVING CUTTING ATTACHMENTS OR ADD-ONS 1. LEHR | ALL RIGHTS RESERVED 2008-2009 9 Upper Shaft Housing Knob...

Operation Manual
Page 10
...rst use, it may be necessary to squeeze the throttle open ame. Squeeze the throttle control slightly to warm up for the day, disconnect the propane canister from the throttle control. Release your unit is equipped with a spring loaded type ON/OFF switch, it may take extra pulls to 60... Fig. 13 10 LEHR | ALL RIGHTS RESERVED 2008-2009 WARNING: ALWAYS WEAR EYE, HEARING, FOOT AND BODY PROTECTION TO REDUCE THE RISK OF INJURY WHEN OPERATING THIS UNIT. NOTE: If your hand from the unit. Once warm, the engine should start with 3-5 pulls. When done using the trimmer for 30 to ll...
...rst use, it may be necessary to squeeze the throttle open ame. Squeeze the throttle control slightly to warm up for the day, disconnect the propane canister from the throttle control. Release your unit is equipped with a spring loaded type ON/OFF switch, it may take extra pulls to 60... Fig. 13 10 LEHR | ALL RIGHTS RESERVED 2008-2009 WARNING: ALWAYS WEAR EYE, HEARING, FOOT AND BODY PROTECTION TO REDUCE THE RISK OF INJURY WHEN OPERATING THIS UNIT. NOTE: If your hand from the unit. Once warm, the engine should start with 3-5 pulls. When done using the trimmer for 30 to ll...
Operation Manual
Page 11
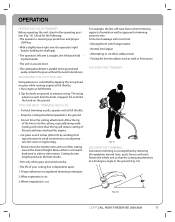
...and proper clothing. • With a slightly-bent right arm, the operator's right hand is holding the shaft grip. • The operator's left arm is controlled by removing all vegetation around trees, posts, fences ...increments to avoid prema ture line wear or engine drag. • Slowly move the trimmer into objects such as opposed to trimming around a tree. OPERATION OPERATING YOUR TRIMMER Before operating the unit, stand in a ... hold the knob on grass while running engine at a 30-degree angle to the ground (Fig. 16). 30° Fig. 16 LEHR | ALL RIGHTS RESERVED 2008-2009 11
...and proper clothing. • With a slightly-bent right arm, the operator's right hand is holding the shaft grip. • The operator's left arm is controlled by removing all vegetation around trees, posts, fences ...increments to avoid prema ture line wear or engine drag. • Slowly move the trimmer into objects such as opposed to trimming around a tree. OPERATION OPERATING YOUR TRIMMER Before operating the unit, stand in a ... hold the knob on grass while running engine at a 30-degree angle to the ground (Fig. 16). 30° Fig. 16 LEHR | ALL RIGHTS RESERVED 2008-2009 11

Operation Manual
Page 12
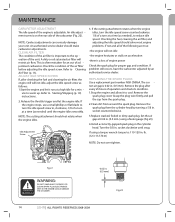
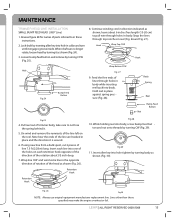
...should also be overemphasized. Check oil before removing it all the way back in the crankcase cannot be a part of any non-road engine repair establishment, individual or authorized service dealer. Clean the area around the oil ll plug/dipstick before each use: 1. If the level... PARTS. NOTE: Failure to maintain your trimmer at , level surface to your trimmer NOTE: Some maintenance procedures may result in the table. Oil Fill Hole Fig. 18 12 LEHR | ALL RIGHTS RESERVED 2008-2009 MAINTENANCE FREQUENCY BEFORE STARTING ENGINE EVERY 10 HOURS FIRST CHANGE AT 10 HOURS...
...should also be overemphasized. Check oil before removing it all the way back in the crankcase cannot be a part of any non-road engine repair establishment, individual or authorized service dealer. Clean the area around the oil ll plug/dipstick before each use: 1. If the level... PARTS. NOTE: Failure to maintain your trimmer at , level surface to your trimmer NOTE: Some maintenance procedures may result in the table. Oil Fill Hole Fig. 18 12 LEHR | ALL RIGHTS RESERVED 2008-2009 MAINTENANCE FREQUENCY BEFORE STARTING ENGINE EVERY 10 HOURS FIRST CHANGE AT 10 HOURS...

Operation Manual
Page 13
... WARNING: TO AVOID SERIOUS PERSONAL INJURY, BE SURE TO TURN THE UNIT OFF BEFORE SERVICING IT. Replace the oil ll plug/dipstick. 7. Replace the lter. LEHR | ALL RIGHTS RESERVED 2008-2009 13 CLEANING THE AIR FILTER Clean and re-oil the air lter every 10 hours of operation. Remove the air... lter (Fig. 21). Reconnect the spark plug boot. MAINTENANCE CHANGING THE OIL For a new engine, change the oil after the rst 10 hours of operation. Rinse the lter thoroughly and allow it to its side (Fig. 19). The oil will...
... WARNING: TO AVOID SERIOUS PERSONAL INJURY, BE SURE TO TURN THE UNIT OFF BEFORE SERVICING IT. Replace the oil ll plug/dipstick. 7. Replace the lter. LEHR | ALL RIGHTS RESERVED 2008-2009 13 CLEANING THE AIR FILTER Clean and re-oil the air lter every 10 hours of operation. Remove the air... lter (Fig. 21). Reconnect the spark plug boot. MAINTENANCE CHANGING THE OIL For a new engine, change the oil after the rst 10 hours of operation. Rinse the lter thoroughly and allow it to its side (Fig. 19). The oil will...
Operation Manual
Page 14
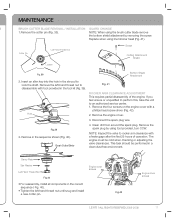
... mm.) using a torque wrench torque to reduce idle speed. REPLACING THE SPARK PLUGS Use a replacement part number NGK CMR6A. Turn the 5/8 in , clockwise, 1/8 of engine power Check the spark plug for a min - Checking the fuel, cleaning the air lter, and adjusting the idle speed should solve most... engine problems. If not and all of the unit. Idle Adjustment Screw 3. GRIT IN THE ENGINE COULD DAMAGE THE CYLINDER. 0.02 in. (0.5 mm) Fig.23 14 LEHR | ALL RIGHTS RESERVED 2008-2009 ute to the op eration of the...
... mm.) using a torque wrench torque to reduce idle speed. REPLACING THE SPARK PLUGS Use a replacement part number NGK CMR6A. Turn the 5/8 in , clockwise, 1/8 of engine power Check the spark plug for a min - Checking the fuel, cleaning the air lter, and adjusting the idle speed should solve most... engine problems. If not and all of the unit. Idle Adjustment Screw 3. GRIT IN THE ENGINE COULD DAMAGE THE CYLINDER. 0.02 in. (0.5 mm) Fig.23 14 LEHR | ALL RIGHTS RESERVED 2008-2009 ute to the op eration of the...
Operation Manual
Page 15
...Hook Retention Hook Wire Reel Fig. 26 Fig.30 NOTE: Always use original equipment manufacturer replacement line. When shaft can no longer rotate, loosen head by turning CCW (Fig. 25). 8. Continue winding cord in these ...Nut Fig.25 4. MAINTENANCE TRIMMER HEAD LINE INSTALLATION SMALL BUMP FEED HEAD (.080" Line) 1. Snap the lines through holes in place against spring pres sure (Fig. 28). Lock shaft by turning CW (Fig. ... 6. Lines other than those speci ed may make the engine overheat or fail. LEHR | ALL RIGHT RESERVED 2008-2009 15 Review gure 28 for names of the holes on...
...Hook Retention Hook Wire Reel Fig. 26 Fig.30 NOTE: Always use original equipment manufacturer replacement line. When shaft can no longer rotate, loosen head by turning CCW (Fig. 25). 8. Continue winding cord in these ...Nut Fig.25 4. MAINTENANCE TRIMMER HEAD LINE INSTALLATION SMALL BUMP FEED HEAD (.080" Line) 1. Snap the lines through holes in place against spring pres sure (Fig. 28). Lock shaft by turning CW (Fig. ... 6. Lines other than those speci ed may make the engine overheat or fail. LEHR | ALL RIGHT RESERVED 2008-2009 15 Review gure 28 for names of the holes on...
Operation Manual
Page 17
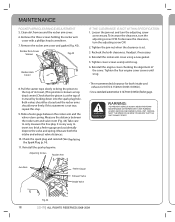
...cold when checking or adjusting the valve clearances. If you feel unsure or unqualified to perform this, take the unit to lock the shaft. Insert an allen key into the hole in the sequence shown (Fig. 40). NOTE: Inspect the valve to dissasemble with a phillips... screws Fig.42 Engine cover screws LEHR | All Rights Reserved 2008-2009 17 Fig. 41 ROCKER ARM CLEARANCE ADJUSTMENT This requires partial disassembly of operation. Remove the engine cover. 3. NOTE: When using the brush cutter blade remove the bottom shield attachment by using line trimmer head (Fig. 41...
...cold when checking or adjusting the valve clearances. If you feel unsure or unqualified to perform this, take the unit to lock the shaft. Insert an allen key into the hole in the sequence shown (Fig. 40). NOTE: Inspect the valve to dissasemble with a phillips... screws Fig.42 Engine cover screws LEHR | All Rights Reserved 2008-2009 17 Fig. 41 ROCKER ARM CLEARANCE ADJUSTMENT This requires partial disassembly of operation. Remove the engine cover. 3. NOTE: When using the brush cutter blade remove the bottom shield attachment by using line trimmer head (Fig. 41...
Operation Manual
Page 18
...• The recommended clearance for both intake and exhaust is known as necessary. Jam Nuts Feeler Gauge Exhaust Valve Intake Valve Fig.44 18 LEHR | ALL RIGHTS RESERVED 2008-2009 Rocker Arm Cover Screws Fig.43 Rocker Arm Cover 8. Measure the distance between the rocker arm and the valve... cover with a phillips head screwdriver. 7. Tighten the jam nut when the clearance is very easy to only measure the free play. Reinstall the engine cover checking the alignment of its travel by looking down into the spark plug hole. Remove the rocker arm cover and gasket (Fig. 43)....
...• The recommended clearance for both intake and exhaust is known as necessary. Jam Nuts Feeler Gauge Exhaust Valve Intake Valve Fig.44 18 LEHR | ALL RIGHTS RESERVED 2008-2009 Rocker Arm Cover Screws Fig.43 Rocker Arm Cover 8. Measure the distance between the rocker arm and the valve... cover with a phillips head screwdriver. 7. Tighten the jam nut when the clearance is very easy to only measure the free play. Reinstall the engine cover checking the alignment of its travel by looking down into the spark plug hole. Remove the rocker arm cover and gasket (Fig. 43)....
Operation Manual
Page 19
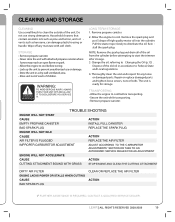
... SECTION OR TAKE TO AN AUTHORIZED SERVICE DEALER FOR AN ADJUSTMENT ENGINE WILL NOT ACCELERATE CAUSE ACTION CUTTING ATTACHMENT BOUND WITH GRASS STOP ENGINE AND CLEAN THE CUTTING ATTACHMENT DIRTY AIR FILTER ENGINE LACKS POWER OR STALLS WHEN CUTTING CAUSE BAD SPARK PLUG CLEAN OR REPLACE ... unit while transporting. • Remove propane canister. Repair or replace damaged parts and tighten loose screws, nuts or bolts. LEHR | ALL RIGHTS RESERVED 2008-2009 19 Change the oil, referring to distribute the oil. Allow the engine to start the trimmer after storage. 3. Rein stall the spark...
... SECTION OR TAKE TO AN AUTHORIZED SERVICE DEALER FOR AN ADJUSTMENT ENGINE WILL NOT ACCELERATE CAUSE ACTION CUTTING ATTACHMENT BOUND WITH GRASS STOP ENGINE AND CLEAN THE CUTTING ATTACHMENT DIRTY AIR FILTER ENGINE LACKS POWER OR STALLS WHEN CUTTING CAUSE BAD SPARK PLUG CLEAN OR REPLACE ... unit while transporting. • Remove propane canister. Repair or replace damaged parts and tighten loose screws, nuts or bolts. LEHR | ALL RIGHTS RESERVED 2008-2009 19 Change the oil, referring to distribute the oil. Allow the engine to start the trimmer after storage. 3. Rein stall the spark...

Operation Manual
Page 20
SPECIFICATIONS ENGINE* ENGINE TYPE DISPLACEMENT CLUTCH TYPE OPERATING R.P.M. ELECTRONIC PUSH ON/OFF SWITCH 0.076-0.152MM (0.003-0.006 IN) 0.020 INCH (0.5 MM) SAE 10W-30 OIL 1.7 FLUIDOZ. (50mL) PROPANE 16.4OZ CANISTER CHOKE-LESS, ALL-POSITION AUTO REWIND BAFFLED WITH GUARD SAFETY LOCK WITH... TYPE IGNITION SWITCH VALVE CLEARANCE SPARK PLUG GAP LUBRICATION CRANKCASE OIL CAPACITY FUEL CARBURETOR STARTER MUFFLER THROTTLE DRIVE SHAFT AND HOUSING DRIVE SHAFT HOUSING THROTTLE CONTROL APPROXIMATE UNIT WEIGHT CUTTING MECHANISM LINE SPOOL DIAMETER TRIMMING LINE DIAMETER CUTTING PATH DIAMETER AIR ...
SPECIFICATIONS ENGINE* ENGINE TYPE DISPLACEMENT CLUTCH TYPE OPERATING R.P.M. ELECTRONIC PUSH ON/OFF SWITCH 0.076-0.152MM (0.003-0.006 IN) 0.020 INCH (0.5 MM) SAE 10W-30 OIL 1.7 FLUIDOZ. (50mL) PROPANE 16.4OZ CANISTER CHOKE-LESS, ALL-POSITION AUTO REWIND BAFFLED WITH GUARD SAFETY LOCK WITH... TYPE IGNITION SWITCH VALVE CLEARANCE SPARK PLUG GAP LUBRICATION CRANKCASE OIL CAPACITY FUEL CARBURETOR STARTER MUFFLER THROTTLE DRIVE SHAFT AND HOUSING DRIVE SHAFT HOUSING THROTTLE CONTROL APPROXIMATE UNIT WEIGHT CUTTING MECHANISM LINE SPOOL DIAMETER TRIMMING LINE DIAMETER CUTTING PATH DIAMETER AIR ...

Operation Manual
Page 21
... begins on your equipment is defective, the part will wear and require replacement with each new LEHR brand power tool or attachment is free from defects in this operator's manual. The use of the engine: Air Filter, Carburetor, Regulator, Fuel Lines & Fittings, Fuel Valve, Ignition Coil, Spark...only for regular inspection in a reasonable amount of the United States or Canada, its products. Add-on your small o -road engine, but LEHR cannot deny warranty solely for the lack of any warranty maintenance or repairs and must be provided without notice or obligation to abuse,...
... begins on your equipment is defective, the part will wear and require replacement with each new LEHR brand power tool or attachment is free from defects in this operator's manual. The use of the engine: Air Filter, Carburetor, Regulator, Fuel Lines & Fittings, Fuel Valve, Ignition Coil, Spark...only for regular inspection in a reasonable amount of the United States or Canada, its products. Add-on your small o -road engine, but LEHR cannot deny warranty solely for the lack of any warranty maintenance or repairs and must be provided without notice or obligation to abuse,...


