
Operation Manual
Page 1
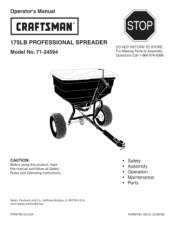
www.sears.com/craftsman PRINTED IN USA ,, Safety ,, Assembly ,, Operation ,, Maintenance ,, Parts FORM NO. 42012 (12/08/08) Sears, Roebuck and Co., Hoffman Estates, IL 60179 U.S.A. Operator's IVlanuai CRRFTSMR°H 175LB PROFESSIONAL SPREADER Model No. 71-24594 DO NOT RETURN TO STORE For Missing Parts or Assembly Questions Call 1-866-576-8388 CAUTION: Before using this product, read this manual and follow all Safety Rules and Operating Instructions.
www.sears.com/craftsman PRINTED IN USA ,, Safety ,, Assembly ,, Operation ,, Maintenance ,, Parts FORM NO. 42012 (12/08/08) Sears, Roebuck and Co., Hoffman Estates, IL 60179 U.S.A. Operator's IVlanuai CRRFTSMR°H 175LB PROFESSIONAL SPREADER Model No. 71-24594 DO NOT RETURN TO STORE For Missing Parts or Assembly Questions Call 1-866-576-8388 CAUTION: Before using this product, read this manual and follow all Safety Rules and Operating Instructions.
Operation Manual
Page 2
... 3...... ASSEMBL..Y 5...........REPAIRPARTSLIST 1..1...... This warranty gives you specific legal rights, and you to a defect in first (low) gear and with the engine at all supplied instructions, if this product is ever used for free replacement. You should record both the serial number and the date of purchase if this Craftsman Professional product fails due to loose control of the broadcast spreader and tractor. Read the chemical label instructions and...
... 3...... ASSEMBL..Y 5...........REPAIRPARTSLIST 1..1...... This warranty gives you specific legal rights, and you to a defect in first (low) gear and with the engine at all supplied instructions, if this product is ever used for free replacement. You should record both the serial number and the date of purchase if this Craftsman Professional product fails due to loose control of the broadcast spreader and tractor. Read the chemical label instructions and...
Operation Manual
Page 3
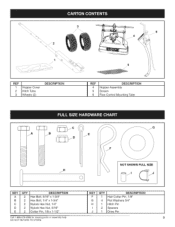
3 6 4 _J REF 1 2 3 Hopper Cover Hitch Tube Wheels (2) DESCRIPTION 5 J J REF 4 5 6 DESCRIPTION i Hopper Assembly Screen i Flow Control Mounting Tube q jB J / J I J I J J f J J J J / J E NOT SHOWN FULL SIZE KEY A B C D E QTY 2 2 2 2 2 DESCRIPTION Hex Bolt, 5/16"x 1-3/4" Hex Bolt, 1/4" x 1-3/4" Nylock Hex Nut, 1/4" Nylock Hex Nut, 5/16" Cotter Pin, 1/8 x 1-1/2" Call 1-866-576-8388 for missing parts or assembly help DO NOT RETURN TO STORE KEY F G H I J QTY 1 4 1 2 1 DESCRIPTION Hair Cotter Pin, 1/8" Flat Washers 3/4" Hitch Pin Spacers Drive Pin 3
3 6 4 _J REF 1 2 3 Hopper Cover Hitch Tube Wheels (2) DESCRIPTION 5 J J REF 4 5 6 DESCRIPTION i Hopper Assembly Screen i Flow Control Mounting Tube q jB J / J I J I J J f J J J J / J E NOT SHOWN FULL SIZE KEY A B C D E QTY 2 2 2 2 2 DESCRIPTION Hex Bolt, 5/16"x 1-3/4" Hex Bolt, 1/4" x 1-3/4" Nylock Hex Nut, 1/4" Nylock Hex Nut, 5/16" Cotter Pin, 1/8 x 1-1/2" Call 1-866-576-8388 for missing parts or assembly help DO NOT RETURN TO STORE KEY F G H I J QTY 1 4 1 2 1 DESCRIPTION Hair Cotter Pin, 1/8" Flat Washers 3/4" Hitch Pin Spacers Drive Pin 3
Operation Manual
Page 4
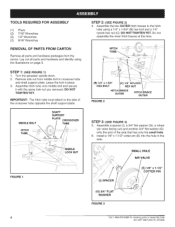
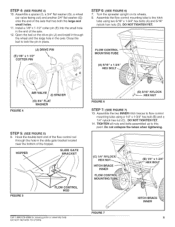
... 3. TOOLS REQUIRED FOR ASSEMBLY (!) Pliers (2) 7/16" Wrenches (2) 1/2" Wrenches (2) 9/16" Wrenches REMOVAL OF PARTS FROM CARTON Remove all parts and hardware and identify using a 1/4" x 1-3/4" (B) hex bolt and a 1/4" nylock hex nut (C). Turn the spreader upside down. 2. Remove lock nut from the carton. install a 1/8" x 1-1/2" cotter pin (E) into the hole in the axle. (I ), a 3/4" fiat washer (G), a wheel (air valve facing out) and another 3/4" fiat washer (G) onto the end of the crossover tube opposite the shaft support...
... 3. TOOLS REQUIRED FOR ASSEMBLY (!) Pliers (2) 7/16" Wrenches (2) 1/2" Wrenches (2) 9/16" Wrenches REMOVAL OF PARTS FROM CARTON Remove all parts and hardware and identify using a 1/4" x 1-3/4" (B) hex bolt and a 1/4" nylock hex nut (C). Turn the spreader upside down. 2. Remove lock nut from the carton. install a 1/8" x 1-1/2" cotter pin (E) into the hole in the axle. (I ), a 3/4" fiat washer (G), a wheel (air valve facing out) and another 3/4" fiat washer (G) onto the end of the crossover tube opposite the shaft support...
Operation Manual
Page 5
.... Turn the spreader upright on the drive pin (J) and install it through the hole in the slide gate bracket located near the bottom of the flow control rod through the wheel and the large hole in the axle. Assemble the two INNER hitch braces to the hitch tube using a 1/4" × 1-3/4" he× bolt (B) and a 1/4" nylock he × bolts (A) and 5/16" nylock hex nuts (D). Assemble...
.... Turn the spreader upright on the drive pin (J) and install it through the hole in the slide gate bracket located near the bottom of the flow control rod through the wheel and the large hole in the axle. Assemble the two INNER hitch braces to the hitch tube using a 1/4" × 1-3/4" he× bolt (B) and a 1/4" nylock he × bolts (A) and 5/16" nylock hex nuts (D). Assemble...
Operation Manual
Page 6
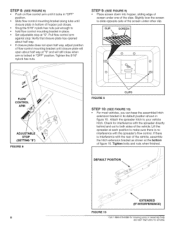
..." nylock hex nuts just enough to * hold flow control mounting bracket in place. * Set adjustable stop . Lift the spreader at each position to your vehicle hitch. Attach the spreader hitch to make sure there is no interference with the spreader directly behind and out to slide opposite side of the screen under one of the clips. Pull flow control arm against stop...
..." nylock hex nuts just enough to * hold flow control mounting bracket in place. * Set adjustable stop . Lift the spreader at each position to your vehicle hitch. Attach the spreader hitch to make sure there is no interference with the spreader directly behind and out to slide opposite side of the screen under one of the clips. Pull flow control arm against stop...
Operation Manual
Page 7
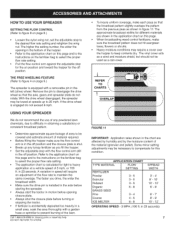
... required. If fertilizer is in speed will require an adjustment of any lumpy fertilizer as you drive, the wider the broadcast width. HOW TO USE YOUR SPREADER SETTING THE FLOW CONTROL (Refer to figure 8 on page 6.) • Loosen the nylon wing nut, set the adjustable stop for the on position and toward the hopper for missing parts or assembly help DO NOT RETURN TO...
... required. If fertilizer is in speed will require an adjustment of any lumpy fertilizer as you drive, the wider the broadcast width. HOW TO USE YOUR SPREADER SETTING THE FLOW CONTROL (Refer to figure 8 on page 6.) • Loosen the nylon wing nut, set the adjustable stop for the on position and toward the hopper for missing parts or assembly help DO NOT RETURN TO...
Operation Manual
Page 8
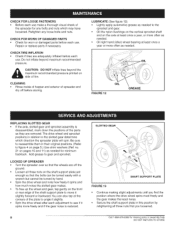
... and gear. no. 21 on side of tire. CHECK FOR WORN OF DAMAGED PARTS Check for any loose bolts and nuts. CAUTION: DO NOT inflate tires beyond maximum recommended pressure. CHECK FOR LOOSE FASTENERS • Before each use make a thorough visual check of the spreader for worn or damaged parts before each use . OIL OIL FIGURE 12 GREASE REPLACING SLOTTED GEAR If the axle, slotted gear and sprocket assembly is...
... and gear. no. 21 on side of tire. CHECK FOR WORN OF DAMAGED PARTS Check for any loose bolts and nuts. CAUTION: DO NOT inflate tires beyond maximum recommended pressure. CHECK FOR LOOSE FASTENERS • Before each use make a thorough visual check of the spreader for worn or damaged parts before each use . OIL OIL FIGURE 12 GREASE REPLACING SLOTTED GEAR If the axle, slotted gear and sprocket assembly is...

Operation Manual
Page 9
Call 1-866-576-8388 for missing parts or assembly help 9 DO NOT RETURN TO STORE • Rinse inside of hopper and exterior of spreader and dry off before storing. • Store in a clean, dry area.
Call 1-866-576-8388 for missing parts or assembly help 9 DO NOT RETURN TO STORE • Rinse inside of hopper and exterior of spreader and dry off before storing. • Store in a clean, dry area.
Operation Manual
Page 10
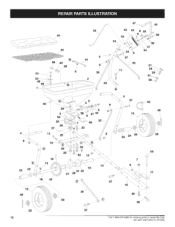
65 53 30 40 39 9 35 63 47_ 42 45 54 \ \ \ 44 J 39 \ 37 54 37 35 37 9 9 49 40 15 5 ....... 23 24 50 24 23 \ 36 F 29 _l 55 / 7 13 14 9@ \ 19 \\ i 21 20 21 22 17 / / / 37 16 50 10 35 / 50 37 56 Call 1-866-576-8388 for missing parts or assembly help DO NOT RETURN TO STORE
65 53 30 40 39 9 35 63 47_ 42 45 54 \ \ \ 44 J 39 \ 37 54 37 35 37 9 9 49 40 15 5 ....... 23 24 50 24 23 \ 36 F 29 _l 55 / 7 13 14 9@ \ 19 \\ i 21 20 21 22 17 / / / 37 16 50 10 35 / 50 37 56 Call 1-866-576-8388 for missing parts or assembly help DO NOT RETURN TO STORE

Operation Manual
Page 11
....* 1 Tube, Hitch 2 Wheel 1 Bracket, Hitch Extension 1 Bracket, Hitch 1 Shaft, Axle 2 Pin, Spring 3/16" Dia. Call 1-866-576-8388 for missing parts or assembly help 11 DO NOT RETURN TO STORE x 1" Lg. 60 44950 1 Bolt, Carriage 1/4-20 x 3/4" 61 23697 62 48515 1 Hopper Strap 1 Drive Pin W/Bail, 1/4" x 2" 63 48514 64 44481 65 40825 42012 1 Flow Control Mounting Tube 1 i Vinyl Cap 1 i Vinyl Cover 1 Owner's Manual * Purchase standard...
....* 1 Tube, Hitch 2 Wheel 1 Bracket, Hitch Extension 1 Bracket, Hitch 1 Shaft, Axle 2 Pin, Spring 3/16" Dia. Call 1-866-576-8388 for missing parts or assembly help 11 DO NOT RETURN TO STORE x 1" Lg. 60 44950 1 Bolt, Carriage 1/4-20 x 3/4" 61 23697 62 48515 1 Hopper Strap 1 Drive Pin W/Bail, 1/4" x 2" 63 48514 64 44481 65 40825 42012 1 Flow Control Mounting Tube 1 i Vinyl Cap 1 i Vinyl Cover 1 Owner's Manual * Purchase standard...

Operation Manual
Page 12
For Sears professional installation of home appliances and items like vacuums, lawn equipment, and electronics, call anytime for the location of your home - Your Home For expert troubleshooting and home solutions advice: www.managemyhome.com For repair - For the replacement parts, accessories and owner's manuals that you need to do-it ! and Canada) www.sears.com www.sears.ca Our Home For repair of carry-in...
For Sears professional installation of home appliances and items like vacuums, lawn equipment, and electronics, call anytime for the location of your home - Your Home For expert troubleshooting and home solutions advice: www.managemyhome.com For repair - For the replacement parts, accessories and owner's manuals that you need to do-it ! and Canada) www.sears.com www.sears.ca Our Home For repair of carry-in...


