Owners Manual
Page 1
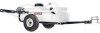
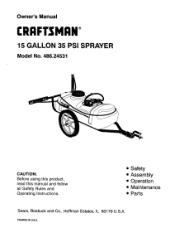
PRINTED IN U.S.A. Owner's Manual CRAFTSMAN+ 15 GALLON 35 PSI SPRAYER Model No. 486.24531 CAUTION: Before using this product, read this manual and follow all Safety Rules and Operating Instructions. • Safety • Assembly • Operation • Maintenance • Parts Sears, Roebuck and Co., Hoffman Estates, IL 60179 U.S.A.
PRINTED IN U.S.A. Owner's Manual CRAFTSMAN+ 15 GALLON 35 PSI SPRAYER Model No. 486.24531 CAUTION: Before using this product, read this manual and follow all Safety Rules and Operating Instructions. • Safety • Assembly • Operation • Maintenance • Parts Sears, Roebuck and Co., Hoffman Estates, IL 60179 U.S.A.
Owners Manual
Page 2
... allow passengers on the towing vehicle. • Keep the area of operation clear of all times, when using power equipment. • Read this owners manual carefully before attempting to assemble or operate this sprayer. • Read your tractor's braking and stability. SAFETY RULES 2 FULL SIZE HARDWARE CHART 3 CARTON CONTENTS 4 ASSEMBLY 4 OPERATION 7 MAINTENANCE 8 STORAGE 8 SPRAYING CHARTS 9 REPAIR PARTS ILLUSTRATION 10 REPAIR PARTS LIST 11 PARTS ORDERING/SERVICE Back Page LIMITED ONEYEAR WARRANTY ON For one...
... allow passengers on the towing vehicle. • Keep the area of operation clear of all times, when using power equipment. • Read this owners manual carefully before attempting to assemble or operate this sprayer. • Read your tractor's braking and stability. SAFETY RULES 2 FULL SIZE HARDWARE CHART 3 CARTON CONTENTS 4 ASSEMBLY 4 OPERATION 7 MAINTENANCE 8 STORAGE 8 SPRAYING CHARTS 9 REPAIR PARTS ILLUSTRATION 10 REPAIR PARTS LIST 11 PARTS ORDERING/SERVICE Back Page LIMITED ONEYEAR WARRANTY ON For one...

Owners Manual
Page 3
...2 E 2 F 4 G 2 H 6 I 4 J 2 K 16 L 2 M 4 N 4 O 2 DESCRIPTION Bolt, Hex 5/16" x 3" Bolt, Hex 5/16" x 2-1/4" Bolt, Hex 5/16" x 1-1/2" Bolt, Carriage 5/16"x 1-3/4" Bolt, Carriage 5/16" x 1-1/4" Bolt, Curved Head, 5/16" x 1-5/8" Screw, #10 x 1/2" Hex Nut, 5/16" Hex Lock Nut, 5/16" Lock Washer, #10 Lock Washer 5/16" Flat Washer, 5/16" Flat Washer, 1/2" Washer, Bowed Washer, 5/16" Tooth Lock KEY QTY. P 1 Q 1 R 2 S 2 T 1 U 1 V 2 W 2 X 1 Y 2 Z 1 AA 1 BB 1 CC 1 DD 1 EE 1 DESCRIPTION Hair Cotter Pin Hitch Pin Hub Cap Knob Spray Gun Clip, Small Spray...
...2 E 2 F 4 G 2 H 6 I 4 J 2 K 16 L 2 M 4 N 4 O 2 DESCRIPTION Bolt, Hex 5/16" x 3" Bolt, Hex 5/16" x 2-1/4" Bolt, Hex 5/16" x 1-1/2" Bolt, Carriage 5/16"x 1-3/4" Bolt, Carriage 5/16" x 1-1/4" Bolt, Curved Head, 5/16" x 1-5/8" Screw, #10 x 1/2" Hex Nut, 5/16" Hex Lock Nut, 5/16" Lock Washer, #10 Lock Washer 5/16" Flat Washer, 5/16" Flat Washer, 1/2" Washer, Bowed Washer, 5/16" Tooth Lock KEY QTY. P 1 Q 1 R 2 S 2 T 1 U 1 V 2 W 2 X 1 Y 2 Z 1 AA 1 BB 1 CC 1 DD 1 EE 1 DESCRIPTION Hair Cotter Pin Hitch Pin Hub Cap Knob Spray Gun Clip, Small Spray...

Owners Manual
Page 4
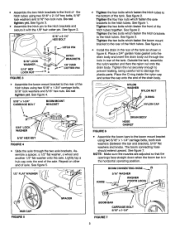
... tubes. Do not tighten yet. Boom Assembly REMOVAL OF PARTS FROM CARTON • Remove all parts and hardware and identify using two 5/16" x 3" hex bolts, four 5/16" lock washers and two 5/16" hex lock nuts. Do not tighten yet. See figure 2. • Assemble the axle clamps to the tank using four curved head bolts, 5/16" lock washers and 5/16" hex nuts. Wheels (2) 4. Boom Mount Bracket 9. See figure 2. •...
... tubes. Do not tighten yet. Boom Assembly REMOVAL OF PARTS FROM CARTON • Remove all parts and hardware and identify using two 5/16" x 3" hex bolts, four 5/16" lock washers and two 5/16" hex lock nuts. Do not tighten yet. See figure 2. • Assemble the axle clamps to the tank using four curved head bolts, 5/16" lock washers and 5/16" hex nuts. Wheels (2) 4. Boom Mount Bracket 9. See figure 2. •...
Owners Manual
Page 5
...using two 5/16" x 1-1/4" carriage bolts, tooth lock washers (between the bar and bracket), 5/16" fiat washers and knobs. Do not tighten yet. Lightly tap a hub cap onto the end of axle. See figure 1. Install the drain in the rear of the tank. See figure 7. NOTE: Make sure the nozzles are adjusted... bar is in figure 6. Assemble a spacer, a 1/2" flat washer, a wheel and another 1/2" flat washer onto the axle. I_" FLAT WASHER Tighten the four bolts which fasten the hitch brackets to the bottom of the tank as shown in the horizontal operating position. Tighten the two bolts ...
...using two 5/16" x 1-1/4" carriage bolts, tooth lock washers (between the bar and bracket), 5/16" fiat washers and knobs. Do not tighten yet. Lightly tap a hub cap onto the end of axle. See figure 1. Install the drain in the rear of the tank. See figure 7. NOTE: Make sure the nozzles are adjusted... bar is in figure 6. Assemble a spacer, a 1/2" flat washer, a wheel and another 1/2" flat washer onto the axle. I_" FLAT WASHER Tighten the four bolts which fasten the hitch brackets to the bottom of the tank as shown in the horizontal operating position. Tighten the two bolts ...

Owners Manual
Page 6
... of the tank. (The large clip holds the spray gun handle and the small clip holds the wand.) Refer to figure 8. 114" TEE FIGURE 9 CONDUIT CLAMP HOSE VIEWED FROM FRONT Attach the sprayer to the tractor hitch and connect the wiring to the ...wire may be connected to the side of the hose through the conduit clamp (attached to the negative battery post. PUMP SWITCH RED QUICK COUPLER RED \ BROWN BROWN BA'I-FER¥ FIGURE 10 & NEVER ALLOW NEGATIVE PIN ON PLUG TO COME IN CONTACT WITH POSITIVE "HOT" POST ON BATTERY. Place the end of the tank using two #10 x 1/2" screws and #10 lock...
... of the tank. (The large clip holds the spray gun handle and the small clip holds the wand.) Refer to figure 8. 114" TEE FIGURE 9 CONDUIT CLAMP HOSE VIEWED FROM FRONT Attach the sprayer to the tractor hitch and connect the wiring to the ...wire may be connected to the side of the hose through the conduit clamp (attached to the negative battery post. PUMP SWITCH RED QUICK COUPLER RED \ BROWN BROWN BA'I-FER¥ FIGURE 10 & NEVER ALLOW NEGATIVE PIN ON PLUG TO COME IN CONTACT WITH POSITIVE "HOT" POST ON BATTERY. Place the end of the tank using two #10 x 1/2" screws and #10 lock...

Owners Manual
Page 7
... before operating your sprayer to set the spray pattern and nozzle pressure. BEFORE STARTING It is subject to a straight stream. This is not a problem unless the pump is Important to the pump at a predetermined high pressure point (35 PSI). b. BOOM ARM Swivels up and down . ]11 t AL FIGURE 12 If the flow demand is attained with the various controls and their locations...
... before operating your sprayer to set the spray pattern and nozzle pressure. BEFORE STARTING It is subject to a straight stream. This is not a problem unless the pump is Important to the pump at a predetermined high pressure point (35 PSI). b. BOOM ARM Swivels up and down . ]11 t AL FIGURE 12 If the flow demand is attained with the various controls and their locations...
Owners Manual
Page 8
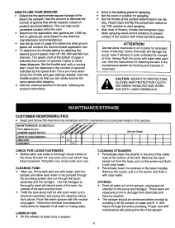
... pump/motor switch to the "ON" position to start spraying. • Stay clear of flowers, shrubs and evergreen trees when spraying weed control solutions to damage from the hose, pull out the screen and flush it with plain water and a chemical neutralizer and repeat the cleaning instructions above. See the instructions for cleaning the tank in the maintenance section for flushing and disposal of the snow thrower...
... pump/motor switch to the "ON" position to start spraying. • Stay clear of flowers, shrubs and evergreen trees when spraying weed control solutions to damage from the hose, pull out the screen and flush it with plain water and a chemical neutralizer and repeat the cleaning instructions above. See the instructions for cleaning the tank in the maintenance section for flushing and disposal of the snow thrower...

Owners Manual
Page 9
...SPEED CHART M.P.H. (KJH) Time Required in Seconds to Travel a Distance of: 100 f_(30.5 M',i200 ft (61 M) 300 ft(91.5 M: 1,0 (I.6) 68 136 205 2.0 (3.2) 34 68 102 3.0 (4.8) 23 45 68 4.0 (6.4) 17 34 51 5.0 (8.0) 14 27 41 6.0 (9.7) 11 23 34 7.0 (11.3) 9.7 19 29 8.0 (12.9) 8.5 17 26 9.0 (14.5) 7.6 15 23 10.0 (16.1) 6.8 14 20 Width Inches Pressure... (40,5) 6.9 (26,8) 4.4 (20,0) Jet Spray Size Width Inches (mm) Pressure Tip Capacity PSI Imperial Gallons (Bar) per minute i(liters per minute IMPERIAL GALLONS (Uters) PER 1000 SQ. U.S.
...SPEED CHART M.P.H. (KJH) Time Required in Seconds to Travel a Distance of: 100 f_(30.5 M',i200 ft (61 M) 300 ft(91.5 M: 1,0 (I.6) 68 136 205 2.0 (3.2) 34 68 102 3.0 (4.8) 23 45 68 4.0 (6.4) 17 34 51 5.0 (8.0) 14 27 41 6.0 (9.7) 11 23 34 7.0 (11.3) 9.7 19 29 8.0 (12.9) 8.5 17 26 9.0 (14.5) 7.6 15 23 10.0 (16.1) 6.8 14 20 Width Inches Pressure... (40,5) 6.9 (26,8) 4.4 (20,0) Jet Spray Size Width Inches (mm) Pressure Tip Capacity PSI Imperial Gallons (Bar) per minute i(liters per minute IMPERIAL GALLONS (Uters) PER 1000 SQ. U.S.
Owners Manual
Page 11
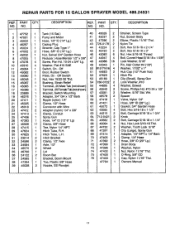
... 4 Bolt, Curved Head 5/16-18 x 1-5/8" 4 Screw, Pan Hd. 10-24 x 3/4" Lg. 48 43086 16 Lock Washer, 5/16" 4 Washer, Flat #10 SAE 49 43343 1 Pin, Hair Cotter #4 (1/8") 1 Switch, On - REPAIR PARTS FOR 15 GALLON SPRAYER MODEL 486.24531 REF. QTY. Wrt. 1 Adapter, 3/4" GH x 1/2" Barb 58 46578 2 Spacer 1 Nipple (nylon) 1/4" 59 47416 1 Valve, Nylon 1/4" 1 Clamp, 1/2" Hose 60 47421 1 Hose, 3/8" ID (28" Lg.) 1 Connector with Wire...
... 4 Bolt, Curved Head 5/16-18 x 1-5/8" 4 Screw, Pan Hd. 10-24 x 3/4" Lg. 48 43086 16 Lock Washer, 5/16" 4 Washer, Flat #10 SAE 49 43343 1 Pin, Hair Cotter #4 (1/8") 1 Switch, On - REPAIR PARTS FOR 15 GALLON SPRAYER MODEL 486.24531 REF. QTY. Wrt. 1 Adapter, 3/4" GH x 1/2" Barb 58 46578 2 Spacer 1 Nipple (nylon) 1/4" 59 47416 1 Valve, Nylon 1/4" 1 Clamp, 1/2" Hose 60 47421 1 Hose, 3/8" ID (28" Lg.) 1 Connector with Wire...
Owners Manual
Page 12
... les pi_ces For the repair or replacement parts you need: Call 7 am - 7 pm, 7 days a week 1"800-366-PART (1-800-366-7278) Para ordenar piezas con entrega a domicilio - 1-800-659-7084 For the location of a Sears Parts and Repair Center in your area: Call 24 hours a day, 7 clays a week 1-800-488-1222 For information on purchasing a Sears Maintenance Agreement or to inquire...
... les pi_ces For the repair or replacement parts you need: Call 7 am - 7 pm, 7 days a week 1"800-366-PART (1-800-366-7278) Para ordenar piezas con entrega a domicilio - 1-800-659-7084 For the location of a Sears Parts and Repair Center in your area: Call 24 hours a day, 7 clays a week 1-800-488-1222 For information on purchasing a Sears Maintenance Agreement or to inquire...


