Owners Manual
Page 1
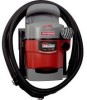
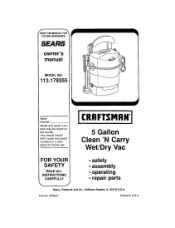
Part No. You should record both model and serial numbers in U.S.A. SP6537 Printed in a safe place for future use, I CRAFTSMAN'J 5 Gallon Clean 'N Carry Wet/Dry Vac FOR YOUR SAFETY READ ALL INSTRUCTIONS CAREFULLY • safety • assembly • operating • repair parts J Sears, Roebuck and Co., Hoffman Estates, IL 60179 U.S.A. f SAVETHIS MANUAL FOR FUTUREREFERENCE 8_8 owner's manual MODEL NO. 113.179255 Serial Number Model and serial numbers may be found on the handle.
Part No. You should record both model and serial numbers in U.S.A. SP6537 Printed in a safe place for future use, I CRAFTSMAN'J 5 Gallon Clean 'N Carry Wet/Dry Vac FOR YOUR SAFETY READ ALL INSTRUCTIONS CAREFULLY • safety • assembly • operating • repair parts J Sears, Roebuck and Co., Hoffman Estates, IL 60179 U.S.A. f SAVETHIS MANUAL FOR FUTUREREFERENCE 8_8 owner's manual MODEL NO. 113.179255 Serial Number Model and serial numbers may be found on the handle.
Owners Manual
Page 2
...; Do not run Wet/Dry Vac unattended. • To reduce the risk of health hazards from the ground. 2 Use only as described in use this Wet/Dry Vac with a tom filter or without the filter installed except when vacuuming liquids as described in this manual. To reduce the risk of fire, electric shock, or injury: Read and understand this product is a very fine dust which vary from...
...; Do not run Wet/Dry Vac unattended. • To reduce the risk of health hazards from the ground. 2 Use only as described in use this Wet/Dry Vac with a tom filter or without the filter installed except when vacuuming liquids as described in this manual. To reduce the risk of fire, electric shock, or injury: Read and understand this product is a very fine dust which vary from...
Owners Manual
Page 3
... not handle plug or the Wet/Dry Vac with any object into ventilation openings. Do not vacuum with wet hands. • Do not put any ventilation openings blocked; This Wet/Dry Vac is double-insulated, eliminating the need for Servicing Double-Insulated Wet/Dry Vacs before commencing operation. Observe the following table to a Sears Service Center. • Do not pull or carry by pulling on stairs. NLY IDENTICAL REPLACEMENT PARTS. do not run Wet/Dry Vac over cord. They...
... not handle plug or the Wet/Dry Vac with any object into ventilation openings. Do not vacuum with wet hands. • Do not put any ventilation openings blocked; This Wet/Dry Vac is double-insulated, eliminating the need for Servicing Double-Insulated Wet/Dry Vacs before commencing operation. Observe the following table to a Sears Service Center. • Do not pull or carry by pulling on stairs. NLY IDENTICAL REPLACEMENT PARTS. do not run Wet/Dry Vac over cord. They...
Owners Manual
Page 4
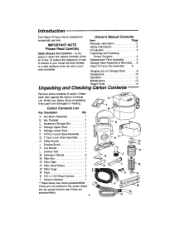
... Carefully Warranty Information 2 Safety Instructions 2 Introduction 4 Static Shocks Are Common - In dry areas or when the relative humidity of the air is low, To reduce the frequency of carton, Check each item against the Carton Contents List. Carton Contents List Key Description Qty. Unpacking and Checking Carton Contents 4 Replacement Filter Assembly ........ 5 Storage Rack Assembly & Mounting ., .6 Clean 'N Carry Vac Assembly 8 Hanging Vac on Storage Rack ....... 9 Accessories 10 Operation 11 Maintenance 13 Repair Parts...
... Carefully Warranty Information 2 Safety Instructions 2 Introduction 4 Static Shocks Are Common - In dry areas or when the relative humidity of the air is low, To reduce the frequency of carton, Check each item against the Carton Contents List. Carton Contents List Key Description Qty. Unpacking and Checking Carton Contents 4 Replacement Filter Assembly ........ 5 Storage Rack Assembly & Mounting ., .6 Clean 'N Carry Vac Assembly 8 Hanging Vac on Storage Rack ....... 9 Accessories 10 Operation 11 Maintenance 13 Repair Parts...
Owners Manual
Page 5
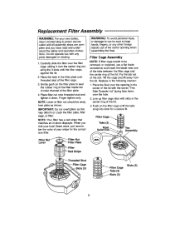
.... 3. Filter Cage Assembly NOTE: If filter cage needs to be sure to keep hands, fingers, or any other foreign objects out of the center opening in the following manner: 1. Filter Cage _ ilter Cage Slots (3) Tabs (3) Slots (3) s 13) Replacement Filter Assembly WARNING: For your own safety, never connect plug to power source outlet until all assembly steps are complete and you visit your local Sears store, just...
.... 3. Filter Cage Assembly NOTE: If filter cage needs to be sure to keep hands, fingers, or any other foreign objects out of the center opening in the following manner: 1. Filter Cage _ ilter Cage Slots (3) Tabs (3) Slots (3) s 13) Replacement Filter Assembly WARNING: For your own safety, never connect plug to power source outlet until all assembly steps are complete and you visit your local Sears store, just...
Owners Manual
Page 6
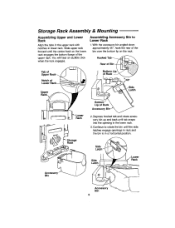
... the bottom lip on the lower rack engages the bottom flange of the upper rack. Continue to Lower Rack 1. Assembling Accessory Bin to rotate the bin until the side latches engage openings in rack and the bin is in a horizontal position. Side Accesson Bin Side Latch Rack Accessory Bin 6 You... Notch of Rack Accessory 2. Depress hooked tab and rotate accessory bin up and back until the center hook on the rack. Storage Rack Assembly & Mounting Assembling Upper and Lower Rack Align the tabs in the upper rack with notches in the lower rack. 3. Slide upper rack forward until tab ...
... the bottom lip on the lower rack engages the bottom flange of the upper rack. Continue to Lower Rack 1. Assembling Accessory Bin to rotate the bin until the side latches engage openings in rack and the bin is in a horizontal position. Side Accesson Bin Side Latch Rack Accessory Bin 6 You... Notch of Rack Accessory 2. Depress hooked tab and rotate accessory bin up and back until the center hook on the rack. Storage Rack Assembly & Mounting Assembling Upper and Lower Rack Align the tabs in the upper rack with notches in the lower rack. 3. Slide upper rack forward until tab ...
Owners Manual
Page 7
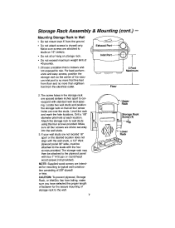
...a location that is no more than eighteen feet from falling, make sure you have selected the proper length of fastener for the secure mounting of 5/8" drywall or less, CAUTION: To prevent plywood, Storage Rack, or Wet/Dry Vac from the electrical outlet. & Mounting (cont.) -- 5 Feet • _ Maximum Floor 2•...with four 1" #10 pan or round head wood screws (not provided). Locate two wall studs and position the storage rack so that five feet from floor and no more that all four screws are spaced sixteen inches apart to wall studs using the four screws provided. Drill a ...
...a location that is no more than eighteen feet from falling, make sure you have selected the proper length of fastener for the secure mounting of 5/8" drywall or less, CAUTION: To prevent plywood, Storage Rack, or Wet/Dry Vac from the electrical outlet. & Mounting (cont.) -- 5 Feet • _ Maximum Floor 2•...with four 1" #10 pan or round head wood screws (not provided). Locate two wall studs and position the storage rack so that five feet from floor and no more that all four screws are spaced sixteen inches apart to wall studs using the four screws provided. Drill a ...
Owners Manual
Page 8
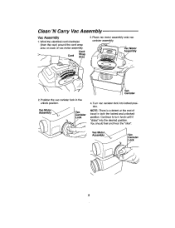
Place vac motor assembly onto vac canister assembly. Continue to turn knob until it "clicks" into locked position. You should feel and hear the "click". Vac Motor Assembly Vac Canister 2. Turn vac canister lock into the desired position. Assembly Vac Canister Lock Position the vac canister lock in both the locked and unlocked position. VacMotor\ J Assembly_ VCacnister Lock 4. Clean 'N Carry Vac Assembly Vac Assembly 1, Wind the electdcal cord clockwise (from the rear) around the cord wrap area on back of...
Place vac motor assembly onto vac canister assembly. Continue to turn knob until it "clicks" into locked position. You should feel and hear the "click". Vac Motor Assembly Vac Canister 2. Turn vac canister lock into the desired position. Assembly Vac Canister Lock Position the vac canister lock in both the locked and unlocked position. VacMotor\ J Assembly_ VCacnister Lock 4. Clean 'N Carry Vac Assembly Vac Assembly 1, Wind the electdcal cord clockwise (from the rear) around the cord wrap area on back of...
Owners Manual
Page 9
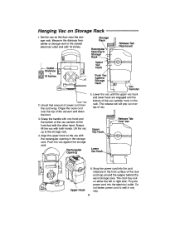
... the handle with the rectangular opening in any way, Align the upper hook on the vac with one hand and the bottom of the vacuum and down the front. 3. Plug the power cord into the cord retainers in Storage Rack Release Tab _1 DOutlet_ istance __ Inches 2, Uncoil that amount of the vac canister rests on the floor near the stor- Set the vac on...
... the handle with the rectangular opening in any way, Align the upper hook on the vac with one hand and the bottom of the vacuum and down the front. 3. Plug the power cord into the cord retainers in Storage Rack Release Tab _1 DOutlet_ istance __ Inches 2, Uncoil that amount of the vac canister rests on the floor near the stor- Set the vac on...
Owners Manual
Page 10
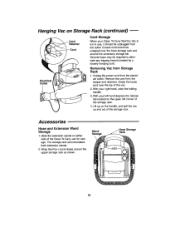
... folding handle. 3. Wrap the Pos-I-Lock Hoses around the accessory storage bin. Removing Vac from the outlet. Several loops may be wrapped over the top of the storage rack. Hanging Vac on either side of the storage rack. 4. Accessories Hose and Extension Wand Storage 1.Slide the extension wands on Storage Rack (continued) Electrical Outlet Retainer Cord Storage When your Clean 'N Carry Wet]Dry Vac is...
... folding handle. 3. Wrap the Pos-I-Lock Hoses around the accessory storage bin. Removing Vac from the outlet. Several loops may be wrapped over the top of the storage rack. Hanging Vac on either side of the storage rack. 4. Accessories Hose and Extension Wand Storage 1.Slide the extension wands on Storage Rack (continued) Electrical Outlet Retainer Cord Storage When your Clean 'N Carry Wet]Dry Vac is...
Owners Manual
Page 11
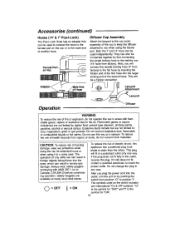
... does not fit, contact a qualified electrician to the male end of the vac to keep the diffuser attached to ; If the plug does not fit fully in Canada, CSA Z94.3) before commencing operation. on the switch actuator are available at many local retail stores. The symbols used on Mac Diffuser Cap Assembly Attach the lanyard to the vac motor assembly of another hose.
... does not fit, contact a qualified electrician to the male end of the vac to keep the diffuser attached to ; If the plug does not fit fully in Canada, CSA Z94.3) before commencing operation. on the switch actuator are available at many local retail stores. The symbols used on Mac Diffuser Cap Assembly Attach the lanyard to the vac motor assembly of another hose.
Owners Manual
Page 12
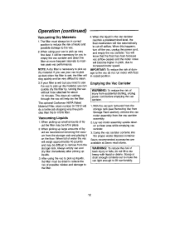
... run motor with liquid or debris. With the vacuum removed from the storage rack (see Removing Vac from Storage Rack section), remove the vac motor assembly from accidental starting, unplug power cord before emptying the vac canister. WARNING: To reduce the risk of leaks and possible damage to maintain peak vac performance. After using your vac to pick up dry material, you can quickly dry the filter by running the vac without hose attached for you use the vac...
... run motor with liquid or debris. With the vacuum removed from the storage rack (see Removing Vac from Storage Rack section), remove the vac motor assembly from accidental starting, unplug power cord before emptying the vac canister. WARNING: To reduce the risk of leaks and possible damage to maintain peak vac performance. After using your vac to pick up dry material, you can quickly dry the filter by running the vac without hose attached for you use the vac...
Owners Manual
Page 13
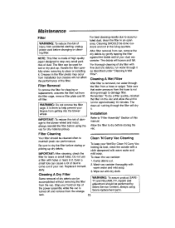
... designed to dry before using Sears replacement parts, 13 For best cleaning results due to clean or installing it immediately. Remember: To dry a filter quickly, reinstall the filter on top of dry debris can be accomplished without removing the filter from a hose or spigot. Clean 'N Carry Vac Cleaning To keep your fingers from vac, remove the dry debris by Sears Service Centers, always using the vac for wet or dry pick up dry debris. WARNING: To assure product SAFETY and RELIABILITY, repairs and adjustment...
... designed to dry before using Sears replacement parts, 13 For best cleaning results due to clean or installing it immediately. Remember: To dry a filter quickly, reinstall the filter on top of dry debris can be accomplished without removing the filter from a hose or spigot. Clean 'N Carry Vac Cleaning To keep your fingers from vac, remove the dry debris by Sears Service Centers, always using the vac for wet or dry pick up dry debris. WARNING: To assure product SAFETY and RELIABILITY, repairs and adjustment...
Owners Manual
Page 14
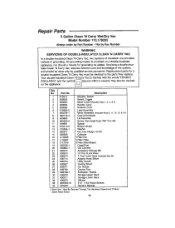
... SP6537 Description Actuator, Switch Switch, Toggle Motor Cover (includesKeys 1, 2, 4, & 5) Handle, Carry Retainer Cord Lead Assembly Motor Assembly (IncludesKeys6, 11, 12, 13, & 14) Cord w/Terminals Lid Assembly Screw, Pan Head Type =AS" 10 x 3/4 Spacer Blower Wheel Washer Nut, Hex Flange 1/4-20 Collector 1 Filter Nut t Filter Plate t Filter (Red Stdpe) Cage/Float Vac Canister Accessory Storage Bin 14' Pos-I-Lock Hose 7' Pos-l-Lock Hose (IncludesKey 24) Adaptor Hose Elbow Utility Nozzle Dusting Brush Car Nozzle Crevice Tool Extension, Wands Storage Upper Rack...
... SP6537 Description Actuator, Switch Switch, Toggle Motor Cover (includesKeys 1, 2, 4, & 5) Handle, Carry Retainer Cord Lead Assembly Motor Assembly (IncludesKeys6, 11, 12, 13, & 14) Cord w/Terminals Lid Assembly Screw, Pan Head Type =AS" 10 x 3/4 Spacer Blower Wheel Washer Nut, Hex Flange 1/4-20 Collector 1 Filter Nut t Filter Plate t Filter (Red Stdpe) Cage/Float Vac Canister Accessory Storage Bin 14' Pos-I-Lock Hose 7' Pos-l-Lock Hose (IncludesKey 24) Adaptor Hose Elbow Utility Nozzle Dusting Brush Car Nozzle Crevice Tool Extension, Wands Storage Upper Rack...
Owners Manual
Page 16
...-home major brand repair service: Call 24 hours a day, 7 days a week 1-800-4-MY-HOME (1-800-469-4663) Para pedir servicio de reparacion a domicilio - 1-800-676-5811 For the repair or replacement parts you need: Call 6 am - 5 pro, Monday - SP6537 Form No. Saturday 1-800-827-6655 S /ARS SM HomeCentral The model and serial numbers will be found on purchasing a Sears Maintenance Agreement or...
...-home major brand repair service: Call 24 hours a day, 7 days a week 1-800-4-MY-HOME (1-800-469-4663) Para pedir servicio de reparacion a domicilio - 1-800-676-5811 For the repair or replacement parts you need: Call 6 am - 5 pro, Monday - SP6537 Form No. Saturday 1-800-827-6655 S /ARS SM HomeCentral The model and serial numbers will be found on purchasing a Sears Maintenance Agreement or...


