Owners Manual
Page 2
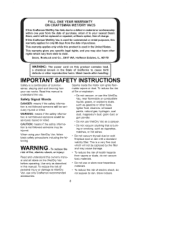
...seriously injured or killed. If this Wet!Dry Vac, near hazardous materials. • To reduce the risk of fire or explosion: • Do not vacuum, or use only Craftsman recommended accessories. Read this manual. ...To reduce the risk of fire, electric shock, or injury: Read and understand this Craftsman Wet/Dry Vac fails due to cause birth I WdefAecRtsNINoGr :otheTrhe repprodwuecrtivecord haormn . WARNING -Toreductehe risk of personal injury or damage to Wet/Dry Vac, use this Craftsman Wet/Dry Vac...
...seriously injured or killed. If this Wet!Dry Vac, near hazardous materials. • To reduce the risk of fire or explosion: • Do not vacuum, or use only Craftsman recommended accessories. Read this manual. ...To reduce the risk of fire, electric shock, or injury: Read and understand this Craftsman Wet/Dry Vac fails due to cause birth I WdefAecRtsNINoGr :otheTrhe repprodwuecrtivecord haormn . WARNING -Toreductehe risk of personal injury or damage to Wet/Dry Vac, use this Craftsman Wet/Dry Vac...
Owners Manual
Page 8
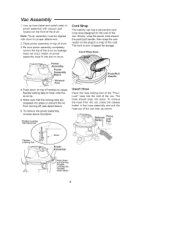
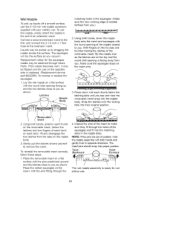
... remove the power assembly, reverse above directions. Place power assembly on drum. Notch on power assembly must be aligned with vacuum port located on the rear of the vac. Simply, wrap the power cord around the push/pull handle, then snap the connector on top of handles to cause flexible.... Flexible Locking "Tab Pulled Out Flexible Locking Tab \ Push/Pull Handle Insert Hose Insert the hose locking end of drum. 3. Cord Wrap The wet/dry vac has a convenient cord wrap area designed on the front of the drum so leakage does not occur. Cord Wrap Area\ _N P°wer Assembly...
... remove the power assembly, reverse above directions. Place power assembly on drum. Notch on power assembly must be aligned with vacuum port located on the rear of the vac. Simply, wrap the power cord around the push/pull handle, then snap the connector on top of handles to cause flexible.... Flexible Locking "Tab Pulled Out Flexible Locking Tab \ Push/Pull Handle Insert Hose Insert the hose locking end of drum. 3. Cord Wrap The wet/dry vac has a convenient cord wrap area designed on the front of the drum so leakage does not occur. Cord Wrap Area\ _N P°wer Assembly...
Owners Manual
Page 10
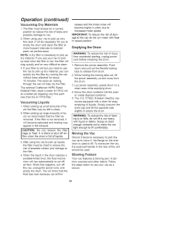
...vac. 2. The optional Craftsman HEPA Rated Material Filter, stock number 9-17912 will become saturated and misting may be used to the filter. 4. When picking up dry material. IMPORTANT: To reduce the risk of damage to the vac...to reduce the risk of liquids. The 113.177420, 9-Gallon Wet/Dry Vac comes equipped with float in correct position to release from the drum. 3. When this... to lift. Operation (continued) Vacuuming Dry Materials 1. If your vac as a blower. 10 The clean air rushing through the vac will become necessary to pick the vac up very fine dust, it ...
...vac. 2. The optional Craftsman HEPA Rated Material Filter, stock number 9-17912 will become saturated and misting may be used to the filter. 4. When picking up dry material. IMPORTANT: To reduce the risk of damage to the vac...to reduce the risk of liquids. The 113.177420, 9-Gallon Wet/Dry Vac comes equipped with float in correct position to release from the drum. 3. When this... to lift. Operation (continued) Vacuuming Dry Materials 1. If your vac as a blower. 10 The clean air rushing through the vac will become necessary to pick the vac up very fine dust, it ...
Owners Manual
Page 13
... each latch, lift and disengage the two latches from the tabs on each thumb below the latches) and two fingers of the insert to you vacuum. Gently pull the latches toward yourself to the extension wand. inspect the pins of each hand on the nozzle body. 3. Twist Twist The... extension wand to the first, and connect the 2-1/2 inch x 7 foot hose to remove the insert. Make sure the squeegee stays on a flat surface with your wet/dry vac. Place the removable insert on the insert, with the pins positioned upward and the latches close to you . The squeegee will...
... each latch, lift and disengage the two latches from the tabs on each thumb below the latches) and two fingers of the insert to you vacuum. Gently pull the latches toward yourself to the extension wand. inspect the pins of each hand on the nozzle body. 3. Twist Twist The... extension wand to the first, and connect the 2-1/2 inch x 7 foot hose to remove the insert. Make sure the squeegee stays on a flat surface with your wet/dry vac. Place the removable insert on the insert, with the pins positioned upward and the latches close to you . The squeegee will...


