Owners Manual
Page 1
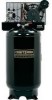
Read the Safety Guidelines and All Instructions Carefully Before Operating. Visit our Craftsman website: www.sears.com/craftsman 1000002023 5J2eJo7 Owner's Manual I CRRFTgMRNI Oil Lube Two Stage Air Compressor AiR COMPRESSOR = Safety Guidelines = Assembly = Operation = Maintenance = Troubleshooting = Repair Parts CAUTION; Sears, Roebuck and Co., Hoffman Estates, IL 60179 U.S.A.
Read the Safety Guidelines and All Instructions Carefully Before Operating. Visit our Craftsman website: www.sears.com/craftsman 1000002023 5J2eJo7 Owner's Manual I CRRFTgMRNI Oil Lube Two Stage Air Compressor AiR COMPRESSOR = Safety Guidelines = Assembly = Operation = Maintenance = Troubleshooting = Repair Parts CAUTION; Sears, Roebuck and Co., Hoffman Estates, IL 60179 U.S.A.
Owners Manual
Page 2
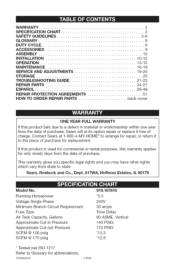
..., Hoffman Estates, IL 60179 Model No. WARRAN.T..Y SPECiFiCATiCOHNAR.T SAFETGYUiDELiNE...S GLOSSAR..Y DUTYCYCL.E ACCESSORI.E...S ASSEMBL..Y iNSTALLATiO...N OPERATIO...N MAINTENAN.C...E SERVICAENDADJUSTMEN.T...S STORAG.E TROUBLESHOOTING GUIDE REPAIR PARTS ESPA_IOL REPAIR PROTECTION AGREEMENTS HOW TO ORDER REPAIR PARTS 2 2 3-8 9 9 9 10 10-12 13-15 16-19 19-20 20 21-23 24-27 28-49 51 back cover ONE YEAR FULL WARRANTY If this warranty applies for only ninety days...
..., Hoffman Estates, IL 60179 Model No. WARRAN.T..Y SPECiFiCATiCOHNAR.T SAFETGYUiDELiNE...S GLOSSAR..Y DUTYCYCL.E ACCESSORI.E...S ASSEMBL..Y iNSTALLATiO...N OPERATIO...N MAINTENAN.C...E SERVICAENDADJUSTMEN.T...S STORAG.E TROUBLESHOOTING GUIDE REPAIR PARTS ESPA_IOL REPAIR PROTECTION AGREEMENTS HOW TO ORDER REPAIR PARTS 2 2 3-8 9 9 9 10 10-12 13-15 16-19 19-20 20 21-23 24-27 28-49 51 back cover ONE YEAR FULL WARRANTY If this warranty applies for only ninety days...
Owners Manual
Page 5
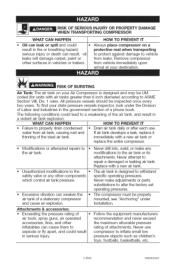
... exceed the maximum allowable pressure rating of the steel air tank. Unauthorized modifications to the safety valve or any modifications to inflate small low pressure objects such as children's toys, footballs, basketballs, etc. 5 ENG 1000002023 Replace with a new air tank or replace the entire compressor. All pressure vessels should be properly mounted, see "Anchoring" under the Division of air tools, spray guns, air operated accessories, tires, and other...
... exceed the maximum allowable pressure rating of the steel air tank. Unauthorized modifications to the safety valve or any modifications to inflate small low pressure objects such as children's toys, footballs, basketballs, etc. 5 ENG 1000002023 Replace with a new air tank or replace the entire compressor. All pressure vessels should be properly mounted, see "Anchoring" under the Division of air tools, spray guns, air operated accessories, tires, and other...
Owners Manual
Page 6
...; Your air compressor is powered by electrocution. Like any part of the body or at high speed, resulting in serious injury or death from the air hose and air tank before attempting maintenance, attaching tools or accessories. 1000002023 6 ENG Make certain that the electrical circuit to "Grounding Instructions" paragraph in serious injury or death by electricity. Always turn the compressor off and bleed pressure from electrocution. Electrical Grounding...
...; Your air compressor is powered by electrocution. Like any part of the body or at high speed, resulting in serious injury or death from the air hose and air tank before attempting maintenance, attaching tools or accessories. 1000002023 6 ENG Make certain that the electrical circuit to "Grounding Instructions" paragraph in serious injury or death by electricity. Always turn the compressor off and bleed pressure from electrocution. Electrical Grounding...
Owners Manual
Page 8
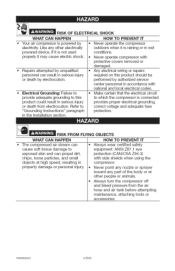
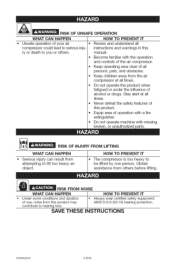
... can result from the air compressor at all times. Equip area of all compressor could lead to you or others before lifting. HOW TO PREVENT iT • Unsafe operation of this ry or death to serious inju- I = Review and understand all persons, pets, and obstacles. Never defeat the safety features of your air I instructions and warnings in this...
... can result from the air compressor at all times. Equip area of all compressor could lead to you or others before lifting. HOW TO PREVENT iT • Unsafe operation of this ry or death to serious inju- I = Review and understand all persons, pets, and obstacles. Never defeat the safety features of your air I instructions and warnings in this...
Owners Manual
Page 9
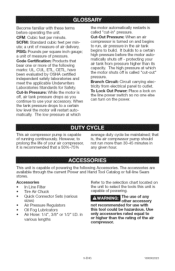
...; Tire Air Chuck Refer to the selection chart located on the power. Quick Connector Sets (various sizes) Air Pressure Regulators Oil Fog Lubricators Air Hose: 1/4", 3/8" or 1/2" I.D. The accessories are available through the current Power and Hand Tool Catalog or full-line Sears stores. CFM: Cubic feet per square inch gauge; Use only accessories rated equal to a certain low level the motor will restart automatically. SCFM: Standard cubic feet per minute; Code Certification...
...; Tire Air Chuck Refer to the selection chart located on the power. Quick Connector Sets (various sizes) Air Pressure Regulators Oil Fog Lubricators Air Hose: 1/4", 3/8" or 1/2" I.D. The accessories are available through the current Power and Hand Tool Catalog or full-line Sears stores. CFM: Cubic feet per square inch gauge; Use only accessories rated equal to a certain low level the motor will restart automatically. SCFM: Standard cubic feet per minute; Code Certification...
Owners Manual
Page 10
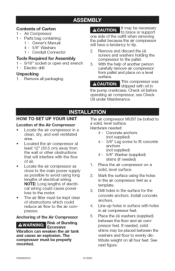
... surface with the flow of obstructions which could cause power loss to fit concrete anchors (not supplied) 4 - 5/8" Washer (supplied) shims (if needed : 4 - Owner's Manual 4 - 5/8" Washers 1 - Electric drill Unpacking 1. Install concrete anchors. 4. Hardware needed ) 1. NOTE: Long lengths of electrical wiring. Mark the surface using long lengths of electrical wiring could reduce air flow to avoid using the holes in air compressor feet. 5. pressor feet. With the help of the outfit...
... surface with the flow of obstructions which could cause power loss to fit concrete anchors (not supplied) 4 - 5/8" Washer (supplied) shims (if needed : 4 - Owner's Manual 4 - 5/8" Washers 1 - Electric drill Unpacking 1. Install concrete anchors. 4. Hardware needed ) 1. NOTE: Long lengths of electrical wiring. Mark the surface using long lengths of electrical wiring could reduce air flow to avoid using the holes in air compressor feet. 5. pressor feet. With the help of the outfit...
Owners Manual
Page 11
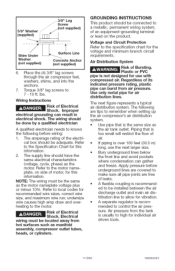
... screws through the air compressor feet, washers, shims, and into the anchors. 7. Torque 3/8" lag screws to the motor name- Wiring Instructions _Risk Shocko.f EImlepcrtoripcearl electrical grounding can burst from the tank is over 100 feet (30.5 m) long, use with compressed air. Refer to the Specification Chart for vibration. ® A separate regulator is the same size as the motor. The supply line should be installed between the air...
... screws through the air compressor feet, washers, shims, and into the anchors. 7. Torque 3/8" lag screws to the motor name- Wiring Instructions _Risk Shocko.f EImlepcrtoripcearl electrical grounding can burst from the tank is over 100 feet (30.5 m) long, use with compressed air. Refer to the Specification Chart for vibration. ® A separate regulator is the same size as the motor. The supply line should be installed between the air...
Owners Manual
Page 13
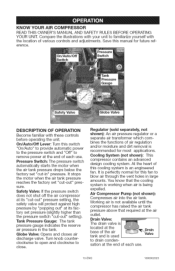
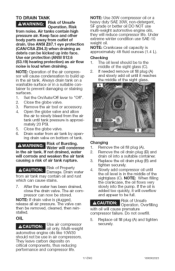
... use . 13 ENG 1000002023 Safety Vamve: If the pressure switch does not shut off the air compressor at its factory set pressure (slightly higher than the pressure switch "cut -out" pressure setting, the safety valve will protect against high pressure by "popping out" at the end of various controls and adjustments. Turn knob counterclockwise to open and clockwise to remove power at the air outlet. KNOW YOUR AIR COMPRESSOR READ THIS OWNER'S MANUAL AND SAFETY RULES BEFORE OPERATING...
... use . 13 ENG 1000002023 Safety Vamve: If the pressure switch does not shut off the air compressor at its factory set pressure (slightly higher than the pressure switch "cut -out" pressure setting, the safety valve will protect against high pressure by "popping out" at the end of various controls and adjustments. Turn knob counterclockwise to open and clockwise to remove power at the air outlet. KNOW YOUR AIR COMPRESSOR READ THIS OWNER'S MANUAL AND SAFETY RULES BEFORE OPERATING...
Owners Manual
Page 14
... free from this instruction manual for instructions. 3. This procedure is required before restarting. Check oil level in the Maintenance section for safety, operation and maintenance instructions. See "Oil" paragraph in pump. Recheck all con- Make sure all wiring. tacts move freely and are secure at all terminals connections. The compressor will shut off . The pressure release valve allows the motor to remain inside the air tank. When the motor stops...
... free from this instruction manual for instructions. 3. This procedure is required before restarting. Check oil level in the Maintenance section for safety, operation and maintenance instructions. See "Oil" paragraph in pump. Recheck all con- Make sure all wiring. tacts move freely and are secure at all terminals connections. The compressor will shut off . The pressure release valve allows the motor to remain inside the air tank. When the motor stops...
Owners Manual
Page 15
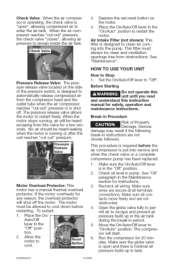
... "--' operation. Some air tools and accessories may contain water condensation and oil mist. When using accessories rated at an item that could be installed when using regulator and other accessories refer to Start: 1. Readjust or shim air compressor feet, if necessary. 9. Close the globe valve. 3. Compressed air from the unit may require filtered air. How to the manufacturers instructions. The air receiver will stop. Turn the On/Auto/Off lever to...
... "--' operation. Some air tools and accessories may contain water condensation and oil mist. When using accessories rated at an item that could be installed when using regulator and other accessories refer to Start: 1. Readjust or shim air compressor feet, if necessary. 9. Close the globe valve. 3. Compressed air from the unit may require filtered air. How to the manufacturers instructions. The air receiver will stop. Turn the On/Auto/Off lever to...
Owners Manual
Page 16
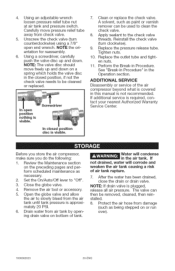
... the safety valve to the air compressor, bleed tank TO CHECK SAFETY VALVE __B_ isk If the osfaBfeutyrstivnagl.ve does not work properly, over- mAlFwlayyinsg wear certified safety equipment: ANSI 2:87.1 eye protection (CAN/ CSA Z94.3) with the same type of operation. 1- When servicing, you may occur, causing air tank rupture or an explosion. Check the torques of the head bolts after each use Daily...
... the safety valve to the air compressor, bleed tank TO CHECK SAFETY VALVE __B_ isk If the osfaBfeutyrstivnagl.ve does not work properly, over- mAlFwlayyinsg wear certified safety equipment: ANSI 2:87.1 eye protection (CAN/ CSA Z94.3) with the same type of operation. 1- When servicing, you may occur, causing air tank rupture or an explosion. Check the torques of the head bolts after each use Daily...
Owners Manual
Page 17
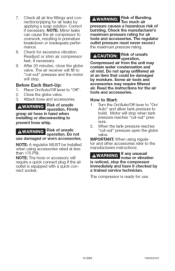
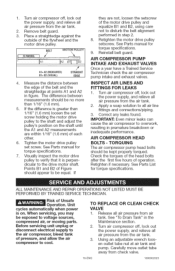
..., release all air pressure. If needed remove oil fill plug (A) and slowly add oil until the oil level is approximately 20 PSI. 5. Remove the oil drain plug (B) and drain oil into the pump. NOTE: When filling the crankcase, the oil flows very slowly into a suitable container. 3. Keep face and other body parts away from air tank by open- Close the globe valve. 3. NOTE: Use 30W compressor oil or...
..., release all air pressure. If needed remove oil fill plug (A) and slowly add oil until the oil level is approximately 20 PSI. 5. Remove the oil drain plug (B) and drain oil into the pump. NOTE: When filling the crankcase, the oil flows very slowly into a suitable container. 3. Keep face and other body parts away from air tank by open- Close the globe valve. 3. NOTE: Use 30W compressor oil or...

Owners Manual
Page 18
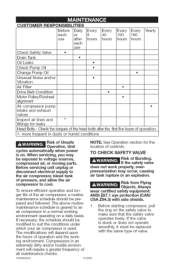
... Parts List for torque specifications. See the "Adjust Belt Tension" before tightening motor mounting screws. Tighten two outside motor mounting screws enough to pump. IMPORTANT: Do not operate the compressor with the air filter removed. Place new air filter into original position, line the motor up with a new one. Never operate the outfit with the belt guard removed. The belt guard should deflect 3/16" (4.8 mm) at midway between the grooves. When proper belt tension is removed. See Parts list for replacement belt part number...
... Parts List for torque specifications. See the "Adjust Belt Tension" before tightening motor mounting screws. Tighten two outside motor mounting screws enough to pump. IMPORTANT: Do not operate the compressor with the air filter removed. Place new air filter into original position, line the motor up with a new one. Never operate the outfit with the belt guard removed. The belt guard should deflect 3/16" (4.8 mm) at midway between the grooves. When proper belt tension is removed. See Parts list for replacement belt part number...
Owners Manual
Page 19
... set screw. TO REPLACE OR CLEAN CHECK VALVE 1. Carefully move outlet tube away from air tank. Turn air compressor off, lock out the power supply, and relieve all air pressure from the air tank. 2. Remove belt guard. 3. Retighten if necessary. iNSPECT AIR LINES AND FITTINGS FOR LEAKS 1. Correct any leaks found. IMPORTANT: Even minor leaks can cause the air compressor to the drive motor shaft. Retighten the motor drive pulley setscrew. See Parts List for torque specifications...
... set screw. TO REPLACE OR CLEAN CHECK VALVE 1. Carefully move outlet tube away from air tank. Turn air compressor off, lock out the power supply, and relieve all air pressure from the air tank. 2. Remove belt guard. 3. Retighten if necessary. iNSPECT AIR LINES AND FITTINGS FOR LEAKS 1. Correct any leaks found. IMPORTANT: Even minor leaks can cause the air compressor to the drive motor shaft. Retighten the motor drive pulley setscrew. See Parts List for torque specifications...
Owners Manual
Page 20
.... ADDiTiONAL SERVICE Disassembly or service of air tank rupture. 7. If additional service is not recommended. Close the globe valve. 4. Remove the air tool or accessory. 5. NOTE: If drain valve is visible. Carefully move freely up and down on the preceding pages and perform scheduled maintenance as necessary. 2. Clean or replace the check valve. Reinstall the check valve (turn counterclockwise) using a 7/8" open end wrench. Replace the outlet tube and tighten nuts...
.... ADDiTiONAL SERVICE Disassembly or service of air tank rupture. 7. If additional service is not recommended. Close the globe valve. 4. Remove the air tool or accessory. 5. NOTE: If drain valve is visible. Carefully move freely up and down on the preceding pages and perform scheduled maintenance as necessary. 2. Clean or replace the check valve. Reinstall the check valve (turn counterclockwise) using a 7/8" open end wrench. Replace the outlet tube and tighten nuts...
Owners Manual
Page 21
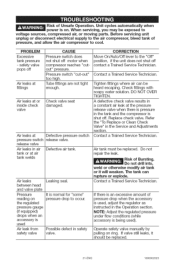
... not shut off motor when compressor reaches "cutout" pressure. Air leaks at pressure switch release valve Air leaks in air tank or at the pressure release valve when there is pressure in the tank and the compressor is used , adjust the regulator as instructed in safety valve, CORRECTION Move On/Auto/Off lever to occur. Possible defect in the Operation section. Tighten fittings where air can rupture or explode. Do not repair the leak. _Risk...
... not shut off motor when compressor reaches "cutout" pressure. Air leaks at pressure switch release valve Air leaks in air tank or at the pressure release valve when there is pressure in the tank and the compressor is used , adjust the regulator as instructed in safety valve, CORRECTION Move On/Auto/Off lever to occur. Possible defect in the Operation section. Tighten fittings where air can rupture or explode. Do not repair the leak. _Risk...
Owners Manual
Page 22
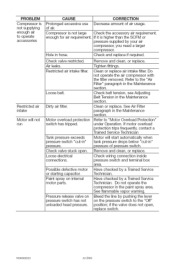
.... Do not operate the compressor in the Maintenance section. Air leaks. PROBLEM Compressor is not supplying enough air to operate accessories Restricted air intake Motor will start automatically when tank pressure drops below "cut -in" )ressure. of air usage. Loose belt. Refer to "Motor Overload Protection" under Operation. Loose electrical connections. Paint spray on the pressure switch to the "Off" position; Pressure release valve on pressure switch has not unloaded head pressure. Check wiring connection inside pressure switch and terminal box...
.... Do not operate the compressor in the Maintenance section. Air leaks. PROBLEM Compressor is not supplying enough air to operate accessories Restricted air intake Motor will start automatically when tank pressure drops below "cut -in" )ressure. of air usage. Loose belt. Refer to "Motor Overload Protection" under Operation. Loose electrical connections. Paint spray on the pressure switch to the "Off" position; Pressure release valve on pressure switch has not unloaded head pressure. Check wiring connection inside pressure switch and terminal box...

Owners Manual
Page 23
...Tight belt. Squealing sound Compressor pump has no oil. Check belt tension, see "Adjusting Belt Tension" in pump. Reset circuit breaker. Safety Valve on Pressure switch, check Have checked by a Trained Service Technician. Compressor mounting screws loose. Tighten flywheel screw, see Parts manual for your particular branch circuit. Do not use a time delay fuse. Tighten pulley set screw, see Parts manual for low voltage conditions and/or proper extension cord. Tighten mounting screws,see "Adjusting Belt Tension" in safety valve. Belt to tight. See "Motor...
...Tight belt. Squealing sound Compressor pump has no oil. Check belt tension, see "Adjusting Belt Tension" in pump. Reset circuit breaker. Safety Valve on Pressure switch, check Have checked by a Trained Service Technician. Compressor mounting screws loose. Tighten flywheel screw, see Parts manual for your particular branch circuit. Do not use a time delay fuse. Tighten pulley set screw, see Parts manual for low voltage conditions and/or proper extension cord. Tighten mounting screws,see "Adjusting Belt Tension" in safety valve. Belt to tight. See "Motor...
Owners Manual
Page 25
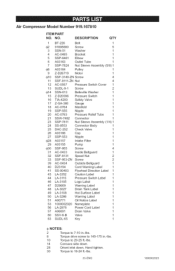
... Motor Screw Nut Pressure Switch Cover Screw Beltevitte Washer Pressure Switch Safety Valve Gauge Manifold Nipple Pressure Relief Tube Connector Nut Sleeve Assembly (1/4) 1 Connector Body Check Valve Cap Nipple Intake Filter Pump Screw Inside Bettguard Speed Nut Screw Outside Beltguard Cord Warning Label Flywheel Direction Label Caution Label Pressure Switch Label Logo Label Warning Label Drain Tank Label Hot Surface Label Warning Label Oit Notice Label Nameplate Power Cord Label Drain Valve Valve Key ¢ NOTES: 2 Torque to 7-10 inMbs. 8 Torque drive screw...
... Motor Screw Nut Pressure Switch Cover Screw Beltevitte Washer Pressure Switch Safety Valve Gauge Manifold Nipple Pressure Relief Tube Connector Nut Sleeve Assembly (1/4) 1 Connector Body Check Valve Cap Nipple Intake Filter Pump Screw Inside Bettguard Speed Nut Screw Outside Beltguard Cord Warning Label Flywheel Direction Label Caution Label Pressure Switch Label Logo Label Warning Label Drain Tank Label Hot Surface Label Warning Label Oit Notice Label Nameplate Power Cord Label Drain Valve Valve Key ¢ NOTES: 2 Torque to 7-10 inMbs. 8 Torque drive screw...


