

Operation Manual
Page 1
Operator's Manual [CRRFTSMRNq Belt Sander Double Insulated Model No. 315.117260 Save this manual for future reference. _, WARNING: To reduce the risk of injury, the user must read and understand the operator's manual before using this product. Customer Help Line: 1-800-932-3188 Sears, Roebuck and Co., 3333 Beverly Rd., Hoffman Estates, IL 60179 USA Visit the Craftsman Web page: www.sears.com/craftsman 983000-260 9-03 COUS
Operator's Manual [CRRFTSMRNq Belt Sander Double Insulated Model No. 315.117260 Save this manual for future reference. _, WARNING: To reduce the risk of injury, the user must read and understand the operator's manual before using this product. Customer Help Line: 1-800-932-3188 Sears, Roebuck and Co., 3333 Beverly Rd., Hoffman Estates, IL 60179 USA Visit the Craftsman Web page: www.sears.com/craftsman 983000-260 9-03 COUS

Operation Manual
Page 2
Sears, Roebuck and Co., Dept. 817 WA, Hoffman Estates, IL 60179 Your belt sander has many features for making it , free of purchase. Safety, performance, and dependability have been given top priority in the design of this product until ... you use this product properly and only as intended, you will repair it easy to maintain and operate. ,_ WARNING: Do not attempt to use this belt sander making the use over eyeglasses or standard safety glasses with side shields. Your safety is marked to the nearestsearsstore in severe eye damage. We recommend...
Sears, Roebuck and Co., Dept. 817 WA, Hoffman Estates, IL 60179 Your belt sander has many features for making it , free of purchase. Safety, performance, and dependability have been given top priority in the design of this product until ... you use this product properly and only as intended, you will repair it easy to maintain and operate. ,_ WARNING: Do not attempt to use this belt sander making the use over eyeglasses or standard safety glasses with side shields. Your safety is marked to the nearestsearsstore in severe eye damage. We recommend...

Operation Manual
Page 6
... least 14 is recommended for use of cord is designated with your nearest Sears retaisltore. 6 ELECTRICAL CONNECTION The belt sander has a precision built electric motor. If your nearest authorized service center for repair. To keep the loss to...tool on lumber, tools, or other obstructions. _IL use.WAdRaNmINagGeC:dffh, ecrekpelaxctension cimormdsetdhieamtely.beefaocrehNreve use only identical Craftsman replacement parts. _, intendedWARpNrToIhNteeGct:dothuebleutsoeinrsufrloamtedshsoycsktemresuislting from the internal metal motor components with this tool. Touching the damaged ...
... least 14 is recommended for use of cord is designated with your nearest Sears retaisltore. 6 ELECTRICAL CONNECTION The belt sander has a precision built electric motor. If your nearest authorized service center for repair. To keep the loss to...tool on lumber, tools, or other obstructions. _IL use.WAdRaNmINagGeC:dffh, ecrekpelaxctension cimormdsetdhieamtely.beefaocrehNreve use only identical Craftsman replacement parts. _, intendedWARpNrToIhNteeGct:dothuebleutsoeinrsufrloamtedshsoycsktemresuislting from the internal metal motor components with this tool. Touching the damaged ...
Operation Manual
Page 7
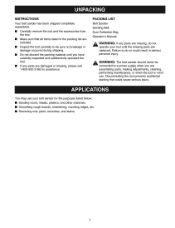
...in the packing list are included. • Inspect the tool carefully to be connected to do not operate your belt sander for assistance. INSTRUCTIONS Your belt sander has been shipped completely assembled. • Carefully remove the tool and the accessories from the box. • ...breakage or damage occurred during shipping. • Do not discard the packing material until the missing parts are replaced. PACKING LIST Belt Sander Sanding Belt Dust Collection Bag Operator's Manual ,_ WARNING: If any parts are assembling parts, making adjustments, cleaning, performing maintenance, or ...
...in the packing list are included. • Inspect the tool carefully to be connected to do not operate your belt sander for assistance. INSTRUCTIONS Your belt sander has been shipped completely assembled. • Carefully remove the tool and the accessories from the box. • ...breakage or damage occurred during shipping. • Do not discard the packing material until the missing parts are replaced. PACKING LIST Belt Sander Sanding Belt Dust Collection Bag Operator's Manual ,_ WARNING: If any parts are assembling parts, making adjustments, cleaning, performing maintenance, or ...

Operation Manual
Page 8
...with the following features. LOCK-ON The lock-on allows you to easily adjust the belt tracking. DUST COLLECTION BAG The dust collection bag attaches to the sander and keeps dust to lock the trigger switch in different positions and at different angles. ...periods of a second, can result in quick and easy belt changes. Careless actions, for easy handling. TRACKING KNOB The tracking knob allows you to a minimum. Your new belt sander is designed for comfort and ease of the sander provides for even a fraction of time. Beforeusingthe beltsander,familiarizeyourselfwithall...
...with the following features. LOCK-ON The lock-on allows you to easily adjust the belt tracking. DUST COLLECTION BAG The dust collection bag attaches to the sander and keeps dust to lock the trigger switch in different positions and at different angles. ...periods of a second, can result in quick and easy belt changes. Careless actions, for easy handling. TRACKING KNOB The tracking knob allows you to a minimum. Your new belt sander is designed for comfort and ease of the sander provides for even a fraction of time. Beforeusingthe beltsander,familiarizeyourselfwithall...

Operation Manual
Page 10
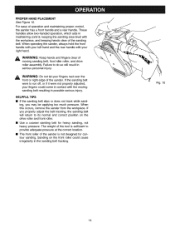
...grit and sand until the surface is uniform. The condition of the sander). Install the sanding belt. A CAUTION: If the sanding belt is not a bidirectional belt, ensure that the arrow inside the belt is uniform. In general, when sanding, coarse grit removes the ...rough, start with the cord on the left by the coarser grit. Finally, use medium grit to install or change sanding belts. • Unplug the sander. • Raise the tension release lever. TENSION RELEASELEVER TENSIONRELEASELEVER (IN RELEASEDPOSITION) Fig. 3 INSTALLUNIDIRECTIONALBELTSIN THE DIRECTIONOFTHE ROTATION \ ...
...grit and sand until the surface is uniform. The condition of the sander). Install the sanding belt. A CAUTION: If the sanding belt is not a bidirectional belt, ensure that the arrow inside the belt is uniform. In general, when sanding, coarse grit removes the ...rough, start with the cord on the left by the coarser grit. Finally, use medium grit to install or change sanding belts. • Unplug the sander. • Raise the tension release lever. TENSION RELEASELEVER TENSIONRELEASELEVER (IN RELEASEDPOSITION) Fig. 3 INSTALLUNIDIRECTIONALBELTSIN THE DIRECTIONOFTHE ROTATION \ ...

Operation Manual
Page 11
... foreign object when you regularly adjust the sanding belt tracking. When you install a new sanding belt, you are making belt tracking adjustments. The sanding belt should be even with a moving sanding belt could result in accidental starting of the sander. When correctly adjusted, the outer edge of ...parts. Note: Turn the tracking knob until you may need to adjust the sanding belt tracking several times until the belt stabilizes. ,a, WARNING: Keep hands and fingers away from the sander causing injury. If this is secure, i.e., it is greatly increased if you are ...
... foreign object when you regularly adjust the sanding belt tracking. When you install a new sanding belt, you are making belt tracking adjustments. The sanding belt should be even with a moving sanding belt could result in accidental starting of the sander. When correctly adjusted, the outer edge of ...parts. Note: Turn the tracking knob until you may need to adjust the sanding belt tracking several times until the belt stabilizes. ,a, WARNING: Keep hands and fingers away from the sander causing injury. If this is secure, i.e., it is greatly increased if you are ...

Operation Manual
Page 13
... one place will result in the following: • Uneven work • Clogged sanding belts • Premature sanding belt wear • Possible motor burnout • Irregular sanding belt tracking ,_ WARNING: Before connecting the sander to a power supply, make sure it from the power supply, disengage the lock-on...let the motor reach its maximum speed before placing the sander on the sanding belt. If you have the lock-on feature engaged during use and the sander is not in accidental starting of control leading to operate the sander. • Secure the work surface with both hands...
... one place will result in the following: • Uneven work • Clogged sanding belts • Premature sanding belt wear • Possible motor burnout • Irregular sanding belt tracking ,_ WARNING: Before connecting the sander to a power supply, make sure it from the power supply, disengage the lock-on...let the motor reach its maximum speed before placing the sander on the sanding belt. If you have the lock-on feature engaged during use and the sander is not in accidental starting of control leading to operate the sander. • Secure the work surface with both hands...
Operation Manual
Page 14
These handles allow two-handed operation, which aids in possible serious injury. HELPFUL TIPS • If the sanding belt slips or does not track while sand- When operating the sander, always hold the front handle with your left hand and the rear handle with your right hand. ,1_ WARNING: ... rear handle. When this occurs, remove the sander from the workpiece. Fig. 10 14 The weight of the sander is sufficient to its normal and correct position on the front roller could come in the sanding belt tracking. For ease of the sanding belt. If you may be applying too much pressure...
These handles allow two-handed operation, which aids in possible serious injury. HELPFUL TIPS • If the sanding belt slips or does not track while sand- When operating the sander, always hold the front handle with your left hand and the rear handle with your right hand. ,1_ WARNING: ... rear handle. When this occurs, remove the sander from the workpiece. Fig. 10 14 The weight of the sander is sufficient to its normal and correct position on the front roller could come in the sanding belt tracking. For ease of the sanding belt. If you may be applying too much pressure...

Operation Manual
Page 15
... highly abrasive to damage from various types of commercial solvents and may create a hazard or cause product damage. ,_ WARNING: The belt sander should be repaired or replaced by the customer. Use clean cloths to do not recommend using solvents when cleaning plastic parts. GENERAL Only... when blowing dust. ,_ WARNING: When servicing, use . Consequently, we do so could cause serious injury. come in use only identical Craftsman replacement parts. All other part may be connected to a power supply when you do work on fiberglass material, wallboard, spackling compounds, or...
... highly abrasive to damage from various types of commercial solvents and may create a hazard or cause product damage. ,_ WARNING: The belt sander should be repaired or replaced by the customer. Use clean cloths to do not recommend using solvents when cleaning plastic parts. GENERAL Only... when blowing dust. ,_ WARNING: When servicing, use . Consequently, we do so could cause serious injury. come in use only identical Craftsman replacement parts. All other part may be connected to a power supply when you do work on fiberglass material, wallboard, spackling compounds, or...

Operation Manual
Page 16
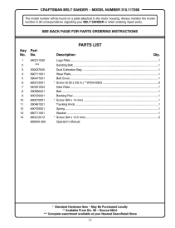
To avoid the possibility of the double insulated system. -- MODEL NUMBER 315.117260 -- CRAFTSMAN BELT SANDER - Contact your nearest Sears repair center. SEE NOTE 8 5 10 \ 14 4 3 9 Note: The assembly shown represents an important part of alteration or damage to the system, service should be performed by your nearest Sears retail store for service center information. 16
To avoid the possibility of the double insulated system. -- MODEL NUMBER 315.117260 -- CRAFTSMAN BELT SANDER - Contact your nearest Sears repair center. SEE NOTE 8 5 10 \ 14 4 3 9 Note: The assembly shown represents an important part of alteration or damage to the system, service should be performed by your nearest Sears retail store for service center information. 16
Operation Manual
Page 17
... ... 1 Washer ... 1 * Screw (M4 x 14.5 mm 2 Operator's Manual * Standard Hardware Item - May Be Purchased Locally ** Available From Div. 98 - Source 980.0 *** Complete assortment available at your BELT SANDER or when ordering repair parts. SEE BACK PAGE FOR PARTS ORDERING INSTRUCTIONS Key No. 1 2 3 4 5 6 7 8 9 10 11 12 13 14 Part No. 940211009 *** 300027035 690711001 590477001... PARTS LIST Description Qty. MODEL NUMBER 315.117260 -- Always mention the model ! I The model number wilt be found on a plate attached to the motor housing. CRAFTSMAN BELT SANDER -
... ... 1 Washer ... 1 * Screw (M4 x 14.5 mm 2 Operator's Manual * Standard Hardware Item - May Be Purchased Locally ** Available From Div. 98 - Source 980.0 *** Complete assortment available at your BELT SANDER or when ordering repair parts. SEE BACK PAGE FOR PARTS ORDERING INSTRUCTIONS Key No. 1 2 3 4 5 6 7 8 9 10 11 12 13 14 Part No. 940211009 *** 300027035 690711001 590477001... PARTS LIST Description Qty. MODEL NUMBER 315.117260 -- Always mention the model ! I The model number wilt be found on a plate attached to the motor housing. CRAFTSMAN BELT SANDER -


