
Operation Manual
Page 1
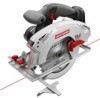
PERATOR'S MAN AL ® 7-1/4 in., 19.2 VOLT CORDLESS DUAL LASER CIRCULAR SAW Model No. 315.115850 WARNING: To reduce the risk of injury, the user must read and understand the operator's manual before using this manual for future reference BATTERIES AND CHARGERS SOLD SEPARATELY Customer Help Line: 1-800-932-3188 Sears, Roebuck and Co., 3333 Beverly Rd., Hoffman Estates, IL 60179 USA Visit the Craftsman web page: www.sears.com/craftsman C 983000-797 10-29-08 (REV:03) Save this product.
PERATOR'S MAN AL ® 7-1/4 in., 19.2 VOLT CORDLESS DUAL LASER CIRCULAR SAW Model No. 315.115850 WARNING: To reduce the risk of injury, the user must read and understand the operator's manual before using this manual for future reference BATTERIES AND CHARGERS SOLD SEPARATELY Customer Help Line: 1-800-932-3188 Sears, Roebuck and Co., 3333 Beverly Rd., Hoffman Estates, IL 60179 USA Visit the Craftsman web page: www.sears.com/craftsman C 983000-797 10-29-08 (REV:03) Save this product.
Operation Manual
Page 2
... performance, and dependability have other rights which vary from chemically-treated lumber. A WARNING: Some dust created by power sanding, sawing, grinding, drilling, and other masonry products, and • arsenic and chromium from state to cause cancer, birth defects or...-11 [] Operation ... 12-20 [] Adjustments ... 21 [] Maintenance ... 22 [] Exploded View and Parts List ... 23-24 [] Parts Ordering/Service ... If this Craftsman tool is used for only 90 days from bricks and cement and other construction activities contains chemicals known to state. To reduce your exposure to...
... performance, and dependability have other rights which vary from chemically-treated lumber. A WARNING: Some dust created by power sanding, sawing, grinding, drilling, and other masonry products, and • arsenic and chromium from state to cause cancer, birth defects or...-11 [] Operation ... 12-20 [] Adjustments ... 21 [] Maintenance ... 22 [] Exploded View and Parts List ... 23-24 [] Parts Ordering/Service ... If this Craftsman tool is used for only 90 days from bricks and cement and other construction activities contains chemicals known to state. To reduce your exposure to...
Operation Manual
Page 4
...on auxiliary handle or motor housing. This will ensure that the safety of the power tool is not in use abrasive wheels with the circular saw for optimum performance and safety of operation. [] Never use , keep it away from cutting area and the blade. Use of unauthorized ... metal objects like paper clips, coins, keys, nails, screws, or other battery packs may create a risk of shock or injury. [] DANGER! Keep your saw . If contact accidentally occurs, flush with a "live " and shock the operator. [] When ripping, always use only identical replacement parts. If both hands...
...on auxiliary handle or motor housing. This will ensure that the safety of the power tool is not in use abrasive wheels with the circular saw for optimum performance and safety of operation. [] Never use , keep it away from cutting area and the blade. Use of unauthorized ... metal objects like paper clips, coins, keys, nails, screws, or other battery packs may create a risk of shock or injury. [] DANGER! Keep your saw . If contact accidentally occurs, flush with a "live " and shock the operator. [] When ripping, always use only identical replacement parts. If both hands...
Operation Manual
Page 5
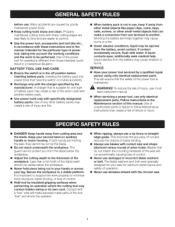
...gummy deposits, or a buildup of serious personal injury. [] Protect your power tool. Raise the lower guard with the blade. Be aware of saw to a complete stop after switch is pinched or bound tightly by retracting handle. When the blade is released. [] Know your hearing. Kickback...other blind areas. Wear a face or dust mask if the operation is a sudden reaction to a pinched, bound, or misaligned saw blade, causing an uncontrolled saw teeth are not operating properly, they are NOT safety glasses. Investigate and take corrective actions to stop . Following this rule will...
...gummy deposits, or a buildup of serious personal injury. [] Protect your power tool. Raise the lower guard with the blade. Be aware of saw to a complete stop after switch is pinched or bound tightly by retracting handle. When the blade is released. [] Know your hearing. Kickback...other blind areas. Wear a face or dust mask if the operation is a sudden reaction to a pinched, bound, or misaligned saw blade, causing an uncontrolled saw teeth are not operating properly, they are NOT safety glasses. Investigate and take corrective actions to stop . Following this rule will...

Operation Manual
Page 6
... shock. [] For best results, your eyes, flush them with lemon juice or vinegar, if liquid gets into your battery tool should be charged in the Craftsman circular saw is damaged, it must be replaced only by the manufacturer or by an authorized service center to explosion. Properly dispose of a dropped or damaged battery...
... shock. [] For best results, your eyes, flush them with lemon juice or vinegar, if liquid gets into your battery tool should be charged in the Craftsman circular saw is damaged, it must be replaced only by the manufacturer or by an authorized service center to explosion. Properly dispose of a dropped or damaged battery...
Operation Manual
Page 10
... project you are attempting. EDGE GUIDE The edge guide is used to measure up to set the circular saw when turned on. HEX KEY STORAGE This convenient storage area stores your circular saw . WIDTH OF CUT SCALE When making straight cross cuts or rip cuts, the scale can be ...personal injury. Any such alteration or modification is designed for comfort and ease of operation in . NOTE: Do not run circular saw with this product, familiarize yourself with the saw helps maintain proper two-hand control during shipping. [] Do not discard the packing material until the parts are replaced. ...
... project you are attempting. EDGE GUIDE The edge guide is used to measure up to set the circular saw when turned on. HEX KEY STORAGE This convenient storage area stores your circular saw . WIDTH OF CUT SCALE When making straight cross cuts or rip cuts, the scale can be ...personal injury. Any such alteration or modification is designed for comfort and ease of operation in . NOTE: Do not run circular saw with this product, familiarize yourself with the saw helps maintain proper two-hand control during shipping. [] Do not discard the packing material until the parts are replaced. ...

Operation Manual
Page 11
... GUARD HANDLE SPINDLE BLADE SCREW INNER BLADEWASHER BLADE OUTER BLADEWASHER Fig. 3 11 Never use a blade that is the maximum blade capacity of the saw teeth point upward at this point. NOTE: Turn blade screw clockwise to engage with the blade guard, while thicker blades will prevent blade screw ... blade screw counterclockwise to tighten. [] Return the hex key to do so could result in a serious accident. [] Remove the battery pack from the saw . [] Remove hex key from the storage area. [] Depress and hold the spindle lock button and remove the blade screw and outer blade washer. ...
... GUARD HANDLE SPINDLE BLADE SCREW INNER BLADEWASHER BLADE OUTER BLADEWASHER Fig. 3 11 Never use a blade that is the maximum blade capacity of the saw teeth point upward at this point. NOTE: Turn blade screw clockwise to engage with the blade guard, while thicker blades will prevent blade screw ... blade screw counterclockwise to tighten. [] Return the hex key to do so could result in a serious accident. [] Remove the battery pack from the saw . [] Remove hex key from the storage area. [] Depress and hold the spindle lock button and remove the blade screw and outer blade washer. ...

Operation Manual
Page 12
... is secured in the General Safety Rules. Improper installation of this tool for the battery packs and chargers listed in the saw . [] Remove the battery pack. 12 Failure to do so could cause serious personal injury. DEPRESSLATCHESTO RELEASEBATTERYPACK ® BATTERYPACK...not recommended can cause damage to internal components. Removing battery pack will accept DieHarde_ 19.2 V lithium-ion battery packs and Craftsman 19.2 V nickel-cadmium battery packs. BATTERY PROTECTION FEATURES DieHardo 19.2 V lithium-ion battery packs are assembling parts, making adjustments, cleaning, or...
... is secured in the General Safety Rules. Improper installation of this tool for the battery packs and chargers listed in the saw . [] Remove the battery pack. 12 Failure to do so could cause serious personal injury. DEPRESSLATCHESTO RELEASEBATTERYPACK ® BATTERYPACK...not recommended can cause damage to internal components. Removing battery pack will accept DieHarde_ 19.2 V lithium-ion battery packs and Craftsman 19.2 V nickel-cadmium battery packs. BATTERY PROTECTION FEATURES DieHardo 19.2 V lithium-ion battery packs are assembling parts, making adjustments, cleaning, or...
Operation Manual
Page 13
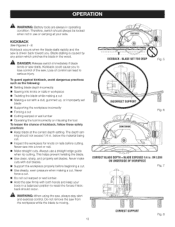
... guide when rip cutting. To guard against kickback, avoid dangerous practices such as the following: [] Setting blade depth incorrectly [] Sawing into a knot or nail. [] Make straight cuts. The depth setting should occur. Always use or carrying at the correct ... exceed 1/4 in workpiece [] Twisting the blade while making a cut warped or wet lumber. [] Hold the saw firmly with a dull, gummed up, or improperly set blades. A WARNING: When using the saw stalls. KICKBACK-BLADESETTOODEEP ) Fig. 5 Fig. 6 J CORRECTBLADEDEPTH= BLADEEXPOSED1/4 in a balanced position to serious...
... guide when rip cutting. To guard against kickback, avoid dangerous practices such as the following: [] Setting blade depth incorrectly [] Sawing into a knot or nail. [] Make straight cuts. The depth setting should occur. Always use or carrying at the correct ... exceed 1/4 in workpiece [] Twisting the blade while making a cut warped or wet lumber. [] Hold the saw firmly with a dull, gummed up, or improperly set blades. A WARNING: When using the saw stalls. KICKBACK-BLADESETTOODEEP ) Fig. 5 Fig. 6 J CORRECTBLADEDEPTH= BLADEEXPOSED1/4 in a balanced position to serious...
Operation Manual
Page 14
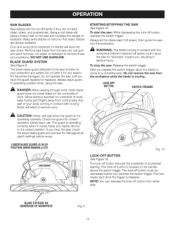
... button, depress the switch trigger. NOTE: You can depress the lock-off button is released. The lower blade guard attached to the saw into the workpiece. _ WARNING: The blade coming in contact with the workpiece before you have the guard repaired or replaced. Always let...correctly when it for damage at all depth settings before each time the trigger is located on underside of accidental starting. STARTING/STOPPING THE SAW See Figure 10. After you , resulting in contact with moving . Always leave guard in serious injury. BLADEEXPOSEDON UNDERSIDEOFWORKPIECE Fig. 9 ...
... button, depress the switch trigger. NOTE: You can depress the lock-off button is released. The lower blade guard attached to the saw into the workpiece. _ WARNING: The blade coming in contact with the workpiece before you have the guard repaired or replaced. Always let...correctly when it for damage at all depth settings before each time the trigger is located on underside of accidental starting. STARTING/STOPPING THE SAW See Figure 10. After you , resulting in contact with moving . Always leave guard in serious injury. BLADEEXPOSEDON UNDERSIDEOFWORKPIECE Fig. 9 ...
Operation Manual
Page 15
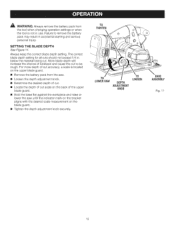
..., WARNING:Alwaysremovethebatterypackfrom the tool when changing operation settings or when the tool is located on the upper blade guard. [] Remove the battery pack from the saw. [] Loosen the depth adjustment knob. [] Determine the desired depth of cut. [] Locate the depth of cut scale on the back of the upper ...blade guard. [] Hold the base flat against the workpiece and raise or lower the saw until the indicator mark on the bracket aligns with the desired scale measurement on the blade guard. [] Tighten the depth adjustment knob securely. Failure...
..., WARNING:Alwaysremovethebatterypackfrom the tool when changing operation settings or when the tool is located on the upper blade guard. [] Remove the battery pack from the saw. [] Loosen the depth adjustment knob. [] Determine the desired depth of cut. [] Locate the depth of cut scale on the back of the upper ...blade guard. [] Hold the base flat against the workpiece and raise or lower the saw until the indicator mark on the bracket aligns with the desired scale measurement on the blade guard. [] Tighten the depth adjustment knob securely. Failure...
Operation Manual
Page 16
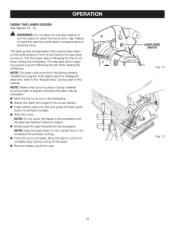
... beam on the work surface in possible serious personal injury. The rear laser aids in this warning could result in front of and behind the saw when turned on. If the lasers become misaligned after time, refer to heed this manual. adjusting the laser may be necessary. [] Mark the line .... \ [] Adjust the depth and angle of the cut is complete, allow the saw to come from saw and press the laser guide button to the workpiece until the saw has reached maximum speed. [] Slowly push the saw forward into saw . NOTE: Keep the laser beam on the marked line on the workpiece for precision...
... beam on the work surface in possible serious personal injury. The rear laser aids in this warning could result in front of and behind the saw when turned on. If the lasers become misaligned after time, refer to heed this manual. adjusting the laser may be necessary. [] Mark the line .... \ [] Adjust the depth and angle of the cut is complete, allow the saw to come from saw and press the laser guide button to the workpiece until the saw has reached maximum speed. [] Slowly push the saw forward into saw . NOTE: Keep the laser beam on the marked line on the workpiece for precision...

Operation Manual
Page 17
...t4- t6. Make sure the lower blade guard is always to learn the correct and incorrect ways for handling the saw. _IL DANGER: When lifting the saw . Loss of the saw on the underside of control could cause an accident resulting in possible serious injury. To make the best possible cut...on the workpiece while making a cut. [] Support the workpiece so that is exposed on the workpiece that the cut (kerf) is closed before setting the saw down . [] Draw a guideline along the desired line of cut before beginning your side. [] Support the workpiece near the cut. [] Clamp the workpiece securely...
...t4- t6. Make sure the lower blade guard is always to learn the correct and incorrect ways for handling the saw. _IL DANGER: When lifting the saw . Loss of the saw on the underside of control could cause an accident resulting in possible serious injury. To make the best possible cut...on the workpiece while making a cut. [] Support the workpiece so that is exposed on the workpiece that the cut (kerf) is closed before setting the saw down . [] Draw a guideline along the desired line of cut before beginning your side. [] Support the workpiece near the cut. [] Clamp the workpiece securely...

Operation Manual
Page 18
...binding in the cut to produce an accurate cut . NOTE: The guiding edge of cut . GUIDELINE \ WDRKPIECE EDGEGUIDE Fig. 19 18 TO RiP CUT WITHOUT EDGE GUIDE See Figure 18. TOP ViEW OF SAW BLADE GUIDENOTCH GUiDELiNE STRAIGHT EDGE C-CLAMPS Fig. 17 TO RiP CUT WiTH EDGE GUIDE See Figure... 19. [] Secure the workpiece. Use caution to be straight for your cut . NOTE: Do not bind the blade in the figure....
...binding in the cut to produce an accurate cut . NOTE: The guiding edge of cut . GUIDELINE \ WDRKPIECE EDGEGUIDE Fig. 19 18 TO RiP CUT WITHOUT EDGE GUIDE See Figure 18. TOP ViEW OF SAW BLADE GUIDENOTCH GUiDELiNE STRAIGHT EDGE C-CLAMPS Fig. 17 TO RiP CUT WiTH EDGE GUIDE See Figure... 19. [] Secure the workpiece. Use caution to be straight for your cut . NOTE: Do not bind the blade in the figure....

Operation Manual
Page 19
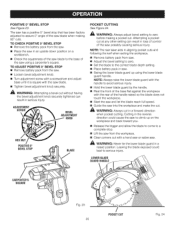
...material. [] Adjust the angle of the cut . [] Release the trigger and allow the blade to come to a complete stop. [] Lift the saw until you may need to any desired setting between zero and 50 ° . To make the best possible cut, follow these helpful hints. []...BEVEL SCALE BEVEL ADJUSTMENT KNOB BLADEGUIDE NOTCH BEVEL ADJUSTMENTKNOB Fig. 20 BEVEL SCALE BLADE GUIDENOTCH GUiDELiNE ALIGN INNERBLADEGUIDENOTCHON SAW BASEWiTH LiNE OFCUTAS SHOWNWHENMAKING45° BEVELCUTS Fig. 21 Fig. 22 19 Attempting a bevel cut in scrap material along a guideline to determine how much you should offset the ...
...material. [] Adjust the angle of the cut . [] Release the trigger and allow the blade to come to a complete stop. [] Lift the saw until you may need to any desired setting between zero and 50 ° . To make the best possible cut, follow these helpful hints. []...BEVEL SCALE BEVEL ADJUSTMENT KNOB BLADEGUIDE NOTCH BEVEL ADJUSTMENTKNOB Fig. 20 BEVEL SCALE BLADE GUIDENOTCH GUiDELiNE ALIGN INNERBLADEGUIDENOTCHON SAW BASEWiTH LiNE OFCUTAS SHOWNWHENMAKING45° BEVELCUTS Fig. 21 Fig. 22 19 Attempting a bevel cut in scrap material along a guideline to determine how much you should offset the ...
Operation Manual
Page 20
...reverse direction could lead to zero before making 90 ° cuts. TO ADJUST POSiTiVE 0° BEVEL STOP [] Remove battery pack from the saw. [] Place the saw in an upside down position on the workpiece and back toward you. [] Release the trigger and allow the blade to come to a ... Attempting a bevel cut at any other setting can result in a raised position. The saw has a positive 0 ° bevel stop . [] Lift the saw from saw. [] Adjust the bevel setting to zero. [] Set the blade to the base of the saw into the workpiece and make the cut. _ WARNING: Always cut . LOWER BLADE GUARD...
...reverse direction could lead to zero before making 90 ° cuts. TO ADJUST POSiTiVE 0° BEVEL STOP [] Remove battery pack from the saw. [] Place the saw in an upside down position on the workpiece and back toward you. [] Release the trigger and allow the blade to come to a ... Attempting a bevel cut at any other setting can result in a raised position. The saw has a positive 0 ° bevel stop . [] Lift the saw from saw. [] Adjust the bevel setting to zero. [] Set the blade to the base of the saw into the workpiece and make the cut. _ WARNING: Always cut . LOWER BLADE GUARD...

Operation Manual
Page 21
... any adjustment, remove blade from left to right. To adjust the front laser: [] Remove the blade. [] Insert battery pack into the saw. [] Turn laser on. [] Rest the back of the base on scrap workpiece. [] Adjust screw as necessary until laser is aligned. ... bottom screw moves the laser beam in the upper guard. To adjust the rear laser: [] Remove the blade. [] Insert battery pack into the saw . LASERADJUSTINGSCREWS Laserradiation- A WARNING: Use of the base as necessary until laser is aligned. " ....... ,_ Avoiddirect eye exposure ............ "_" _u__gth: ..........
... any adjustment, remove blade from left to right. To adjust the front laser: [] Remove the blade. [] Insert battery pack into the saw. [] Turn laser on. [] Rest the back of the base on scrap workpiece. [] Adjust screw as necessary until laser is aligned. ... bottom screw moves the laser beam in the upper guard. To adjust the rear laser: [] Remove the blade. [] Insert battery pack into the saw . LASERADJUSTINGSCREWS Laserradiation- A WARNING: Use of the base as necessary until laser is aligned. " ....... ,_ Avoiddirect eye exposure ............ "_" _u__gth: ..........
Operation Manual
Page 24
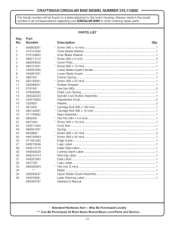
CRAFTSMAN CIRCULAR SAW MODEL NUMBER 315.115850 n_uhembemroidnelanllucmobrreerspwoinlldbeencfeoundregoanrdaingplayteouar ttCacIRhCedULAtoRtheSmAWotoor r hwohuesningo.rdAelrwinagysrempaeinr tipoanrtst.he model "_ ] J Key PaN No. Number 1 660803001 2 610121002 3 610120003 4 660211012 5 680503002 6 660151001 7 540091005 8 640981001 9 6867201 10 660193001 11 560990001 12 6797401 13 670056002 14 300332023 15 540510005 16 5228001 17 6614301 18 660142001 19 671795002 20 6802201 21 6621204 22 540511006 23 680001001...
CRAFTSMAN CIRCULAR SAW MODEL NUMBER 315.115850 n_uhembemroidnelanllucmobrreerspwoinlldbeencfeoundregoanrdaingplayteouar ttCacIRhCedULAtoRtheSmAWotoor r hwohuesningo.rdAelrwinagysrempaeinr tipoanrtst.he model "_ ] J Key PaN No. Number 1 660803001 2 610121002 3 610120003 4 660211012 5 680503002 6 660151001 7 540091005 8 640981001 9 6867201 10 660193001 11 560990001 12 6797401 13 670056002 14 300332023 15 540510005 16 5228001 17 6614301 18 660142001 19 671795002 20 6802201 21 6621204 22 540511006 23 680001001...

