Option Guide
Page 4
... 2000 3-1 Assigning Permissions for the Service Account 3-3 Configuring the Backup Agent 3-3 The BrightStor ARCserve Backup Browser 3-5 Selecting Exchange Objects in the BrightStor ARCserve Backup Browser 3-6 Backing Up 3-7 Database Backup Strategies 3-8 Backup Options 3-10 Files Backed Up for Each Option 3-11 Backing Up an Exchange Database, Mailboxes, or Individual Folders 3-11 Restoring 3-14 Restore Options 3-15 Restoring an Exchange Database...
... 2000 3-1 Assigning Permissions for the Service Account 3-3 Configuring the Backup Agent 3-3 The BrightStor ARCserve Backup Browser 3-5 Selecting Exchange Objects in the BrightStor ARCserve Backup Browser 3-6 Backing Up 3-7 Database Backup Strategies 3-8 Backup Options 3-10 Files Backed Up for Each Option 3-11 Backing Up an Exchange Database, Mailboxes, or Individual Folders 3-11 Restoring 3-14 Restore Options 3-15 Restoring an Exchange Database...
Option Guide
Page 12
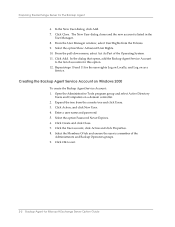
... for Microsof t Exchange Server Option Guide Click Add. Open the Administrative Tools program group and select Active Directory Users and Computers on Windows 2000 To create the Backup Agent Service Account: 1. Enter a user name and password. 5. Click Create and click Close. 7. In the New... the option Show Advanced User Rights. 10. Repeat steps 10 and 11 for the Backup Agent 6. Click Close. Click OK to the list of the Operating System. 11. Expand the tree from the Policies. 9. Creating the Backup Agent Service Account on a domain controller. 2. Click Action, and click...
... for Microsof t Exchange Server Option Guide Click Add. Open the Administrative Tools program group and select Active Directory Users and Computers on Windows 2000 To create the Backup Agent Service Account: 1. Enter a user name and password. 5. Click Create and click Close. 7. In the New... the option Show Advanced User Rights. 10. Repeat steps 10 and 11 for the Backup Agent 6. Click Close. Click OK to the list of the Operating System. 11. Expand the tree from the Policies. 9. Creating the Backup Agent Service Account on a domain controller. 2. Click Action, and click...

Option Guide
Page 21
...the Individual Mailboxes or Public Folders and select the items that you want to back up . Using the Backup Agent on Exchange Version 5.5 2-11 To back up an Exchange database, in the Backup Manager Browser, click Microsoft Exchange Server Brick Level. To back up a mailbox or folder, in the... Backup Manager, select the database objects you want to back up . Expand either the Directory or Information Store...
...the Individual Mailboxes or Public Folders and select the items that you want to back up . Using the Backup Agent on Exchange Version 5.5 2-11 To back up an Exchange database, in the Backup Manager Browser, click Microsoft Exchange Server Brick Level. To back up a mailbox or folder, in the... Backup Manager, select the database objects you want to back up . Expand either the Directory or Information Store...
Option Guide
Page 26
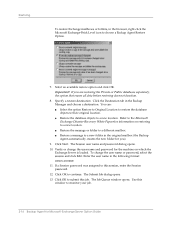
...and click OK. Important! Click Start. Specify a restore destination. Click the Destination tab in the following format: DOMAIN\USERNAME 11. Click OK to monitor your job. 2-16 Backup Agent for Microsof t Exchange Server Option Guide Use this window to continue. If you ). 9. Enter the user name in ... mailbox. ■ Restore a message to a new folder in the browser, right-click the Microsoft Exchange-Brick Level icon to choose a Backup Agent Restore Option. 7. Refer to a new location. Restoring To restore Exchange mailboxes or folders, in the original mailbox (the...
...and click OK. Important! Click Start. Specify a restore destination. Click the Destination tab in the following format: DOMAIN\USERNAME 11. Click OK to monitor your job. 2-16 Backup Agent for Microsof t Exchange Server Option Guide Use this window to continue. If you ). 9. Enter the user name in ... mailbox. ■ Restore a message to a new folder in the browser, right-click the Microsoft Exchange-Brick Level icon to choose a Backup Agent Restore Option. 7. Refer to a new location. Restoring To restore Exchange mailboxes or folders, in the original mailbox (the...

Option Guide
Page 30
.... Click OK to ensure that the user is a member of any other mailbox. In the Active Directory Users and Computers, click User Account, Action, and Properties. 11. Click the Members Of tab to exit. 3-2 Backup Agent for the mailbox. Select the Password Never Expires option. 7. Click Next. 8. Enter a unique alias name for Microsoft...
.... Click OK to ensure that the user is a member of any other mailbox. In the Active Directory Users and Computers, click User Account, Action, and Properties. 11. Click the Members Of tab to exit. 3-2 Backup Agent for the mailbox. Select the Password Never Expires option. 7. Click Next. 8. Enter a unique alias name for Microsoft...
Option Guide
Page 39
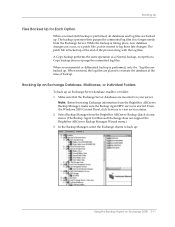
...Exchange 2000 3-11 Note: Before browsing Exchange information from the Exchange Server. In the Backup Manager, select the Exchange objects to recreate the database at the end of backup. Make sure that a Copy backup does not purge the committed log files. While the backup is taking ...the Windows 2000 Control Panel, click Services to log these late changes. The backup operation then purges the committed log files it no longer needs from the BrightStor ARCserve Backup Manager, make sure the Backup Agent RPC service is created to view service status. 2. Backing Up an ...
...Exchange 2000 3-11 Note: Before browsing Exchange information from the Exchange Server. In the Backup Manager, select the Exchange objects to recreate the database at the end of backup. Make sure that a Copy backup does not purge the committed log files. While the backup is taking ...the Windows 2000 Control Panel, click Services to log these late changes. The backup operation then purges the committed log files it no longer needs from the BrightStor ARCserve Backup Manager, make sure the Backup Agent RPC service is created to view service status. 2. Backing Up an ...
Option Guide
Page 46
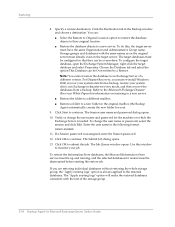
... choose a destination. Click OK to continue. Specify a restore destination. Click the Destination tab in the following format: DOMAIN\USERNAME 11. To configure the target database, open the Exchange System Manager, right-click the target database and select Properties. Click Start to ...objects to their original location. ■ Restore the database objects to a new folder in disaster recovery mode, and then recover the databases from a backup, restore your job. Restoring 8. The Session user name and password dialog opens. 10. Use this job. You can be up and running, and...
... choose a destination. Click OK to continue. Specify a restore destination. Click the Destination tab in the following format: DOMAIN\USERNAME 11. To configure the target database, open the Exchange System Manager, right-click the target database and select Properties. Click Start to ...objects to their original location. ■ Restore the database objects to a new folder in disaster recovery mode, and then recover the databases from a backup, restore your job. Restoring 8. The Session user name and password dialog opens. 10. Use this job. You can be up and running, and...