
Upgrading and Servicing Guide
Page 11
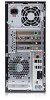
... drive bay, may be a CD-ROM, CD-RW, DVD-ROM, DVD+RW/+R, or combination drive B Lower 5.25-inch optical drive bay, may be empty (knockout plate) or a CD-ROM, CD-RW, DVD-ROM, DVD+RW/+R, combination drive, or HP Personal Media Drive bay C HP Pocket Media Drive bay, a hard disk drive...
... drive bay, may be a CD-ROM, CD-RW, DVD-ROM, DVD+RW/+R, or combination drive B Lower 5.25-inch optical drive bay, may be empty (knockout plate) or a CD-ROM, CD-RW, DVD-ROM, DVD+RW/+R, combination drive, or HP Personal Media Drive bay C HP Pocket Media Drive bay, a hard disk drive...
Upgrading and Servicing Guide
Page 13
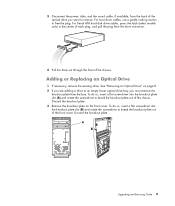
... of each plug, and pull the plug from the bay. To do so, insert a flat screwdriver into the knockout plate slot (A) and rotate the screwdriver to remove. Discard the knockout plate. 3 Disconnect the power, data, and the sound cable, if available, from the back of the optical drive you must remove ...existing drive. For Serial ATA hard disk drive cables, press the latch (select models only) in the center of the front cover. Discard the knockout plate. 3 Remove the knockout plate on page 8. 2 If you are adding a drive to an empty lower optical drive bay, you want to break the knockout...
... of each plug, and pull the plug from the bay. To do so, insert a flat screwdriver into the knockout plate slot (A) and rotate the screwdriver to remove. Discard the knockout plate. 3 Disconnect the power, data, and the sound cable, if available, from the back of the optical drive you must remove ...existing drive. For Serial ATA hard disk drive cables, press the latch (select models only) in the center of the front cover. Discard the knockout plate. 3 Remove the knockout plate on page 8. 2 If you are adding a drive to an empty lower optical drive bay, you want to break the knockout...

Upgrading and Servicing Guide
Page 29
...add-in card, close the open slot by inserting the metal slot cover into the knockout plate slot (A) and rotate the screwdriver to break the knockout plate. See "Opening and Closing the PC" on page 1. 2 Gently lay the PC on its side. 3 On the back of the sharp edges on the motherboard. Removing ...an Add-in Card 1 Complete the procedures to prepare the PC and to scrape the card against the other...
...add-in card, close the open slot by inserting the metal slot cover into the knockout plate slot (A) and rotate the screwdriver to break the knockout plate. See "Opening and Closing the PC" on page 1. 2 Gently lay the PC on its side. 3 On the back of the sharp edges on the motherboard. Removing ...an Add-in Card 1 Complete the procedures to prepare the PC and to scrape the card against the other...