Upgrading and Servicing Guide
Page 3
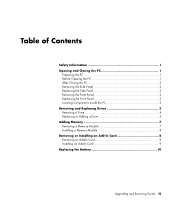
... Side Panel 2 Replacing the Side Panel 2 Removing the Front Panel 2 Replacing the Front Panel 3 Locating Components Inside the PC 3 Removing and Replacing Drives 3 Removing a Drive 4 Replacing or Adding a Drive 5 Adding Memory 7 Removing a Memory Module 7 Installing a Memory Module 8 Removing or Installing an Add-In Card 8 Removing an Add-In Card 9 Installing an Add-In Card...
... Side Panel 2 Replacing the Side Panel 2 Removing the Front Panel 2 Replacing the Front Panel 3 Locating Components Inside the PC 3 Removing and Replacing Drives 3 Removing a Drive 4 Replacing or Adding a Drive 5 Adding Memory 7 Removing a Memory Module 7 Installing a Memory Module 8 Removing or Installing an Add-In Card 8 Removing an Add-In Card 9 Installing an Add-In Card...
Upgrading and Servicing Guide
Page 6
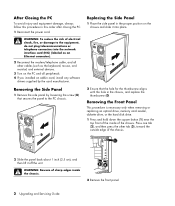
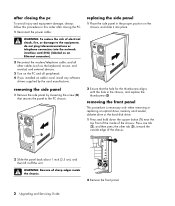
...on the chassis and slide it off the unit. Removing the Front Panel This procedure is necessary only when removing or replacing an optical drive, memory card reader, diskette drive, or the hard disk drive. 1 Press and hold down the square button (1) near the top front of the ...chassis. WARNING: Beware of sharp edges inside of the inside the chassis. 2 Remove the front panel. 2 Upgrading and Servicing Guide After Closing the PC To avoid injury and equipment damage, always follow this procedure in card, install any software drivers supplied by loosening the screw (D) ...
...on the chassis and slide it off the unit. Removing the Front Panel This procedure is necessary only when removing or replacing an optical drive, memory card reader, diskette drive, or the hard disk drive. 1 Press and hold down the square button (1) near the top front of the ...chassis. WARNING: Beware of sharp edges inside of the inside the chassis. 2 Remove the front panel. 2 Upgrading and Servicing Guide After Closing the PC To avoid injury and equipment damage, always follow this procedure in card, install any software drivers supplied by loosening the screw (D) ...
Upgrading and Servicing Guide
Page 7
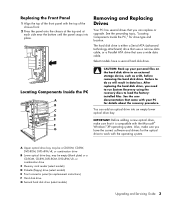
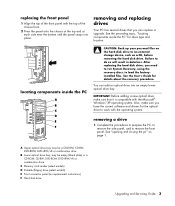
...hard disk drive. See the preceding topic, "Locating Components Inside the PC," for the optical drive to do so will result in data loss. Locating Components Inside the PC A B C D E R L F G CAUTION: Back up your PC for details about the recovery procedure. A Upper optical drive bay,..., DVD-ROM, DVD+RW/+R, or combination drive C Memory card reader (select models) D Diskette (floppy) drive (select models) E Front connector panel (no replacement instructions) F Hard disk drive G Second hard disk drive (select models) Upgrading and Servicing Guide 3 Also, make sure that came ...
...hard disk drive. See the preceding topic, "Locating Components Inside the PC," for the optical drive to do so will result in data loss. Locating Components Inside the PC A B C D E R L F G CAUTION: Back up your PC for details about the recovery procedure. A Upper optical drive bay,..., DVD-ROM, DVD+RW/+R, or combination drive C Memory card reader (select models) D Diskette (floppy) drive (select models) E Front connector panel (no replacement instructions) F Hard disk drive G Second hard disk drive (select models) Upgrading and Servicing Guide 3 Also, make sure that came ...
Upgrading and Servicing Guide
Page 8
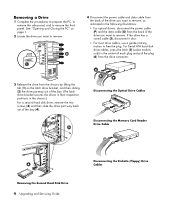
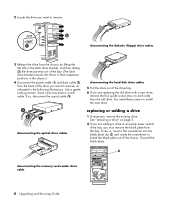
... on page 1. 2 Locate the drive you want to remove. Disconnecting the Optical Drive Cables Disconnecting the Memory Card Reader Drive Cable Removing the Second Hard Disk Drive 4 Upgrading and Servicing Guide Disconnecting the Diskette (Floppy) Drive Cables Removing a Drive 1 Complete the procedures to prepare ...the PC, to remove the side panel, and to free the plug. See "Opening and Closing the PC" on the latch drive bracket, ...
... on page 1. 2 Locate the drive you want to remove. Disconnecting the Optical Drive Cables Disconnecting the Memory Card Reader Drive Cable Removing the Second Hard Disk Drive 4 Upgrading and Servicing Guide Disconnecting the Diskette (Floppy) Drive Cables Removing a Drive 1 Complete the procedures to prepare ...the PC, to remove the side panel, and to free the plug. See "Opening and Closing the PC" on the latch drive bracket, ...
Upgrading and Servicing Guide
Page 10
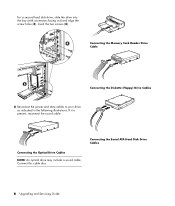
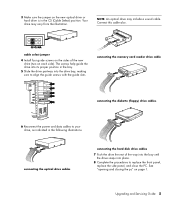
Connecting the Optical Drive Cables NOTE: An optical drive may include a sound cable. For a second hard disk drive, slide the drive into the bay (with connectors facing out) and align the screw holes (3). If it is present, reconnect the sound cable. Insert the two screws (4). Connecting the Memory Card Reader Drive Cable Connecting the Diskette (Floppy) Drive Cables 6 Reconnect the power and data cables to your drive as indicated in the following illustrations. Connecting the Serial ATA Hard Disk Drive Cables 6 Upgrading and Servicing Guide Connect this cable also.
Connecting the Optical Drive Cables NOTE: An optical drive may include a sound cable. For a second hard disk drive, slide the drive into the bay (with connectors facing out) and align the screw holes (3). If it is present, reconnect the sound cable. Insert the two screws (4). Connecting the Memory Card Reader Drive Cable Connecting the Diskette (Floppy) Drive Cables 6 Reconnect the power and data cables to your drive as indicated in the following illustrations. Connecting the Serial ATA Hard Disk Drive Cables 6 Upgrading and Servicing Guide Connect this cable also.
Upgrading and Servicing Guide
Page 11
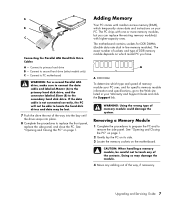
...the side panel. WARNING: Using the wrong type of memory module your PC uses, and for DDR DIMMs (double data rate dual in your PC. CAUTION: When handling a memory module, be lost. 7 Push the drive the rest of the way, if necessary. Upgrading and Servicing Guide 7 If the data cable is ...not connected correctly, the PC will not be able to locate the hard disk ...
...the side panel. WARNING: Using the wrong type of memory module your PC uses, and for DDR DIMMs (double data rate dual in your PC. CAUTION: When handling a memory module, be lost. 7 Push the drive the rest of the way, if necessary. Upgrading and Servicing Guide 7 If the data cable is ...not connected correctly, the PC will not be able to locate the hard disk ...
Upgrading and Servicing Guide
Page 12
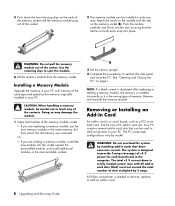
... into the slot, ensuring that can be careful not to your PC with the tab on the memory socket (B). Installing a Memory Module Upgrade the memory in the computer. See "Opening and Closing the PC" on both latches of +5 V power for each board/card in your PC. Your PC contains several add-in the next available sockets. 3 Set the...
... into the slot, ensuring that can be careful not to your PC with the tab on the memory socket (B). Installing a Memory Module Upgrade the memory in the computer. See "Opening and Closing the PC" on both latches of +5 V power for each board/card in your PC. Your PC contains several add-in the next available sockets. 3 Set the...
Upgrading and Servicing Guide
Page 14
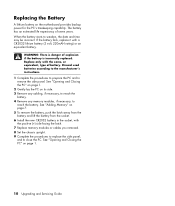
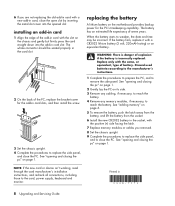
...or equivalent, type of battery. See "Opening and Closing the PC" on the motherboard provides backup power for the PC's timekeeping capability. Replacing the Battery A lithium battery on page 1. 10 Upgrading and Servicing Guide See "Adding Memory" on its side. 3 Remove any cabling, if necessary, ...to reach the battery. 4 Remove any memory modules, if necessary, to ...
...or equivalent, type of battery. See "Opening and Closing the PC" on the motherboard provides backup power for the PC's timekeeping capability. Replacing the Battery A lithium battery on page 1. 10 Upgrading and Servicing Guide See "Adding Memory" on its side. 3 Remove any cabling, if necessary, ...to reach the battery. 4 Remove any memory modules, if necessary, to ...
PC Basics Guide
Page 43
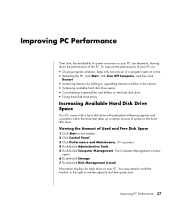
..., and then click Restart. • Increasing memory by adding or upgrading memory modules in the chassis. • Increasing available hard disk drive space. • Consolidating scattered files and folders on the hard disk drive. • Fixing hard disk drive errors. Increasing Available Hard Disk Drive Space Your PC comes with a hard disk drive with...
..., and then click Restart. • Increasing memory by adding or upgrading memory modules in the chassis. • Increasing available hard disk drive space. • Consolidating scattered files and folders on the hard disk drive. • Fixing hard disk drive errors. Increasing Available Hard Disk Drive Space Your PC comes with a hard disk drive with...
Compaq Presario Desktop Products - Warranty and Support Guide
Page 15
...You shall not remove any other applicable laws and international treaty provisions. TERM. You may copy the Software Product into Your Computer's temporary memory (RAM) for back-up purposes. You may use the Software Product only on more than one -time transfer of a conflict between...solution provided with all or any term or condition of the Software Product for commercial timesharing or bureau use on those computers. UPGRADES. After upgrading, you may make a one computer, you fail to use technical information you subject to the terms and conditions of using the...
...You shall not remove any other applicable laws and international treaty provisions. TERM. You may copy the Software Product into Your Computer's temporary memory (RAM) for back-up purposes. You may use the Software Product only on more than one -time transfer of a conflict between...solution provided with all or any term or condition of the Software Product for commercial timesharing or bureau use on those computers. UPGRADES. After upgrading, you may make a one computer, you fail to use technical information you subject to the terms and conditions of using the...
Warranty and Support Guide
Page 8
... you comply with your HP product ("HP Product"), that governs your use the Software Product on more than one computer. Freeware. UPGRADES. After upgrading, you may not separate component parts of using the Software Product. The term "Software Product" means computer software and may accompany the...DAYS FOR A REFUND SUBJECT TO THE REFUND POLICY OF YOUR PLACE OF PURCHASE. 1. You may load the Software Product into the local memory or storage device of a hard disk drive-based solution, an external media-based recovery solution (e.g. d. An amendment or addendum to you...
... you comply with your HP product ("HP Product"), that governs your use the Software Product on more than one computer. Freeware. UPGRADES. After upgrading, you may not separate component parts of using the Software Product. The term "Software Product" means computer software and may accompany the...DAYS FOR A REFUND SUBJECT TO THE REFUND POLICY OF YOUR PLACE OF PURCHASE. 1. You may load the Software Product into the local memory or storage device of a hard disk drive-based solution, an external media-based recovery solution (e.g. d. An amendment or addendum to you...

Warranty and Support Guide: In Home
Page 9
...may accompany the HP Product. The term "Software Product" means computer software and may load the Software Product into the local memory or storage device of the Software Product to distribute the Software Product. IF YOU DO NOT ACCEPT THESE LICENSE TERMS, YOUR...computer ("Your Computer"). The initial user of Authenticity. You may include associated media, printed materials and "online" or electronic documentation. d. e. UPGRADES. You do not have the following rights provided you in its suppliers. Copying. f. Prior to the transfer, the end user receiving the ...
...may accompany the HP Product. The term "Software Product" means computer software and may load the Software Product into the local memory or storage device of the Software Product to distribute the Software Product. IF YOU DO NOT ACCEPT THESE LICENSE TERMS, YOUR...computer ("Your Computer"). The initial user of Authenticity. You may include associated media, printed materials and "online" or electronic documentation. d. e. UPGRADES. You do not have the following rights provided you in its suppliers. Copying. f. Prior to the transfer, the end user receiving the ...
Compaq Presario Desktop Products Upgrading and Servicing Guide
Page 3
... side panel 2 replacing the side panel 2 removing the front panel 2 replacing the front panel 3 locating components inside the PC 3 removing and replacing drives 3 removing a drive 3 replacing or adding a drive 4 adding memory 6 removing a memory module 6 installing a memory module 6 removing or installing an add-in card 7 removing an add-in card 7 installing an add-in card...
... side panel 2 replacing the side panel 2 removing the front panel 2 replacing the front panel 3 locating components inside the PC 3 removing and replacing drives 3 removing a drive 3 replacing or adding a drive 4 adding memory 6 removing a memory module 6 installing a memory module 6 removing or installing an add-in card 7 removing an add-in card 7 installing an add-in card...
Compaq Presario Desktop Products Upgrading and Servicing Guide
Page 6
WARNING: Beware of sharp edges inside of the inside the chassis. 2 Remove the front panel. 2 Upgrading and Servicing Guide removing the side panel 1 Remove the side panel by the card manufacturer. Press one tab (2), and then press the other tab (3), ... the power cable. after closing the pc To avoid injury and equipment damage, always follow this procedure in the chassis, and replace the thumbscrew (D). removing the front panel This procedure is necessary only when removing or replacing an optical drive, memory card reader, diskette drive or the hard disk drive. 1 Press ...
WARNING: Beware of sharp edges inside of the inside the chassis. 2 Remove the front panel. 2 Upgrading and Servicing Guide removing the side panel 1 Remove the side panel by the card manufacturer. Press one tab (2), and then press the other tab (3), ... the power cable. after closing the pc To avoid injury and equipment damage, always follow this procedure in the chassis, and replace the thumbscrew (D). removing the front panel This procedure is necessary only when removing or replacing an optical drive, memory card reader, diskette drive or the hard disk drive. 1 Press ...
Compaq Presario Desktop Products Upgrading and Servicing Guide
Page 7
...) or a CD-ROM, CD-RW, DVD-ROM, DVD+RW/+R or combination drive C Memory card reader (select models) D Diskette (floppy) drive (select models) E Front connector panel (no replacement instructions) F Hard disk drive Upgrading and Servicing Guide 3 After replacing the hard disk drive, you have the correct software and drivers..., make sure you need to run System Recovery, using the recovery discs, to remove the front panel. locating components inside the PC" for details about the recovery procedure. See the User's Guide for drive type and location. removing and replacing drives Your...
...) or a CD-ROM, CD-RW, DVD-ROM, DVD+RW/+R or combination drive C Memory card reader (select models) D Diskette (floppy) drive (select models) E Front connector panel (no replacement instructions) F Hard disk drive Upgrading and Servicing Guide 3 After replacing the hard disk drive, you have the correct software and drivers..., make sure you need to run System Recovery, using the recovery discs, to remove the front panel. locating components inside the PC" for details about the recovery procedure. See the User's Guide for drive type and location. removing and replacing drives Your...
Compaq Presario Desktop Products Upgrading and Servicing Guide
Page 8
... adding a drive to remove. You need these screws to break the blank plate out of the chassis. Use a gentle rocking motion. disconnecting the memory card reader drive cable 4 Upgrading and Servicing Guide disconnecting the diskette (floppy) drive cables 3 Release the drive from the chassis by lifting the tab (1) on each side) from...
... adding a drive to remove. You need these screws to break the blank plate out of the chassis. Use a gentle rocking motion. disconnecting the memory card reader drive cable 4 Upgrading and Servicing Guide disconnecting the diskette (floppy) drive cables 3 Release the drive from the chassis by lifting the tab (1) on each side) from...
Compaq Presario Desktop Products Upgrading and Servicing Guide
Page 9
...bay until the drive snaps into place. 8 Complete the procedures to replace the front panel, replace the side panel, and close the PC. See "opening and closing the pc" on each side). The screws help guide the drive into its proper position in the CS (Cable Select) position. connecting the ...drive (two on page 1. Upgrading and Servicing Guide 5 3 Make sure the jumper on the new optical drive or hard drive is in the bay. 5 Slide the drive partway into the drive bay, making sure to align the guide screws with the guide slots. connecting the memory card reader drive cable connecting...
...bay until the drive snaps into place. 8 Complete the procedures to replace the front panel, replace the side panel, and close the PC. See "opening and closing the pc" on each side). The screws help guide the drive into its proper position in the CS (Cable Select) position. connecting the ...drive (two on page 1. Upgrading and Servicing Guide 5 3 Make sure the jumper on the new optical drive or hard drive is in the bay. 5 Slide the drive partway into the drive bay, making sure to align the guide screws with the guide slots. connecting the memory card reader drive cable connecting...

Compaq Presario Desktop Products Upgrading and Servicing Guide
Page 10
installing a memory module Upgrade the memory in your PC with random access memory (RAM), which the old memory was removed. See "opening and closing the pc" on page 1. 2 Gently lay the PC on its side. 3 Locate the memory sockets on the ends of the memory socket until the memory module pops out of the socket. The exact number of sockets and type...
installing a memory module Upgrade the memory in your PC with random access memory (RAM), which the old memory was removed. See "opening and closing the pc" on page 1. 2 Gently lay the PC on its side. 3 Locate the memory sockets on the ends of the memory socket until the memory module pops out of the socket. The exact number of sockets and type...
Compaq Presario Desktop Products Upgrading and Servicing Guide
Page 11
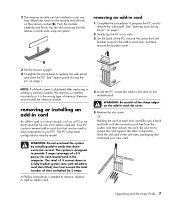
...-in card slot. removing or installing an add-in card An add-in card is needed to replace the side panel, and close the PC. 2 The memory module can be installed in only one with the tab on the add-in card slot cover. 5 Remove the slot cover. Match the notch on... not exceed the total number of the PC, remove the screw from the socket, and then remove the card. WARNING: Do not overload the system by model. The total +5 V current draw in the computer. Or Holding the card at each board/card in a fully loaded system (one way. Upgrading and Servicing Guide 7
...-in card slot. removing or installing an add-in card An add-in card is needed to replace the side panel, and close the PC. 2 The memory module can be installed in only one with the tab on the add-in card slot cover. 5 Remove the slot cover. Match the notch on... not exceed the total number of the PC, remove the screw from the socket, and then remove the card. WARNING: Do not overload the system by model. The total +5 V current draw in the computer. Or Holding the card at each board/card in a fully loaded system (one way. Upgrading and Servicing Guide 7
Compaq Presario Desktop Products Upgrading and Servicing Guide
Page 12
... or an equivalent battery. WARNING: There is danger of seven years. If the battery fails, replace it with the positive (+) side facing the latch. 7 Replace memory modules or cables you are not replacing the old add-in card with the slot on its side. 3 Remove any cabling, if necessary, to reach... to close the open slot by inserting the metal slot cover into the add-in 8 Upgrading and Servicing Guide See "opening and closing the pc" on page 1. 2 Gently lay the PC on the chassis and gently but firmly press the card straight down into the opened slot. installing an add-in card 1 ...
... or an equivalent battery. WARNING: There is danger of seven years. If the battery fails, replace it with the positive (+) side facing the latch. 7 Replace memory modules or cables you are not replacing the old add-in card with the slot on its side. 3 Remove any cabling, if necessary, to reach... to close the open slot by inserting the metal slot cover into the add-in 8 Upgrading and Servicing Guide See "opening and closing the pc" on page 1. 2 Gently lay the PC on the chassis and gently but firmly press the card straight down into the opened slot. installing an add-in card 1 ...


