Compaq DC7600 Hard Drive - HP
Compaq DC7600 Hard Drive
Related Manual Pages


Similar Questions

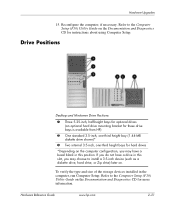
Hard Drive Slots
I have a tower for the compaq dx2450, and it is missing the cage or caddie (dont know what it is cal...
I have a tower for the compaq dx2450, and it is missing the cage or caddie (dont know what it is cal...
(Posted by johnkearns2011 3 years ago)


Is It Time To Get A New Hard Drive And Can I Go Up To 500gb??
I have had virus after virus on this hard drive. I have a lot of important files on it. I use this d...
I have had virus after virus on this hard drive. I have a lot of important files on it. I use this d...
(Posted by vapordaze 12 years ago)

Adding A Hard Drive
I am trying to add a hard drive and the rake is a weird piece of equipment. How do i remove the gree...
I am trying to add a hard drive and the rake is a weird piece of equipment. How do i remove the gree...
(Posted by sramsey310 13 years ago)