Compaq 380207-001 - P 700 - 17" CRT Display Support and Manuals
Get Help and Manuals for this Compaq item

View All Support Options Below
Free Compaq 380207-001 manuals!
Problems with Compaq 380207-001?
Ask a Question
Free Compaq 380207-001 manuals!
Problems with Compaq 380207-001?
Ask a Question
Popular Compaq 380207-001 Manual Pages
Compaq P710/P910/P1210 Color Monitor User's Guide - Page 2
...USB Function 3
WARNING! First
Edition August 2000. SC-B104 Signal Cable 1 TROUBLESHOOTING
6. COMPAQ and the Compaq logo are trademarks of the human body; Patent and Trademark Office. The information in the U.S.
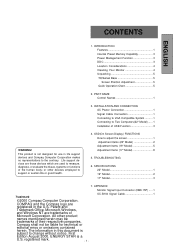
CONTENTS
ENGLISH
1. SPECIFICATIONS 22" Model 1 19" Model 2 17" Model 3
7.
Life support devices are those devices which are used to change without notice. or...
Compaq P710/P910/P1210 Color Monitor User's Guide - Page 3

This guide also provides technical specifications and instructions for ergonomics.
Features
This monitor is an intelligent, microprocessor-based monitor compatible with the precision of all monitor set-up and adjustment functions.
• For use .
• The world's standard DIAMONDTRON NF CRT upgraded with your monitor. horizontal scan frequencies between
30kHz and 108kHz, and vertical...
Compaq P710/P910/P1210 Color Monitor User's Guide - Page 4
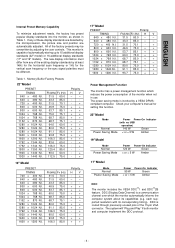
... each supported resolution with no USB
operation)
Normal
140 W
Green
Power Saving Mode < or = 5 W
Amber
19" Model
Mode Normal...Model
Mode Normal Power Saving Mode
Power Power-On Indicator
95 W
Green
< or = 5 W
Amber
DDC
The monitor includes the VESA DDCTM1 and DDCTM2B feature. Check your computer's manual...frequency or 1Hz for setting this function.
22" Model
Mode
Power Power-On...
Compaq P710/P910/P1210 Color Monitor User's Guide - Page 6
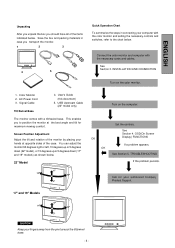
... tilt for your authorized Compaq Product Support.
17" and 19" Models
15 90
90 5
CAUTION
Keep your fingers away from the pivot area of the tilt/swivel base.
- 5 - Connect the color monitor and computer with a tilt/swivel base. Signal Cable
Tilt/Swivel Base
4.
See Section 4. TROUBLESHOOTING
If the problem persists. See Section 3. INSTALLATION AND CONNECTION
Turn...
Compaq P710/P910/P1210 Color Monitor User's Guide - Page 9
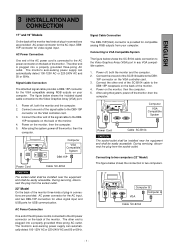
... and the computer. 2. Connect the one end of the signal cable to two computers. During servicing, disconnect the plug from your computer. Signal Cable Connection
The attached signal cable provides a DB9-... for video signal input and USB ports for USB communication. ENGLISH
3 INSTALLATION AND
CONNECTION
17" and 19" Models
On the back of the monitor two kinds of plug-in connections are...
Compaq P710/P910/P1210 Color Monitor User's Guide - Page 12

... will disappear. to display the OSD
CONTRAST
(3) Select the group icon on Sub Menu by pressing the OSD OFF button.
(2) Press button screen. The 22" model OSD can be turned off quickly by pressing button.
Compaq P710/P910/P1210 Color Monitor User's Guide - Page 13
ENGLISH
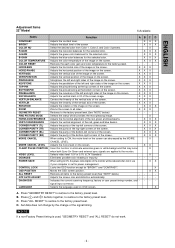
Adjustment Items 22" Model
X:Available
Items
Function
ABC D
CONTRAST
Adjusts the contrast level.
XX X
PIN-... not work.
- 2 -
Press and buttons together, to restore to the factory preset level.(See "NOTE" below .)
-- - - Set data does not change by the MOIRE
X
CANCEL LEVEL.
CONTROL LOCK
Locks the OSD function except for the selected color. XX X
TOP...
Compaq P710/P910/P1210 Color Monitor User's Guide - Page 14

...". To expand the width of the color mode selected by "COLOR NO".
To expand the center of the screen image to all sides.
ENGLISH
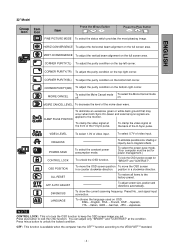
22" Model Group Item Icon Icon
Item
Press the Minus Button
Press the Plus Button
CONTRAST
To decrease the contrast.
To increase the color temperature of the...
Compaq P710/P910/P1210 Color Monitor User's Guide - Page 15
... to keep the OSD screen image you set for "BRIGHT" and "CONTRAST".
CORNER PURITY(BL) To adjust the purity condition on the bottom-right corner.
position in a counter clockwise direction. To show the current scanning frequency, Preset No., and signal input connection. ENGLISH
22" Model
Group Item Icon Icon
Item
Press the...
Compaq P710/P910/P1210 Color Monitor User's Guide - Page 16

...of the image on the screen. VERT-SIZE
Adjusts the vertical size of the image on the screen.
POWER-SAVE
When setting to the monitor. XX XX XX X X X X X X X X X X
X --- Press -
HORIZ-...(BR)
Adjusts the purity of the bottom-right of the screen.
ENGLISH
Adjustment Items
19" Model Items
Function
X = Available A BC
CONTRAST
Adjusts the contrast level.
CORNER PURITY (BL)...
Compaq P710/P910/P1210 Color Monitor User's Guide - Page 17

... expand the width of the screen To narrow the width of the screen image near the corners of the image on the screen.
ENGLISH
19" Model Group Item Icon Icon
Item
Press the Minus Button
Press the Plus Button
SCREEN
GEOMETRY
CONTRAST
To decrease the contrast.
To expand the height of...
Compaq P710/P910/P1210 Color Monitor User's Guide - Page 18

... the front of the H-Sync pulse.
To select the power-save mode. (Your computer must be set for power management.)
To lock the OSD function except for "BRIGHT" and "CONTRAST". CORNER PURITY(TL...the vertical beam alignment on OSD.
To select 0.7V of the H-Sync pulse. ENGLISH
19" Model Group Item Icon Icon
Item
Press the Minus Button
Press the Plus Button
VIDEO
HORIZ-STATIC
To adjust...
Compaq P710/P910/P1210 Color Monitor User's Guide - Page 19

... the pincushioning at the bottom corners of the image on the screen.
POWER-SAVE
When setting to ON, the power consumption of the screen image. DIAGNOSIS
Indicates the current scanning frequency...to keep the screen you desired. X
PINCUSHION
Straightens the left and right sides of the screen. Set data does not change by the change of the signal timing.
*Moire is no longer observed....
Compaq P710/P910/P1210 Color Monitor User's Guide - Page 21

PROBLEM...able to synchronize with the specification outlined in Section 6. ENGLISH
5 TROUBLESHOOTING
Before calling your 1-800-OK-COMPAQ for the
ATTENTION
SIGNAL ...FV @ 43.0Hz
PLEASE CHANGE SIGNAL TIMING.
• Check the specification of a display size
• Do "GEOMETRY-RESET" or "ALL ...Front (OSD)
- 1 - SPECIFICATIONS and Section 7.
APPENDIX. The following message appeared. • Input signal ...
Compaq P710/P910/P1210 Color Monitor User's Guide - Page 22
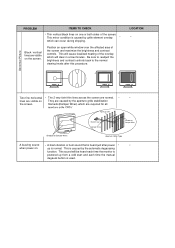
... will cause localized heating of the screen.
when power on the screen. Abnormal Picture
PROBLEM
ITEMS TO CHECK
• Thin vertical black lines on They are caused by the aperture... element overlap
•
which can occur during shipping. up from a cold start and each time the manual
degauss button is used.
lines are visible on one or both sides of the overlap which are normal....
Compaq 380207-001 Reviews
We have not received any reviews for Compaq yet.