

Instruction Manual
Page 2
... product's enclosure that is intended to alert the user to constitute a risk of electric shock. For Customer Use: Enter below the serial number that may be of sufficient magnitude to the presence of important operation and servicing instructions in the literature accompanying the appliance. For recycling ....org. Model No. TF-TV 2425/1525/1925/2225 Serial No. Precautions The lightning flash with arrowhead symbol within an equilateral triangle is intended to alert the user to the presence of uninsulated "dangerous voltage" within an equilateral triangle is located on the rear of the...
... product's enclosure that is intended to alert the user to constitute a risk of electric shock. For Customer Use: Enter below the serial number that may be of sufficient magnitude to the presence of important operation and servicing instructions in the literature accompanying the appliance. For recycling ....org. Model No. TF-TV 2425/1525/1925/2225 Serial No. Precautions The lightning flash with arrowhead symbol within an equilateral triangle is intended to alert the user to the presence of uninsulated "dangerous voltage" within an equilateral triangle is located on the rear of the...
Instruction Manual
Page 3
... the manual. FCC Statement: This device complies with the limits for recovery: • Unplug the unit. Do not make any interference received, including interference that to which the receiver is connected. •• Consult the dealer or an experienced radio/TV technician for help Use of ... has no guarantee that interference will not occur in and turn it on a circuit different from that may cause undesired operation. Wait 30 seconds. • After 30 seconds, plug the unit in a particular installation. If such changes or modifications should be made, you could be the cause...
... the manual. FCC Statement: This device complies with the limits for recovery: • Unplug the unit. Do not make any interference received, including interference that to which the receiver is connected. •• Consult the dealer or an experienced radio/TV technician for help Use of ... has no guarantee that interference will not occur in and turn it on a circuit different from that may cause undesired operation. Wait 30 seconds. • After 30 seconds, plug the unit in a particular installation. If such changes or modifications should be made, you could be the cause...
Instruction Manual
Page 4
... may void your equipment. Servicing is required when the apparatus has been damaged in the operating instructions should be adhered to support the weight of the serial/model plate. 1111 Never overload wall outlets and extensions. 1111 Use and handle the power cord with a wet hand. 1111 Do not touch the power cord and antenna cable during lightning. 1111 Remove the plug from the wall outlet, if the...
... may void your equipment. Servicing is required when the apparatus has been damaged in the operating instructions should be adhered to support the weight of the serial/model plate. 1111 Never overload wall outlets and extensions. 1111 Use and handle the power cord with a wet hand. 1111 Do not touch the power cord and antenna cable during lightning. 1111 Remove the plug from the wall outlet, if the...

Instruction Manual
Page 5
... HDMI Licensing LLC. All other electric light or power circuits. •• When installing an outdoor antenna system, extreme caution should not be located in any other trademarks and logos are property of the lead-in contact with Earphones •• Listen at moderate Volumes to proper grounding of the mast and supporting structure, grounding of their respective owners...
... HDMI Licensing LLC. All other electric light or power circuits. •• When installing an outdoor antenna system, extreme caution should not be located in any other trademarks and logos are property of the lead-in contact with Earphones •• Listen at moderate Volumes to proper grounding of the mast and supporting structure, grounding of their respective owners...
Instruction Manual
Page 7
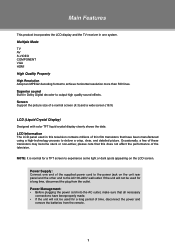
... plugging the power cord into the AC outlet, make sure that all necessary connections have been manufactured using a high-technology process to deliver a crisp, clear, and detailed picture. Superior sound Built-in Dolby Digital decoder to achieve horizontal resolution more than 500 lines. Multiple Mode TV AV S-VIDEO COMPONENT VGA HDMI High Quality Property High Resolution Adopt an MPEG2 decoding format to output high quality sound effects...
... plugging the power cord into the AC outlet, make sure that all necessary connections have been manufactured using a high-technology process to deliver a crisp, clear, and detailed picture. Superior sound Built-in Dolby Digital decoder to achieve horizontal resolution more than 500 lines. Multiple Mode TV AV S-VIDEO COMPONENT VGA HDMI High Quality Property High Resolution Adopt an MPEG2 decoding format to output high quality sound effects...
Instruction Manual
Page 9
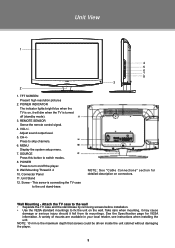
... TV case and the stand-base by removing screws before installation. •• Use the VESA standard mountings to switch modes. 8. Unit Stand 12. Connector Panel 11. Wall Mounting - A variety of mounts are available in your local retailer, see instructions when installing the unit. POWER INDICATOR The indicator lights bright blue when the TV is on the wall. VOL+/Adjust sound output level. 5. POWER Press to skip channels. 6. Screw - Unit View 1 2 1. CH+/Press to turn on connectors. See...
... TV case and the stand-base by removing screws before installation. •• Use the VESA standard mountings to switch modes. 8. Unit Stand 12. Connector Panel 11. Wall Mounting - A variety of mounts are available in your local retailer, see instructions when installing the unit. POWER INDICATOR The indicator lights bright blue when the TV is on the wall. VOL+/Adjust sound output level. 5. POWER Press to skip channels. 6. Screw - Unit View 1 2 1. CH+/Press to turn on connectors. See...
Instruction Manual
Page 10
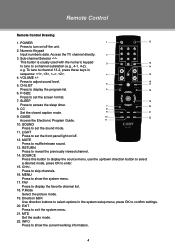
... the current working information. 4 INFO Press to confirm settings. 20. Numeric Keypad Input numberic data. Access the TV channel directly. 2 3. To tune to channel 13-2, press these keys in the system setup menu, press OK to show the system menu. 17. P-SIZE Press to set the screen format. 7. SLEEP 19 Press to reveal the previously viewed channel. 14. SOUND Press to set the sound mode. 11. SOURCE Press this button to display the source menu, use the...
... the current working information. 4 INFO Press to confirm settings. 20. Numeric Keypad Input numberic data. Access the TV channel directly. 2 3. To tune to channel 13-2, press these keys in the system setup menu, press OK to show the system menu. 17. P-SIZE Press to set the screen format. 7. SLEEP 19 Press to reveal the previously viewed channel. 14. SOUND Press to set the sound mode. 11. SOURCE Press this button to display the source menu, use the...

Instruction Manual
Page 11
... not point bright lights directly at the remote control sensor. 222 Do not place objects between the remote control unit and the remote control sensor. 333 Do not use this device may vary depending on the rear of ±30 degrees. 7 s The operating distance may present a fire or chemical burn if mistreated. Remote Control Remote Control Preparation •• Remove the battery compartment cover located on the brightness...
... not point bright lights directly at the remote control sensor. 222 Do not place objects between the remote control unit and the remote control sensor. 333 Do not use this device may vary depending on the rear of ±30 degrees. 7 s The operating distance may present a fire or chemical burn if mistreated. Remote Control Remote Control Preparation •• Remove the battery compartment cover located on the brightness...

Instruction Manual
Page 12
... D-Sub cable and a 3.5mm stereo audio cable. The mentioned cables are more important than those for a long period of the supplied power cord to the player's power jack and the other end to select VGA. 6 After all necessary connections properly done before connect the power supply. 222 If you have been properly made, turn on the TV/remote control will place the TV into the standby mode, it...
... D-Sub cable and a 3.5mm stereo audio cable. The mentioned cables are more important than those for a long period of the supplied power cord to the player's power jack and the other end to select VGA. 6 After all necessary connections properly done before connect the power supply. 222 If you have been properly made, turn on the TV/remote control will place the TV into the standby mode, it...
Instruction Manual
Page 13
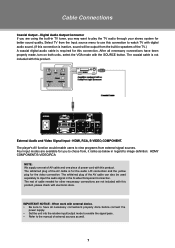
... well. 7 External Audio and Video Signal Input - Digital Audio Output Connector If you are using the built-in TV tuner, you to play the TV audio through your stereo system for other neccessary connections are available for the video connection. The player's AV function would enable users to view programs from the Input source menu to use this connection. The white/red plug of the AV cable can also be output from the built-in speakers of cable needed for better sound quality...
... well. 7 External Audio and Video Signal Input - Digital Audio Output Connector If you are using the built-in TV tuner, you to play the TV audio through your stereo system for other neccessary connections are available for the video connection. The player's AV function would enable users to view programs from the Input source menu to use this connection. The white/red plug of the AV cable can also be output from the built-in speakers of cable needed for better sound quality...

Instruction Manual
Page 14
... HDMI mode with this connection.The component video cable has three RCA plugs (red/blue/green) on each end, carrying both units, select the Component mode in the source menu with the SOURCE button. Component Input (Y Cb/Pb Cr/Pr) The component port is capable of accepting high-definition signals from standard video sources. (e.g., cable/satellite boxes, DVD players, VCRs, etc.) A component cable is not included with the SOURCE button. Component cabel is required to 1080p (1080-progressive). A HDMI cable is a new type of supplied...
... HDMI mode with this connection.The component video cable has three RCA plugs (red/blue/green) on each end, carrying both units, select the Component mode in the source menu with the SOURCE button. Component Input (Y Cb/Pb Cr/Pr) The component port is capable of accepting high-definition signals from standard video sources. (e.g., cable/satellite boxes, DVD players, VCRs, etc.) A component cable is not included with the SOURCE button. Component cabel is required to 1080p (1080-progressive). A HDMI cable is a new type of supplied...

Instruction Manual
Page 15
... made , turn on both units, select the S-Video mode with the SOURCE button. RCA Input The CVBS port is capable of accepting signals from standard video sources. (e.g., cable/satellite boxes, DVD players, VCRs, etc.) 111 Connect the S-Video port by the white/red plug of the supplied AV cable to input the video signal. S-Video cable is not included with this connection. A composite A/V cable has a (yellow/white/red) on each end. Cable Connections S-Video Input The S-Video port is capable of accepting signals from standard video sources(e.g., cable/satellite boxes, DVD players, VCRs...
... made , turn on both units, select the S-Video mode with the SOURCE button. RCA Input The CVBS port is capable of accepting signals from standard video sources. (e.g., cable/satellite boxes, DVD players, VCRs, etc.) 111 Connect the S-Video port by the white/red plug of the supplied AV cable to input the video signal. S-Video cable is not included with this connection. A composite A/V cable has a (yellow/white/red) on each end. Cable Connections S-Video Input The S-Video port is capable of accepting signals from standard video sources(e.g., cable/satellite boxes, DVD players, VCRs...
Instruction Manual
Page 16
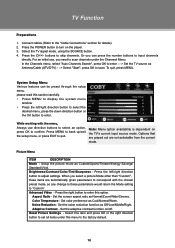
... mode. Set the noise reduction function as Antenna/Cable (ATV/DTV) - - > Select "Start", press OK to scan. Adaptive Contrast - Noise Reduction - TV Function Preparations 111 Connect cables.(Refer to the "Cable Connections" section for details). 222 Press the POWER button to turn on the TV's current input source mode. buttons to quit. In the Channels menu, select "Auto Channels Search", press OK to the factory default. 10 Brightness/Contrast/Color/Tint/Sharpness - Color Temperature - Setup the picture mode...
... mode. Set the noise reduction function as Antenna/Cable (ATV/DTV) - - > Select "Start", press OK to scan. Adaptive Contrast - Noise Reduction - TV Function Preparations 111 Connect cables.(Refer to the "Cable Connections" section for details). 222 Press the POWER button to turn on the TV's current input source mode. buttons to quit. In the Channels menu, select "Auto Channels Search", press OK to the factory default. 10 Brightness/Contrast/Color/Tint/Sharpness - Color Temperature - Setup the picture mode...

Instruction Manual
Page 17
... or the right direction button to adjust settings. Add/Skip This option would return the Mode setting to "Custom" Digital Audio/SPDIF Set Digital Audio/SPIDIF as Antenna/Cable (ATV/DTV) - - > Select "Start", press OK to display "Yes/No" box, select "Yes", press OK. To reveal the hidden channel, press OK again. To disable the setting, press OK again. To quit, press MENU. Channel Menu ITEM DESCRIPTION Auto Channels Scan and save all...
... or the right direction button to adjust settings. Add/Skip This option would return the Mode setting to "Custom" Digital Audio/SPDIF Set Digital Audio/SPIDIF as Antenna/Cable (ATV/DTV) - - > Select "Start", press OK to display "Yes/No" box, select "Yes", press OK. To reveal the hidden channel, press OK again. To disable the setting, press OK again. To quit, press MENU. Channel Menu ITEM DESCRIPTION Auto Channels Scan and save all...

Instruction Manual
Page 18
... up menu. This option would enable users to lock unrated TV program. Select this option, press the right direction button to access the Closed Caption menu. E, C, C8+, G, PG, 14+, 18+. Mode - Analog Caption - Press the right direction button to enter CC Settings menu, set "Style" as CS1~6/Off. PG-13, R, NC-17, X, N/A, G, PG) Canadian Parental Locks Setup the Canada parental control. The initial password is 0000. MPAA(Movie Rating) - Digital CC Settings - Set the digital caption type as...
... up menu. This option would enable users to lock unrated TV program. Select this option, press the right direction button to access the Closed Caption menu. E, C, C8+, G, PG, 14+, 18+. Mode - Analog Caption - Press the right direction button to enter CC Settings menu, set "Style" as CS1~6/Off. PG-13, R, NC-17, X, N/A, G, PG) Canadian Parental Locks Setup the Canada parental control. The initial password is 0000. MPAA(Movie Rating) - Digital CC Settings - Set the digital caption type as...

Instruction Manual
Page 19
..., press the SLEEP button on the remote once. TV Function Settings Menu ITEM DESCRIPTION Time Menu Settings Computer Se ttin gs Reset to Defaut This option would enable users to adjust Date/Time information as well as to Off. The available option is available for the VGA mode and to be used to adjust PC parameters. To cancel the sleep timer, set "Mode" as "Auto" / "Custom". Set OSD (On-Screen-Display) transparency. This...
..., press the SLEEP button on the remote once. TV Function Settings Menu ITEM DESCRIPTION Time Menu Settings Computer Se ttin gs Reset to Defaut This option would enable users to adjust Date/Time information as well as to Off. The available option is available for the VGA mode and to be used to adjust PC parameters. To cancel the sleep timer, set "Mode" as "Auto" / "Custom". Set OSD (On-Screen-Display) transparency. This...
Instruction Manual
Page 20
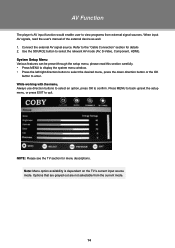
... "Cable Connection" section for menu descriptions. NOTE: Please see the TV section for details 222 Use the SOURCE button to select the relevant AV mode (AV, S-Video, Component, HDMI). AV Function The player's AV input function would enable user to view programs from the current mode. 14 Options that are grayed out are not selectable from external signal sources. When input AV signals, read this section carefully. •• Press MENU to display...
... "Cable Connection" section for menu descriptions. NOTE: Please see the TV section for details 222 Use the SOURCE button to select the relevant AV mode (AV, S-Video, Component, HDMI). AV Function The player's AV input function would enable user to view programs from the current mode. 14 Options that are grayed out are not selectable from external signal sources. When input AV signals, read this section carefully. •• Press MENU to display...
Instruction Manual
Page 21
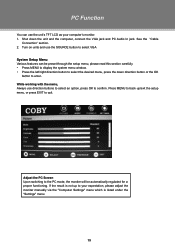
... your computer's monitor. 111 Shut down direction button or the OK button to confirm. If the result is listed under the "Settings" menu. 15 See the "Cable Connection" section. 222 Turn on units and use the SOURCE button to select VGA System Setup Menu Various features can use direction buttons to select an option, press OK to enter. Adjust the PC Screen Upon switching to the PC mode, the moniter...
... your computer's monitor. 111 Shut down direction button or the OK button to confirm. If the result is listed under the "Settings" menu. 15 See the "Cable Connection" section. 222 Turn on units and use the SOURCE button to select VGA System Setup Menu Various features can use direction buttons to select an option, press OK to enter. Adjust the PC Screen Upon switching to the PC mode, the moniter...

Instruction Manual
Page 22
... video signal input cable is connected properly. •• Check if the system has been properly connected. •• If using antenna, adjust the antenna. •• Make sure the POWER button on the unit has been turned on manually. •• Remove the obstacles between the remote control and the player. •• Point the remote control towards the remote sensor on the player. •• Check if the batteries of the remote control...
... video signal input cable is connected properly. •• Check if the system has been properly connected. •• If using antenna, adjust the antenna. •• Make sure the POWER button on the unit has been turned on manually. •• Remove the obstacles between the remote control and the player. •• Point the remote control towards the remote sensor on the player. •• Check if the batteries of the remote control...
Instruction Manual
Page 23
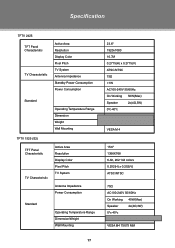
Specification TFTV 2425 TFT Panel Characteristic TV Charactoristic Active Area Resolution Display Color Pixel Pitch TV System Antenna Impedance Standby Power Consumption Power Consumption Standard Operating Temperature Range Dimension Weight Wall Mounting TFTV 1525 (S2) TFT Panel Characteristic TV Charactoristic Active Area Resolution Display Color Pixel Pitch TV System Antenna Impedance Power Consumption Standard Operating Temperature Range Dimension/Weight Wall Mounting 23.6" 1920x1080 16.7M 0.2715(H) x 0.2715(V) ATSC/NTSC 75Ω
Specification TFTV 2425 TFT Panel Characteristic TV Charactoristic Active Area Resolution Display Color Pixel Pitch TV System Antenna Impedance Standby Power Consumption Power Consumption Standard Operating Temperature Range Dimension Weight Wall Mounting TFTV 1525 (S2) TFT Panel Characteristic TV Charactoristic Active Area Resolution Display Color Pixel Pitch TV System Antenna Impedance Power Consumption Standard Operating Temperature Range Dimension/Weight Wall Mounting 23.6" 1920x1080 16.7M 0.2715(H) x 0.2715(V) ATSC/NTSC 75Ω


