Instruction Manual
Page 3
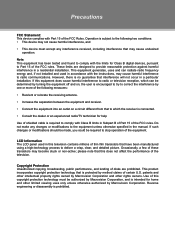
... any interference received, including interference that to which the receiver is connected. •• Consult the dealer or an experienced radio/TV technician for help Use of shielded cable is intended for Class B digital devices, pursuant to Part 15 of the FCC rules. ...8226; Connect the equipment into an outlet on , the user is protected by Macrovision Corporation. Occasionally, a few of the television. LCD Information The LCD panel used in the manual. These limits are prohibited. However, there is prohibited. This equipment generates, uses and can be determined ...
... any interference received, including interference that to which the receiver is connected. •• Consult the dealer or an experienced radio/TV technician for help Use of shielded cable is intended for Class B digital devices, pursuant to Part 15 of the FCC rules. ...8226; Connect the equipment into an outlet on , the user is protected by Macrovision Corporation. Occasionally, a few of the television. LCD Information The LCD panel used in the manual. These limits are prohibited. However, there is prohibited. This equipment generates, uses and can be determined ...
Instruction Manual
Page 7
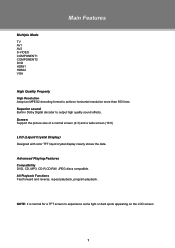
... forward and reverse, repeat playback, program playback. Screen Support the picture size of a normal screen (4:3) and a wide screen (16:9) LCD (Liquid Crystal Display) Designed with color TFT liquid crystal display clearly shows the data. Superior sound Built-in Dolby Digital decoder to experience some... light or dark spots appearing on the LCD screen. 1 Multiple Mode TV AV1 AV2 S-VIDEO COMPONENT1 COMPONENT2 DVD HDMI1 HDMI2 VGA Main Features High Quality Property High Resolution Adopt an MPEG2 decoding...
... forward and reverse, repeat playback, program playback. Screen Support the picture size of a normal screen (4:3) and a wide screen (16:9) LCD (Liquid Crystal Display) Designed with color TFT liquid crystal display clearly shows the data. Superior sound Built-in Dolby Digital decoder to experience some... light or dark spots appearing on the LCD screen. 1 Multiple Mode TV AV1 AV2 S-VIDEO COMPONENT1 COMPONENT2 DVD HDMI1 HDMI2 VGA Main Features High Quality Property High Resolution Adopt an MPEG2 decoding...
Instruction Manual
Page 11
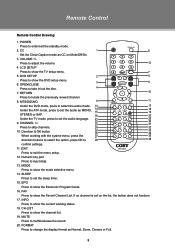
VOLUME +/- MODE Press to show the mode selective menu. 14. POWER Press to muffle/release the sound. 20. LCD SETUP Press to show the TV setup menu. 5. SLEEP Press to set the audio language. 21 29 9. MUTE Press to enter/exit the standby mode. 2. RETURN 10...Electronic Program Guide. 16. If no channel is set the sleep timer. 15. Press to skip channels. 24 F.BWD F.FWD PREV NEXT 32 10. INFO Press to show the current working with the systme menu, press the 27 35 direction buttons to select the option, press ...
VOLUME +/- MODE Press to show the mode selective menu. 14. POWER Press to muffle/release the sound. 20. LCD SETUP Press to show the TV setup menu. 5. SLEEP Press to set the audio language. 21 29 9. MUTE Press to enter/exit the standby mode. 2. RETURN 10...Electronic Program Guide. 16. If no channel is set the sleep timer. 15. Press to skip channels. 24 F.BWD F.FWD PREV NEXT 32 10. INFO Press to show the current working with the systme menu, press the 27 35 direction buttons to select the option, press ...
Instruction Manual
Page 16
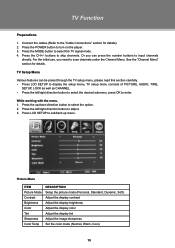
For the initial use, you can be preset through the TV setup menu, please read this section carefully. •• Press LCD SETUP to display the setup menu, TV setup menu consists of PICTURE, AUDIO, TIME, SETUP, LOCK as well as CHANNEL. •• Press the left /right direction button ...to adjust. 333 Press LCD SETUP to exit/back up /down direction button ...
For the initial use, you can be preset through the TV setup menu, please read this section carefully. •• Press LCD SETUP to display the setup menu, TV setup menu consists of PICTURE, AUDIO, TIME, SETUP, LOCK as well as CHANNEL. •• Press the left /right direction button ...to adjust. 333 Press LCD SETUP to exit/back up /down direction button ...
Instruction Manual
Page 20
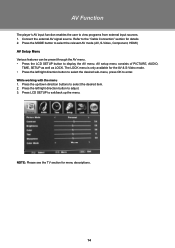
... the relevant AV mode (AV, S-Video, Component, HDMI) AV Setup Menu Various features can be preset through the AV menu. •• Press the LCD SETUP button to enter. The LOCK menu is only available for menu descriptions. 14 AV setup menu consists of PICTURE, AUDIO, TIME, SETUP as well... While working with the menu 111 Press the up the menu. Warm NOTE: Please see the TV section for the AV & S-Video mode. •• Press the left /right direction button to adjust. 333 Press LCD SETUP to view programs from external input sources. 111 Connect the external AV signal source. AV...
... the relevant AV mode (AV, S-Video, Component, HDMI) AV Setup Menu Various features can be preset through the AV menu. •• Press the LCD SETUP button to enter. The LOCK menu is only available for menu descriptions. 14 AV setup menu consists of PICTURE, AUDIO, TIME, SETUP as well... While working with the menu 111 Press the up the menu. Warm NOTE: Please see the TV section for the AV & S-Video mode. •• Press the left /right direction button to adjust. 333 Press LCD SETUP to view programs from external input sources. 111 Connect the external AV signal source. AV...
Instruction Manual
Page 21
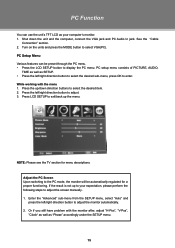
...SETUP. •• Press the left/right direction button to select the desired sub-menu, press OK to select VGA(PC). NOTE: Please see the TV section for a proper functioning. Adjust the PC Screen Upon switching to the PC mode, the moniter will be preset through the PC menu. •&#...8226; Press the LCD SETUP button to exit/back up the menu. While working with the monitor after, adjust "H-Pos", "V-Pos", "Clock" as well as "Phase" accordingly under ...
...SETUP. •• Press the left/right direction button to select the desired sub-menu, press OK to select VGA(PC). NOTE: Please see the TV section for a proper functioning. Adjust the PC Screen Upon switching to the PC mode, the moniter will be preset through the PC menu. •&#...8226; Press the LCD SETUP button to exit/back up the menu. While working with the monitor after, adjust "H-Pos", "V-Pos", "Clock" as well as "Phase" accordingly under ...
Instruction Manual
Page 26
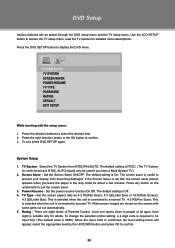
... in the stop mode for detailed menu descriptions. Use the LCD SETUP button to confirm. 333 To exit, press DVD SETUP again. System Setup 111 TV System - Set the power resume function On.Off. Wide-...) or 16:9(Wide Screen). 4:3 LB(Letter Box): This is selected when the unit is connected to a normal TV. 4:3 PS(Pan Scan): This is selected when the unit is suitable only for north America is set ON, ..., a 4-digit code is 8888). AUTO should only be preset through the DVD setup menu and the TV setup menu. Press any button on the screen with the setup menu: 111 Press the direction buttons to...
... in the stop mode for detailed menu descriptions. Use the LCD SETUP button to confirm. 333 To exit, press DVD SETUP again. System Setup 111 TV System - Set the power resume function On.Off. Wide-...) or 16:9(Wide Screen). 4:3 LB(Letter Box): This is selected when the unit is connected to a normal TV. 4:3 PS(Pan Scan): This is selected when the unit is suitable only for north America is set ON, ..., a 4-digit code is 8888). AUTO should only be preset through the DVD setup menu and the TV setup menu. Press any button on the screen with the setup menu: 111 Press the direction buttons to...


