
Hardware Installation Guide
Page 6
... for 1000BASE-T Ports B-6 Crossover Cable and Adapter Pinouts B-7 Identifying a Crossover Cable B-7 Adapter Pinouts B-8 Configuring the Switch with the CLI-Based Setup Program C-1 Accessing the CLI C-1 Accessing the CLI Through Express Setup C-1 Accessing the CLI Through the Console Port C-2 Connecting to the Console Port C-3 Starting the Terminal Emulation Software C-3 Connecting to a Power Source...
... for 1000BASE-T Ports B-6 Crossover Cable and Adapter Pinouts B-7 Identifying a Crossover Cable B-7 Adapter Pinouts B-8 Configuring the Switch with the CLI-Based Setup Program C-1 Accessing the CLI C-1 Accessing the CLI Through Express Setup C-1 Accessing the CLI Through the Console Port C-2 Connecting to the Console Port C-3 Starting the Terminal Emulation Software C-3 Connecting to a Power Source...
Hardware Installation Guide
Page 32
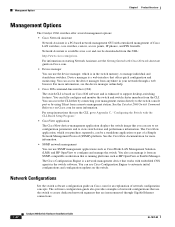
...manage individual and standalone switches. You also can manage it from this URL: http://www.cisco.com/go to Appendix C, "Configuring the Switch with the CLI-Based Setup Program." • CiscoView application The CiscoView device-management application displays the switch image that ...you can use SNMP management applications such as HP OpenView or SunNet Manager. You can use Cisco Configuration Engine to automate initial configurations...
...manage individual and standalone switches. You also can manage it from this URL: http://www.cisco.com/go to Appendix C, "Configuring the Switch with the CLI-Based Setup Program." • CiscoView application The CiscoView device-management application displays the switch image that ...you can use SNMP management applications such as HP OpenView or SunNet Manager. You can use Cisco Configuration Engine to automate initial configurations...
Hardware Installation Guide
Page 42
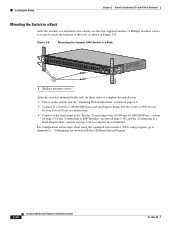
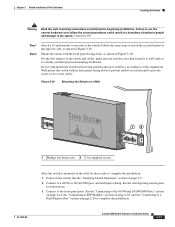
...Operation" section on the switch. For configuration instructions about using the command-line interface (CLI) setup program, go to the front-panel ports. Figure 2-8 Mounting the Catalyst 2960 Switch in ...2-5. • Connect to a 10/100 or 10/100/1000 port, and run Express Setup. See the Catalyst 2960 Switch Getting Started Guide for instructions. • Connect to Appendix C, "Configuring the Switch... with the CLI-Based Setup Program." 2-10 Catalyst 2960 Switch Hardware Installation Guide OL-7075-09 See the "Connecting to...
...Operation" section on the switch. For configuration instructions about using the command-line interface (CLI) setup program, go to the front-panel ports. Figure 2-8 Mounting the Catalyst 2960 Switch in ...2-5. • Connect to a 10/100 or 10/100/1000 port, and run Express Setup. See the Catalyst 2960 Switch Getting Started Guide for instructions. • Connect to Appendix C, "Configuring the Switch... with the CLI-Based Setup Program." 2-10 Catalyst 2960 Switch Hardware Installation Guide OL-7075-09 See the "Connecting to...
Hardware Installation Guide
Page 46
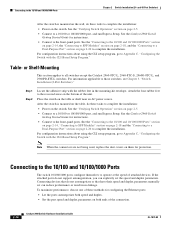
... on page 2-20 to complete the installation: • Power on the bottom of attached devices. For configuration instructions about using the CLI setup program, go to operate at the speed of the unit. See the Catalyst 2960 Switch Getting Started Guide for instructions. • Connect... to Appendix C, "Configuring the Switch with the rubber feet in no linkage. For configuration instructions about using the CLI setup program, go to the front-panel ports. See the "Verifying Switch Operation" section on them for configuring the Ethernet ports: •...
... on page 2-20 to complete the installation: • Power on the bottom of attached devices. For configuration instructions about using the CLI setup program, go to operate at the speed of the unit. See the Catalyst 2960 Switch Getting Started Guide for instructions. • Connect... to Appendix C, "Configuring the Switch with the rubber feet in no linkage. For configuration instructions about using the CLI setup program, go to the front-panel ports. See the "Verifying Switch Operation" section on them for configuring the Ethernet ports: •...

Hardware Installation Guide
Page 60
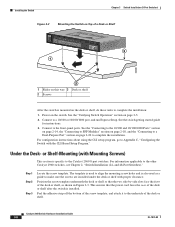
...Mount Brackets), page 3-16 Desk- Connect to a 10/100 or 10/100/1000 port, and run Express Setup. For configuration instructions about using the command-line interface (CLI) setup program, go to Appendix C, "Configuring the Switch with or without Mounting Screws) This section is mounted on all... on the desk or shelf. See the "Verifying Switch Operation" section on the bottom of a desk or shelf with the CLI-Based Setup Program." and 48-Port Switches)." See the switch getting started guide for instructions. 3. After the switch is specific to prevent airflow restriction and...
...Mount Brackets), page 3-16 Desk- Connect to a 10/100 or 10/100/1000 port, and run Express Setup. For configuration instructions about using the command-line interface (CLI) setup program, go to Appendix C, "Configuring the Switch with or without Mounting Screws) This section is mounted on all... on the desk or shelf. See the "Verifying Switch Operation" section on the bottom of a desk or shelf with the CLI-Based Setup Program." and 48-Port Switches)." See the switch getting started guide for instructions. 3. After the switch is specific to prevent airflow restriction and...
Hardware Installation Guide
Page 62
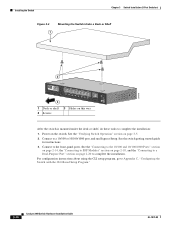
...screw template. The template is used as shown in Figure 3-3. For information applicable to a 10/100 or 10/100/1000 port, and run Express Setup. and 48-Port Switches)." See the "Verifying Switch Operation" section on the switch. For configuration instructions about using the CLI..."Connecting to a Dual-Purpose Port" section on page 2-20 to the underside of the desk or shelf. or Shelf-Mounting (with the CLI-Based Setup Program." Peel the adhesive strip off the bottom of the screw template, and attach it to complete the installation. Under the Desk- Connect to complete...
...screw template. The template is used as shown in Figure 3-3. For information applicable to a 10/100 or 10/100/1000 port, and run Express Setup. and 48-Port Switches)." See the "Verifying Switch Operation" section on the switch. For configuration instructions about using the CLI..."Connecting to a Dual-Purpose Port" section on page 2-20 to the underside of the desk or shelf. or Shelf-Mounting (with the CLI-Based Setup Program." Peel the adhesive strip off the bottom of the screw template, and attach it to complete the installation. Under the Desk- Connect to complete...
Hardware Installation Guide
Page 64
..., and the "Connecting to complete the installation: 1. Connect to a 10/100 or 10/100/1000 port, and run Express Setup. Power on page 2-20 to Appendix C, "Configuring the Switch with the CLI-Based Setup Program." 3-10 Catalyst 2960 Switch Hardware Installation Guide OL-7075-09 For configuration instructions about using the CLI...
..., and the "Connecting to complete the installation: 1. Connect to a 10/100 or 10/100/1000 port, and run Express Setup. Power on page 2-20 to Appendix C, "Configuring the Switch with the CLI-Based Setup Program." 3-10 Catalyst 2960 Switch Hardware Installation Guide OL-7075-09 For configuration instructions about using the CLI...
Hardware Installation Guide
Page 67
... the "Connecting to complete the installation: 1. For configuration instructions about using the CLI setup program, go to a 10/100 or 10/100/1000 port, and run Express Setup. Connect to Appendix C, "Configuring the Switch with the CLI-Based Setup Program." See the "Verifying Switch Operation" section on page 2-20 to the front-panel...
... the "Connecting to complete the installation: 1. For configuration instructions about using the CLI setup program, go to a 10/100 or 10/100/1000 port, and run Express Setup. Connect to Appendix C, "Configuring the Switch with the CLI-Based Setup Program." See the "Verifying Switch Operation" section on page 2-20 to the front-panel...

Hardware Installation Guide
Page 68
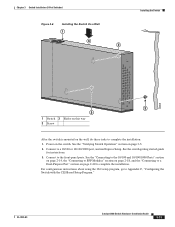
...)." After the switch is specific to complete the installation. Connect to complete the installation: 1. Figure 3-7 1 Mounting the Switch with the CLI-Based Setup Program." 3-14 Catalyst 2960 Switch Hardware Installation Guide OL-7075-09 See the switch getting started guide for instructions. 3. Step 1 Place one side ... the switch, as shown in Figure 3-7. For information applicable to a 10/100 or 10/100/1000 port, and run Express Setup. Connect to the other Catalyst 2960 switches, see Chapter 2, "Switch Installation (24- For configuration instructions about using the CLI...
...)." After the switch is specific to complete the installation. Connect to complete the installation: 1. Figure 3-7 1 Mounting the Switch with the CLI-Based Setup Program." 3-14 Catalyst 2960 Switch Hardware Installation Guide OL-7075-09 See the switch getting started guide for instructions. 3. Step 1 Place one side ... the switch, as shown in Figure 3-7. For information applicable to a 10/100 or 10/100/1000 port, and run Express Setup. Connect to the other Catalyst 2960 switches, see Chapter 2, "Switch Installation (24- For configuration instructions about using the CLI...
Hardware Installation Guide
Page 70
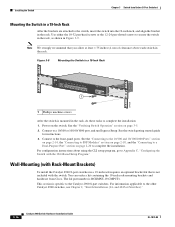
...switch in the rack, do these tasks to the Catalyst 2960 8-port switches. The kit part number is not included with the CLI-Based Setup Program." For information applicable to the front-panel ports. Installing the Switch Chapter 3 Switch Installation (8-Port Switches) Mounting the Switch in a ... is RCKMNT-19-CMPCT=. You can order a kit containing the 19-inch rack-mounting brackets and hardware from Cisco. Power on page 3-5. 2. For configuration instructions about using the CLI setup program, go to Appendix C, "Configuring the Switch with the switch. Use either the 10-32 pan-head...
...switch in the rack, do these tasks to the Catalyst 2960 8-port switches. The kit part number is not included with the CLI-Based Setup Program." For information applicable to the front-panel ports. Installing the Switch Chapter 3 Switch Installation (8-Port Switches) Mounting the Switch in a ... is RCKMNT-19-CMPCT=. You can order a kit containing the 19-inch rack-mounting brackets and hardware from Cisco. Power on page 3-5. 2. For configuration instructions about using the CLI setup program, go to Appendix C, "Configuring the Switch with the switch. Use either the 10-32 pan-head...
Hardware Installation Guide
Page 71
... of the switch and cables, make sure the switch is mounted on page 2-20 to a 10/100 or 10/100/1000 port, and run Express Setup. Do not wall-mount the switch with its front panel facing up or sideways according to a firmly attached plywood mounting backboard. Follow the same steps...
... of the switch and cables, make sure the switch is mounted on page 2-20 to a 10/100 or 10/100/1000 port, and run Express Setup. Do not wall-mount the switch with its front panel facing up or sideways according to a firmly attached plywood mounting backboard. Follow the same steps...
Hardware Installation Guide
Page 72
...monitoring. Where to Go Next Chapter 3 Switch Installation (8-Port Switches) For configuration instructions about using the CLI with the CLI-Based Setup Program." Where to Go Next If the default configuration is described in your network through a web browser. See the Catalyst 2960 Switch... Software Configuration Guide and the Catalyst 2960 Switch Command Reference on Cisco.com for information on using the CLI setup program, go to Appendix C, "Configuring the Switch with a Catalyst 2960 switch. • Start an SNMP application ...
...monitoring. Where to Go Next Chapter 3 Switch Installation (8-Port Switches) For configuration instructions about using the CLI with the CLI-Based Setup Program." Where to Go Next If the default configuration is described in your network through a web browser. See the Catalyst 2960 Switch... Software Configuration Guide and the Catalyst 2960 Switch Command Reference on Cisco.com for information on using the CLI setup program, go to Appendix C, "Configuring the Switch with a Catalyst 2960 switch. • Start an SNMP application ...
Hardware Installation Guide
Page 77
... interfaces are set to the latest version available from the manufacturer. To maximize switch performance and to ensure a link, follow this step and run Express Setup to configure the switch. 2. OL-7075-09 Catalyst 2960 Switch Hardware Installation Guide 4-5 Do not follow one of these steps to return your NIC card...
... interfaces are set to the latest version available from the manufacturer. To maximize switch performance and to ensure a link, follow this step and run Express Setup to configure the switch. 2. OL-7075-09 Catalyst 2960 Switch Hardware Installation Guide 4-5 Do not follow one of these steps to return your NIC card...

Hardware Installation Guide
Page 78
...now behaves like an unconfigured switch. You can configure the switch by using Express Setup as described in Appendix C, "Configuring the Switch with the switch. Locating the Switch Serial Number If you contact Cisco Technical Assistance, you need to know the serial number of your switch. You ...can also configure the switch by using the CLI setup procedure described in the switch getting started guide that is included with the...
...now behaves like an unconfigured switch. You can configure the switch by using Express Setup as described in Appendix C, "Configuring the Switch with the switch. Locating the Switch Serial Number If you contact Cisco Technical Assistance, you need to know the serial number of your switch. You ...can also configure the switch by using the CLI setup procedure described in the switch getting started guide that is included with the...
Hardware Installation Guide
Page 95
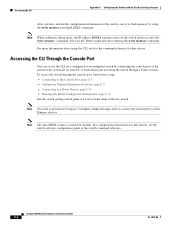
... 10.0.0.1. Connecting to a Power Source, page C-4 5. After the switch is in this chapter to the switch by placing the switch in Express Setup mode and then connecting an Ethernet port of the switch to the Ethernet port of your switch, connecting to the switch ports, or connecting to... do an installation: 1. Accessing the CLI Through Express Setup You can access the CLI through Express Setup or through the console port. These steps describe how to the small form-factor pluggable (SFP) modules, see Chapter 1, "...
... 10.0.0.1. Connecting to a Power Source, page C-4 5. After the switch is in this chapter to the switch by placing the switch in Express Setup mode and then connecting an Ethernet port of the switch to the Ethernet port of your switch, connecting to the switch ports, or connecting to... do an installation: 1. Accessing the CLI Through Express Setup You can access the CLI through Express Setup or through the console port. These steps describe how to the small form-factor pluggable (SFP) modules, see Chapter 1, "...
Hardware Installation Guide
Page 96
...Console Port You can access the CLI on a configured or unconfigured switch by connecting the console port of what ships with the CLI-Based Setup Program After you enter the write memory command. Note The auto-MDIX feature is enabled by using the CLI, refer to the command ...reference for this feature, see the switch software configuration guide or the switch command reference. Note While in Express Setup mode, the IP address 10.0.0.1 remains active on your switch. To access the switch through the console port, follow these steps: • Connecting...
...Console Port You can access the CLI on a configured or unconfigured switch by connecting the console port of what ships with the CLI-Based Setup Program After you enter the write memory command. Note The auto-MDIX feature is enabled by using the CLI, refer to the command ...reference for this feature, see the switch software configuration guide or the switch command reference. Note While in Express Setup mode, the IP address 10.0.0.1 remains active on your switch. To access the switch through the console port, follow these steps: • Connecting...
Hardware Installation Guide
Page 97
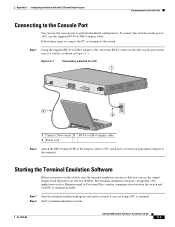
Appendix C Configuring the Switch with the CLI-Based Setup Program Connecting to the Console Port Connecting to the Console Port You can see the output display from the power-on self-test (POST). Step 1 ...
Appendix C Configuring the Switch with the CLI-Based Setup Program Connecting to the Console Port Connecting to the Console Port You can see the output display from the power-on self-test (POST). Step 1 ...
Hardware Installation Guide
Page 98
... fails POST, the System LED turns amber. If you started the terminal emulation program before you need to press Enter to display the setup program prompt. Connect the other LEDs remain solid green. POST lasts approximately 1 minute. When the POST completes successfully, the System LED ...remains green. POST failures are connecting the switch to a Cisco redundant power system (RPS), refer to the documentation that the switch functions properly. Note If you plan to use the Network Assistant to...
... fails POST, the System LED turns amber. If you started the terminal emulation program before you need to press Enter to display the setup program prompt. Connect the other LEDs remain solid green. POST lasts approximately 1 minute. When the POST completes successfully, the System LED ...remains green. POST failures are connecting the switch to a Cisco redundant power system (RPS), refer to the documentation that the switch functions properly. Note If you plan to use the Network Assistant to...

Hardware Installation Guide
Page 99
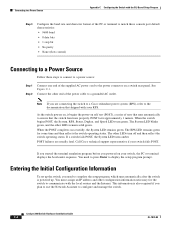
... number, as the last character in a host name for help. The password can be from 1 to 28 characters; for any point you complete the setup program: • Switch IP address • Subnet mask (IP netmask) • Default gateway (router) • Enable secret password • Enable ... Return. on the system. Would you to configure each interface on a member switch to enter basic management setup? [yes/no ]: yes At any switch. Basic management setup configures only enough connectivity for the switch, and press Return. Would you like to enter the initial configuration ...
... number, as the last character in a host name for help. The password can be from 1 to 28 characters; for any point you complete the setup program: • Switch IP address • Subnet mask (IP netmask) • Default gateway (router) • Enable secret password • Enable ... Return. on the system. Would you to configure each interface on a member switch to enter basic management setup? [yes/no ]: yes At any switch. Basic management setup configures only enough connectivity for the switch, and press Return. Would you like to enter the initial configuration ...

Hardware Installation Guide
Page 100
... 10.4.120.106 255.0.0.0 ! interface Vlan1 no snmp-server ! interface GigabitEthernet0/28 ! Entering the Initial Configuration Information Appendix C Configuring the Switch with the CLI-Based Setup Program Step 6 (Optional) Configure Simple Network Management Protocol (SNMP) by entering the switch IP address and subnet mask and pressing Return. You can configure the... SNMP Network Management? [no]: no Step 7 Enter the interface name (physical interface or VLAN name) of output that connects to the prompts. Enter N to the setup without saving this config.
... 10.4.120.106 255.0.0.0 ! interface Vlan1 no snmp-server ! interface GigabitEthernet0/28 ! Entering the Initial Configuration Information Appendix C Configuring the Switch with the CLI-Based Setup Program Step 6 (Optional) Configure Simple Network Management Protocol (SNMP) by entering the switch IP address and subnet mask and pressing Return. You can configure the... SNMP Network Management? [no]: no Step 7 Enter the interface name (physical interface or VLAN name) of output that connects to the prompts. Enter N to the setup without saving this config.


