Owners Manual
Page 2
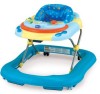
... walker frame if any components are broken or missing. • Do not use replacement parts other than those approved by the manufacturer or distributor. • Strangulation Hazard: Do not use laces or ties to attach play tray. • Keep all of the product, please refer to the following instructions.... performance. Only use the walker safely, the child's height must only be used by children who can sit unaided, approximately 6 months old. Always keep them for children weighing more than 26.5 lbs, or able to walk unassisted. • To use the baby walking frame on flat, ...
... walker frame if any components are broken or missing. • Do not use replacement parts other than those approved by the manufacturer or distributor. • Strangulation Hazard: Do not use laces or ties to attach play tray. • Keep all of the product, please refer to the following instructions.... performance. Only use the walker safely, the child's height must only be used by children who can sit unaided, approximately 6 months old. Always keep them for children weighing more than 26.5 lbs, or able to walk unassisted. • To use the baby walking frame on flat, ...
Owners Manual
Page 8
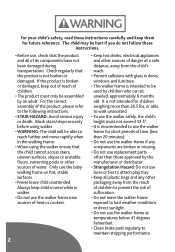
Asegúrese de que las almohadillas de freno estén completamente insertas en cada uno de los huecos. 8 Inserte las almohadillas de freno en los huecos ubicados alrededor de la base del andador como se muestra en la figura. Insert the Brake Pads into each of the Walker Frame as shown. Ensure that the Brake Pads are firmly pushed all the way into the sockets located around the bottom of the sockets. 3. How to Assemble Walker Cómo armar el andador 3 3.
Asegúrese de que las almohadillas de freno estén completamente insertas en cada uno de los huecos. 8 Inserte las almohadillas de freno en los huecos ubicados alrededor de la base del andador como se muestra en la figura. Insert the Brake Pads into each of the Walker Frame as shown. Ensure that the Brake Pads are firmly pushed all the way into the sockets located around the bottom of the sockets. 3. How to Assemble Walker Cómo armar el andador 3 3.
Owners Manual
Page 17
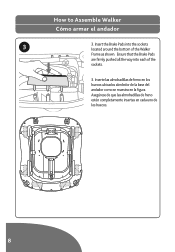
... de que la posición regulable de altura esté bien firme. 11. Reach under the front of the seat: Remove your child from the walker. Antes de colocar a su hijo en el andador, presione la bandeja hacia abajo para asegurarse de que la posición regulable de altura esté...; bien firme. 17 Before placing your child in the walker push down on the tray to make sure your child in the walker push down on the latch to allow the seat height to be raised or lowered. Before placing your child...
... de que la posición regulable de altura esté bien firme. 11. Reach under the front of the seat: Remove your child from the walker. Antes de colocar a su hijo en el andador, presione la bandeja hacia abajo para asegurarse de que la posición regulable de altura esté...; bien firme. 17 Before placing your child in the walker push down on the tray to make sure your child in the walker push down on the latch to allow the seat height to be raised or lowered. Before placing your child...
Owners Manual
Page 19
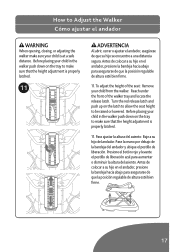
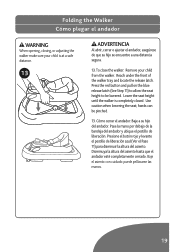
... liberación azul (Ver el Paso 11) para disminuir la altura del asiento. Folding the Walker Cómo plegar el andador WARNING When opening, closing, or adjusting the walker make sure your child from the walker. Cómo cerrar el andador: Baje a su hijo del andador. Disminuya la altura del ...asiento hasta que el andador esté completamente cerrado. Reach under the front of the walker tray and locate the release latch. Baje el asiento con cuidado: puede pellizcarse las manos. 19 Press the red button and pull on the blue...
... liberación azul (Ver el Paso 11) para disminuir la altura del asiento. Folding the Walker Cómo plegar el andador WARNING When opening, closing, or adjusting the walker make sure your child from the walker. Cómo cerrar el andador: Baje a su hijo del andador. Disminuya la altura del ...asiento hasta que el andador esté completamente cerrado. Reach under the front of the walker tray and locate the release latch. Baje el asiento con cuidado: puede pellizcarse las manos. 19 Press the red button and pull on the blue...
Owners Manual
Page 20
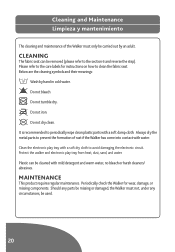
... come into contact with water. Do not bleach. It is recommended to periodically wipe clean plastic parts with a soft dry cloth to prevent the formation of the Walker must not, under any parts be missing or damaged, the Walker must only be carried out by hand in cold water. Plastic can be removed (please.... MAINTENANCE This product requires regular maintenance. Please refer to the care labels for wear, damage, or missing components. Do not tumble dry. Periodically check the Walker for instructions on how to the section 6 and reverse the step).
... come into contact with water. Do not bleach. It is recommended to periodically wipe clean plastic parts with a soft dry cloth to prevent the formation of the Walker must not, under any parts be missing or damaged, the Walker must only be carried out by hand in cold water. Plastic can be removed (please.... MAINTENANCE This product requires regular maintenance. Please refer to the care labels for wear, damage, or missing components. Do not tumble dry. Periodically check the Walker for instructions on how to the section 6 and reverse the step).
Owners Manual
Page 22
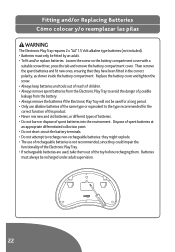
... toy before recharging them out of spent batteries into the environment. Batteries must only be recharged under adult supervision. 22 Fitting and/or Replacing Batteries Cómo colocar y/o reemplazar las pilas WARNING The Electronic Play Tray requires 2 x "AA" 1.5 Volt alkaline type batteries (not... included). • Batteries must always be fitted by an adult. • To fit and/or replace batteries: Loosen the screw on the battery compartment cover with a suitable screwdriver, press the tab and remove the battery compartment cover. Then remove...
... toy before recharging them out of spent batteries into the environment. Batteries must only be recharged under adult supervision. 22 Fitting and/or Replacing Batteries Cómo colocar y/o reemplazar las pilas WARNING The Electronic Play Tray requires 2 x "AA" 1.5 Volt alkaline type batteries (not... included). • Batteries must always be fitted by an adult. • To fit and/or replace batteries: Loosen the screw on the battery compartment cover with a suitable screwdriver, press the tab and remove the battery compartment cover. Then remove...

Owners Manual
Page 24
... Please do not return this product, or are missing any questions or comments about this product to the store. Contact us in one of the parts. For more Information Para más información If you have any of the following ways: By phone (toll free): (877)-424-4226 By e-mail: [email protected] By mail: 1826 William Penn Way Lancaster, PA 17601 Si tiene preguntas o sugerencias sobre este producto, o falta alguna de las partes, no devuelva este producto a la tienda.
... Please do not return this product, or are missing any questions or comments about this product to the store. Contact us in one of the parts. For more Information Para más información If you have any of the following ways: By phone (toll free): (877)-424-4226 By e-mail: [email protected] By mail: 1826 William Penn Way Lancaster, PA 17601 Si tiene preguntas o sugerencias sobre este producto, o falta alguna de las partes, no devuelva este producto a la tienda.


