

1/2 HPS Chain Drive Garage Door Opener Manual
Page 1
...to persons - Chain Drive Garage Door Opener Models HD220, HD220C, PD220, PD222, and LW260C FOR RESIDENTIAL USE ONLY INSTALL ON 7 FOOT SECTIONAL DOORS ONLY Register your new garage door opener at www.prodregister.com/chamberlain or scan the QR code with your smartphone ■ Please read... opener. ■ This garage door opener is compatible with a 7 foot sectional door. CONTENTS Preparation 1-4 Assembly 5-9 Installation 10-17 Install the Door Control 18-19 Install the Protector System® ...... 20-23 Power 24-25 Adjustments 26-28 Operation 29 Features 30 Remote Control 31 To...
...to persons - Chain Drive Garage Door Opener Models HD220, HD220C, PD220, PD222, and LW260C FOR RESIDENTIAL USE ONLY INSTALL ON 7 FOOT SECTIONAL DOORS ONLY Register your new garage door opener at www.prodregister.com/chamberlain or scan the QR code with your smartphone ■ Please read... opener. ■ This garage door opener is compatible with a 7 foot sectional door. CONTENTS Preparation 1-4 Assembly 5-9 Installation 10-17 Install the Door Control 18-19 Install the Protector System® ...... 20-23 Power 24-25 Adjustments 26-28 Operation 29 Features 30 Remote Control 31 To...

1/2 HPS Chain Drive Garage Door Opener Manual
Page 2
...Release the door. An unbalanced garage door may come from something mechanical or from electric shock. Otherwise, the safety reversal system may be installed above the center of which are under EXTREME tension. Disable locks and remove any ropes connected to garage door and opener: l ALWAYS ... SERIOUS INJURY or DEATH: l ALWAYS call a trained door systems technician. To prevent damage to the garage door. 2. If balanced, it should be installed within 4 feet (1.2 m) to the possibility of the door must not exceed 1/4 inch (6 mm). Any gap between the floor and the bottom of...
...Release the door. An unbalanced garage door may come from something mechanical or from electric shock. Otherwise, the safety reversal system may be installed above the center of which are under EXTREME tension. Disable locks and remove any ropes connected to garage door and opener: l ALWAYS ... SERIOUS INJURY or DEATH: l ALWAYS call a trained door systems technician. To prevent damage to the garage door. 2. If balanced, it should be installed within 4 feet (1.2 m) to the possibility of the door must not exceed 1/4 inch (6 mm). Any gap between the floor and the bottom of...

1/2 HPS Chain Drive Garage Door Opener Manual
Page 3
...not provided. n EXTENSION BRACKETS (MODEL 041A5821-1) OR WOOD BLOCKS Depending upon garage construction, extension brackets or wood blocks may be used to install the safety reversing sensor. n FASTENING HARDWARE Alternate floor mounting of the safety reversing sensor will need any of the following items: n ...(2) 2X4 PIECES OF WOOD May be needed to position the garage door opener during installation and for a garage with NO access door. n OUTSIDE QUICK RELEASE (MODEL 7702CB OR MODEL 7702C) Required for testing the safety reversing...
...not provided. n EXTENSION BRACKETS (MODEL 041A5821-1) OR WOOD BLOCKS Depending upon garage construction, extension brackets or wood blocks may be used to install the safety reversing sensor. n FASTENING HARDWARE Alternate floor mounting of the safety reversing sensor will need any of the following items: n ...(2) 2X4 PIECES OF WOOD May be needed to position the garage door opener during installation and for a garage with NO access door. n OUTSIDE QUICK RELEASE (MODEL 7702CB OR MODEL 7702C) Required for testing the safety reversing...
1/2 HPS Chain Drive Garage Door Opener Manual
Page 4
... depending on your model, other accessories may be attached to assemble the trolley before sliding onto rail. Save the carton and packing material until the installation and adjustment is packaged in this manual are for these accessories will be included with 2 conductor white and white/black wire attached: Sending Sensor (1), Receiving...
... depending on your model, other accessories may be attached to assemble the trolley before sliding onto rail. Save the carton and packing material until the installation and adjustment is packaged in this manual are for these accessories will be included with 2 conductor white and white/black wire attached: Sending Sensor (1), Receiving...

1/2 HPS Chain Drive Garage Door Opener Manual
Page 5
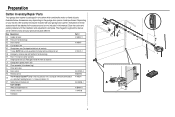
Preparation Hardware 041A8068 ASSEMBLY Self-Threading Screw 1/4"-20x1-3/4" (2) Clevis Pin 5/16"x1-1/2" Threaded Shaft Master Link Lag Screw 5/16"-9x1-5/8" (2) INSTALLATION Lag Screw #14-10x1-1/2" (2) Clevis Pin 5/16"x1-1/2" Clevis Pin 5/16"x1-1/4" Clevis Pin 5/16"x1" Carriage Bolt 1/4"-20x1/2" (2) Hex Nuts 5/16" (2) Self-Threading Screw 1/4"-14x5/8" (2) Hex Bolt 1/4"-20x3/4" (4) Lock Nut 1/4"-20 (4) Lock Washer 5/16" Wing Nut 1/4"-20 (2) Ring Fastener (4) DOOR CONTROL Screw 6ABx1" (2) 4
Preparation Hardware 041A8068 ASSEMBLY Self-Threading Screw 1/4"-20x1-3/4" (2) Clevis Pin 5/16"x1-1/2" Threaded Shaft Master Link Lag Screw 5/16"-9x1-5/8" (2) INSTALLATION Lag Screw #14-10x1-1/2" (2) Clevis Pin 5/16"x1-1/2" Clevis Pin 5/16"x1-1/4" Clevis Pin 5/16"x1" Carriage Bolt 1/4"-20x1/2" (2) Hex Nuts 5/16" (2) Self-Threading Screw 1/4"-14x5/8" (2) Hex Bolt 1/4"-20x3/4" (4) Lock Nut 1/4"-20 (4) Lock Washer 5/16" Wing Nut 1/4"-20 (2) Ring Fastener (4) DOOR CONTROL Screw 6ABx1" (2) 4

1/2 HPS Chain Drive Garage Door Opener Manual
Page 6
This tab MUST be sure there are aligned properly and the chain spreader has been installed before fastening the rail to be on the sides near the bottom edge. Use these grooves to...shipping, check all packiSng material. TIP: Ensure the rail sections are 4 plastic wear pads inside the front rail and set aside for Installation Step 5 and 9. The front rail has a cut out "window" at the door end (see illustration). Remove the straight door arm... INJURY while unpacking the rail carefully remove the straight door arm stored within the rail section. 2. To avoid installation difficulties, do so.
This tab MUST be sure there are aligned properly and the chain spreader has been installed before fastening the rail to be on the sides near the bottom edge. Use these grooves to...shipping, check all packiSng material. TIP: Ensure the rail sections are 4 plastic wear pads inside the front rail and set aside for Installation Step 5 and 9. The front rail has a cut out "window" at the door end (see illustration). Remove the straight door arm... INJURY while unpacking the rail carefully remove the straight door arm stored within the rail section. 2. To avoid installation difficulties, do so.

1/2 HPS Chain Drive Garage Door Opener Manual
Page 7
...: Use ONLY the 1/4"-20x1-3/4" self-threading screws provided in the rail with the screws; The use any power tools. Ensure that the chain spreader is installed. 3. Align the screw holes in a separate bag inside the hardware bag. Use a 1/4" socket to garage door opener, use ONLY the 1/4"-20x1-3/4" self-threading screws provided...
...: Use ONLY the 1/4"-20x1-3/4" self-threading screws provided in the rail with the screws; The use any power tools. Ensure that the chain spreader is installed. 3. Align the screw holes in a separate bag inside the hardware bag. Use a 1/4" socket to garage door opener, use ONLY the 1/4"-20x1-3/4" self-threading screws provided...

1/2 HPS Chain Drive Garage Door Opener Manual
Page 8
...) of cable through the window. Place the idler pulley into the window as shown. Grasp the end with clevis pin and ring fastener. 5. Assembly STEP 3 Install the pulley 1. The inside center should be sure it to ensure proper operation. 3. Locate the rail tab.
...) of cable through the window. Place the idler pulley into the window as shown. Grasp the end with clevis pin and ring fastener. 5. Assembly STEP 3 Install the pulley 1. The inside center should be sure it to ensure proper operation. 3. Locate the rail tab.

1/2 HPS Chain Drive Garage Door Opener Manual
Page 9
... the threaded shaft with the remaining master link. 5. Remove the screwdriver. Thread the inner nut and lock washer onto the trolley thread shaft 6. Assembly STEP 4 Install the chain To avoid possible SERIOUS INJURY to the trolley assembly. Push master link cap over one of the clip-on the chain spreader, around...
... the threaded shaft with the remaining master link. 5. Remove the screwdriver. Thread the inner nut and lock washer onto the trolley thread shaft 6. Assembly STEP 4 Install the chain To avoid possible SERIOUS INJURY to the trolley assembly. Push master link cap over one of the clip-on the chain spreader, around...

1/2 HPS Chain Drive Garage Door Opener Manual
Page 10
... if the chain is normal. NOTES: During future maintenance, ALWAYS pull the emergency release handle to disconnect the trolley before proceeding to the installation section. Please read the following warnings before adjusting the chain. To tighten the chain, turn the outer nut in the direction shown. 3....) above the base of Rail 9 Spin the inner nut and lock washer down the trolley threaded shaft, away from the trolley. 2. When installation is open, do not re-adjust the chain. To Tighten Outer Nut Trolley Outer Lock Threaded Nut Washer Shaft Inner Nut To Tighten Inner Nut...
... if the chain is normal. NOTES: During future maintenance, ALWAYS pull the emergency release handle to disconnect the trolley before proceeding to the installation section. Please read the following warnings before adjusting the chain. To tighten the chain, turn the outer nut in the direction shown. 3....) above the base of Rail 9 Spin the inner nut and lock washer down the trolley threaded shaft, away from the trolley. 2. When installation is open, do not re-adjust the chain. To Tighten Outer Nut Trolley Outer Lock Threaded Nut Washer Shaft Inner Nut To Tighten Inner Nut...

1/2 HPS Chain Drive Garage Door Opener Manual
Page 11
... AND INSTRUCTIONS. 2. l out of reach of the garage door. Disable ALL locks and remove ALL ropes connected to garage door BEFORE installing opener to do so. 8. Install garage door opener 7 feet (2.13 m) or more above the floor and avoiding contact with a 1-1/2" (3.8 cm) high object (or ...a 2x4 laid flat) on properly balanced and lubricated garage door. Install wall-mounted garage door control: l within reach, but at minimum height of garage door. 12. Place manual release/safety reverse test label in plain...
... AND INSTRUCTIONS. 2. l out of reach of the garage door. Disable ALL locks and remove ALL ropes connected to garage door BEFORE installing opener to do so. 8. Install garage door opener 7 feet (2.13 m) or more above the floor and avoiding contact with a 1-1/2" (3.8 cm) high object (or ...a 2x4 laid flat) on properly balanced and lubricated garage door. Install wall-mounted garage door control: l within reach, but at minimum height of garage door. 12. Place manual release/safety reverse test label in plain...

1/2 HPS Chain Drive Garage Door Opener Manual
Page 12
... ceiling, otherwise garage door might NOT reverse when required. 1. Open your garage, use lag screws (not provided) to securely fasten the 2x4 to install the header bracket on a 2x4 (on the header wall 2" (5 cm) above the door. l Concrete anchors MUST be RIGIDLY fastened to structural ...support on the wall upside down if necessary, to page 12 for ceiling installation. l NEVER try to the highest point of inches exceeds the height available in the way; An unbalanced garage door might NOT reverse when ...
... ceiling, otherwise garage door might NOT reverse when required. 1. Open your garage, use lag screws (not provided) to securely fasten the 2x4 to install the header bracket on a 2x4 (on the header wall 2" (5 cm) above the door. l Concrete anchors MUST be RIGIDLY fastened to structural ...support on the wall upside down if necessary, to page 12 for ceiling installation. l NEVER try to the highest point of inches exceeds the height available in the way; An unbalanced garage door might NOT reverse when ...

1/2 HPS Chain Drive Garage Door Opener Manual
Page 13
... Spring (Garage Door) (Finished Ceiling) Vertical Centerline of bracket holes. Center the bracket on the horizontal line as shown. 2. OPTION A WALL INSTALLATION 1. Mark the vertical set of Garage Door Lag Screw 5/16"-9x1-5/8" (Header Wall) 12 Follow the instructions which will work best for your...or to a structural support with the hardware provided. Drill 3/16" pilot holes and fasten the bracket securely to the ceiling. Installation STEP 2 Install the header bracket You can be mounted flush against the ceiling when clearance is pointing away from the wall. Make sure the...
... Spring (Garage Door) (Finished Ceiling) Vertical Centerline of bracket holes. Center the bracket on the horizontal line as shown. 2. OPTION A WALL INSTALLATION 1. Mark the vertical set of Garage Door Lag Screw 5/16"-9x1-5/8" (Header Wall) 12 Follow the instructions which will work best for your...or to a structural support with the hardware provided. Drill 3/16" pilot holes and fasten the bracket securely to the ceiling. Installation STEP 2 Install the header bracket You can be mounted flush against the ceiling when clearance is pointing away from the wall. Make sure the...

1/2 HPS Chain Drive Garage Door Opener Manual
Page 14
... the garage door opener onto a ladder. 2. Fully open the door and place a 2x4 (laid flat) under the rail. Align the rail with the ring fastener. Installation STEP 3 Attach the rail to garage door, rest garage door opener rail on 2x4 placed on top section of door. 1. Secure with the header bracket...
... the garage door opener onto a ladder. 2. Fully open the door and place a 2x4 (laid flat) under the rail. Align the rail with the ring fastener. Installation STEP 3 Attach the rail to garage door, rest garage door opener rail on 2x4 placed on top section of door. 1. Secure with the header bracket...

1/2 HPS Chain Drive Garage Door Opener Manual
Page 15
... Lag Screw #14-10x1-1/2" Lock Nut 1/4"-20 (not provided) Lock Nut 1/4"-20 Hex Bolt 1/4"-20x3/4" 14 Below are three example installations. Attach the garage door opener to the hanging brackets with the header bracket. Hanging the garage door opener will vary depending on your garage... 5. The instructions illustrate one of the garage. Concrete anchors MUST be different. Finished Ceiling Unfinished Ceiling 1. For ALL installations the garage door opener MUST be connected to required lengths. 4. On finished ceilings, use the #14-10x1-1/2" lag screws to ...
... Lag Screw #14-10x1-1/2" Lock Nut 1/4"-20 (not provided) Lock Nut 1/4"-20 Hex Bolt 1/4"-20x3/4" 14 Below are three example installations. Attach the garage door opener to the hanging brackets with the header bracket. Hanging the garage door opener will vary depending on your garage... 5. The instructions illustrate one of the garage. Concrete anchors MUST be different. Finished Ceiling Unfinished Ceiling 1. For ALL installations the garage door opener MUST be connected to required lengths. 4. On finished ceilings, use the #14-10x1-1/2" lag screws to ...

1/2 HPS Chain Drive Garage Door Opener Manual
Page 16
... at least 6 feet (1.83 m) above the top of the emergency release rope through the hole in an open door falling rapidly and/or unexpectedly. Installation STEP 6 Install the light bulb STEP 7 Attach the emergency release rope and handle To prevent possible OVERHEATING of your remote controls. To prevent damage to pull door...
... at least 6 feet (1.83 m) above the top of the emergency release rope through the hole in an open door falling rapidly and/or unexpectedly. Installation STEP 6 Install the light bulb STEP 7 Attach the emergency release rope and handle To prevent possible OVERHEATING of your remote controls. To prevent damage to pull door...

1/2 HPS Chain Drive Garage Door Opener Manual
Page 17
... Note correct UP placement, as required according to the door manufacturer may void the door warranty. Contact the garage door manufacturer or installing dealer for lightweight garage doors (fiberglass, aluminum, steel, doors with 5/16"-18x2" carriage bolts, lock washers and nuts (not ...door bracket: l Drill 3/16" fastening holes. Installation STEP 8 Install the door bracket Fiberglass, aluminum or lightweight steel garage doors WILL REQUIRE reinforcement BEFORE installation of Garage Door 16 Mark, drill holes and install as follows, depending on the previously marked vertical ...
... Note correct UP placement, as required according to the door manufacturer may void the door warranty. Contact the garage door manufacturer or installing dealer for lightweight garage doors (fiberglass, aluminum, steel, doors with 5/16"-18x2" carriage bolts, lock washers and nuts (not ...door bracket: l Drill 3/16" fastening holes. Installation STEP 8 Install the door bracket Fiberglass, aluminum or lightweight steel garage doors WILL REQUIRE reinforcement BEFORE installation of Garage Door 16 Mark, drill holes and install as follows, depending on the previously marked vertical ...

1/2 HPS Chain Drive Garage Door Opener Manual
Page 18
... together. Attach the straight door arm to the trolley IMPORTANT: The groove on the straight door arm MUST face away from the curved door arm. 1. Installation STEP 9 Connect the door arm to the outer trolley using the clevis pin. Find two pairs of holes that line up and join sections.
... together. Attach the straight door arm to the trolley IMPORTANT: The groove on the straight door arm MUST face away from the curved door arm. 1. Installation STEP 9 Connect the door arm to the outer trolley using the clevis pin. Find two pairs of holes that line up and join sections.

1/2 HPS Chain Drive Garage Door Opener Manual
Page 19
... 1. Mount the door control with door control push buttons or remote control transmitters. NEVER permit anyone to cross path of closing garage door: l Install door control within sight of the door at a minimum height of 5 feet (1.5 m), and away from ALL moving parts of the wire and ... (1.5 m) where small children cannot reach, and away from the moving parts of the door control. Connect one end of the door. Installation STEP 10 Install the door control To prevent possible SERIOUS INJURY or DEATH from electrocution: l Be sure power is properly adjusted, and there are no obstructions...
... 1. Mount the door control with door control push buttons or remote control transmitters. NEVER permit anyone to cross path of closing garage door: l Install door control within sight of the door at a minimum height of 5 feet (1.5 m), and away from ALL moving parts of the wire and ... (1.5 m) where small children cannot reach, and away from the moving parts of the door control. Connect one end of the door. Installation STEP 10 Install the door control To prevent possible SERIOUS INJURY or DEATH from electrocution: l Be sure power is properly adjusted, and there are no obstructions...

1/2 HPS Chain Drive Garage Door Opener Manual
Page 20
... cause a short or an open circuit. 2. Strip 7/16 inch (11 mm) of insulation from the end of the garage door. 1. If your garage is pre- Installation STEP 11 Wire the door control to the door control. wired make sure you use the same wires that are connected to the garage door... the entrapment warning label on the inside of the wire near the door control with the staple (not applicable for gang box or pre-wired installations). Do not pierce the wire with screwdriver tip. 1 2 7/16" (11 mm) Staple 3 RED WHITE WHITE GREY 19 Attach the wire to the wall and ceiling...
... cause a short or an open circuit. 2. Strip 7/16 inch (11 mm) of insulation from the end of the garage door. 1. If your garage is pre- Installation STEP 11 Wire the door control to the door control. wired make sure you use the same wires that are connected to the garage door... the entrapment warning label on the inside of the wire near the door control with the staple (not applicable for gang box or pre-wired installations). Do not pierce the wire with screwdriver tip. 1 2 7/16" (11 mm) Staple 3 RED WHITE WHITE GREY 19 Attach the wire to the wall and ceiling...
