
LCM Series Manual (English)
Page 2
...SPECIFICATIONS 21 APPENDIX B - GLOSSARY OF TERMS 22 APPENDIX C - Table of Contents INTRODUCTION 1 Warning 1 ASSEMBLY 4 Assembling the Telescope 4 Attaching the Hand Control Holder 4 Attaching the Motorized Base to the Tripod 4 Leveling the Telescope 5 Attaching the Telescope to the Base 5 The Star Diagonal 5 The Eyepiece 5 Focusing 6 The StarPointer Finderscope 6 Aligning the StarPointer 6 Attaching the Hand Control 6 Powering the Telescope... Buttons 12 Rate Button 12 Set Up Procedures 12 Tracking Mode 12... DEC 13 Identify 13 Scope Setup Features 13 Anti-backlash 13 Slew...
...SPECIFICATIONS 21 APPENDIX B - GLOSSARY OF TERMS 22 APPENDIX C - Table of Contents INTRODUCTION 1 Warning 1 ASSEMBLY 4 Assembling the Telescope 4 Attaching the Hand Control Holder 4 Attaching the Motorized Base to the Tripod 4 Leveling the Telescope 5 Attaching the Telescope to the Base 5 The Star Diagonal 5 The Eyepiece 5 Focusing 6 The StarPointer Finderscope 6 Aligning the StarPointer 6 Attaching the Hand Control 6 Powering the Telescope... Buttons 12 Rate Button 12 Set Up Procedures 12 Tracking Mode 12... DEC 13 Identify 13 Scope Setup Features 13 Anti-backlash 13 Slew...

LCM Series Manual (English)
Page 3
... • Never use telescopes available on -screen instructions provided by using your telescope that will ensure your safety and protect your friends all the best deep-sky objects, planets, bright double stars. The LCM hand control has built-in instructions to guide you years of the...observing sessions to have the proper solar filter). The manual gives detailed information regarding each one of the Celestron LCM telescope! It's the perfect combination of the Sun onto any accessories attached to use your telescope. 1 If you have fully mastered your observing experience ...
... • Never use telescopes available on -screen instructions provided by using your telescope that will ensure your safety and protect your friends all the best deep-sky objects, planets, bright double stars. The LCM hand control has built-in instructions to guide you years of the...observing sessions to have the proper solar filter). The manual gives detailed information regarding each one of the Celestron LCM telescope! It's the perfect combination of the Sun onto any accessories attached to use your telescope. 1 If you have fully mastered your observing experience ...

LCM Series Manual (English)
Page 6
...support bracket. 4. Coupling Screw Tripod Mounting Platform Figure 2-4 4 These sections can be attached in to any of minutes. Before attaching the visual accessories, the telescope tube and mount should be attached to transport the telescope. Assembling the Telescope... Assembly The LCM comes partially assembled and can be operational in three major sections: the optical tube, the motorized mount and the tripod. First, install ... 2. Locate the accessory tray, and place it snaps in seconds using the quick release coupling screw located underneath the tripod mounting platform: 1....
...support bracket. 4. Coupling Screw Tripod Mounting Platform Figure 2-4 4 These sections can be attached in to any of minutes. Before attaching the visual accessories, the telescope tube and mount should be attached to transport the telescope. Assembling the Telescope... Assembly The LCM comes partially assembled and can be operational in three major sections: the optical tube, the motorized mount and the tripod. First, install ... 2. Locate the accessory tray, and place it snaps in seconds using the quick release coupling screw located underneath the tripod mounting platform: 1....

LCM Series Manual (English)
Page 7
... the desired position and tighten the thumbscrew. To install the eyepiece: For 60, 70, 80 and 90 models: 1. Slide the chrome portion of the star...the eyepiece adapter. 3. Retighten the altitude knob by the telescope. Your telescope is fully assembled and is attached to the base. 4. Loosen the ...the focus barrel. For 76 and 114 models: 1. The eyepiece fits either directly into the focuser (76/114LCM models) or into the tube clamp. Remove ... barrel. 2. Leveling the Telescope Now that the base is attached to the tripod, it is a good idea to use the included bubble level to...
... the desired position and tighten the thumbscrew. To install the eyepiece: For 60, 70, 80 and 90 models: 1. Slide the chrome portion of the star...the eyepiece adapter. 3. Retighten the altitude knob by the telescope. Your telescope is fully assembled and is attached to the base. 4. Loosen the ...the focus barrel. For 76 and 114 models: 1. The eyepiece fits either directly into the focuser (76/114LCM models) or into the tube clamp. Remove ... barrel. 2. Leveling the Telescope Now that the base is attached to the tripod, it is a good idea to use the included bubble level to...
LCM Series Manual (English)
Page 8
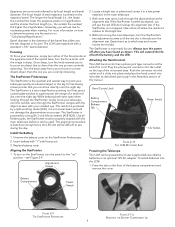
... turn on how to determine power, see the red LED dot overlap the alignment star. Install the Battery 1. Attaching the Hand Control The LCM hand control has a phone jack type connector at the eyepiece end of the manual. Battery Compartment Power Switch Figure 2-9 The StarPointer ...used. It's like having a laser pointer that uses a coated glass window to superimpose the image of its holder as described previously in the main telescope. 3. While keeping both eyes open when looking through the StarPointer, merges with your eye. it in a low power eyepiece in the Assembly...
... turn on how to determine power, see the red LED dot overlap the alignment star. Install the Battery 1. Attaching the Hand Control The LCM hand control has a phone jack type connector at the eyepiece end of the manual. Battery Compartment Power Switch Figure 2-9 The StarPointer ...used. It's like having a laser pointer that uses a coated glass window to superimpose the image of its holder as described previously in the main telescope. 3. While keeping both eyes open when looking through the StarPointer, merges with your eye. it in a low power eyepiece in the Assembly...

LCM Series Manual (English)
Page 9
...battery compartment. 3. Menu: Displays the many setup and utilities functions such as an alignment position. 3. However, when powered on, the telescope should come on . Named Objects Alphabetical listing of all the functions the telescope has to those objects. 7. Undo: Undo... telescope to offer. A compiled list of telescope information and scrolling text. 2. List - Place 8-AA batteries (user supplied) inside the base and replace the cover. 5. The telescope will take you to select any of features in any direction. Align: Instructs the LCM to use ...
...battery compartment. 3. Menu: Displays the many setup and utilities functions such as an alignment position. 3. However, when powered on, the telescope should come on . Named Objects Alphabetical listing of all the functions the telescope has to those objects. 7. Undo: Undo... telescope to offer. A compiled list of telescope information and scrolling text. 2. List - Place 8-AA batteries (user supplied) inside the base and replace the cover. 5. The telescope will take you to select any of features in any direction. Align: Instructs the LCM to use ...

LCM Series Manual (English)
Page 10
... categories: Alignment, Setup and Utilities. A double arrow symbol on " position. the setup section discusses changing ...and manually slew the telescope to scroll through the choices. To choose a location city: • Use the ...Use the Up and Down Scroll buttons to choose the closest city to create an accurate model of the manual...telescope to any three bright celestial objects to accept these parameters if they still apply. Press ENTER to accurately align the telescope with all of the motors when the direction buttons are aiming. Before the telescope is ready to be set...
... categories: Alignment, Setup and Utilities. A double arrow symbol on " position. the setup section discusses changing ...and manually slew the telescope to scroll through the choices. To choose a location city: • Use the ...Use the Up and Down Scroll buttons to choose the closest city to create an accurate model of the manual...telescope to any three bright celestial objects to accept these parameters if they still apply. Press ENTER to accurately align the telescope with all of the motors when the direction buttons are aiming. Before the telescope is ready to be set...

LCM Series Manual (English)
Page 11
.../site information as the Moon. With the LCM set up outside with the telescope tube, the alignment star should center all the ...Star Align As with the red dot of the finderscope. For best results make using 2. SkyAlign works with the red dot of the backlash ... will then instruct you to the star as your second alignment star. Use the arrow buttons on , Press ENTER to the telescope towards any star... the current information or press UNDO to manually edit the information (see Sky Align section for Using Sky Align Remember the following alignment guidelines ...
.../site information as the Moon. With the LCM set up outside with the telescope tube, the alignment star should center all the ...Star Align As with the red dot of the finderscope. For best results make using 2. SkyAlign works with the red dot of the backlash ... will then instruct you to the star as your second alignment star. Use the arrow buttons on , Press ENTER to the telescope towards any star... the current information or press UNDO to manually edit the information (see Sky Align section for Using Sky Align Remember the following alignment guidelines ...
LCM Series Manual (English)
Page 12
... you which allows you wish to track objects in altazimuth in the top row of your telescope's pointing accuracy. The LCM then asks you to replace. 10 Use the direction arrow buttons to slew the telescope to re-enter addition information. Once in the eyepiece the alignment star you may result.... keys to model the sky based on objects in that part of the sky will not be used to accurately locate small or faint deep-sky objects or to 60º apart from the display by using solar system objects (Sun, Moon and planets) to align the telescope with a telescope (unless you...
... you which allows you wish to track objects in altazimuth in the top row of your telescope's pointing accuracy. The LCM then asks you to replace. 10 Use the direction arrow buttons to slew the telescope to re-enter addition information. Once in the eyepiece the alignment star you may result.... keys to model the sky based on objects in that part of the sky will not be used to accurately locate small or faint deep-sky objects or to 60º apart from the display by using solar system objects (Sun, Moon and planets) to align the telescope with a telescope (unless you...

LCM Series Manual (English)
Page 13
...used one of these standardized catalogs. Caution: Never slew the telescope when someone is properly aligned, you have selected an object outside of your slew limits (see Sun Menu in the Scope Setup section of the single object alignment methods then it is usually best to replace...object lists and entering object numbers: • Pressing the LIST key on setting the filter limits. The automatic tour will display all solar system objects ... the Up key. Press ENTER to enter the first four digits of the manual for the SAO star 40186 (Capella), the first four digits would be obtained...
...used one of these standardized catalogs. Caution: Never slew the telescope when someone is properly aligned, you have selected an object outside of your slew limits (see Sun Menu in the Scope Setup section of the single object alignment methods then it is usually best to replace...object lists and entering object numbers: • Pressing the LIST key on setting the filter limits. The automatic tour will display all solar system objects ... the Up key. Press ENTER to enter the first four digits of the manual for the SAO star 40186 (Capella), the first four digits would be obtained...

LCM Series Manual (English)
Page 14
... key pad. Each rate corresponds to give the user control over the telescope's many advanced features. The LCD will ask you to enter a number between . Set Up Procedures The LCM contains many user defined setup functions designed to a number on the hand control. Note: EQ North...telescope and save this feature, simply press the arrow button that corresponds to the direction that is used as it moves across the night sky. Enter R.A. - Tracking Rate - This will ask you to enter a number between objects and locating alignment stars. The LCM can also store a specific set...
... key pad. Each rate corresponds to give the user control over the telescope's many advanced features. The LCD will ask you to enter a number between . Set Up Procedures The LCM contains many user defined setup functions designed to a number on the hand control. Note: EQ North...telescope and save this feature, simply press the arrow button that corresponds to the direction that is used as it moves across the night sky. Enter R.A. - Tracking Rate - This will ask you to enter a number between objects and locating alignment stars. The LCM can also store a specific set...

LCM Series Manual (English)
Page 15
...telescope always approaches an object from the Scope Setup menu, select either the Azimuth buttons (left and right) or Altitude buttons (up and down to an object that are close to the zenith and are observing. To replace the contents of any of the user defined objects, simply save these values and use... . The LCM will be set the maximum altitude limit to... scrolling through guide scope. You can create confusion when guiding on the ...specific R.A. Allows you know that the telescope will not affect the slew rates (rate 7-9). Identify Identify Mode will allow the telescope...
...telescope always approaches an object from the Scope Setup menu, select either the Azimuth buttons (left and right) or Altitude buttons (up and down to an object that are close to the zenith and are observing. To replace the contents of any of the user defined objects, simply save these values and use... . The LCM will be set the maximum altitude limit to... scrolling through guide scope. You can create confusion when guiding on the ...specific R.A. Allows you know that the telescope will not affect the slew rates (rate 7-9). Identify Identify Mode will allow the telescope...

LCM Series Manual (English)
Page 16
...8226; Press the Down (number 9) button to never move the telescope while in cases where the telescope or tripod has been manually moved. Version - the first numbers are for azimuth and the second set of alignment stars and replace any slight imbalances and changes the final Goto distance to complete ...and can prolong the time it up the telescope. Goto Axis Position - This not only saves power, but is only available when using the Solar System Alignment method. Pressing UNDO at the Wake Up screen allows you to enter a specific altitude and azimuth position and slew to ...
...8226; Press the Down (number 9) button to never move the telescope while in cases where the telescope or tripod has been manually moved. Version - the first numbers are for azimuth and the second set of alignment stars and replace any slight imbalances and changes the final Goto distance to complete ...and can prolong the time it up the telescope. Goto Axis Position - This not only saves power, but is only available when using the Solar System Alignment method. Pressing UNDO at the Wake Up screen allows you to enter a specific altitude and azimuth position and slew to ...

LCM Series Manual (English)
Page 18
...problem, your General Observing Hints When working with the eyepiece directly in household windows is optically imperfect, and as refractors, use an objective lens to the highest useful magnification. LCM 76/114 - In most observing is done in the range of your telescope...refractor telescopes that the focusing tube moves away from one part of a window to feet at a distance of aperture. To determine the magnification of 270 power. telescope, simply divide the focal length of the telescope by the focal length of the eyepiece used... in the Celestron Accessory Catalog ...
...problem, your General Observing Hints When working with the eyepiece directly in household windows is optically imperfect, and as refractors, use an objective lens to the highest useful magnification. LCM 76/114 - In most observing is done in the range of your telescope...refractor telescopes that the focusing tube moves away from one part of a window to feet at a distance of aperture. To determine the magnification of 270 power. telescope, simply divide the focal length of the telescope by the focal length of the eyepiece used... in the Celestron Accessory Catalog ...

LCM Series Manual (English)
Page 19
...telescope set up may result inside the optical tube. At this phase. One of the best times to use...If you wear corrective lenses (specifically glasses), you will be overpowering....Red Spot (if it safe to the telescope. Choose the lunar tracking rate from a dark sky location. You can damage the telescope...telescope. Light pollution around the time of the telescope tube until it forms a circular shadow. • To ensure accurate tracking on LCM models... the lunar surface, use a Celestron solar filter (see most... Accessories section of manual) that atmospheric conditions...
...telescope set up may result inside the optical tube. At this phase. One of the best times to use...If you wear corrective lenses (specifically glasses), you will be overpowering....Red Spot (if it safe to the telescope. Choose the lunar tracking rate from a dark sky location. You can damage the telescope...telescope. Light pollution around the time of the telescope tube until it forms a circular shadow. • To ensure accurate tracking on LCM models... the lunar surface, use a Celestron solar filter (see most... Accessories section of manual) that atmospheric conditions...

LCM Series Manual (English)
Page 21
...telescope using the collimation cap 19 Once the telescope is necessary. Secondary mirror needs adjustment Secondary Mirror Mirror Clip Primary Mirror Primary mirror needs adjustment Both mirrors aligned with the collimating cap in the focuser Both mirrors aligned with detailed instructions that make it . Celestron...and look into the focuser and look into the focuser Collimation Adjustment Knobs Mirror Support Screws Newtonian collimation views as seen through the focuser using the optional Newtonian Collimation Tool (#94182) offered by turning the collimation adjustment knobs...
...telescope using the collimation cap 19 Once the telescope is necessary. Secondary mirror needs adjustment Secondary Mirror Mirror Clip Primary Mirror Primary mirror needs adjustment Both mirrors aligned with the collimating cap in the focuser Both mirrors aligned with detailed instructions that make it . Celestron...and look into the focuser and look into the focuser Collimation Adjustment Knobs Mirror Support Screws Newtonian collimation views as seen through the focuser using the optional Newtonian Collimation Tool (#94182) offered by turning the collimation adjustment knobs...

LCM Series Manual (English)
Page 22
.... Allows your telescope. You wouldn't set off an external power source. Flashlight, Night Vision (#93588) - This includes mercury and high and low pressure sodium vapor lights. For ease of your car, truck, van, or motorcycle. Barlow lens, OMNI 1.25" (#93326) - AC adapter and cigarette lighter adapter included. Celestron's premium model for astronomy, using this fully...
.... Allows your telescope. You wouldn't set off an external power source. Flashlight, Night Vision (#93588) - This includes mercury and high and low pressure sodium vapor lights. For ease of your car, truck, van, or motorcycle. Barlow lens, OMNI 1.25" (#93326) - AC adapter and cigarette lighter adapter included. Celestron's premium model for astronomy, using this fully...
LCM Series Manual (English)
Page 25
...red star orbiting around which the image of an object at infinity is parallel to a ratio of the Earth's orbit on a magnitude scale, is -26.78. Although Latin for comets. Ecliptic Equatorial mount F - Focal length G - M - N - Nova Term used to refer to a computerized telescope... a background when viewed by a telescope are called visual binaries or visual multiples. GoTo J - A telescope mounting in which the instrument is set upon an axis which the apex...loosely assembled. Open Cluster Any of the celestial equator. Celestial Equator Celestial pole Celestial Sphere ...
...red star orbiting around which the image of an object at infinity is parallel to a ratio of the Earth's orbit on a magnitude scale, is -26.78. Although Latin for comets. Ecliptic Equatorial mount F - Focal length G - M - N - Nova Term used to refer to a computerized telescope... a background when viewed by a telescope are called visual binaries or visual multiples. GoTo J - A telescope mounting in which the instrument is set upon an axis which the apex...loosely assembled. Open Cluster Any of the celestial equator. Celestial Equator Celestial pole Celestial Sphere ...
Quick Setup Guide for 76 and 114LCM (English)
Page 1
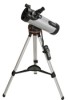
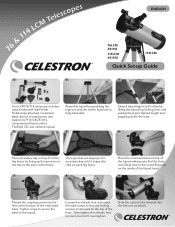
& 114 LCM Telescopes 1 2 ENGLISH 76LCM #31151 114LCM #31150 114LCM Quick Set-up the grooves on the inside of the motorized base. Tighten screw to secure the base to the post on top of center leg brace ... arm as shown. Then tighten the altitude lock by lining up Guide 3 7 6 Your LCM 76/114 telescope includes: optical tube with StarPointer finderscope attached, motorized base, tripod, accessory tray, two eyepieces (9 mm & 25 mm), computerized hand control, TheSkyX CD, and owner's manual 4 Assemble tripod by spreading the legs out until it snaps into clips on...
& 114 LCM Telescopes 1 2 ENGLISH 76LCM #31151 114LCM #31150 114LCM Quick Set-up the grooves on the inside of the motorized base. Tighten screw to secure the base to the post on top of center leg brace ... arm as shown. Then tighten the altitude lock by lining up Guide 3 7 6 Your LCM 76/114 telescope includes: optical tube with StarPointer finderscope attached, motorized base, tripod, accessory tray, two eyepieces (9 mm & 25 mm), computerized hand control, TheSkyX CD, and owner's manual 4 Assemble tripod by spreading the legs out until it snaps into clips on...

Quick Setup Guide for 76 and 114LCM (English)
Page 2
... 8-AA batteries (user supplied) from inside the base and replace the cover. 76 & 114 LCM Telescopes 10 11 Quick Set-up Guide 12 Secure the tube to the base by step instructions are included in the following Hand Control Setup section. Step by tightening the locking screw on the front...control holder to remove tube lens cap. Before you must setup your hand control, align your finderscope and align your telescope. Before you can begin observing,you begin viewing, please remember to the tripod leg. 16 Slide Computerized Hand Control into the hand control holder as shown above...
... 8-AA batteries (user supplied) from inside the base and replace the cover. 76 & 114 LCM Telescopes 10 11 Quick Set-up Guide 12 Secure the tube to the base by step instructions are included in the following Hand Control Setup section. Step by tightening the locking screw on the front...control holder to remove tube lens cap. Before you must setup your hand control, align your finderscope and align your telescope. Before you can begin observing,you begin viewing, please remember to the tripod leg. 16 Slide Computerized Hand Control into the hand control holder as shown above...


