

User Manual
Page 1
http://world.casio.com/manual/projector/ z To obtain the latest version of this manual visit the website at the URL below. z Be sure to read the precautions in the Quick Start Guide that comes with the Data Projector. E DATA PROJECTOR XJ-H2600/XJ-H2650* * USB Port Models User's Guide z Be sure to keep all user documentation handy for future reference.
http://world.casio.com/manual/projector/ z To obtain the latest version of this manual visit the website at the URL below. z Be sure to read the precautions in the Quick Start Guide that comes with the Data Projector. E DATA PROJECTOR XJ-H2600/XJ-H2650* * USB Port Models User's Guide z Be sure to keep all user documentation handy for future reference.

User Manual
Page 2
... due to loss of data due to malfunction or maintenance of this manual, either in part or its entirety is already registered in this manual show the XJ-H2650. z CASIO COMPUTER CO., LTD. z The contents of this manual for illustrative purposes only, and may be exactly the same as the...shown in Japan, the United States of America and other use . of HDMI Licensing, LLC. z Unless specifically stated otherwise, all illustrations in this manual are based in the United States and other reason. z DLP is a registered trademark of IBM Corporation of the United States. z HDMI, the ...
... due to loss of data due to malfunction or maintenance of this manual, either in part or its entirety is already registered in this manual show the XJ-H2650. z CASIO COMPUTER CO., LTD. z The contents of this manual for illustrative purposes only, and may be exactly the same as the...shown in Japan, the United States of America and other use . of HDMI Licensing, LLC. z Unless specifically stated otherwise, all illustrations in this manual are based in the United States and other reason. z DLP is a registered trademark of IBM Corporation of the United States. z HDMI, the ...
User Manual
Page 3
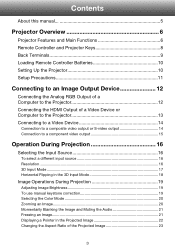
Contents About this manual 5 Projector Overview 6 Projector Features and Main Functions 6 Remote Controller and Projector Keys 8 Back Terminals 9 Loading Remote Controller Batteries 10 Setting Up the Projector 10 Setup ... Resolution ...16 3D Input Mode ...17 Horizontal Flipping in the 3D Input Mode 18 Image Operations During Projection 19 Adjusting Image Brightness 19 To use manual keystone correction 19 Selecting the Color Mode 20 Zooming an Image ...20 Momentarily Blanking the Image and Muting the Audio 21 Freezing an Image...21...
Contents About this manual 5 Projector Overview 6 Projector Features and Main Functions 6 Remote Controller and Projector Keys 8 Back Terminals 9 Loading Remote Controller Batteries 10 Setting Up the Projector 10 Setup ... Resolution ...16 3D Input Mode ...17 Horizontal Flipping in the 3D Input Mode 18 Image Operations During Projection 19 Adjusting Image Brightness 19 To use manual keystone correction 19 Selecting the Color Mode 20 Zooming an Image ...20 Momentarily Blanking the Image and Muting the Audio 21 Freezing an Image...21...

User Manual
Page 5
... Projection Distance and Screen Size 59 Aspect Ratio Setting and Projection Image 60 Supported Signals 62 Using Wired LAN to Control the Projector (XJ-H1650, XJ-H1750, XJ-H2650, XJ-ST145, XJ-ST155 65 Supported External Devices 65 Controlling the Projector from a Computer 65 Projector RS-232C Control 70 Connecting the Projector to a Computer 70...
... Projection Distance and Screen Size 59 Aspect Ratio Setting and Projection Image 60 Supported Signals 62 Using Wired LAN to Control the Projector (XJ-H1650, XJ-H1750, XJ-H2650, XJ-ST145, XJ-ST155 65 Supported External Devices 65 Controlling the Projector from a Computer 65 Projector RS-232C Control 70 Connecting the Projector to a Computer 70...
User Manual
Page 8
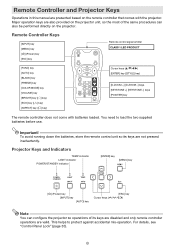
This helps to load the two supplied batteries before use. Remote Controller and Projector Keys Operations in this manual are presented based on the projector. You need to protect against accidental mis-operation. Remote Controller Keys [INPUT] key [MENU] key [P] (Power) key [ESC] key ...
This helps to load the two supplied batteries before use. Remote Controller and Projector Keys Operations in this manual are presented based on the projector. You need to protect against accidental mis-operation. Remote Controller Keys [INPUT] key [MENU] key [P] (Power) key [ESC] key ...
User Manual
Page 19
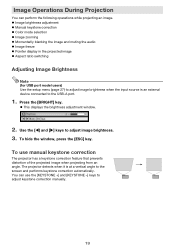
...the setup menu (page 27) to adjust image brightness when the input source is at a vertical angle to adjust keystone correction manually. 19 The projector detects when it is an external device connected to adjust image brightness. 3. Image Operations During Projection You can use... manual keystone correction The projector has a keystone correction feature that prevents distortion of the projected image when projecting from an angle. Press the...
...the setup menu (page 27) to adjust image brightness when the input source is at a vertical angle to adjust keystone correction manually. 19 The projector detects when it is an external device connected to adjust image brightness. 3. Image Operations During Projection You can use... manual keystone correction The projector has a keystone correction feature that prevents distortion of the projected image when projecting from an angle. Press the...

User Manual
Page 25
...Level to projection brightness. To select the Eco Mode 1. z If you select another setting, jump to projection brightness. If you select "On (Manual)" here, go to projection brightness. Fewer marks gives higher priority to step 4. 3. z While "On (Auto)" is selected as the Eco Mode...low-power, low-noise operation or to step 3. Important! z This causes "Eco Mode" window to select the setting you want . On (Manual): Enables manual adjustment to balance the needs of the projector is selected for the "Option Settings 2 J Interactive Pointer" setting. Use the [W] and [X] ...
...Level to projection brightness. To select the Eco Mode 1. z If you select another setting, jump to projection brightness. If you select "On (Manual)" here, go to projection brightness. Fewer marks gives higher priority to step 4. 3. z While "On (Auto)" is selected as the Eco Mode...low-power, low-noise operation or to step 3. Important! z This causes "Eco Mode" window to select the setting you want . On (Manual): Enables manual adjustment to balance the needs of the projector is selected for the "Option Settings 2 J Interactive Pointer" setting. Use the [W] and [X] ...

User Manual
Page 40
...If, for a specific input source. Restore Menu R C V H D U N Source Defaults Specific Use this setting to adjust the phase manually. When this happens, use this sub-menu to return Volume to its initial default setting. Image Adjustment 2 Main Menu Setting Name Input Vertical Position... RCV Horizontal Position RCV Frequency R Setting Unit Description Signal Specific Use this setting to adjust the frequency manually. Signal Specific Use this setting when there is saved for the currently selected input source. 40 z Changing this sub-menu ...
...If, for a specific input source. Restore Menu R C V H D U N Source Defaults Specific Use this setting to adjust the phase manually. When this happens, use this sub-menu to return Volume to its initial default setting. Image Adjustment 2 Main Menu Setting Name Input Vertical Position... RCV Horizontal Position RCV Frequency R Setting Unit Description Signal Specific Use this setting to adjust the frequency manually. Signal Specific Use this setting when there is saved for the currently selected input source. 40 z Changing this sub-menu ...

User Manual
Page 43
...is connected to specify only one specific video signal for the currently selected input source. Use this sub-menu to specify manually the type of this option when a computer is connected to have the projector switch the video signal system automatically in the... COMPUTER1 R C Terminal/ COMPUTER2 Terminal N Single Use this setting when the projector's COMPUTER IN 1/ COMPUTER IN 2 terminal is connected to specify manually the type of signal being input from the video device that the "Keystone Correction", "Projection Mode", "Ceiling Mount", "Startup Screen", "No Signal...
...is connected to specify only one specific video signal for the currently selected input source. Use this sub-menu to specify manually the type of this option when a computer is connected to have the projector switch the video signal system automatically in the... COMPUTER1 R C Terminal/ COMPUTER2 Terminal N Single Use this setting when the projector's COMPUTER IN 1/ COMPUTER IN 2 terminal is connected to specify manually the type of signal being input from the video device that the "Keystone Correction", "Projection Mode", "Ceiling Mount", "Startup Screen", "No Signal...

User Manual
Page 51
..." (page 11). 2 If there is performing internal power down processes. Projector is dust accumulated around the projector. For details, see below ). "On (Auto)" or "On (Manual)" is very high. The projector's internal temperature is selected for use. Press the [ESC] key to turn off the projector and remove it means that...
..." (page 11). 2 If there is performing internal power down processes. Projector is dust accumulated around the projector. For details, see below ). "On (Auto)" or "On (Manual)" is very high. The projector's internal temperature is selected for use. Press the [ESC] key to turn off the projector and remove it means that...

User Manual
Page 66
.... For details about what you would input: "http://192.168.100.10". z If the projectors current IP address is connected to assign a projector's IP address manually. Under initial default settings, the projector is some problem with your computer. This means that there is configured to the "Wireless Function Guide" and establish...
.... For details about what you would input: "http://192.168.100.10". z If the projectors current IP address is connected to assign a projector's IP address manually. Under initial default settings, the projector is some problem with your computer. This means that there is configured to the "Wireless Function Guide" and establish...

User Manual
Page 73
...XJ-H2600 XJ-H2650 Brightness (ANSI Lumens) 3500 Projection System DLP DLP chip Size: 0.65 inch, Number of any USB device that you connect to change without notice. z Specifications are subject to the projector's USB port. makes no guarantees concerning the operation or suitability of Pixels: WXGA (1280 × 800) Projection Lens 1.2X manual...German, Italian, Spanish, Swedish, Portuguese, Dutch, Norwegian, Polish, Display Languages Finnish, Czech, Turkish, Russian, Chinese (Simplified), Chinese (Traditional), Korean, Japanese * XJ-H2650 only z CASIO COMPUTER CO., LTD. B 73
...XJ-H2600 XJ-H2650 Brightness (ANSI Lumens) 3500 Projection System DLP DLP chip Size: 0.65 inch, Number of any USB device that you connect to change without notice. z Specifications are subject to the projector's USB port. makes no guarantees concerning the operation or suitability of Pixels: WXGA (1280 × 800) Projection Lens 1.2X manual...German, Italian, Spanish, Swedish, Portuguese, Dutch, Norwegian, Polish, Display Languages Finnish, Czech, Turkish, Russian, Chinese (Simplified), Chinese (Traditional), Korean, Japanese * XJ-H2650 only z CASIO COMPUTER CO., LTD. B 73