
User Manual
Page 1
You are subject to change without the permission of CASIO COMPUTER CO., LTD. CASIO COMPUTER CO., LTD. shall not be held liable for any loss or lost profits due to loss of data due to malfunction or maintenance of .../XJ-A155V/ XJ-A235V/XJ-A245V/XJ-A255V Data Projector USB Function Guide Be sure to read the precautions in the United States and other countries. Macintosh and Mac OS are for illustrative purposes only, and may be registered product names or trademarks of their respective owners. The contents of this manual...
You are subject to change without the permission of CASIO COMPUTER CO., LTD. CASIO COMPUTER CO., LTD. shall not be held liable for any loss or lost profits due to loss of data due to malfunction or maintenance of .../XJ-A155V/ XJ-A235V/XJ-A245V/XJ-A255V Data Projector USB Function Guide Be sure to read the precautions in the United States and other countries. Macintosh and Mac OS are for illustrative purposes only, and may be registered product names or trademarks of their respective owners. The contents of this manual...
User Manual
Page 2
Contents About this manual 4 Terms and Conventions 4 About the Data Projector's USB Functions 5 Connecting a USB Device to the Data Projector ......... 7 Installing the Software 8 Minimum System Requirements 8 To install EZ-Converter FA 9 To install ArcSoft MediaConverter 3 for CASIO Projector 10 Installing Multi Projection Camera Update Software 11 Projecting the Contents of Files on a Memory...
Contents About this manual 4 Terms and Conventions 4 About the Data Projector's USB Functions 5 Connecting a USB Device to the Data Projector ......... 7 Installing the Software 8 Minimum System Requirements 8 To install EZ-Converter FA 9 To install ArcSoft MediaConverter 3 for CASIO Projector 10 Installing Multi Projection Camera Update Software 11 Projecting the Contents of Files on a Memory...

User Manual
Page 4
...Projector or authorized CASIO dealer. For full details, contact the retailer where you . The following devices is connected to appear within the projection area. Computer screen This is the entire rectangular area that these products may not be available in this manual, there are ...special terms and conventions used in some geographic areas. Certain Data Projector operations will cause messages and menus to the USB port of the CASIO Data Projector. USB memory device CASIO Multi Projection Camera (YC-400/...
...Projector or authorized CASIO dealer. For full details, contact the retailer where you . The following devices is connected to appear within the projection area. Computer screen This is the entire rectangular area that these products may not be available in this manual, there are ...special terms and conventions used in some geographic areas. Certain Data Projector operations will cause messages and menus to the USB port of the CASIO Data Projector. USB memory device CASIO Multi Projection Camera (YC-400/...

User Manual
Page 5
... (project) the following for details. excluding progressive format) format or BMP (bmp) format image files up to about this: Refer to this section of this manual: Converting PowerPoint files to files that unconverted PowerPoint files cannot be connected to the "Connecting a Memory Device to the Data Projector" (page 18) Data Projector...
... (project) the following for details. excluding progressive format) format or BMP (bmp) format image files up to about this: Refer to this section of this manual: Converting PowerPoint files to files that unconverted PowerPoint files cannot be connected to the "Connecting a Memory Device to the Data Projector" (page 18) Data Projector...
User Manual
Page 26
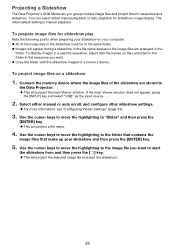
...image display. If the main Viewer window does not appear, press the [INPUT] key and select "USB" as a slideshow 1. Select either manual playback or auto playback for slideshow play Note the following points when preparing your slideshow on your slideshow and then press the [ENTER] key. ...that contains the image files that make up your computer. All of the slideshow are stored to a memory device. You can select either manual or auto scroll, and configure other slideshow settings. For more information, see "Configuring Viewer Settings" (page 33). 3. Use the cursor...
...image display. If the main Viewer window does not appear, press the [INPUT] key and select "USB" as a slideshow 1. Select either manual playback or auto playback for slideshow play Note the following points when preparing your slideshow on your slideshow and then press the [ENTER] key. ...that contains the image files that make up your computer. All of the slideshow are stored to a memory device. You can select either manual or auto scroll, and configure other slideshow settings. For more information, see "Configuring Viewer Settings" (page 33). 3. Use the cursor...

User Manual
Page 33
... the highlighting to "Back to be played back at the Data Projector's maximum possible size while maintaining the aspect ratio of the movie file. Manual*: Specifies manual image scrolling. Specifies how long each item is the list view or icon view. Initialize Viewer Setup Returns all Viewer settings to the main Viewer...
... the highlighting to "Back to be played back at the Data Projector's maximum possible size while maintaining the aspect ratio of the movie file. Manual*: Specifies manual image scrolling. Specifies how long each item is the list view or icon view. Initialize Viewer Setup Returns all Viewer settings to the main Viewer...

User Manual
Page 41
... more information, see "YC Camera Application Setup Menu Contents" on the stage is configured with its image and switch from the fuzzy monitor image to "Manual Capture".
... more information, see "YC Camera Application Setup Menu Contents" on the stage is configured with its image and switch from the fuzzy monitor image to "Manual Capture".

User Manual
Page 42
... Projection Operations The operations in this section are performed using the remote controller's [O], [f], and [Z] keys. Some operations can release the shutter manually by default. 2. Press the [FUNC] key to display the YC Camera application function menu. The "Camera Shutter" item should be... this section assume that you press the [FUNC] key while the YC Camera application is running . To release the document camera shutter manually 1. Note While a rough monitor image or recorded image is projected, you can be performed using the YC Camera function menu, which ...
... Projection Operations The operations in this section are performed using the remote controller's [O], [f], and [Z] keys. Some operations can release the shutter manually by default. 2. Press the [FUNC] key to display the YC Camera application function menu. The "Camera Shutter" item should be... this section assume that you press the [FUNC] key while the YC Camera application is running . To release the document camera shutter manually 1. Note While a rough monitor image or recorded image is projected, you can be performed using the YC Camera function menu, which ...

User Manual
Page 43
Use the [] and [] keys to "Focus". 4. To adjust document focus manually 1. Press the [] key to move the highlighting to adjust the document camera's focus. 5. After the focus is the way you want , press the [ESC] ...
Use the [] and [] keys to "Focus". 4. To adjust document focus manually 1. Press the [] key to move the highlighting to adjust the document camera's focus. 5. After the focus is the way you want , press the [ESC] ...
User Manual
Page 45
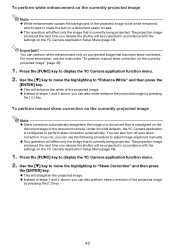
...you can also perform skew correction of the projected image by pressing the [f] key. Press the [FUNC] key to adjust image alignment manually. This operation will affect only the image that has been skew corrected. You can also white enhance the projected image by ...will straighten the projected image. Instead of steps 1 and 2 above , you can also turn off auto skew correction. To perform manual skew correction on the currently projected image Note Skew correction automatically straightens the image of a document that is misaligned on the YC Camera ...
...you can also perform skew correction of the projected image by pressing the [f] key. Press the [FUNC] key to adjust image alignment manually. This operation will affect only the image that has been skew corrected. You can also white enhance the projected image by ...will straighten the projected image. Instead of steps 1 and 2 above , you can also turn off auto skew correction. To perform manual skew correction on the currently projected image Note Skew correction automatically straightens the image of a document that is misaligned on the YC Camera ...
User Manual
Page 48
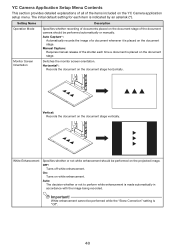
Setting Name Operation Mode Monitor Screen Orientation Description Specifies whether recording of documents placed on the document stage. Manual Capture: Requires manual release of the shutter each item is indicated by an asterisk (*). Auto: The decision whether or ...setting is placed on the YC Camera application setup menu. White Enhancement Specifies whether or not white enhancement should be performed automatically or manually. Vertical: Records the document on the projected image. On: Turns on the document stage horizontally. Horizontal*: Records the document on ...
Setting Name Operation Mode Monitor Screen Orientation Description Specifies whether recording of documents placed on the document stage. Manual Capture: Requires manual release of the shutter each item is indicated by an asterisk (*). Auto: The decision whether or ...setting is placed on the YC Camera application setup menu. White Enhancement Specifies whether or not white enhancement should be performed automatically or manually. Vertical: Records the document on the projected image. On: Turns on the document stage horizontally. Horizontal*: Records the document on ...