
User Manual
Page 4
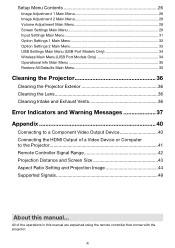
... 29 Input Settings Main Menu 31 Option Settings 1 Main Menu 32 Option Settings 2 Main Menu 33 USB Settings Main Menu (USB Port Models Only 34 Wireless Main Menu (USB Port Models Only 34 Operational Info Main Menu 35 Restore All Defaults Main Menu 35 Cleaning the Projector 36 Cleaning the Projector...
... 29 Input Settings Main Menu 31 Option Settings 1 Main Menu 32 Option Settings 2 Main Menu 33 USB Settings Main Menu (USB Port Models Only 34 Wireless Main Menu (USB Port Models Only 34 Operational Info Main Menu 35 Restore All Defaults Main Menu 35 Cleaning the Projector 36 Cleaning the Projector...
User Manual
Page 6
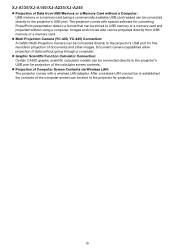
...USB memory or a memory card and projected without going through a computer. Graphic Scientific Function Calculator Connection: Certain CASIO graphic scientific calculator models can be connected directly to the projector's USB port for projection of the calculator screen contents. ...for fine resolution projection of documents and other images. The projector comes with a wireless LAN adapter. Document camera capabilities allow projection of data without using a computer. XJ-A135/XJ-A145/XJ-A235/XJ-A245 Projection of Data from USB memory or a memory card. &#...
...USB memory or a memory card and projected without going through a computer. Graphic Scientific Function Calculator Connection: Certain CASIO graphic scientific calculator models can be connected directly to the projector's USB port for projection of the calculator screen contents. ...for fine resolution projection of documents and other images. The projector comes with a wireless LAN adapter. Document camera capabilities allow projection of data without using a computer. XJ-A135/XJ-A145/XJ-A235/XJ-A245 Projection of Data from USB memory or a memory card. &#...
User Manual
Page 9
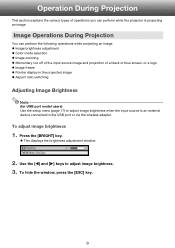
...] key. 9 Press the [BRIGHT] key. This displays the brightness adjustment window. 2. Use the [] and [] keys to the USB port or via the wireless adapter. Operation During Projection This section explains the various types of a black or blue screen, or a logo Image freeze Pointer display in the...
...] key. 9 Press the [BRIGHT] key. This displays the brightness adjustment window. 2. Use the [] and [] keys to the USB port or via the wireless adapter. Operation During Projection This section explains the various types of a black or blue screen, or a logo Image freeze Pointer display in the...

User Manual
Page 15
... the highlighted Eco Mode name. 3. To hide the window, press the [ESC] key. On (Level2) : Gives maximum priority to the USB port or via the wireless adapter. 15 Press the [ECO] key. This displays the Eco Mode selection window. Note (for USB port model users) Use the setup menu (page...
... the highlighted Eco Mode name. 3. To hide the window, press the [ESC] key. On (Level2) : Gives maximum priority to the USB port or via the wireless adapter. 15 Press the [ECO] key. This displays the Eco Mode selection window. Note (for USB port model users) Use the setup menu (page...

User Manual
Page 16
... operations described below . Note (for USB port model users) When the input source is an external device connected to the USB port or via the wireless adapter, use this menu to control the connected device. For details, see the "USB Function Guide" and...
... operations described below . Note (for USB port model users) When the input source is an external device connected to the USB port or via the wireless adapter, use this menu to control the connected device. For details, see the "USB Function Guide" and...
User Manual
Page 26
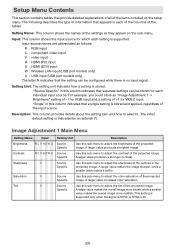
... and how to adjust the color saturation of the settings as follows: R : RGB input C : component video input V : video input H : HDMI (PC) input D : HDMI (DTV) input W : Wireless LAN input (USB port models only) U : USB input (USB port models only) The letter N indicates that appears in the projected image. Image Adjustment 1 Main Menu...
... and how to adjust the color saturation of the settings as follows: R : RGB input C : component video input V : video input H : HDMI (PC) input D : HDMI (DTV) input W : Wireless LAN input (USB port models only) U : USB input (USB port models only) The letter N indicates that appears in the projected image. Image Adjustment 1 Main Menu...
User Manual
Page 34
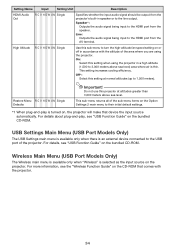
... For details about plug-and-play is turned on the Option Settings 2 main menu to the line output. Wireless Main Menu (USB Port Models Only) The Wireless main menu is available only when "Wireless" is an external device connected to the USB port of the sub-menu items on , the projector will ... all of the projector. Off*: Select this projector at normal altitudes (up to the HDMI port from the speaker. For more information, see the "Wireless Function Guide" on the bundled CD-ROM. Do not use this setting at altitudes greater than 3,000 meters above sea level) area where air is...
... For details about plug-and-play is turned on the Option Settings 2 main menu to the line output. Wireless Main Menu (USB Port Models Only) The Wireless main menu is available only when "Wireless" is an external device connected to the USB port of the sub-menu items on , the projector will ... all of the projector. Off*: Select this projector at normal altitudes (up to the HDMI port from the speaker. For more information, see the "Wireless Function Guide" on the bundled CD-ROM. Do not use this setting at altitudes greater than 3,000 meters above sea level) area where air is...