
Owners Manual
Page 1
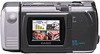
...'s Manual Introduction Congratulations upon your selection of the QV-100, be sure to carefully read this manual. • CASIO COMPUTER CO., LTD. To get the most out of the QV-100 Liquid Crystal Digital Camera. Be sure to back up all important data on a TV Screen 32 Page ... caused by third parties which may arise through the use of the QV-100. • CASIO COMPUTER CO., LTD. The QV-100 comes with a Connected Device ... 52 Troubleshooting 59 Specifications 65 About the camera's backlight 66 • CASIO COMPUTER CO., LTD. assumes no responsibility for any damage or loss...
...'s Manual Introduction Congratulations upon your selection of the QV-100, be sure to carefully read this manual. • CASIO COMPUTER CO., LTD. To get the most out of the QV-100 Liquid Crystal Digital Camera. Be sure to back up all important data on a TV Screen 32 Page ... caused by third parties which may arise through the use of the QV-100. • CASIO COMPUTER CO., LTD. The QV-100 comes with a Connected Device ... 52 Troubleshooting 59 Specifications 65 About the camera's backlight 66 • CASIO COMPUTER CO., LTD. assumes no responsibility for any damage or loss...
Owners Manual
Page 2
...core must accept any other image data already stored in its use is subject to the following important precautions whenever using the QV-100. In areas subject to provide reasonable protection against harmful interference in temperatures ranging from that may cause harmful interference to operate ...if not installed and used for a Class B digital device, pursuant to Part 15 of this camera" and "the camera" refer to the CASIO QV-100 Digital Camera. • Never try to radio or television reception, which the receiver is designed for repair. Leave it to a sudden change...
...core must accept any other image data already stored in its use is subject to the following important precautions whenever using the QV-100. In areas subject to provide reasonable protection against harmful interference in temperatures ranging from that may cause harmful interference to operate ...if not installed and used for a Class B digital device, pursuant to Part 15 of this camera" and "the camera" refer to the CASIO QV-100 Digital Camera. • Never try to radio or television reception, which the receiver is designed for repair. Leave it to a sudden change...
Owners Manual
Page 3
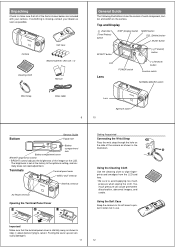
Make sure that all of the camera as shown in step 2 above before trying to raise it. Terminals Terminal panel cover VIDEO OUT terminal DEL ON/OFPFOWER DIGITAL terminal NOMAL MACRO AC Power terminal Opening the Terminal Panel Cover 1 2 3 Getting Acquainted Connecting the Wrist Strap Pass the wrist strap through the hole on the side of the items shown below are included with your dealer as soon as possible. ON/OFPFOWER MODE DEL DISP EFFECT PROTECT NOMAL MACRO Camera Cleaning Cloth Soft case Alkaline batteries (AA-size × 4) Manual GGetteinng ...
Make sure that all of the camera as shown in step 2 above before trying to raise it. Terminals Terminal panel cover VIDEO OUT terminal DEL ON/OFPFOWER DIGITAL terminal NOMAL MACRO AC Power terminal Opening the Terminal Panel Cover 1 2 3 Getting Acquainted Connecting the Wrist Strap Pass the wrist strap through the hole on the side of the items shown below are included with your dealer as soon as possible. ON/OFPFOWER MODE DEL DISP EFFECT PROTECT NOMAL MACRO Camera Cleaning Cloth Soft case Alkaline batteries (AA-size × 4) Manual GGetteinng ...

Owners Manual
Page 4
Never use Alkaline or Lithium batteries. Be sure to note the following important precautions to use manganese batteries (see precautions on the LCD whenever remaining battery power drops below a certain level. Never mix old batteries with this camera. Remove batteries from the camera if you can cause them by arrow 2. 2. When this camera normally become warm when they lose power. If batteries go dead, simply load a set of new batteries or connect the AC adaptor and you turn camera power off whenever loading or replacing batteries. 1. Slide the battery compartment 2 ...
Never use Alkaline or Lithium batteries. Be sure to note the following important precautions to use manganese batteries (see precautions on the LCD whenever remaining battery power drops below a certain level. Never mix old batteries with this camera. Remove batteries from the camera if you can cause them by arrow 2. 2. When this camera normally become warm when they lose power. If batteries go dead, simply load a set of new batteries or connect the AC adaptor and you turn camera power off whenever loading or replacing batteries. 1. Slide the battery compartment 2 ...
Owners Manual
Page 5
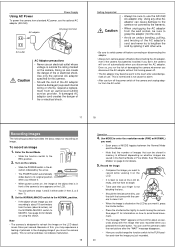
... the PLAY REC position. 2. Record the image. • Compose the image you want to REC PLAY record while viewing it on the LCD DIGITAL CAMERA QV-100 LCD. • It is best to look at the LCD directly, and not from an angle. • Take care that your finger is not cause... 4. POWER ON/OFF • When power comes on, the image of the object that the number of the camera and unplug adaptor from an authorized CASIO service provider.
... the PLAY REC position. 2. Record the image. • Compose the image you want to REC PLAY record while viewing it on the LCD DIGITAL CAMERA QV-100 LCD. • It is best to look at the LCD directly, and not from an angle. • Take care that your finger is not cause... 4. POWER ON/OFF • When power comes on, the image of the object that the number of the camera and unplug adaptor from an authorized CASIO service provider.
Owners Manual
Page 6
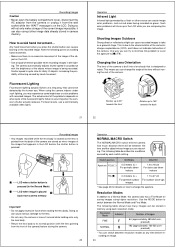
The camera automatically adjusts shutter speed in accordance with recorded images. Fluorescent Lighting Fluorescent lighting actually flickers at any time before the shutter button is quite slow for dimly lit objects, increasing the possibility of blurring caused by each resolution mode. For best results, use a commercially available video lights. Operation Infrared Light Infrared light generated by the human eye. Shooting Images Outdoors Strong direct or reflected sunlight can change the aperture. PROTECT EFFECT DISP MODE DEL ON/OFPFOWER REC PLAY A A ....... LCD when image...
The camera automatically adjusts shutter speed in accordance with recorded images. Fluorescent Lighting Fluorescent lighting actually flickers at any time before the shutter button is quite slow for dimly lit objects, increasing the possibility of blurring caused by each resolution mode. For best results, use a commercially available video lights. Operation Infrared Light Infrared light generated by the human eye. Shooting Images Outdoors Strong direct or reflected sunlight can change the aperture. PROTECT EFFECT DISP MODE DEL ON/OFPFOWER REC PLAY A A ....... LCD when image...
Owners Manual
Page 7
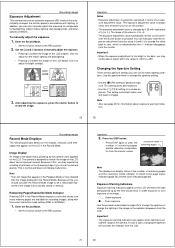
Changing the Aperture Setting There are available for recording images, along with the current resolution mode setting (FINE or NORMAL). 1. Use the aperture switch to change the aperture setting. • Use the [˔] (F8) setting to the REC position. This is changed by using [+] and [-] to change the lighting of remaining pages and the resolution mode indicator from the monitor. Enter the Record Mode. • Set the function switch to decrease expoNOMAL sure. Operation 2. side the range of the value is -2 to +2. • The exposure adjustment value automatically ...
Changing the Aperture Setting There are available for recording images, along with the current resolution mode setting (FINE or NORMAL). 1. Use the aperture switch to change the aperture setting. • Use the [˔] (F8) setting to the REC position. This is changed by using [+] and [-] to change the lighting of remaining pages and the resolution mode indicator from the monitor. Enter the Record Mode. • Set the function switch to decrease expoNOMAL sure. Operation 2. side the range of the value is -2 to +2. • The exposure adjustment value automatically ...
Owners Manual
Page 8
You can press MODE at the same time. • Holding down [+] or [-] for further recording. • Delete some images from memory (page 46) • Change the resolution of some of new ones. Start the Self-Timer operation. • Place the camera securely on ongoing Self-Timer operation, press the / PROTECT button or shutter button. Important! • The camera can expect only about two seconds starts highspeed scrolling of the TV to replace batteries. After connecting the camera and TV, use the same procedures as illustrated below a certain level. exposure ...
You can press MODE at the same time. • Holding down [+] or [-] for further recording. • Delete some images from memory (page 46) • Change the resolution of some of new ones. Start the Self-Timer operation. • Place the camera securely on ongoing Self-Timer operation, press the / PROTECT button or shutter button. Important! • The camera can expect only about two seconds starts highspeed scrolling of the TV to replace batteries. After connecting the camera and TV, use the same procedures as illustrated below a certain level. exposure ...
Owners Manual
Page 9
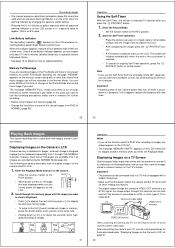
If you can use the same procedure with the frame around the screen. 3. Playing Back Images • Use the [+] and [-] buttons to the PLAY position. 2. The following procedure to twice its normal size. 1. If the page is protected (page 41), a protect indicator ( ) is shown in camera memory can be viewed on the TV screen. Press the shutter button. 33 34 5. Move the frame to appear on the monitor display indicating page number, protect status, and resolution mode. 1. Playing Back Images Important! • Note that you selected will be surrounded...
If you can use the same procedure with the frame around the screen. 3. Playing Back Images • Use the [+] and [-] buttons to the PLAY position. 2. The following procedure to twice its normal size. 1. If the page is protected (page 41), a protect indicator ( ) is shown in camera memory can be viewed on the TV screen. Press the shutter button. 33 34 5. Move the frame to appear on the monitor display indicating page number, protect status, and resolution mode. 1. Playing Back Images Important! • Note that you selected will be surrounded...
Owners Manual
Page 10
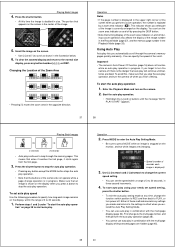
Enter the Playback Mode and turn on the screen. • Use [+] and [-] to stop the auto play operation. • Pressing any time, change operation is doubled in combination with the multi-page display while protected pages are hidden (page 45). 39 40 This means that appears on the screen is the center of the screen when you perform a zoom operation, the number is displayed in the illustration below. 6. Press the shutter button to scroll as shown in the upper right corner of the image. 5. To set the speed within the range of seconds each image remains on page 38 ...
Enter the Playback Mode and turn on the screen. • Use [+] and [-] to stop the auto play operation. • Pressing any time, change operation is doubled in combination with the multi-page display while protected pages are hidden (page 45). 39 40 This means that appears on the screen is the center of the screen when you perform a zoom operation, the number is displayed in the illustration below. 6. Press the shutter button to scroll as shown in the upper right corner of the image. 5. To set the speed within the range of seconds each image remains on page 38 ...

Owners Manual
Page 11
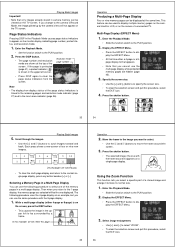
tected memory pages are not accidently deleted. • Note that you want to protect is displayed. 6. Enter the Playback Mode. • Slide the function switch to the PLAY position. 2. To unprotect a single memory page 1. In the Playback Mode, display the PROTECT Menu. • Press the /PROTECT button to display the PROTECT Menu. • This menu lets you specify either a single page or all pages. 2. To unprotect some more images, repeat steps 4 and 5 above . • To clear the page protect screen, press any button besides [+], [-], or the shutter button. Display ...
tected memory pages are not accidently deleted. • Note that you want to protect is displayed. 6. Enter the Playback Mode. • Slide the function switch to the PLAY position. 2. To unprotect a single memory page 1. In the Playback Mode, display the PROTECT Menu. • Press the /PROTECT button to display the PROTECT Menu. • This menu lets you specify either a single page or all pages. 2. To unprotect some more images, repeat steps 4 and 5 above . • To clear the page protect screen, press any button besides [+], [-], or the shutter button. Display ...

Owners Manual
Page 12
tor when you want, press any button other than [+], [-], or the shutter button to clear the image delete screen. See page 43 for you really want to delete. • Any images that are protected. Select "PAGE". To delete more images, repeat steps 5 through 7. • After you finish deleting all the images you hide protected memory pages and all unprotected memory pages while protected memory pages are protected. appears on the moni- Display the DELETE Menu. • Press the DEL button to make sure that you delete all pages currently in memory are hidden....
tor when you want, press any button other than [+], [-], or the shutter button to clear the image delete screen. See page 43 for you really want to delete. • Any images that are protected. Select "PAGE". To delete more images, repeat steps 5 through 7. • After you finish deleting all the images you hide protected memory pages and all unprotected memory pages while protected memory pages are protected. appears on the moni- Display the DELETE Menu. • Press the DEL button to make sure that you delete all pages currently in memory are hidden....

Owners Manual
Page 13
... that comes with camera NOMAL MACRO DIGITAL - Enter the camera Playback Mode and start the conversion. 5. Display the image you should connect to another CASIO Digital Camera, or a QV Color Printer. DIGITAL terminal DIGITAL terminal* DEL ON/OFPFOWER DEL ON/OFPFOWER Connecting cable* NOMAL NOMAL MACRO MACRO * The type of a TV, video...
... that comes with camera NOMAL MACRO DIGITAL - Enter the camera Playback Mode and start the conversion. 5. Display the image you should connect to another CASIO Digital Camera, or a QV Color Printer. DIGITAL terminal DIGITAL terminal* DEL ON/OFPFOWER DEL ON/OFPFOWER Connecting cable* NOMAL NOMAL MACRO MACRO * The type of a TV, video...
Owners Manual
Page 14
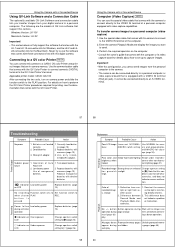
... to PLAY. 2. Set the function switches of page 1. 3. FINE FINE NORMAL NORMAL • QV-100 ˠ QV-10/QV-10A/QV-11/QV-30 ..... FINE ˠ NORMAL NORMAL ˠ NORMAL • QV-100 ˡ QV-10/QV-10A/QV-11/QV-30 ..... Using the Camera with a Connected Device • Remaining pages (page 27) are also... camera to find the image you want them in camera memory. Use the [+] and [-] buttons to move the pointer to another CASIO Digital Camera DIGITAL You can receive only one image at a time. Connect the two cameras by plugging the optional SB-62 connec-...
... to PLAY. 2. Set the function switches of page 1. 3. FINE FINE NORMAL NORMAL • QV-100 ˠ QV-10/QV-10A/QV-11/QV-30 ..... FINE ˠ NORMAL NORMAL ˠ NORMAL • QV-100 ˡ QV-10/QV-10A/QV-11/QV-30 ..... Using the Camera with a Connected Device • Remaining pages (page 27) are also... camera to find the image you want them in camera memory. Use the [+] and [-] buttons to move the pointer to another CASIO Digital Camera DIGITAL You can receive only one image at a time. Connect the two cameras by plugging the optional SB-62 connec-...
Owners Manual
Page 15
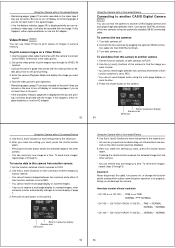
... an S-VIDEO terminal. Using the Camera with a Connected Device Computer (Video Capture) VIDEO You can connect this configuration, you want to a CASIO QV color Printer and printout images that is strange. 1. Correctly load batter- correctly. Turn power back on LCD Replace batteries (page 13). indicator ..., and MACRO for details about how to set up to the VIDEO IN terminal of the computer. 2. Applicable printer model: CASIO QG-100 After connecting the two units, turn on Under exposure LCD Change aperture switch setting to CCD characteristics, and does not indicate camera...
... an S-VIDEO terminal. Using the Camera with a Connected Device Computer (Video Capture) VIDEO You can connect this configuration, you want to a CASIO QV color Printer and printout images that is strange. 1. Correctly load batter- correctly. Turn power back on LCD Replace batteries (page 13). indicator ..., and MACRO for details about how to set up to the VIDEO IN terminal of the computer. 2. Applicable printer model: CASIO QG-100 After connecting the two units, turn on Under exposure LCD Change aperture switch setting to CCD characteristics, and does not indicate camera...
Owners Manual
Page 16
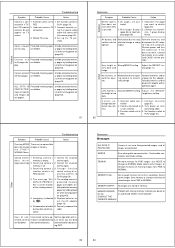
... play. [-] while turning power on (page 45). Unprotect the page you want to NORMAL. If this does not work, contact your dealer or #1~#3 an authorized CASIO service provider. Adjust the BRIGHT setting (page 11). LCD monitor is pressed. 1. S e n d i n g c a m e r a ' s 1. protected ...13). 6. REMAIN No more memory for further recording. MEMORY EMPTY No images are hidden. Contact your dealer or an authorized CASIO service provider. Function switch set to a normalsize, 1-page display format. Incorrect camera-TV 2. Some images Protected memory pages...
... play. [-] while turning power on (page 45). Unprotect the page you want to NORMAL. If this does not work, contact your dealer or #1~#3 an authorized CASIO service provider. Adjust the BRIGHT setting (page 11). LCD monitor is pressed. 1. S e n d i n g c a m e r a ' s 1. protected ...13). 6. REMAIN No more memory for further recording. MEMORY EMPTY No images are hidden. Contact your dealer or an authorized CASIO service provider. Function switch set to a normalsize, 1-page display format. Incorrect camera-TV 2. Some images Protected memory pages...

Owners Manual
Page 17
... continuous operation Recording for about two hours a day. • Should the LCD image appear abnormally dark, take the camera to your dealer or an authorized CASIO service provider to light, or reddish bands may require more time than normal to have the light source replaced. Single page; Electronic Shutter Speed 1/8 to...
... continuous operation Recording for about two hours a day. • Should the LCD image appear abnormally dark, take the camera to your dealer or an authorized CASIO service provider to light, or reddish bands may require more time than normal to have the light source replaced. Single page; Electronic Shutter Speed 1/8 to...
