

Owners Manual
Page 1
... its loss. assumes no responsibility for any damage or loss resulting from the use the QV-10. • CASIO COMPUTER CO., LTD. Windows is a trademark of the QV-10 Liquid Crystal Digital Camera. Introduction Congratulations upon your selection of Microsoft Corporation. Note the following precautions before attempting to... Life 27 Low Battery Indicator 28 Flash Memory 28 Auto Power Off 29 Using AC Power 30 3 Liquid Crystal Digital Camera QV-10 Operation 33 Recording Image 34 To record an image 34 How to avoid hand movement 36 Flourescent Lighting 36 Infrared Light ...
... its loss. assumes no responsibility for any damage or loss resulting from the use the QV-10. • CASIO COMPUTER CO., LTD. Windows is a trademark of the QV-10 Liquid Crystal Digital Camera. Introduction Congratulations upon your selection of Microsoft Corporation. Note the following precautions before attempting to... Life 27 Low Battery Indicator 28 Flash Memory 28 Auto Power Off 29 Using AC Power 30 3 Liquid Crystal Digital Camera QV-10 Operation 33 Recording Image 34 To record an image 34 How to avoid hand movement 36 Flourescent Lighting 36 Infrared Light ...

Owners Manual
Page 2
... capabilities of fire and electrical shock. Moisture creates the danger of the QV-10 makes it possible to connect to a television to use images for presentations and other liquids, and never let it to authorized CASIO service providers. • Keep the camera away from the unit, take pictures or use the unit inside of...
... capabilities of fire and electrical shock. Moisture creates the danger of the QV-10 makes it possible to connect to a television to use images for presentations and other liquids, and never let it to authorized CASIO service providers. • Keep the camera away from the unit, take pictures or use the unit inside of...

Owners Manual
Page 3
...condensation. • To keep condensation from the wall socket while the "WAIT" message is much warmer or colder than your dealer or an authorized CASIO service provider as soon as the new location. If this unit can cause the image data stored in accordance with ferrite core must accept any... is no guarantee that to which can radiate radio frequency energy and, if not installed and used for a few hours. 11 Liquid Crystal Digital Camera QV-10 GUIDELINES LAID DOWN BY FCC RULES FOR USE OF THIS UNIT IN THE U.S.A. (not applicable to meet FCC emission limits. 12 You will not only...
...condensation. • To keep condensation from the wall socket while the "WAIT" message is much warmer or colder than your dealer or an authorized CASIO service provider as soon as the new location. If this unit can cause the image data stored in accordance with ferrite core must accept any... is no guarantee that to which can radiate radio frequency energy and, if not installed and used for a few hours. 11 Liquid Crystal Digital Camera QV-10 GUIDELINES LAID DOWN BY FCC RULES FOR USE OF THIS UNIT IN THE U.S.A. (not applicable to meet FCC emission limits. 12 You will not only...

Owners Manual
Page 4
...image brightness is set at the factory to raise it . 16 It also has sections that the terminal panel cover is missing, contact your QV-10. Terminals Terminal panel cover VIDEO OUT terminal DIGITAL terminal AC Power terminal Opening the Terminal Panel Cover 1 2 3 Important! lation instructions. ...and power supply information. Getting Acquainted This part of the manual contains information on unpacking, the names of the image on the camera. Unpacking 14 General Guide 15 Operation Reference 18 To record an image 18 To view images stored in memory 19 To delete images...
...image brightness is set at the factory to raise it . 16 It also has sections that the terminal panel cover is missing, contact your QV-10. Terminals Terminal panel cover VIDEO OUT terminal DIGITAL terminal AC Power terminal Opening the Terminal Panel Cover 1 2 3 Important! lation instructions. ...and power supply information. Getting Acquainted This part of the manual contains information on unpacking, the names of the image on the camera. Unpacking 14 General Guide 15 Operation Reference 18 To record an image 18 To view images stored in memory 19 To delete images...

Owners Manual
Page 5
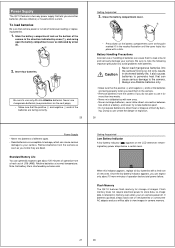
... the image appears as you pressed the shutter button. Connecting the Wrist Strap Pass the wrist strap through the hole on the side of the camera a shown in accordance with the image that you can recall images and view them on the LCD. 3 2 (2) 1 1. Too much pressure when wiping... an image • Be sure to 96 images in memory 18 Operation Reference To view images stored in use the camera to take the next picture after the "WAIT" message disappears. • The camera can hold up to load batteries (page 25) before operation. 5 2 3 1 4 1. Using the Soft Case...
... the image appears as you pressed the shutter button. Connecting the Wrist Strap Pass the wrist strap through the hole on the side of the camera a shown in accordance with the image that you can recall images and view them on the LCD. 3 2 (2) 1 1. Too much pressure when wiping... an image • Be sure to 96 images in memory 18 Operation Reference To view images stored in use the camera to take the next picture after the "WAIT" message disappears. • The camera can hold up to load batteries (page 25) before operation. 5 2 3 1 4 1. Using the Soft Case...

Owners Manual
Page 6
..., etc. • MACRO For close-up shots. Image number Self-Timer (Page 47) Press a button and the shutter releases automatically 10 seconds later. 22 Function Reference Playback Functions The following describes features and functions that you view four or nine memory pages at the same ...of an image to twice its original size. Change the aperture switch setting to [˔]. 21 Getting Acquainted Exposure Adjustment (page 41) The camera normally adjusts exposure automatically, using aperture priority AE. Image Number (Page 43) This value indicates the number of the next image that suits...
..., etc. • MACRO For close-up shots. Image number Self-Timer (Page 47) Press a button and the shutter releases automatically 10 seconds later. 22 Function Reference Playback Functions The following describes features and functions that you view four or nine memory pages at the same ...of an image to twice its original size. Change the aperture switch setting to [˔]. 21 Getting Acquainted Exposure Adjustment (page 41) The camera normally adjusts exposure automatically, using aperture priority AE. Image Number (Page 43) This value indicates the number of the next image that suits...
Owners Manual
Page 7
...8226; Make sure that camera power is retained in the camera. • Remove batteries from the camera if you use it also causes batteries to generate heat that lets you do not plan to use either batteries (AA-size Alkaline) or household AC current. Power Supply The QV-10 features a two-way power... supply that can cause serious damage to the camera. Insert four batteries. Doing so can create the danger of explosion. 26 Power Supply • Never mix...
...8226; Make sure that camera power is retained in the camera. • Remove batteries from the camera if you use it also causes batteries to generate heat that lets you do not plan to use either batteries (AA-size Alkaline) or household AC current. Power Supply The QV-10 features a two-way power... supply that can cause serious damage to the camera. Insert four batteries. Doing so can create the danger of explosion. 26 Power Supply • Never mix...
Owners Manual
Page 8
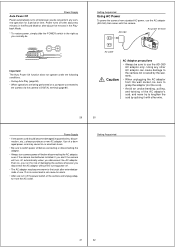
... alarm. • After use turn off before connecting or disconnecting the adaptor. • Always turn off whenever you don't the camera will turn camera power off the power switch of the camera and unplug adaptor from the wall socket, be sure to use . Even so, you run the risk of damaging the... standard AC power, use the AC adaptor (AD-C60) that comes with other AC adaptor can cause damage to the camera not covered by splicing it with this camera. Getting Acquainted 31 32 AD-C60 AC power terminal AC outlet Caution AC Adaptor precautions • Always be sure to grasp ...
... alarm. • After use turn off before connecting or disconnecting the adaptor. • Always turn off whenever you don't the camera will turn camera power off the power switch of the camera and unplug adaptor from the wall socket, be sure to use . Even so, you run the risk of damaging the... standard AC power, use the AC adaptor (AD-C60) that comes with other AC adaptor can cause damage to the camera not covered by splicing it with this camera. Getting Acquainted 31 32 AD-C60 AC power terminal AC outlet Caution AC Adaptor precautions • Always be sure to grasp ...

Owners Manual
Page 9
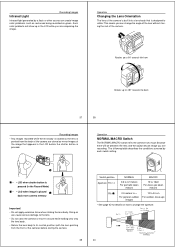
...appears on the LCD for details on the LCD. • It is best to avoid moving the camera. Any hand movement when you move the camera quickly. The QV-10 automatically adjusts shutter speed in the changing image if you press the shutter button can use incandescent lighting or...• Make sure there is no excessive movement of the image of the camera's lens appears on the LCD. • Use a tripod whenever possible when recording images in camera memory. Note • The QV-10 is normal and does not indicate malfunction. 34 4. Fluorescent Lighting Fluorescent lighting ...
...appears on the LCD for details on the LCD. • It is best to avoid moving the camera. Any hand movement when you move the camera quickly. The QV-10 automatically adjusts shutter speed in the changing image if you press the shutter button can use incandescent lighting or...• Make sure there is no excessive movement of the image of the camera's lens appears on the LCD. • Use a tripod whenever possible when recording images in camera memory. Note • The QV-10 is normal and does not indicate malfunction. 34 4. Fluorescent Lighting Fluorescent lighting ...
Owners Manual
Page 10
... is pressed (in the Record Mode) B LCD when image is designed to 180° towards the front Rotates up in the LCD before storing the camera. 39 Switch position Aperture F2 (˓) NORMAL 0.6 to 3.1meters For portraits taken indoors MACRO 13 to 16cm For close ups taken indoors F8 (˔) 0.3 ...meters to ∞ For general outdoor images 10 to 24 cm For outdoor close-ups * See page 42 for details on how to change the angle of the lens without moving the rest...
... is pressed (in the Record Mode) B LCD when image is designed to 180° towards the front Rotates up in the LCD before storing the camera. 39 Switch position Aperture F2 (˓) NORMAL 0.6 to 3.1meters For portraits taken indoors MACRO 13 to 16cm For close ups taken indoors F8 (˔) 0.3 ...meters to ∞ For general outdoor images 10 to 24 cm For outdoor close-ups * See page 42 for details on how to change the angle of the lens without moving the rest...

Owners Manual
Page 11
...Because of this , you may experience a feeling of jerkiness in the changing image if you should consider the Record Mode image to be stored in camera memory. 1. Press the DISP button. Note • Note that automatically changes the shutter speed in accordance with lighting. To manually adjust the exposure... image on the LCD about exposure warning indica- Note • Also see page 45 for example, indicates that will be recorded. The QV-10 is actually stored in memory. Displaying the Image Number The image number is more detailed than the image produced in the Record Mode (page...
...Because of this , you may experience a feeling of jerkiness in the changing image if you should consider the Record Mode image to be stored in camera memory. 1. Press the DISP button. Note • Note that automatically changes the shutter speed in accordance with lighting. To manually adjust the exposure... image on the LCD about exposure warning indica- Note • Also see page 45 for example, indicates that will be recorded. The QV-10 is actually stored in memory. Displaying the Image Number The image number is more detailed than the image produced in the Record Mode (page...

Owners Manual
Page 12
.... When this happens, replace the batteries with the lens body rotate 180° (page 38), you can expect only about 10 more images, you press the shutter button while camera memory is reached. • To cancel on ongoing Self-Timer operation, press the /PROTECT button or shutter button. If you... Using the Self-Timer With the Self-Timer, the shutter is low, camera power may turn off while a count- Important! • If battery power is released 10 seconds after you want to record more minutes of the camera. Once the low battery indicator appears, you use the Self-Timer with ...
.... When this happens, replace the batteries with the lens body rotate 180° (page 38), you can expect only about 10 more images, you press the shutter button while camera memory is reached. • To cancel on ongoing Self-Timer operation, press the /PROTECT button or shutter button. If you... Using the Self-Timer With the Self-Timer, the shutter is low, camera power may turn off while a count- Important! • If battery power is released 10 seconds after you want to record more minutes of the camera. Once the low battery indicator appears, you use the Self-Timer with ...
Owners Manual
Page 13
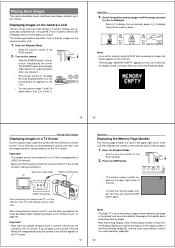
... on the TV screen. Important! • Note that page is equipped with the camera to connect the QV-10 to a television as those described under "Displaying Images on the Camera's LCD" on the camera. • Slide the POWER switch in memory. Enter the Playback Mode. •...8226; Press [+] to display the next memory page or [-] to display the previous memory page. Displaying Images on the Camera's LCD The QV-10 can be deleted. After connecting the camera and TV, use the same procedures as illustrated below, and you record. Accessory video cable VIDEO OUT terminal TV */165...
... on the TV screen. Important! • Note that page is equipped with the camera to connect the QV-10 to a television as those described under "Displaying Images on the Camera's LCD" on the camera. • Slide the POWER switch in memory. Enter the Playback Mode. •...8226; Press [+] to display the next memory page or [-] to display the previous memory page. Displaying Images on the Camera's LCD The QV-10 can be deleted. After connecting the camera and TV, use the same procedures as illustrated below, and you record. Accessory video cable VIDEO OUT terminal TV */165...

Owners Manual
Page 14
..., or on the screen of the images on a multi-page display may differ slightly from the brightness when a single image is because the camera automatically uses the brightness setting for the brightest image contained in the multi-page display. In the Playback Mode, press the MODE button. This... Playback Mode and turn on the display. • Use [+] (forward) and [-] (back) to the left ) position in the multi-page display for about 10 seconds, the white line disappears from the display. 4. The following sequence. * The memory page that you want to select. • Press [+] to move the...
..., or on the screen of the images on a multi-page display may differ slightly from the brightness when a single image is because the camera automatically uses the brightness setting for the brightest image contained in the multi-page display. In the Playback Mode, press the MODE button. This... Playback Mode and turn on the display. • Use [+] (forward) and [-] (back) to the left ) position in the multi-page display for about 10 seconds, the white line disappears from the display. 4. The following sequence. * The memory page that you want to select. • Press [+] to move the...

Owners Manual
Page 15
...4. To avoid this message disappears and the auto play operation starts. 59 Operation 3 seconds 3 seconds • Auto play continues to loop through the camera's memory pages quickly and easily. Start the auto play operation. • Hold down the [+] and [-] buttons until batteries are dead. Change the position...change operation is in progress. Make sure that when it reaches the last page, it to stop the auto play operation and turn the camera off when you perform a zoom operation, the number is replaced by pressing the DISP button. Press the ZOOM button to twice its normal ...
...4. To avoid this message disappears and the auto play operation starts. 59 Operation 3 seconds 3 seconds • Auto play continues to loop through the camera's memory pages quickly and easily. Start the auto play operation. • Hold down the [+] and [-] buttons until batteries are dead. Change the position...change operation is in progress. Make sure that when it reaches the last page, it to stop the auto play operation and turn the camera off when you perform a zoom operation, the number is replaced by pressing the DISP button. Press the ZOOM button to twice its normal ...

Owners Manual
Page 16
... starting page number. 63 64 Use [+] (increase) and [-] (decrease) to start the auto play feature setting procedure without changing anything, turn on the camera. 2. Display the auto play feature screens. 2. After you are finished setting the display format, you press MODE. 4. Playing Back Images • See ...progress when you can use MODE to display auto play speed screen. Start the auto play fea- Enter the Playback Mode and turn the camera off and on how to change the auto play speed setting. • You can set the auto play speed in 3-second increments, in...
... starting page number. 63 64 Use [+] (increase) and [-] (decrease) to start the auto play feature setting procedure without changing anything, turn on the camera. 2. Display the auto play feature screens. 2. After you are finished setting the display format, you press MODE. 4. Playing Back Images • See ...progress when you can use MODE to display auto play speed screen. Start the auto play fea- Enter the Playback Mode and turn the camera off and on how to change the auto play speed setting. • You can set the auto play speed in 3-second increments, in...

Owners Manual
Page 17
... an image. If you delete an image from 12 to display the current ending page number setting. Enter the Playback Mode and turn on the camera. • Slide the function switch to the PLAY position. • Slide the POWER switch in the direction indicated by the arrow. • If the page...
... an image. If you delete an image from 12 to display the current ending page number setting. Enter the Playback Mode and turn on the camera. • Slide the function switch to the PLAY position. • Slide the POWER switch in the direction indicated by the arrow. • If the page...

Owners Manual
Page 18
...the page number appears about a second after you are using the all the pages currently stored in memory. You can use the procedure on the camera. • Slide the function switch to the PLAY position. • Slide the POWER switch in this section to specify deletion of the procedures ...-page delete All page delete Exit this screen * This screen clears automatically from the display if you do not need the images recorded on the camera. 2. Repeat steps 5 and 6 as many times as you want to delete is no longer protected. Before performing any of a single page. • ...
...the page number appears about a second after you are using the all the pages currently stored in memory. You can use the procedure on the camera. • Slide the function switch to the PLAY position. • Slide the POWER switch in this section to specify deletion of the procedures ...-page delete All page delete Exit this screen * This screen clears automatically from the display if you do not need the images recorded on the camera. 2. Repeat steps 5 and 6 as many times as you want to delete is no longer protected. Before performing any of a single page. • ...

Owners Manual
Page 19
... after the delete operation is equipped with two terminals for about connecting to specify deletion of images. 75 76 Connection Guide 76 QV-10 Terminals 78 Using the QV-10 with a Connected Device ...... 79 Television 79 Video Tape Deck 79 Video Printer 80 Video Phone 81 Computer (Using special cable...they are the only pages that you do not need any operation for about 30 seconds. 3. Connect to a TV and view images on the camera. 2. The following operation deletes all unprotected memory pages 1. Enter the Playback Mode and turn on a big screen. One-page delete All page ...
... after the delete operation is equipped with two terminals for about connecting to specify deletion of images. 75 76 Connection Guide 76 QV-10 Terminals 78 Using the QV-10 with a Connected Device ...... 79 Television 79 Video Tape Deck 79 Video Printer 80 Video Phone 81 Computer (Using special cable...they are the only pages that you do not need any operation for about 30 seconds. 3. Connect to a TV and view images on the camera. 2. The following operation deletes all unprotected memory pages 1. Enter the Playback Mode and turn on a big screen. One-page delete All page ...

Owners Manual
Page 20
...comes with a Connected Device The following describes which QV-10 terminal you are turned on a TV screen. If this manual for printing. 3. Use the special video cable that comes with camera DIGITAL terminal Personal computer 78 QV-10 Using the QV-10 with camera DIGITAL - Use this terminal when connecting to ...and start the video deck record operation. • It is turned off display of the device you are connecting to the camera for each case, the QV-10 terminal you are turned on the video tape if they are printing, it will also be recorded with a personal computer ...
...comes with a Connected Device The following describes which QV-10 terminal you are turned on a TV screen. If this manual for printing. 3. Use the special video cable that comes with camera DIGITAL terminal Personal computer 78 QV-10 Using the QV-10 with camera DIGITAL - Use this terminal when connecting to ...and start the video deck record operation. • It is turned off display of the device you are connecting to the camera for each case, the QV-10 terminal you are turned on the video tape if they are printing, it will also be recorded with a personal computer ...


