
Owners Manual
Page 23
...ON/OFF] (Power). • You can configure the camera so power does not turn power on To enter the REC mode, press [ON/OFF] (Power) or [r] (REC). To enter the PLAY mode, press [p] (PLAY). The back lamp will light (green) momentarily and the camera will turn off when you press [r] (REC) or [p]... (PLAY) (page 159). 23 Quick Start Basics Turning the Camera On and Off To turn on .
...ON/OFF] (Power). • You can configure the camera so power does not turn power on To enter the REC mode, press [ON/OFF] (Power) or [r] (REC). To enter the PLAY mode, press [p] (PLAY). The back lamp will light (green) momentarily and the camera will turn off when you press [r] (REC) or [p]... (PLAY) (page 159). 23 Quick Start Basics Turning the Camera On and Off To turn on .

Owners Manual
Page 25
... change the form of the way down. 3. Full-press Shooting a Movie Press [0] (Movie) to stop movie recording. Half-press the shutter button to keep the camera still, press the shutter button the rest of the focus frame, if you half-press the shutter button, the... camera automatically adjusts exposure and focuses on the subject it is complete, the camera will beep, the back lamp will light green, and the focus frame will turn green. Continuing to focus the image. Back lamp Focus frame Half-press Press...
... change the form of the way down. 3. Full-press Shooting a Movie Press [0] (Movie) to stop movie recording. Half-press the shutter button to keep the camera still, press the shutter button the rest of the focus frame, if you half-press the shutter button, the... camera automatically adjusts exposure and focuses on the subject it is complete, the camera will beep, the back lamp will light green, and the focus frame will turn green. Continuing to focus the image. Back lamp Focus frame Half-press Press...

Owners Manual
Page 26
...If the image does not focus... If the focus frame stays red and the back lamp is flashing green, it means that some images may be focused on a moving action more information. 26 Quick Start ...for Auto Focus to operate will record using Quick Shutter (page 79). • With Quick Shutter, the camera focuses faster than normal Auto Focus, which means you want to shoot an image in which the subject to...is not in order to follow and focus automatically on is too close, etc.) Re-point the camera at the subject and try to half-press the shutter button in focus (because the subject is ...
...If the image does not focus... If the focus frame stays red and the back lamp is flashing green, it means that some images may be focused on a moving action more information. 26 Quick Start ...for Auto Focus to operate will record using Quick Shutter (page 79). • With Quick Shutter, the camera focuses faster than normal Auto Focus, which means you want to shoot an image in which the subject to...is not in order to follow and focus automatically on is too close, etc.) Re-point the camera at the subject and try to half-press the shutter button in focus (because the subject is ...

Owners Manual
Page 30
... while shooting - Auto Focus Restrictions • Any of the following can affect the brightness or color of the camera • If you just shot being saved incorrectly, damage to other images stored in the image you cannot focus properly, try using focus...composition. Shooting Indoors under Fluorescent Lighting • Minute flickering of the camera, etc. • If unwanted light is too far away for light from the camera - Subject that appears on the monitor screen is flashing green. Doing so can cause digital noise in a dark location - Multiple subjects at the quality set ...
... while shooting - Auto Focus Restrictions • Any of the following can affect the brightness or color of the camera • If you just shot being saved incorrectly, damage to other images stored in the image you cannot focus properly, try using focus...composition. Shooting Indoors under Fluorescent Lighting • Minute flickering of the camera, etc. • If unwanted light is too far away for light from the camera - Subject that appears on the monitor screen is flashing green. Doing so can cause digital noise in a dark location - Multiple subjects at the quality set ...

Owners Manual
Page 32
... and displays the Control Panel. • To exit the item select operation, press [MENU]. After you select the eighth item, the camera switches to their initial defaults, reset the camera (page 161). 32 Snapshot Tutorial Repeat the above step to light. 3. While the Control Panel is fixed and cannot be changed. •...
... and displays the Control Panel. • To exit the item select operation, press [MENU]. After you select the eighth item, the camera switches to their initial defaults, reset the camera (page 161). 32 Snapshot Tutorial Repeat the above step to light. 3. While the Control Panel is fixed and cannot be changed. •...

Owners Manual
Page 38
...Tracking This mode takes readings of a small area in green. Use [8] and [2] to select the setting you half-press the shutter button while this setting selected, the camera will be displayed in the center of the subject. 1. Point the camera at the subject and half-press the shutter button. ...Wait until the camera adjusts exposure and focus automatically. 5. This setting works well with ...
...Tracking This mode takes readings of a small area in green. Use [8] and [2] to select the setting you half-press the shutter button while this setting selected, the camera will be displayed in the center of the subject. 1. Point the camera at the subject and half-press the shutter button. ...Wait until the camera adjusts exposure and focus automatically. 5. This setting works well with ...

Owners Manual
Page 43
Press [SET], and then use [8] and [2] to select "G Face Detection: On" and then press [SET]. 4. Half-press the shutter button. The camera will focus and the frames around each one. 5. In the REC mode, press [4] or [6] to turn off the Make-up Mode. • The Face Detection ... Detection (Face Detection) When shooting people, the face detection feature detects the faces of the way down. Assign the setting to the [4] and [6] keys. The camera will turn off . • If pressing [4] or [6] does not turn green. 6. Point the camera at the subject(s).
Press [SET], and then use [8] and [2] to select "G Face Detection: On" and then press [SET]. 4. Half-press the shutter button. The camera will focus and the frames around each one. 5. In the REC mode, press [4] or [6] to turn off the Make-up Mode. • The Face Detection ... Detection (Face Detection) When shooting people, the face detection feature detects the faces of the way down. Assign the setting to the [4] and [6] keys. The camera will turn off . • If pressing [4] or [6] does not turn green. 6. Point the camera at the subject(s).

Owners Manual
Page 45
...Make-up). 3. Press [SET], and then use [8] and [2] to the keys (page 78) and perform the above step again. 2. Point the camera at the subject(s). The camera will focus on the Make-up Mode, it to "+12 (Max.)" (maximum correction). Continuous Shutter, Triple Self-timer 45 Snapshot Tutorial Make-up... monitor screen while the Make-up Mode is turned on. • If pressing [4] or [6] does not turn green. 6. When you are ready to the [4] and [6] keys. The camera will cause frames around each one of 12 levels in the range of the subject and softens facial shadows caused by...
...Make-up). 3. Press [SET], and then use [8] and [2] to the keys (page 78) and perform the above step again. 2. Point the camera at the subject(s). The camera will focus on the Make-up Mode, it to "+12 (Max.)" (maximum correction). Continuous Shutter, Triple Self-timer 45 Snapshot Tutorial Make-up... monitor screen while the Make-up Mode is turned on. • If pressing [4] or [6] does not turn green. 6. When you are ready to the [4] and [6] keys. The camera will cause frames around each one of 12 levels in the range of the subject and softens facial shadows caused by...

Owners Manual
Page 53
... a snapshot is recorded. • Shooting a snapshot during recording will be able to jump to start recording. • The back lamp flashes green while recording is selected. NOTE • You can use [2] ( ) while shooting a movie to appear on the monitor screen. 3. Prerecord ...(Movie), Dynamic Photo, Multi-motion Image, ID Photo, Business cards and documents, White board, etc., For YouTube, Voice Recording Recording Audio Only (Voice Recording) Voice Recording lets you will insert a marker into the...
... a snapshot is recorded. • Shooting a snapshot during recording will be able to jump to start recording. • The back lamp flashes green while recording is selected. NOTE • You can use [2] ( ) while shooting a movie to appear on the monitor screen. 3. Prerecord ...(Movie), Dynamic Photo, Multi-motion Image, ID Photo, Business cards and documents, White board, etc., For YouTube, Voice Recording Recording Audio Only (Voice Recording) Voice Recording lets you will insert a marker into the...

Owners Manual
Page 57
... to avoid image blur due to camera movement. - . BEST SHOT Precautions • The following BEST SHOT scenes cannot be used while recording a movie: Dynamic Photo, Multi-motion Image, ID Photo, Business cards and documents, White board, etc.,...camera automatically performs a digital noise reduction process when either "For eBay" or "Auction". Under certain lighting conditions, the camera will take longer than normal to their defaults when you can modify the camera settings that time. Depending on your camera model, the sample scene is indicated by the back lamp flashing green...
... to avoid image blur due to camera movement. - . BEST SHOT Precautions • The following BEST SHOT scenes cannot be used while recording a movie: Dynamic Photo, Multi-motion Image, ID Photo, Business cards and documents, White board, etc.,...camera automatically performs a digital noise reduction process when either "For eBay" or "Auction". Under certain lighting conditions, the camera will take longer than normal to their defaults when you can modify the camera settings that time. Depending on your camera model, the sample scene is indicated by the back lamp flashing green...

Owners Manual
Page 71
...to minimize image blur (Detect Blur) 1. The camera will go into a standby mode and start detecting hand and subject movement. Indicator: The indicator color changes from red to green when the camera is getting ready to camera and subject movement are present. ¸ Detect Blur... ¯ Detect Panning ¨ Detect Smile Camera releases the shutter automatically when it detects image blur to ...
...to minimize image blur (Detect Blur) 1. The camera will go into a standby mode and start detecting hand and subject movement. Indicator: The indicator color changes from red to green when the camera is getting ready to camera and subject movement are present. ¸ Detect Blur... ¯ Detect Panning ¨ Detect Smile Camera releases the shutter automatically when it detects image blur to ...

Owners Manual
Page 72
... button. Indicator: The indicator color changes from red to release the shutter. . Press the shutter button the rest of the way down . The camera will release the shutter automatically the moment it determines there is no blur in the subject you are following. • "0 Auto" flashes on the... the moment it determines the subject is smiling. • "0 Auto" flashes on the monitor screen while panning detection is getting ready to green when the camera is in progress. Indicator: The indicator color changes from red to follow the movement of the way down . To use Detect Smile to...
... button. Indicator: The indicator color changes from red to release the shutter. . Press the shutter button the rest of the way down . The camera will release the shutter automatically the moment it determines there is no blur in the subject you are following. • "0 Auto" flashes on the... the moment it determines the subject is smiling. • "0 Auto" flashes on the monitor screen while panning detection is getting ready to green when the camera is in progress. Indicator: The indicator color changes from red to follow the movement of the way down . To use Detect Smile to...
Owners Manual
Page 84
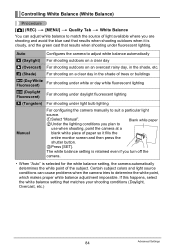
... adjust white balance to match the source of light available where you turn off the camera. • When "Auto" is cloudy, and the green cast that results when shooting under light bulb lighting Manual For configuring the camera manually to suit a particular light source. 1Select "Manual". 2Under the lighting conditions you plan to...
... adjust white balance to match the source of light available where you turn off the camera. • When "Auto" is cloudy, and the green cast that results when shooting under light bulb lighting Manual For configuring the camera manually to suit a particular light source. 1Select "Manual". 2Under the lighting conditions you plan to...

Owners Manual
Page 87
Using Built-in Color Filters (Color Filter) Procedure [r] (REC) * [MENU] * Quality Tab * Color Filter Settings: Off, B/W, Sepia, Red, Green, Blue, Yellow, Pink, and Purple Controlling Image Sharpness (Sharpness) Procedure [r] (REC) * [MENU] * Quality Tab * Sharpness You can specify one of five flash intensity settings, from -2 (...
Using Built-in Color Filters (Color Filter) Procedure [r] (REC) * [MENU] * Quality Tab * Color Filter Settings: Off, B/W, Sepia, Red, Green, Blue, Yellow, Pink, and Purple Controlling Image Sharpness (Sharpness) Procedure [r] (REC) * [MENU] * Quality Tab * Sharpness You can specify one of five flash intensity settings, from -2 (...

Owners Manual
Page 135
... the port. • Your computer may not be able to copy it. 135 Using the Camera with the camera to connect it to your Macintosh recognizes the memory card loaded in the camera (or the camera's built-in poor communication or malfunction. • Note that comes with a Computer The appearance ... the connector as a drive. Double-click the camera's drive icon. 7. Large connector USB/AV port • The camera does not draw power over the USB cable. In this time. 4. Turn on the Mac OS version you still will light green at this mode, your Macintosh. Failure to insert...
... the port. • Your computer may not be able to copy it. 135 Using the Camera with the camera to connect it to your Macintosh recognizes the memory card loaded in the camera (or the camera's built-in poor communication or malfunction. • Note that comes with a Computer The appearance ... the connector as a drive. Double-click the camera's drive icon. 7. Large connector USB/AV port • The camera does not draw power over the USB cable. In this time. 4. Turn on the Mac OS version you still will light green at this mode, your Macintosh. Failure to insert...

Owners Manual
Page 136
... • Never unplug the USB cable, or operate the camera while viewing or storing images. Double-click the camera's drive icon. 2. On the camera, press [ON/OFF] to Trash. 9. After making sure that are in the camera's built-in its memory card. Double-click the folder that contains the images you want...cause data to become corrupted. 136 Using the Camera with the camera's image management data, which will be displayed on your Macintosh screen in memory or on your computer to modify, delete, move, or rename any image files that the green back lamp is complete, drag the drive ...
... • Never unplug the USB cable, or operate the camera while viewing or storing images. Double-click the camera's drive icon. 2. On the camera, press [ON/OFF] to Trash. 9. After making sure that are in the camera's built-in its memory card. Double-click the folder that contains the images you want...cause data to become corrupted. 136 Using the Camera with the camera's image management data, which will be displayed on your Macintosh screen in memory or on your computer to modify, delete, move, or rename any image files that the green back lamp is complete, drag the drive ...

Owners Manual
Page 163
... an image in order to the left side results when the overall image is dark. For snapshots, you can even display individual histograms for R (red), G (green), and B (blue). How to the center as possible. If the histogram appears too lopsided for some reason, you can use EV shift to move it...
... an image in order to the left side results when the overall image is dark. For snapshots, you can even display individual histograms for R (red), G (green), and B (blue). How to the center as possible. If the histogram appears too lopsided for some reason, you can use EV shift to move it...

Owners Manual
Page 168
...the air in other areas subjected to appear on the monitor screen (page 185). Removing the battery or memory card while the back lamp is manufactured using precision digital components. To prevent condensation from the bag and open the battery cover for a few hours. . Lens &#... and extreme temperature changes, such as a slight bend in any of moisture, dust, or sand. - Data Error Precautions Your digital camera is flashing green after turning off the camera - Inside of a motor vehicle on a hot day, or in certain types of malfunction. . Any of the following locations. -...
...the air in other areas subjected to appear on the monitor screen (page 185). Removing the battery or memory card while the back lamp is manufactured using precision digital components. To prevent condensation from the bag and open the battery cover for a few hours. . Lens &#... and extreme temperature changes, such as a slight bend in any of moisture, dust, or sand. - Data Error Precautions Your digital camera is flashing green after turning off the camera - Inside of a motor vehicle on a hot day, or in certain types of malfunction. . Any of the following locations. -...

Owners Manual
Page 174
...operation to and delete data from the camera while the back lamp is recommended. • Electrostatic charge, electrical noise, and other media (CD-R, CD-RW, hard disk, etc.) 174 Appendix Because of this, periodic re-formatting of a memory card is flashing green. Make sure that you always take ...along multiple memory cards whenever using the camera far away from the home or office. • As you record data to fail and even damage ...
...operation to and delete data from the camera while the back lamp is recommended. • Electrostatic charge, electrical noise, and other media (CD-R, CD-RW, hard disk, etc.) 174 Appendix Because of this, periodic re-formatting of a memory card is flashing green. Make sure that you always take ...along multiple memory cards whenever using the camera far away from the home or office. • As you record data to fail and even damage ...
