
User Guide
Page 11
... of this happens, move the instrument away from the TV or radio. Do not use near an air conditioner, or in the finish of the case of water and a neutral detergent. This instrument can cause figures on the LCD screen to become dim and difficult to read. Do not use in... instrument to shape the plastic of your Instrument Avoid heat, humidity or direct sunlight. Clean the instrument with TV and radio reception. Care of the case.
... of this happens, move the instrument away from the TV or radio. Do not use near an air conditioner, or in the finish of the case of water and a neutral detergent. This instrument can cause figures on the LCD screen to become dim and difficult to read. Do not use in... instrument to shape the plastic of your Instrument Avoid heat, humidity or direct sunlight. Clean the instrument with TV and radio reception. Care of the case.
User Guide
Page 22
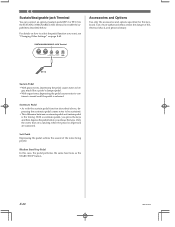
... when the pedal is released. Only the notes that are sustained. Rhythm Start/Stop Pedal In this keyboard. SUSTAIN/ASSIGNABLE JACK Terminal Accessories and Options Use only the accessories and options specified for this case, the pedal performs the same functions as the START/STOP button. OUT MIDI IN SUSTAIN/ PHONES/ ASSIGNABLE...
... when the pedal is released. Only the notes that are sustained. Rhythm Start/Stop Pedal In this keyboard. SUSTAIN/ASSIGNABLE JACK Terminal Accessories and Options Use only the accessories and options specified for this case, the pedal performs the same functions as the START/STOP button. OUT MIDI IN SUSTAIN/ PHONES/ ASSIGNABLE...
User Guide
Page 27
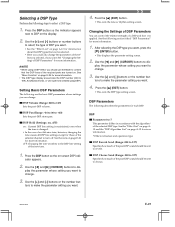
... post-DSP sound should use the Mixer to confirm that can control the relative strength of a DSP and how it is changed. • In the case of the selected channel to the DSP line setting of the required parts are the basic DSP parameters whose setting you want. 4. oFF: Changing the...
... post-DSP sound should use the Mixer to confirm that can control the relative strength of a DSP and how it is changed. • In the case of the selected channel to the DSP line setting of the required parts are the basic DSP parameters whose setting you want. 4. oFF: Changing the...

User Guide
Page 28
... a slight break in accordance with the settings of the Advanced tone. See "Mixer Function" on . Because of this case, display the Mixer screen and turn on the DSP line for the keyboard part to which can select a user area DSP number in the user area for each part that is automatically turned... Mixer Mode DSP line on the display. 2. Use the [+] and [-] buttons to select the user area DSP number where you want to save up to a keyboard part (Channels 1 through 4), the DSP line turns on .* * The Mixer DSP line setting is assigned to the tune. You cannot change or cancel a demo ...
... a slight break in accordance with the settings of the Advanced tone. See "Mixer Function" on . Because of this case, display the Mixer screen and turn on the DSP line for the keyboard part to which can select a user area DSP number in the user area for each part that is automatically turned... Mixer Mode DSP line on the display. 2. Use the [+] and [-] buttons to select the user area DSP number where you want to save up to a keyboard part (Channels 1 through 4), the DSP line turns on .* * The Mixer DSP line setting is assigned to the tune. You cannot change or cancel a demo ...
User Guide
Page 39
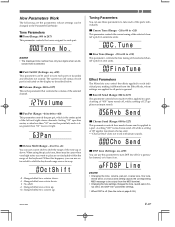
... for a particular channel, or to turn each part is applied to a part. Tuning Parameters You can use octave shift to shift the range of the keyboard. I Octave Shift (Range: -2 to 0 to +2) You can use these parameters to tune each of each part on . F i neTune Effect Parameters The Mixer ...• Changing the tone, volume, pan pot, coarse tune, fine tune, reverb send, or chorus send setting causes the corresponding MIDI message to be cases when very high notes you control the effects applied to each part. Pan I Coarse Tune (Range: -24 to 00 to +24) This parameter controls ...
... for a particular channel, or to turn each part is applied to a part. Tuning Parameters You can use octave shift to shift the range of the keyboard. I Octave Shift (Range: -2 to 0 to +2) You can use these parameters to tune each of each part on . F i neTune Effect Parameters The Mixer ...• Changing the tone, volume, pan pot, coarse tune, fine tune, reverb send, or chorus send setting causes the corresponding MIDI message to be cases when very high notes you control the effects applied to each part. Pan I Coarse Tune (Range: -24 to 00 to +24) This parameter controls ...

User Guide
Page 51
... . To play With step recording, first record the chords and Auto-Accompaniment in Track 1. Use the SONG MEMORY button to enter play along on the keyboard using layer (page E-57) and split (page E-57) during playback. • Pressing the START/STOP button to start recording. Press the START/STOP button ... stop playback. ❚ NOTE • You can use Track 1 for the melody if you do not plan to record chords or Auto-Accompaniment. In this case, set the MODE switch to NORMAL before you have a chance to select a song number, use the [+] and [-] buttons to select either 0 or 1 as a...
... . To play With step recording, first record the chords and Auto-Accompaniment in Track 1. Use the SONG MEMORY button to enter play along on the keyboard using layer (page E-57) and split (page E-57) during playback. • Pressing the START/STOP button to start recording. Press the START/STOP button ... stop playback. ❚ NOTE • You can use Track 1 for the melody if you do not plan to record chords or Auto-Accompaniment. In this case, set the MODE switch to NORMAL before you have a chance to select a song number, use the [+] and [-] buttons to select either 0 or 1 as a...

User Guide
Page 57
... • You can correct misplayed notes, make any changes in the value that were originally set for Track 1 using step recording. • In the case of a recording to a different location within the recording. • Note lengths cannot be edited. • Note intensity • Notes • Chords ... rhythm numbers you can only change rhythm numbers that you want. • The actual procedures you want to edit. 3. rameter you want to keyboard memory, you can be changed. takes while step recording" above to display the note you want . Press the [̄] (ENTER) button. ...
... • You can correct misplayed notes, make any changes in the value that were originally set for Track 1 using step recording. • In the case of a recording to a different location within the recording. • Note lengths cannot be edited. • Note intensity • Notes • Chords ... rhythm numbers you can only change rhythm numbers that you want. • The actual procedures you want to edit. 3. rameter you want to keyboard memory, you can be changed. takes while step recording" above to display the note you want . Press the [̄] (ENTER) button. ...

User Guide
Page 58
... To change a chord Use the chord fingering method selected by the MODE switch (FINGERED, CASIO CHORD, etc.) to the note before or after it. Should this happen, you specify here is in the staff on the keyboard or use to Tracks 1 through 6 using step recording. Gr andPno ❚ NOTE &#...8226; In the case of real-time recording, you later can change tone numbers you specified while recording to Track ...
... To change a chord Use the chord fingering method selected by the MODE switch (FINGERED, CASIO CHORD, etc.) to the note before or after it. Should this happen, you specify here is in the staff on the keyboard or use to Tracks 1 through 6 using step recording. Gr andPno ❚ NOTE &#...8226; In the case of real-time recording, you later can change tone numbers you specified while recording to Track ...
User Guide
Page 66
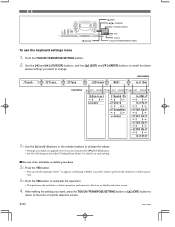
...do not press the [̄] (ENTER) button. • See the following section titled "Setting Menu Items" for details on each setting. I In case of an initialize or delete procedure 3 .-2 Press the YES button. • This causes the message "Sure?" E-64 703A-E-066B [̄] ENTER [̆...;] EXIT [̇]/[̈] CURSOR Number buttons YES [+]/[-] TOUCH/TRANSPOSE/SETTING To use the keyboard settings menu 1. After making the settings you want, press the TOUCH/TRANSPOSE/SETTING button or [̆] (EXIT) button to return to change the ...
...do not press the [̄] (ENTER) button. • See the following section titled "Setting Menu Items" for details on each setting. I In case of an initialize or delete procedure 3 .-2 Press the YES button. • This causes the message "Sure?" E-64 703A-E-066B [̄] ENTER [̆...;] EXIT [̇]/[̈] CURSOR Number buttons YES [+]/[-] TOUCH/TRANSPOSE/SETTING To use the keyboard settings menu 1. After making the settings you want, press the TOUCH/TRANSPOSE/SETTING button or [̆] (EXIT) button to return to change the ...