
User Guide
Page 4
...built-in tones. A builtin backlight keeps the display easy to read, even in total darkness. ❐ Song Memory Record up to pops and jazz. E-2 703A-E-004A This keyboard provides you with the following features and functions. ❐ 348 tones, including 100 "Advanced Tones" A total of...from rock to four of 238 standard tones including piano, organ, brass, and other presets provide you are variations of this CASIO musical instrument. One-touch Presets instantly recalls the most suitable tone and tempo settings to produce your own original creations. Introduction Congratulations...
...built-in tones. A builtin backlight keeps the display easy to read, even in total darkness. ❐ Song Memory Record up to pops and jazz. E-2 703A-E-004A This keyboard provides you with the following features and functions. ❐ 348 tones, including 100 "Advanced Tones" A total of...from rock to four of 238 standard tones including piano, organ, brass, and other presets provide you are variations of this CASIO musical instrument. One-touch Presets instantly recalls the most suitable tone and tempo settings to produce your own original creations. Introduction Congratulations...
User Guide
Page 5
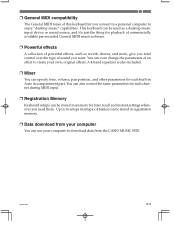
...an effect to download data from your own, original effects. You can also control the same parameters for playback of commercially available pre-recorded General MIDI music software. ❐ Powerful effects A collection of powerful effects, such as reverb, chorus, and more, give you ...the thing for each built-in registration memory. ❐ Data download from the CASIO MUSIC SITE. 703A-E-005A E-3 Up to enjoy "desktop music" capabilities. ❐ General MIDI compatibility The General MIDI tones of this keyboard let you connect to a personal computer to 16 setups (4 setups x 4 ...
...an effect to download data from your own, original effects. You can also control the same parameters for playback of commercially available pre-recorded General MIDI music software. ❐ Powerful effects A collection of powerful effects, such as reverb, chorus, and more, give you ...the thing for each built-in registration memory. ❐ Data download from the CASIO MUSIC SITE. 703A-E-005A E-3 Up to enjoy "desktop music" capabilities. ❐ General MIDI compatibility The General MIDI tones of this keyboard let you connect to a personal computer to 16 setups (4 setups x 4 ...

User Guide
Page 13
... E-46 Basic Song Memory operations E-46 Using Real-time Recording E-47 Mixer Mode Settings E-48 Playing Back from Song Memory E-49 Recording Melody and Chords with Step Recording E-49 Recording Multiple Tracks E-52 Correcting Mistakes While Step Recording E-54 Editing Memory Contents E-55 Editing a Song E-57 Keyboard Settings E-59 Using Layer E-59 Using Split E-59 Using...
... E-46 Basic Song Memory operations E-46 Using Real-time Recording E-47 Mixer Mode Settings E-48 Playing Back from Song Memory E-49 Recording Melody and Chords with Step Recording E-49 Recording Multiple Tracks E-52 Correcting Mistakes While Step Recording E-54 Editing Memory Contents E-55 Editing a Song E-57 Keyboard Settings E-59 Using Layer E-59 Using Split E-59 Using...

User Guide
Page 17
...when a note outside the display range (C2 to provide a reference beat for illustrative purposes only. The name of beats per minute are intended for your keyboard play. 14. Playing a Demo Tune Pressing the DEMO button starts demo tune play in this User's Guide. REC flashes on /off status. 15. ...This display also shows the Mixer channel's on the display during step recording. 13. The number of the chord being played is shown on the metronome to C7) is received. ❚ NOTE • Display examples shown ...
...when a note outside the display range (C2 to provide a reference beat for illustrative purposes only. The name of beats per minute are intended for your keyboard play. 14. Playing a Demo Tune Pressing the DEMO button starts demo tune play in this User's Guide. REC flashes on /off status. 15. ...This display also shows the Mixer channel's on the display during step recording. 13. The number of the chord being played is shown on the metronome to C7) is received. ❚ NOTE • Display examples shown ...
User Guide
Page 24
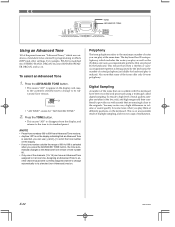
... programming in volume or sound quality for "ADVANCED TONE." 2. To ensure a high level of the channels (1 to scroll the tone number on the keyboard. For example, PIANO is selected, you press the ADVANCED TONE button, the tone automatically changes to the Advanced Tone version of tone number 00. ...; Only one of tonal quality, samples are taken in the low, mid, and high ranges and then combined to provide you with this keyboard have been recorded and processed using a technique called digital sampling. Lit • "AD TONE" stands for some of the tones offer only 16-note polyphony.
... programming in volume or sound quality for "ADVANCED TONE." 2. To ensure a high level of the channels (1 to scroll the tone number on the keyboard. For example, PIANO is selected, you press the ADVANCED TONE button, the tone automatically changes to the Advanced Tone version of tone number 00. ...; Only one of tonal quality, samples are taken in the low, mid, and high ranges and then combined to provide you with this keyboard have been recorded and processed using a technique called digital sampling. Lit • "AD TONE" stands for some of the tones offer only 16-note polyphony.

User Guide
Page 37
... and E-60 for an externally connected computer or other MIDI device, all 16 channels are shown on and off mutes any instrument recorded in the right column of this keyboard is assigned to Channels 6 through the MIDI terminal, etc. Press [̄] (ENTER) and then [̈] (CURSOR) to ... pan pot parameters of each of the 16 channels. The Mixer assigns each part to select a channel. To turn channels on the displayed keyboard and staff. Use the [+]/[-] buttons to a separate channel (1 through 16) and lets you play multiple different musical instrument parts at the same...
... and E-60 for an externally connected computer or other MIDI device, all 16 channels are shown on and off mutes any instrument recorded in the right column of this keyboard is assigned to Channels 6 through the MIDI terminal, etc. Press [̄] (ENTER) and then [̈] (CURSOR) to ... pan pot parameters of each of the 16 channels. The Mixer assigns each part to select a channel. To turn channels on the displayed keyboard and staff. Use the [+]/[-] buttons to a separate channel (1 through 16) and lets you play multiple different musical instrument parts at the same...

User Guide
Page 48
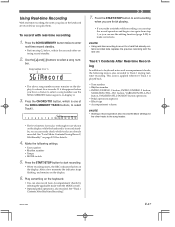
...melody tracks. Start End Track 1 Auto accompaniment (Rhythm, Bass, Chord 1/2/3), Keyboard play Track 2 Keyboard play Track 3 Keyboard play Track 4 Keyboard play Track 5 Keyboard play Track 6 Keyboard play them on the keyboard, and step recording where you can be used to add other parts to select the track ...you play , so they are automatically turned off whenever the keyboard goes into record standby or starts recording. Tracks Keyboard song memory records and plays back much like an entire six-piece band. This means that each of the...
...melody tracks. Start End Track 1 Auto accompaniment (Rhythm, Bass, Chord 1/2/3), Keyboard play Track 2 Keyboard play Track 3 Keyboard play Track 4 Keyboard play Track 5 Keyboard play Track 6 Keyboard play them on the keyboard, and step recording where you can be used to add other parts to select the track ...you play , so they are automatically turned off whenever the keyboard goes into record standby or starts recording. Tracks Keyboard song memory records and plays back much like an entire six-piece band. This means that each of the...
User Guide
Page 49
... whenever Track 1 is one . Press the CHORD/TR1 button, which tracks are already recorded. Make the following data is also recorded. Play something on the display while the keyboard is in record standby, so you can easily check which is played back. • Tone number •...10074; NOTE • Starting a record operation also records the Mixer settings for about five seconds. See "Level Meter Contents During Record/ Edit Standby" on page E-53 for tracks 11 through 16 are shown on the keyboard. • You can also record Auto Accompaniment chords by selecting the applicable...
... whenever Track 1 is one . Press the CHORD/TR1 button, which tracks are already recorded. Make the following data is also recorded. Play something on the display while the keyboard is in record standby, so you can easily check which is played back. • Tone number •...10074; NOTE • Starting a record operation also records the Mixer settings for about five seconds. See "Level Meter Contents During Record/ Edit Standby" on page E-53 for tracks 11 through 16 are shown on the keyboard. • You can also record Auto Accompaniment chords by selecting the applicable...

User Guide
Page 50
... on page E-68. [+]/[-] SONG MEMORY TRACK Track 1 Real-time Recording Variations The following describes a number of different variations you want accompaniment to start, play a chord on the melody keyboard to change each of step 5, press the SYNCHRO/FILL-IN NEXT button...page E-65). play something on the accompaniment keyboard to start recording with the AC adaptor before replacing batteries. • Turning off the keyboard while a record operation is replaced. • Memory contents are currently recording to be used as the keyboard is being used for approximately 3,500 notes....
... on page E-68. [+]/[-] SONG MEMORY TRACK Track 1 Real-time Recording Variations The following describes a number of different variations you want accompaniment to start, play a chord on the melody keyboard to change each of step 5, press the SYNCHRO/FILL-IN NEXT button...page E-65). play something on the accompaniment keyboard to start recording with the AC adaptor before replacing batteries. • Turning off the keyboard while a record operation is replaced. • Memory contents are currently recording to be used as the keyboard is being used for approximately 3,500 notes....

User Guide
Page 51
Even those who find it difficult to play along on the keyboard with an Auto-Accompaniment can create Auto-Accompaniments based on the display. 4. To record chords with Step Recording With step recording, you can record Auto-Accompaniment chords and notes, and even specify note lengths one by...; You can use the [+] and [-] buttons to select either 0 or 1 as a melody keyboard, regardless of the MODE switch setting. Use the SONG MEMORY button to enter play With step recording, first record the chords and Auto-Accompaniment in Track 1. back standby, and then use the Mixer (Page E-...
Even those who find it difficult to play along on the keyboard with an Auto-Accompaniment can create Auto-Accompaniments based on the display. 4. To record chords with Step Recording With step recording, you can record Auto-Accompaniment chords and notes, and even specify note lengths one by...; You can use the [+] and [-] buttons to select either 0 or 1 as a melody keyboard, regardless of the MODE switch setting. Use the SONG MEMORY button to enter play With step recording, first record the chords and Auto-Accompaniment in Track 1. back standby, and then use the Mixer (Page E-...

User Guide
Page 52
...-IN 1 button, VARIATION/FILL-IN 2 button, SYNCRHO/FILL-IN NEXT button operations Specifying Chords in memory and the keyboard stands by the current MODE switch setting (FINGERED, CASIO CHORD, etc.). • When the MODE switch is played. When inputting a chord with a specified bass note, ...pressing two keys of a Note" on the root input keyboard that specifies the root, and press the key in the accompaniment contents when the accompaniment is set to NORMAL during step recording...
...-IN 1 button, VARIATION/FILL-IN 2 button, SYNCRHO/FILL-IN NEXT button operations Specifying Chords in memory and the keyboard stands by the current MODE switch setting (FINGERED, CASIO CHORD, etc.). • When the MODE switch is played. When inputting a chord with a specified bass note, ...pressing two keys of a Note" on the root input keyboard that specifies the root, and press the key in the accompaniment contents when the accompaniment is set to NORMAL during step recording...

User Guide
Page 53
... an eighth note rest, hold down G on the root input keyboard and press the m7 key on page E-49. Specifying the Length of a Note During step recording, the number buttons are based upon the procedure described under "To record chords with an intro pattern In step 4, press INTRO/ENDING ...immediately before the chord where you input the rests, and then chord play In Place of step 4 at the start accompaniment with step recording" on the chord type input keyboard. (G) Hold down [0] and then use buttons [1] through [6] to specify chord type. Example 2: To input Gm/C, hold down ...
... an eighth note rest, hold down G on the root input keyboard and press the m7 key on page E-49. Specifying the Length of a Note During step recording, the number buttons are based upon the procedure described under "To record chords with an intro pattern In step 4, press INTRO/ENDING ...immediately before the chord where you input the rests, and then chord play In Place of step 4 at the start accompaniment with step recording" on the chord type input keyboard. (G) Hold down [0] and then use buttons [1] through [6] to specify chord type. Example 2: To input Gm/C, hold down ...

User Guide
Page 54
...ep Rec E-52 703A-E-054A SONG MEMORY Number buttons START/STOP SONG MEMORY TRACK [+]/[-] Recording Multiple Tracks Track 1 of the keyboard's song memory records Auto Accompaniment and keyboard play back. • Optional pedal operation you originally recorded on page E-53 for details. 3. In addition, there are five other tracks ... button to start to the one , specifying each note's pitch and length. 1. Track Contents After Real-time Recording In addition to keyboard notes, the following settings. • Tone number • Tempo (to se- This data is applied whenever the track is ...
...ep Rec E-52 703A-E-054A SONG MEMORY Number buttons START/STOP SONG MEMORY TRACK [+]/[-] Recording Multiple Tracks Track 1 of the keyboard's song memory records Auto Accompaniment and keyboard play back. • Optional pedal operation you originally recorded on page E-53 for details. 3. In addition, there are five other tracks ... button to start to the one , specifying each note's pitch and length. 1. Track Contents After Real-time Recording In addition to keyboard notes, the following settings. • Tone number • Tempo (to se- This data is applied whenever the track is ...

User Guide
Page 55
...in step 2 of the above procedure. 2. Use the SONG MEMORY TRACK buttons to input chords. 5. Whenever the keyboard is also recorded to Tracks 1 through 16 correspond to the track during step recording. • You can also use to input more notes. 7. You can add on , the amount of pressure... you want to record to input the length of the current MODE switch setting. lect the track you use keyboard keys to se- Flash 3. Tracks with four lit segments already contained recorded data, while tracks with one lit segment are still empty. ...
...in step 2 of the above procedure. 2. Use the SONG MEMORY TRACK buttons to input chords. 5. Whenever the keyboard is also recorded to Tracks 1 through 16 correspond to the track during step recording. • You can also use to input more notes. 7. You can add on , the amount of pressure... you want to record to input the length of the current MODE switch setting. lect the track you use keyboard keys to se- Flash 3. Tracks with four lit segments already contained recorded data, while tracks with one lit segment are still empty. ...

User Guide
Page 56
... the [̇] (CUR- Press the YES button. • This deletes all data from the display, and the STEP indicator flashes. Without exiting step recording, use [̇] and [̈] (CURSOR) to move the input point to the data you move the input point to the left . • The...;] and [̈] (CURSOR)) Data flow A3 C 4 3. C 4 Use [̇] and [̈] (CURSOR) to the left in data you specified and enters step record standby. • Pressing the [̆] (EXIT) button or the NO button cancels deleting the data. Monitoring the data on the display. E-54 703A-E-056A
... the [̇] (CUR- Press the YES button. • This deletes all data from the display, and the STEP indicator flashes. Without exiting step recording, use [̇] and [̈] (CURSOR) to move the input point to the data you move the input point to the left . • The...;] and [̈] (CURSOR)) Data flow A3 C 4 3. C 4 Use [̇] and [̈] (CURSOR) to the left in data you specified and enters step record standby. • Pressing the [̆] (EXIT) button or the NO button cancels deleting the data. Monitoring the data on the display. E-54 703A-E-056A

User Guide
Page 57
... enter the ed- Press the [̄] (ENTER) button. 3. rameter you want . • The actual procedures you want to a different location within the recording. • Note lengths cannot be edited. • Note intensity • Notes • Chords • Tone numbers • Rhythm number • INTRO/... (such as the song number. Make any changes you can only change rhythm numbers that ap- takes while step recording" above to display the note you want to keyboard memory, you want. Press the [̇] (CURSOR) button to se- iting mode. • The REC indicator...
... enter the ed- Press the [̄] (ENTER) button. 3. rameter you want . • The actual procedures you want to a different location within the recording. • Note lengths cannot be edited. • Note intensity • Notes • Chords • Tone numbers • Rhythm number • INTRO/... (such as the song number. Make any changes you can only change rhythm numbers that ap- takes while step recording" above to display the note you want to keyboard memory, you want. Press the [̇] (CURSOR) button to se- iting mode. • The REC indicator...

User Guide
Page 58
...G To change a chord Use the chord fingering method selected by the MODE switch (FINGERED, CASIO CHORD, etc.) to change a tone number. Cho r d [̇]/[̈] CURSOR YES ENTER... number buttons or [+] and [-] to the note before or after it is in the staff on the keyboard or use to change the various parameters stored in progress. • You can only change rhythm numbers that...10074; NOTE • In the case of real-time recording, you later can change rhythm numbers you specified while recording to Track 1 is reflected in the keyboard and the notes shown in progress. • You ...
...G To change a chord Use the chord fingering method selected by the MODE switch (FINGERED, CASIO CHORD, etc.) to change a tone number. Cho r d [̇]/[̈] CURSOR YES ENTER... number buttons or [+] and [-] to the note before or after it is in the staff on the keyboard or use to change the various parameters stored in progress. • You can only change rhythm numbers that...10074; NOTE • In the case of real-time recording, you later can change rhythm numbers you specified while recording to Track 1 is reflected in the keyboard and the notes shown in progress. • You ...

User Guide
Page 59
...song. 5. To delete a specific track 1. Press the [̄] (ENTER) button. • This displays the song delete screen. 4. lect the recorded track or tracks whose data you really want to delete. Press the YES button. • This causes the message "Sure?" Press the [̇] or... be changed) Track delete standby T r .De l . ? 5. Editing a Song You can perform the following operations in track delete standby returns to record standby. 703A-E-059A E-57 Use the [+] and [-] buttons to delete. 3. Press the SONG MEMORY button once to se- Use the SONG MEMORY TRACK ...
...song. 5. To delete a specific track 1. Press the [̄] (ENTER) button. • This displays the song delete screen. 4. lect the recorded track or tracks whose data you really want to delete. Press the YES button. • This causes the message "Sure?" Press the [̇] or... be changed) Track delete standby T r .De l . ? 5. Editing a Song You can perform the following operations in track delete standby returns to record standby. 703A-E-059A E-57 Use the [+] and [-] buttons to delete. 3. Press the SONG MEMORY button once to se- Use the SONG MEMORY TRACK ...

User Guide
Page 60
... the number of the song that contains the header data you want to rewrite. 3. SONG MEMORY To rewrite song header data (Panel Record) You can use a procedure called "Panel Record" to dis- Make the changes you want to rewrite the header data. [̇]/[̈] CURSOR YES ENTER E-58 703A-E-060A play the...
... the number of the song that contains the header data you want to rewrite. 3. SONG MEMORY To rewrite song header data (Panel Record) You can use a procedure called "Panel Record" to dis- Make the changes you want to rewrite the header data. [̇]/[̈] CURSOR YES ENTER E-58 703A-E-060A play the...
User Guide
Page 61
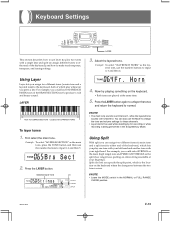
...For example, you press a key. Split also lets you specify the split point, which play whenever you could layer the FRENCH HORN tone on the keyboard where the changeover between the two tones occurs. ❚ NOTE • Leave the MODE switch in the Song Memory Mode. LAYER Main Tone (BRASS ... different tones (a main tone and a layered tone) to the keyboard, both of the keyboard), and how to change the tone and volume settings for these channels. • Layer cannot be used while standing by for recording or while recording is the location on the BRASS SECTION tone to produce a rich...
...For example, you press a key. Split also lets you specify the split point, which play whenever you could layer the FRENCH HORN tone on the keyboard where the changeover between the two tones occurs. ❚ NOTE • Leave the MODE switch in the Song Memory Mode. LAYER Main Tone (BRASS ... different tones (a main tone and a layered tone) to the keyboard, both of the keyboard), and how to change the tone and volume settings for these channels. • Layer cannot be used while standing by for recording or while recording is the location on the BRASS SECTION tone to produce a rich...


