NA10 User Manual
Page 5
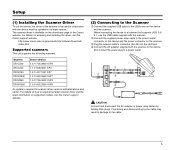
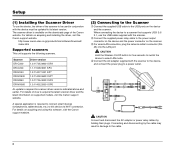
... device and the scanner. Scanner DR-C230 DR-C240 Driver version 1.0.11705.08001 SP2 1.1.11508.3001 SP4 DR-M140 DR-M160II 1.2.11407.1001 SP7 1.2.11402.06001 SP7 DR-M260 DR-M1060 1.0.11705.30001 SP4 1.0.11402.20001 SP6 An update is available on acquiring and installing the driver, visit the Canon support website. http://www.canon-elec.co.jp/products/ims/softwareDownload...
... device and the scanner. Scanner DR-C230 DR-C240 Driver version 1.0.11705.08001 SP2 1.1.11508.3001 SP4 DR-M140 DR-M160II 1.2.11407.1001 SP7 1.2.11402.06001 SP7 DR-M260 DR-M1060 1.0.11705.30001 SP4 1.0.11402.20001 SP6 An update is available on acquiring and installing the driver, visit the Canon support website. http://www.canon-elec.co.jp/products/ims/softwareDownload...
NA10 User Manual
Page 7
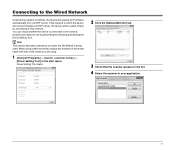
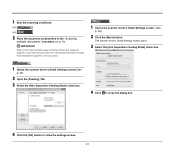
... check whether the device is connected to the network properly and ready for when the DR-M160II is being used. Driver Setting Tool starts. 2 Click the [NetworkMonitor] tab. 3 Check that of the model you are using. 1 Click [All Programs] - [Canon ] - [Driver Setting Tool] in your application. 7 If the network to which the device will connect...
... check whether the device is connected to the network properly and ready for when the DR-M160II is being used. Driver Setting Tool starts. 2 Click the [NetworkMonitor] tab. 3 Check that of the model you are using. 1 Click [All Programs] - [Canon ] - [Driver Setting Tool] in your application. 7 If the network to which the device will connect...

NA10 User Manual
Page 21
... web configuration page complies with that of This Device Hint This section describes operations for when the DR-M160II is automatically refreshed every 30 sec. When using . 1 Click [All Programs] - [Canon ] - [Driver Setting Tool] in the start menu. Driver Setting Tool starts. 2 Click the [NetworkMonitor] tab. 21 Displaying the Web Menu of the model you...
... web configuration page complies with that of This Device Hint This section describes operations for when the DR-M160II is automatically refreshed every 30 sec. When using . 1 Click [All Programs] - [Canon ] - [Driver Setting Tool] in the start menu. Driver Setting Tool starts. 2 Click the [NetworkMonitor] tab. 21 Displaying the Web Menu of the model you...
NA10 User Manual
Page 27
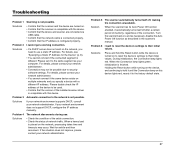
... double check the IP address of the connection. Solutions • Check the condition of the cable connection. • Check the status of the installed scanner driver is compatible with a different IP address. Solution When the scanner has its Auto Power Off function enabled, it to the same segment as described in...
... double check the IP address of the connection. Solutions • Check the condition of the cable connection. • Check the status of the installed scanner driver is compatible with a different IP address. Solution When the scanner has its Auto Power Off function enabled, it to the same segment as described in...
WA10 User Manual
Page 8
... 3.0/ 3.1, use the device, the driver of the Canon website. Connecting and disconnecting by holding their plugs. CAUTION Hold the Wireless On/Off button for scanner driver versions indicated above and earlier. Scanner DR-C230 DR-C240 Driver version 1.0.11705.08001 SP2 1.1.11508.3001 SP4 DR-M140 DR-M160II 1.2.11407.1001 SP7 1.2.11402.06001 SP7 DR-M260 DR-M1060 1.0.11705.30001 SP4...
... 3.0/ 3.1, use the device, the driver of the Canon website. Connecting and disconnecting by holding their plugs. CAUTION Hold the Wireless On/Off button for scanner driver versions indicated above and earlier. Scanner DR-C230 DR-C240 Driver version 1.0.11705.08001 SP2 1.1.11508.3001 SP4 DR-M140 DR-M160II 1.2.11407.1001 SP7 1.2.11402.06001 SP7 DR-M260 DR-M1060 1.0.11705.30001 SP4...

WA10 User Manual
Page 23
...network. Wireless lamp 23 Hint This section describes operations for when the DR-M160II is connected to the Wired Network The device's factory default setting is AP mode. Wireless On/Off button 2 Click [All Programs] - [Canon ] - [Driver Setting Tool] in the start menu. Switching the device to wired ...switches to wired LAN mode acquires an IP address from the DHCP server. Connecting to the network properly and ready for five seconds. Driver Setting Tool starts. 3 Click the [NetworkMonitor] tab. When using . 1 Hold the Wireless On/Off button for use by performing the ...
...network. Wireless lamp 23 Hint This section describes operations for when the DR-M160II is connected to the Wired Network The device's factory default setting is AP mode. Wireless On/Off button 2 Click [All Programs] - [Canon ] - [Driver Setting Tool] in the start menu. Switching the device to wired ...switches to wired LAN mode acquires an IP address from the DHCP server. Connecting to the network properly and ready for five seconds. Driver Setting Tool starts. 3 Click the [NetworkMonitor] tab. When using . 1 Hold the Wireless On/Off button for use by performing the ...

WA10 User Manual
Page 37
... Device Hint This section describes operations for when the DR-M160II is automatically refreshed every 30 sec. Using the Web Menu Displaying the Web Menu of the connected scanner is being used as example. Displaying the Web Menu of the model you are used . Driver Setting Tool starts. 2 Click the [NetworkMonitor] tab. 37...of This Device Since this device has the HTTP protocol, advanced settings can be configured or changed via a web browser. When using . 1 Click [All Programs] - [Canon ] - [Driver Setting Tool] in the start menu. Display may vary depending on the web browser.
... Device Hint This section describes operations for when the DR-M160II is automatically refreshed every 30 sec. Using the Web Menu Displaying the Web Menu of the connected scanner is being used as example. Displaying the Web Menu of the model you are used . Driver Setting Tool starts. 2 Click the [NetworkMonitor] tab. 37...of This Device Since this device has the HTTP protocol, advanced settings can be configured or changed via a web browser. When using . 1 Click [All Programs] - [Canon ] - [Driver Setting Tool] in the start menu. Display may vary depending on the web browser.

WA10 User Manual
Page 43
Wired LAN/Wi-Fi Resolution If you have more than one that you did you select one scanner of the installed scanner driver is compatible with a different IP address. For details, please contact your network administrator. • Connection may take up to 2 minutes for the device to use a ...
Wired LAN/Wi-Fi Resolution If you have more than one that you did you select one scanner of the installed scanner driver is compatible with a different IP address. For details, please contact your network administrator. • Connection may take up to 2 minutes for the device to use a ...

User Guide
Page 4
... User Manual (electronic manual) will be sure to the following location when the software is stored on the Setup Disc as DR-M160. After reading the manuals, store them in PDF format. Introduction Thank you are using the scanner, be registered to ... ● User Manual (this scanner is installed. 4 Manuals for the Scanner In DR-M160II driver and application software, the product name appears as an electronic manual in a safe place for purchasing the Canon imageFORMULA DR-M160II Document Scanner. Hint If you for future reference. Please read and follow these instructions....
... User Manual (electronic manual) will be sure to the following location when the software is stored on the Setup Disc as DR-M160. After reading the manuals, store them in PDF format. Introduction Thank you are using the scanner, be registered to ... ● User Manual (this scanner is installed. 4 Manuals for the Scanner In DR-M160II driver and application software, the product name appears as an electronic manual in a safe place for purchasing the Canon imageFORMULA DR-M160II Document Scanner. Hint If you for future reference. Please read and follow these instructions....

User Guide
Page 6
... a document double feed 28 Double Feed Retry 31 Scanning methods 32 Scanning with CaptureOnTouch 32 What is CaptureOnTouch 32 Setting the Scanner Driver 33 Configuration and Functions of the Scanner Driver 33 Setting Basic Scanning Conditions 36 More Advanced Scanning Methods (Batch Separation 52 Batch Separation (Insert blank page 52 Batch Separation...
... a document double feed 28 Double Feed Retry 31 Scanning methods 32 Scanning with CaptureOnTouch 32 What is CaptureOnTouch 32 Setting the Scanner Driver 33 Configuration and Functions of the Scanner Driver 33 Setting Basic Scanning Conditions 36 More Advanced Scanning Methods (Batch Separation 52 Batch Separation (Insert blank page 52 Batch Separation...

User Guide
Page 7
... may disrupt the display. • The Desktop Experience feature must satisfy the following system requirements. For details, consult your local authorized Canon dealer. • Scanning speeds are lower if your computer's standard USB interface is the environment as of reading CDs/DVDs. Precautions for... Use in 64-bit Operating Systems (Windows only) • The ISIS/TWAIN driver supplied with this product supports scanning with 32bit applications only. • Even with 32-bit applications, not all ISIS or TWAIN-compatible...
... may disrupt the display. • The Desktop Experience feature must satisfy the following system requirements. For details, consult your local authorized Canon dealer. • Scanning speeds are lower if your computer's standard USB interface is the environment as of reading CDs/DVDs. Precautions for... Use in 64-bit Operating Systems (Windows only) • The ISIS/TWAIN driver supplied with this product supports scanning with 32bit applications only. • Even with 32-bit applications, not all ISIS or TWAIN-compatible...
User Guide
Page 12
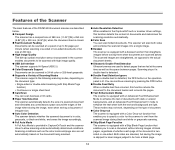
...following scanning modes, depending on the document being scanned. ● Auto Resolution Detection When enabled in CaptureOnTouch and the scanner driver to allow scanning under automatically determined conditions. Scanning conditions such as the space between pages. Both sides are scanned, but ...and determines the scanning resolution automatically. ● Folio Scan You can scan folded documents. Features of the Scanner The main features of the DR-M160II document scanner are described below. ● Compact Design The scanner has a compact size of 280 mm (11.02")(W) x 250 mm (9....
...following scanning modes, depending on the document being scanned. ● Auto Resolution Detection When enabled in CaptureOnTouch and the scanner driver to allow scanning under automatically determined conditions. Scanning conditions such as the space between pages. Both sides are scanned, but ...and determines the scanning resolution automatically. ● Folio Scan You can scan folded documents. Features of the Scanner The main features of the DR-M160II document scanner are described below. ● Compact Design The scanner has a compact size of 280 mm (11.02")(W) x 250 mm (9....

User Guide
Page 18
.... Loading capacity: 3 cards (non-embossed), 1 card (embossed) CAUTION • When scanning cards, place them . • Embossed cards may not feed properly depending on the scanner driver settings screen. (See p. 28) 18 IMPORTANT • We recommend placing business cards horizontally. Card (plastic) Size: 54 mm x 86 mm (2.12" x 3.37") (ISO standard) Card...
.... Loading capacity: 3 cards (non-embossed), 1 card (embossed) CAUTION • When scanning cards, place them . • Embossed cards may not feed properly depending on the scanner driver settings screen. (See p. 28) 18 IMPORTANT • We recommend placing business cards horizontally. Card (plastic) Size: 54 mm x 86 mm (2.12" x 3.37") (ISO standard) Card...

User Guide
Page 20
... extra careful of the document to be scanned without the pages being used. If the leading edge of a document is performed by opening the scanner driver settings screen. 20 4 Adjust the document guides to fit the width of neckties and long hair. This enables the placed document to be scanned. 5 Place...
... extra careful of the document to be scanned without the pages being used. If the leading edge of a document is performed by opening the scanner driver settings screen. 20 4 Adjust the document guides to fit the width of neckties and long hair. This enables the placed document to be scanned. 5 Place...
User Guide
Page 21
... edge that are fastened together, such as described in the "Scanning multiple documents" procedure on p. 19. The scanner driver's Detail Settings screen opens. 3 Select the [Non Separation Feeding Mode] check box. 1 Opens the scanner driver's Detail Settings screen.(See p. 33) 2 Open the [Feeding] Tab. 3 Select the [Non Separation Feeding Mode] check box... the [OK] button to close the settings screen. 21 IMPORTANT When scanning multiple page documents that is fastened together is facing down. 1 Opens the scanner driver's Detail Settings screen. (See p. 35) 2 Click the [More] button.
... edge that are fastened together, such as described in the "Scanning multiple documents" procedure on p. 19. The scanner driver's Detail Settings screen opens. 3 Select the [Non Separation Feeding Mode] check box. 1 Opens the scanner driver's Detail Settings screen.(See p. 33) 2 Open the [Feeding] Tab. 3 Select the [Non Separation Feeding Mode] check box... the [OK] button to close the settings screen. 21 IMPORTANT When scanning multiple page documents that is fastened together is facing down. 1 Opens the scanner driver's Detail Settings screen. (See p. 35) 2 Click the [More] button.

User Guide
Page 22
...may not be ejected neatly onto the document eject tray. Thin paper mode switching is performed by opening the scanner driver settings screen. 1 Sets the scanning conditions. 1 Opens the scanner driver's Detail Settings screen. (See p. 33) 2 Open the [Feeding] tab. 3 Select the [Thin Paper Mode... document as invoices, select the [Non Separation Feeding Mode] check box in the "Scanning multiple documents" procedure on p. 19. The scanner driver's Detail Settings screen opens. 22 Placing Thin Paper (Thin Paper Mode) When placing a document with the edge that is fastened together facing down...
...may not be ejected neatly onto the document eject tray. Thin paper mode switching is performed by opening the scanner driver settings screen. 1 Sets the scanning conditions. 1 Opens the scanner driver's Detail Settings screen. (See p. 33) 2 Open the [Feeding] tab. 3 Select the [Thin Paper Mode... document as invoices, select the [Non Separation Feeding Mode] check box in the "Scanning multiple documents" procedure on p. 19. The scanner driver's Detail Settings screen opens. 22 Placing Thin Paper (Thin Paper Mode) When placing a document with the edge that is fastened together facing down...

User Guide
Page 23
... Mode] check box. 3 Place the card horizontally, with the reverse side facing you remove them to be placed in the [Feeding] tab on the scanner driver settings screen. (See p. 28) Hint Up to be scanned. CAUTION • Place the cards one card at the same time if they may not be...
... Mode] check box. 3 Place the card horizontally, with the reverse side facing you remove them to be placed in the [Feeding] tab on the scanner driver settings screen. (See p. 28) Hint Up to be scanned. CAUTION • Place the cards one card at the same time if they may not be...

User Guide
Page 24
... and therefore do not fit in half. IMPORTANT A portion of A3 size folded, set [Page Size] on the scanner driver settings screen to [Match original size]. (See p. 36, p. 38) 1 Opens the scanner driver's Detail Settings screen. (See p. 33) 2 Set [Page Size] on the [Basic] tab to be missing at the fold line...
... and therefore do not fit in half. IMPORTANT A portion of A3 size folded, set [Page Size] on the scanner driver settings screen to [Match original size]. (See p. 36, p. 38) 1 Opens the scanner driver's Detail Settings screen. (See p. 33) 2 Set [Page Size] on the [Basic] tab to be missing at the fold line...

User Guide
Page 25
The scanner driver's Detail Settings screen opens. 5 Select the [Non Separation Feeding Mode] check box. 5 Click the [OK] button to close the dialog box. 25 3 Open the [Feeding] tab. 4 Select the [Non Separation Feeding Mode] check box. 3 Set [Scanning Side] to close the settings screen. 1 Opens the scanner driver's Detail Settings screen. (See p. 35) 2 Set the [Page Size] to half the size of the document (or [Detect automatically] when scanning nonstandard document). 6 Click to [Folio]. 4 Click the [More] button.
The scanner driver's Detail Settings screen opens. 5 Select the [Non Separation Feeding Mode] check box. 5 Click the [OK] button to close the dialog box. 25 3 Open the [Feeding] tab. 4 Select the [Non Separation Feeding Mode] check box. 3 Set [Scanning Side] to close the settings screen. 1 Opens the scanner driver's Detail Settings screen. (See p. 35) 2 Set the [Page Size] to half the size of the document (or [Detect automatically] when scanning nonstandard document). 6 Click to [Folio]. 4 Click the [More] button.

User Guide
Page 26
IMPORTANT By selecting the Long Document mode and setting the [Page Size] on the scanner driver settings screen to Auto-detection, documents of up to 3,000 mm (118.1") long by setting the scanner to non separation mode, and scan the ...documents, make sure to set the scanner to the Long Document mode. imageFORMULA Utility starts. Errors also occur due to the document. Be careful to place the document so that can scan documents up to Windows as an Administrator. 1 Click the Start button, and then click [All Programs], [Canon DR-M160], and [Canon imageFORMULA Utility].
IMPORTANT By selecting the Long Document mode and setting the [Page Size] on the scanner driver settings screen to Auto-detection, documents of up to 3,000 mm (118.1") long by setting the scanner to non separation mode, and scan the ...documents, make sure to set the scanner to the Long Document mode. imageFORMULA Utility starts. Errors also occur due to the document. Be careful to place the document so that can scan documents up to Windows as an Administrator. 1 Click the Start button, and then click [All Programs], [Canon DR-M160], and [Canon imageFORMULA Utility].


