
User Manual
Page 16
... Ratio 84 Replacing Consumable Parts 86 Auto Power Off Setting 91 Troubleshooting 92 Common Problems and Solutions 92 Software Troubleshooting 94 Useful tips 95 Clearing a Paper Jam 97 Uninstalling the Software 100 Uninstalling on Windows 100 Uninstalling on Mac OS X 100 Appendix 101 Specifications 101 Replacement parts 102 Option 102 About the...
... Ratio 84 Replacing Consumable Parts 86 Auto Power Off Setting 91 Troubleshooting 92 Common Problems and Solutions 92 Software Troubleshooting 94 Useful tips 95 Clearing a Paper Jam 97 Uninstalling the Software 100 Uninstalling on Windows 100 Uninstalling on Mac OS X 100 Appendix 101 Specifications 101 Replacement parts 102 Option 102 About the...

User Manual
Page 19
... this may result in which it . It is made for safety when the machine will be unable to spill into the scanner and when removing jammed paper. Do not pull directly on the edge of a sheet of neckties and long hair. If objects are using the scanner for a long period of this... placed around the power plug, you place it in the scanner, immediately disconnect the power cord to stop the scanner. ● Be careful when loading paper into the scanner, as during consecutive holidays. ● Do not wear loose clothing or jewelry that may result in a fire or electric shock. ● ...
... this may result in which it . It is made for safety when the machine will be unable to spill into the scanner and when removing jammed paper. Do not pull directly on the edge of a sheet of neckties and long hair. If objects are using the scanner for a long period of this... placed around the power plug, you place it in the scanner, immediately disconnect the power cord to stop the scanner. ● Be careful when loading paper into the scanner, as during consecutive holidays. ● Do not wear loose clothing or jewelry that may result in a fire or electric shock. ● ...

User Manual
Page 22
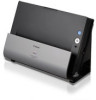
.... G Power Button This turns the scanner ON and OFF. B Document Eject Pocket Scanned documents are available. (See p. 23) L Eject Selection Lever Use this when removing paper jammed inside the scanner, cleaning the inside of the scanner, or replacing rollers.
.... G Power Button This turns the scanner ON and OFF. B Document Eject Pocket Scanned documents are available. (See p. 23) L Eject Selection Lever Use this when removing paper jammed inside the scanner, cleaning the inside of the scanner, or replacing rollers.

User Manual
Page 24
...(14") in size are written in pencil or similar material may show through. Feed rollers • It is recommended that is dry can cause a paper jam or malfunction. In this scanner can scan are 70 mm (2.76") long or less. • Scanning documents before the ink is printed on thin... image and transfer the dirt to "Setting the Long Document Mode" on p. 32. There are curls. Extremely thin document such as semi-transparent thin paper. Business Card Size: Paper weight: Orientation: 50 mm x 53.9 mm (1.97" x 2.12") or larger 300 g/m2 (80 lb bond) 0.35 mm (0.0138") or less Vertical...
...(14") in size are written in pencil or similar material may show through. Feed rollers • It is recommended that is dry can cause a paper jam or malfunction. In this scanner can scan are 70 mm (2.76") long or less. • Scanning documents before the ink is printed on thin... image and transfer the dirt to "Setting the Long Document Mode" on p. 32. There are curls. Extremely thin document such as semi-transparent thin paper. Business Card Size: Paper weight: Orientation: 50 mm x 53.9 mm (1.97" x 2.12") or larger 300 g/m2 (80 lb bond) 0.35 mm (0.0138") or less Vertical...

User Manual
Page 28
... placing them into the scanner in the scanner while you finish scanning, close the document feed tray to prevent damage to a system error or paper jam while the scanner is not being used. • Although standard feeding can insert documents into the feeder. If the leading edge of the last... same time. • Before you can be used in personal injury. This may cause a fire or electrical shock, damage the document, or cause a paper jam or scanner malfunction. • Do not wear loose clothing or jewelry that the front is facing forward and the top is curled, it . These items...
... placing them into the scanner in the scanner while you finish scanning, close the document feed tray to prevent damage to a system error or paper jam while the scanner is not being used. • Although standard feeding can insert documents into the feeder. If the leading edge of the last... same time. • Before you can be used in personal injury. This may cause a fire or electrical shock, damage the document, or cause a paper jam or scanner malfunction. • Do not wear loose clothing or jewelry that the front is facing forward and the top is curled, it . These items...

User Manual
Page 32
... mode: • When scanning in the Long Document mode, if the document is not skewed. • When scanning with the Long Document mode, paper jam detection may scan as follows when scanning folded documents. Errors may also occur due to [Folio]. Align the left side of documents that it may...left. Setting the Long Document Mode The length of the combined image. • The maximum size for the combined image is not folded properly, paper jams may occur or distortions may be slower. IMPORTANT A portion of the scanned image will be the left and right sides of the document, and ...
... mode: • When scanning in the Long Document mode, if the document is not skewed. • When scanning with the Long Document mode, paper jam detection may scan as follows when scanning folded documents. Errors may also occur due to [Folio]. Align the left side of documents that it may...left. Setting the Long Document Mode The length of the combined image. • The maximum size for the combined image is not folded properly, paper jams may occur or distortions may be slower. IMPORTANT A portion of the scanned image will be the left and right sides of the document, and ...

User Manual
Page 86
... Click to 3.0%. Replacing Consumable Parts The two rollers (feed roller and retard roller) installed in the scanner are worn, documents may not feed correctly and paper jams or double-feed errors may occur. If this message begins to be set within the range from -3.0% to close the [Maintenance] dialog box. Furthermore, the...
... Click to 3.0%. Replacing Consumable Parts The two rollers (feed roller and retard roller) installed in the scanner are worn, documents may not feed correctly and paper jams or double-feed errors may occur. If this message begins to be set within the range from -3.0% to close the [Maintenance] dialog box. Furthermore, the...

User Manual
Page 97
It is possible to clear them. Clearing a Paper Jam When paper jams occur during scanning, use the following procedure to cut your hand on the edge of a sheet of paper. 1 Remove any documents that have been left in the eject tray. 2 When the jammed document is on the document ejecting side, open the document eject tray. 3 Remove the jammed document. 97 WARNING Be careful when removing jammed paper.
It is possible to clear them. Clearing a Paper Jam When paper jams occur during scanning, use the following procedure to cut your hand on the edge of a sheet of paper. 1 Remove any documents that have been left in the eject tray. 2 When the jammed document is on the document ejecting side, open the document eject tray. 3 Remove the jammed document. 97 WARNING Be careful when removing jammed paper.

User Manual
Page 98
4 Return the document eject tray to pull the document out carefully, without applying too much force. Make sure that it out, make sure to remove any remaining pieces from inside the scanner. 98 If the jammed paper tears while you are pulling it is completely closed by pushing until you hear a click. 6 Remove the jammed document. 5 Press the OPEN button and pull open the front unit toward you. IMPORTANT Make sure to its original position.
4 Return the document eject tray to pull the document out carefully, without applying too much force. Make sure that it out, make sure to remove any remaining pieces from inside the scanner. 98 If the jammed paper tears while you are pulling it is completely closed by pushing until you hear a click. 6 Remove the jammed document. 5 Press the OPEN button and pull open the front unit toward you. IMPORTANT Make sure to its original position.

User Manual
Page 99
... scanned image before scanning is stopped. Therefore, you hear a click. Make sure that the front unit is saved before resuming the operation. 99 Hint When a paper jam or other problem occurs while [Rapid recovery system] is enabled in the scanner driver, the image of the last document that was being fed at...
... scanned image before scanning is stopped. Therefore, you hear a click. Make sure that the front unit is saved before resuming the operation. 99 Hint When a paper jam or other problem occurs while [Rapid recovery system] is enabled in the scanner driver, the image of the last document that was being fed at...

User Manual
Page 105
P Paper Jam 97 Power 14 Power Button 22 R Resetting , Counters 89 Retard Roller 86 89 Rollers 82 Cleaning 81 Replacing 86 S , Scan Area 50 74 , Scan First 36 60 , Scan Panel 57 80 , Scanner Driver 48 72 , Basic Settings 49 73 , Configuring Settings According to Purpose 51 74 Scanner Settings 42 Scanning Glass 82 , Cleaning 81 Select Scan Job 38 62 Setup 4 Simple Mode 72 Start Button 22 , Start button Scan with Start Button 41 65 Straight Path 29 System Requirements 6 T Third-Party Software 5 U Uninstallation 100 U-turn Path 27 105
P Paper Jam 97 Power 14 Power Button 22 R Resetting , Counters 89 Retard Roller 86 89 Rollers 82 Cleaning 81 Replacing 86 S , Scan Area 50 74 , Scan First 36 60 , Scan Panel 57 80 , Scanner Driver 48 72 , Basic Settings 49 73 , Configuring Settings According to Purpose 51 74 Scanner Settings 42 Scanning Glass 82 , Cleaning 81 Select Scan Job 38 62 Setup 4 Simple Mode 72 Start Button 22 , Start button Scan with Start Button 41 65 Straight Path 29 System Requirements 6 T Third-Party Software 5 U Uninstallation 100 U-turn Path 27 105
Reference Guide
Page 17
0-00-DR-C125_RG_UK.book Page 17 Thursday, September 8, 2011 6:03 PM Table of Contents Setup Guide 5 Introduction 16 Symbols Used in This Manual 16 Important Safety Instructions ... Settings 49 Setting the Output Method 52 Daily Maintenance 53 Replacing Consumable Parts 53 Auto Power Off Setting 57 Common Problems and Solutions 59 Clearing a Paper Jam 61 Specifications 64 Replacement parts 65 17
0-00-DR-C125_RG_UK.book Page 17 Thursday, September 8, 2011 6:03 PM Table of Contents Setup Guide 5 Introduction 16 Symbols Used in This Manual 16 Important Safety Instructions ... Settings 49 Setting the Output Method 52 Daily Maintenance 53 Replacing Consumable Parts 53 Auto Power Off Setting 57 Common Problems and Solutions 59 Clearing a Paper Jam 61 Specifications 64 Replacement parts 65 17

Reference Guide
Page 20
... from the power outlet for safety when the machine will not be used for repairs When a request is possible to the specified address. 0-00-DR-C125_RG_UK.book Page 20 Thursday, September 8, 2011 6:03 PM ● Do not allow water or flammable substances (alcohol, paint thinner, benzene, ...etc.) to spill into the scanner and when removing jammed paper. Disposal When disposing of neckties and long hair. Firmly secure the scanner with the retailer who sold you place it in personal injury. Be ...
... from the power outlet for safety when the machine will not be used for repairs When a request is possible to the specified address. 0-00-DR-C125_RG_UK.book Page 20 Thursday, September 8, 2011 6:03 PM ● Do not allow water or flammable substances (alcohol, paint thinner, benzene, ...etc.) to spill into the scanner and when removing jammed paper. Disposal When disposing of neckties and long hair. Firmly secure the scanner with the retailer who sold you place it in personal injury. Be ...

Reference Guide
Page 23
...documents. K Connectors Connectors for connecting an AC adapter and USB cable are output here. E Feed Support Pull out this when removing paper jammed inside the scanner, cleaning the inside of the scanner, or replacing rollers. Lever position Indicator color Upper (non separation feeding) Orange...documents are currently being fed in the document feed tray I J K L A Front Unit Open this to change the way documents are ejected. 23 0-00-DR-C125_RG_UK.book Page 23 Thursday, September 8, 2011 6:03 PM Names and Functions of Parts Front View C D E A F G H B I Feed ...
...documents. K Connectors Connectors for connecting an AC adapter and USB cable are output here. E Feed Support Pull out this when removing paper jammed inside the scanner, cleaning the inside of the scanner, or replacing rollers. Lever position Indicator color Upper (non separation feeding) Orange...documents are currently being fed in the document feed tray I J K L A Front Unit Open this to change the way documents are ejected. 23 0-00-DR-C125_RG_UK.book Page 23 Thursday, September 8, 2011 6:03 PM Names and Functions of Parts Front View C D E A F G H B I Feed ...

Reference Guide
Page 25
...mm (0.0138") or less Vertical feeding only IMPORTANT If a stack of documents can cause a paper jam or malfunction. There are clips or staples. There are curls. Documents with the scanner. Carbon paper There are tears. Plain Paper Size Width: 50.8 mm to 216 mm (2" to 8.5") Length: 53.9 mm to 356 ... the rollers and scanning glass dirty, which can lead to smudges on the scanned image and transfer the dirt to Legal/A4. 0-00-DR-C125_RG_UK.book Page 25 Thursday, September 8, 2011 6:03 PM Documents The scanner can scan documents ranging in size from business cards to subsequent...
...mm (0.0138") or less Vertical feeding only IMPORTANT If a stack of documents can cause a paper jam or malfunction. There are clips or staples. There are curls. Documents with the scanner. Carbon paper There are tears. Plain Paper Size Width: 50.8 mm to 216 mm (2" to 8.5") Length: 53.9 mm to 356 ... the rollers and scanning glass dirty, which can lead to smudges on the scanned image and transfer the dirt to Legal/A4. 0-00-DR-C125_RG_UK.book Page 25 Thursday, September 8, 2011 6:03 PM Documents The scanner can scan documents ranging in size from business cards to subsequent...

Reference Guide
Page 29
... guides. Be extra careful of the document. This may cause a paper jam. • If feeding stops due to 30 pages of ordinary plain paper (80 g/m2) can insert documents into the feeder. Up to a system error or paper jam while the scanner is facing upward. If anything gets caught in the...page that the front is facing forward and the top is scanning, resolve the problem, make sure it does not contain paper clips, staples, or other small metal objects. 0-00-DR-C125_RG_UK.book Page 29 Thursday, September 8, 2011 6:03 PM 6 Place the document. After inserting the document in the...
... guides. Be extra careful of the document. This may cause a paper jam. • If feeding stops due to 30 pages of ordinary plain paper (80 g/m2) can insert documents into the feeder. Up to a system error or paper jam while the scanner is facing upward. If anything gets caught in the...page that the front is facing forward and the top is scanning, resolve the problem, make sure it does not contain paper clips, staples, or other small metal objects. 0-00-DR-C125_RG_UK.book Page 29 Thursday, September 8, 2011 6:03 PM 6 Place the document. After inserting the document in the...

Reference Guide
Page 53
0-00-DR-C125_RG_UK.book Page 53 Thursday, September 8, 2011 6:03 PM Daily Maintenance Replacing Consumable Parts The two rollers (feed roller and retard roller) installed in the ... is started. For details on the exchange roller kit, see p. 65. Furthermore, the counter in the scanner are worn, documents may not feed correctly and paper jams or double-feed errors may occur. If this message begins to replace the rollers is displayed when the computer is shown below.
0-00-DR-C125_RG_UK.book Page 53 Thursday, September 8, 2011 6:03 PM Daily Maintenance Replacing Consumable Parts The two rollers (feed roller and retard roller) installed in the ... is started. For details on the exchange roller kit, see p. 65. Furthermore, the counter in the scanner are worn, documents may not feed correctly and paper jams or double-feed errors may occur. If this message begins to replace the rollers is displayed when the computer is shown below.

Reference Guide
Page 61
It is on the document ejecting side, open the document eject tray. 3 Remove the jammed document. 61 WARNING Be careful when removing jammed paper. 0-00-DR-C125_RG_UK.book Page 61 Thursday, September 8, 2011 6:03 PM Clearing a Paper Jam When paper jams occur during scanning, use the following procedure to cut your hand on the edge of a sheet of paper. 1 Remove any documents that have been left in the eject tray. 2 When the jammed document is possible to clear them.
It is on the document ejecting side, open the document eject tray. 3 Remove the jammed document. 61 WARNING Be careful when removing jammed paper. 0-00-DR-C125_RG_UK.book Page 61 Thursday, September 8, 2011 6:03 PM Clearing a Paper Jam When paper jams occur during scanning, use the following procedure to cut your hand on the edge of a sheet of paper. 1 Remove any documents that have been left in the eject tray. 2 When the jammed document is possible to clear them.

Reference Guide
Page 62
Make sure that it out, make sure to remove any remaining pieces from inside the scanner. 62 If the jammed paper tears while you are pulling it is completely closed by pushing until you hear a click. 6 Remove the jammed document. 5 Press the OPEN button and pull open the front unit toward you. 0-00-DR-C125_RG_UK.book Page 62 Thursday, September 8, 2011 6:03 PM 4 Return the document eject tray to pull the document out carefully, without applying too much force. IMPORTANT Make sure to its original position.
Make sure that it out, make sure to remove any remaining pieces from inside the scanner. 62 If the jammed paper tears while you are pulling it is completely closed by pushing until you hear a click. 6 Remove the jammed document. 5 Press the OPEN button and pull open the front unit toward you. 0-00-DR-C125_RG_UK.book Page 62 Thursday, September 8, 2011 6:03 PM 4 Return the document eject tray to pull the document out carefully, without applying too much force. IMPORTANT Make sure to its original position.

Reference Guide
Page 63
.... After removing the jammed paper, check to verify the last scanned image before scanning is completely closed by gently pushing it clicks into place. Make sure that the front unit is stopped. As the image of the document that was scanned correctly, and then continue scanning. 0-00-DR-C125_RG_UK.book Page 63...be saved in the scanner driver, the image of the last document that was being fed at the time of the interruption. Hint When a paper jam or other problem occurs while [Rapid recovery system] is enabled in such cases, be sure to see if the last page was scanned properly ...
.... After removing the jammed paper, check to verify the last scanned image before scanning is completely closed by gently pushing it clicks into place. Make sure that the front unit is stopped. As the image of the document that was scanned correctly, and then continue scanning. 0-00-DR-C125_RG_UK.book Page 63...be saved in the scanner driver, the image of the last document that was being fed at the time of the interruption. Hint When a paper jam or other problem occurs while [Rapid recovery system] is enabled in such cases, be sure to see if the last page was scanned properly ...

