
i550 Quick Start Guide
Page 6
Move to the left position for plain paper. Move to the right position for the media in use. Basic Printing 2 Preparing to Load Paper (1) Open and pull out the paper rest. (2) Open the cover and pull out the paper output tray. (3) Open the front cover and adjust the paper thickness lever to the correct position for envelopes, Banner Paper and T-Shirt Transfers. 4
Move to the left position for plain paper. Move to the right position for the media in use. Basic Printing 2 Preparing to Load Paper (1) Open and pull out the paper rest. (2) Open the cover and pull out the paper output tray. (3) Open the front cover and adjust the paper thickness lever to the correct position for envelopes, Banner Paper and T-Shirt Transfers. 4
i550 Quick Start Guide
Page 9
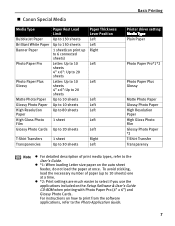
... 4" x 6":Up to 20 sheets Up to 10 sheets Up to 10 sheets Up to 80 sheets 1 sheet Up to 20 sheets Paper Thickness Lever Position Left Left Right Left Left Left Left Left Left Left T-Shirt Transfers Transparencies 1 sheet Up to 30 sheets Right Left Basic Printing ... auto sheet feeder, do not load the paper at a time. „ Canon Special Media Media Type Bubble Jet Paper Brilliant White Paper Banner Paper Photo Paper Pro Photo Paper Plus Glossy Matte Photo Paper Glossy Photo Paper High Resolution Paper High Gloss Photo Film Glossy Photo Cards Paper Rest Load Limit Up to 150 sheets Up...
... 4" x 6":Up to 20 sheets Up to 10 sheets Up to 10 sheets Up to 80 sheets 1 sheet Up to 20 sheets Paper Thickness Lever Position Left Left Right Left Left Left Left Left Left Left T-Shirt Transfers Transparencies 1 sheet Up to 30 sheets Right Left Basic Printing ... auto sheet feeder, do not load the paper at a time. „ Canon Special Media Media Type Bubble Jet Paper Brilliant White Paper Banner Paper Photo Paper Pro Photo Paper Plus Glossy Matte Photo Paper Glossy Photo Paper High Resolution Paper High Gloss Photo Film Glossy Photo Cards Paper Rest Load Limit Up to 150 sheets Up...
i550 Quick Start Guide
Page 44
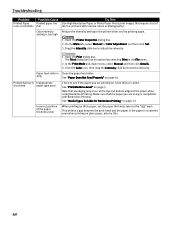
... for Color Adjustment, and then click Set. 3. On the Main tab, select Manual for Borderless Printing" on page 13 Incorrect position of the paper thickness lever When printing on page 3 Note that smudging may occur at the top and bottom edges of Curls or Ink Blots thin ink (i.e. Click the... Color icon, then drag the Intensity slide bar to set the paper thickness lever to the " "mark. If the paper is scratched even when printing on is compatible with intense colors or photographs). In the Print Mode pull-down menu, select...
... for Color Adjustment, and then click Set. 3. On the Main tab, select Manual for Borderless Printing" on page 13 Incorrect position of the paper thickness lever When printing on page 3 Note that smudging may occur at the top and bottom edges of Curls or Ink Blots thin ink (i.e. Click the... Color icon, then drag the Intensity slide bar to set the paper thickness lever to the " "mark. If the paper is scratched even when printing on is compatible with intense colors or photographs). In the Print Mode pull-down menu, select...
i550 Quick Start Guide
Page 9
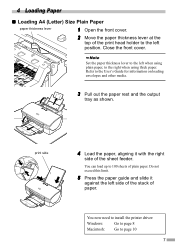
... against the left side of the stack of paper. Set the paper thickness lever to the left when using thick paper. 4 Loading Paper „ Loading A4 (Letter) Size Plain Paper paper thickness lever 1 Open the front cover. 2 Move the paper thickness lever at the top of the print head holder to the right when using plain paper, to the left position. Close the front cover...
... against the left side of the stack of paper. Set the paper thickness lever to the left when using thick paper. 4 Loading Paper „ Loading A4 (Letter) Size Plain Paper paper thickness lever 1 Open the front cover. 2 Move the paper thickness lever at the top of the print head holder to the right when using plain paper, to the left position. Close the front cover...


