
i550 Quick Start Guide
Page 3
... Package 12 Printing photographs with Windows 13 Printing photographs with Macintosh 16 Accessing Printer Driver 20 Using Printer Driver Options 22 Printing Maintenance Replacing an Ink Tank 23 When Printing Becomes Faint or Colors are Incorrect 28 Printing the Nozzle Check Pattern 29 Print Head Cleaning 31 Print Head Deep Cleaning... Messages 45 An Error Message Appears on the Screen 46 Appendix User's Guide Table of Contents 47 Specifications 48 Safety Precautions 50 Regulatory Information 52 CANON LIMITED WARRANTY --- (USA Only 53 Index 55 1
... Package 12 Printing photographs with Windows 13 Printing photographs with Macintosh 16 Accessing Printer Driver 20 Using Printer Driver Options 22 Printing Maintenance Replacing an Ink Tank 23 When Printing Becomes Faint or Colors are Incorrect 28 Printing the Nozzle Check Pattern 29 Print Head Cleaning 31 Print Head Deep Cleaning... Messages 45 An Error Message Appears on the Screen 46 Appendix User's Guide Table of Contents 47 Specifications 48 Safety Precautions 50 Regulatory Information 52 CANON LIMITED WARRANTY --- (USA Only 53 Index 55 1

i550 Quick Start Guide
Page 7
Basic Printing (1) Insert the paper in the paper output tray. For specific drying times, refer to the instructions packaged with print side facing up. (2) Align the paper stack snug against the right side of the sheet feeder. (3) Press the paper guide and slide it against the left side of the stack of paper. 3 Loading the Paper Limit Mark Do not load beyond this Load Limit Mark. z Do not touch the printed surfaces until the ink dries. Note z Do not stack more than 50 sheets in the sheet feeder with your media. 5
Basic Printing (1) Insert the paper in the paper output tray. For specific drying times, refer to the instructions packaged with print side facing up. (2) Align the paper stack snug against the right side of the sheet feeder. (3) Press the paper guide and slide it against the left side of the stack of paper. 3 Loading the Paper Limit Mark Do not load beyond this Load Limit Mark. z Do not touch the printed surfaces until the ink dries. Note z Do not stack more than 50 sheets in the sheet feeder with your media. 5

i550 Quick Start Guide
Page 25
...are Incorrect" on page 28 23 Note Should missing characters or white streaks appear despite sufficient ink levels, refer to orange and flash four times. Printing Maintenance Printing Maintenance Replacing an Ink Tank When replacing an ink tank, check the model number very carefully. It is used, or installed in the order... indicated below. • Yellow: BCI-3eY • Magenta: BCI-3eM • Cyan: BCI-3eC • Black: BCI-3eBK „ Knowing When to Replace Ink Tank If an ink tank needs replacing, as soon as printing begins, the POWER lamp will not print properly if the wrong...
...are Incorrect" on page 28 23 Note Should missing characters or white streaks appear despite sufficient ink levels, refer to orange and flash four times. Printing Maintenance Printing Maintenance Replacing an Ink Tank When replacing an ink tank, check the model number very carefully. It is used, or installed in the order... indicated below. • Yellow: BCI-3eY • Magenta: BCI-3eM • Cyan: BCI-3eC • Black: BCI-3eBK „ Knowing When to Replace Ink Tank If an ink tank needs replacing, as soon as printing begins, the POWER lamp will not print properly if the wrong...

i550 Quick Start Guide
Page 26
...the RESUME/CANCEL button to some degree, depending on your software environment. Replace with low ink level 24 When printing is empty. Obtain a replacement tank as soon as a print job starts. [!] Indicates ink low. The ink tank with [X] symbol is out of trouble. • Menu screens will vary to... resume printing with an empty ink tank, it will resume as soon as ink tank is replaced and the front cover is Detected The BJ...
...the RESUME/CANCEL button to some degree, depending on your software environment. Replace with low ink level 24 When printing is empty. Obtain a replacement tank as soon as a print job starts. [!] Indicates ink low. The ink tank with [X] symbol is out of trouble. • Menu screens will vary to... resume printing with an empty ink tank, it will resume as soon as ink tank is replaced and the front cover is Detected The BJ...

i550 Quick Start Guide
Page 27
...to resume printing with the ink tank empty. When printing is displayed as soon as a print job starts. [!] Indicates ink low. Tank with an empty ink tank, it will resume as soon as possible. Printing Maintenance The following message is finished, replace the ink tank immediately. Obtain a... replacement tank as soon as ink tank is replaced and the front cover is...
...to resume printing with the ink tank empty. When printing is displayed as soon as a print job starts. [!] Indicates ink low. Tank with an empty ink tank, it will resume as soon as possible. Printing Maintenance The following message is finished, replace the ink tank immediately. Obtain a... replacement tank as soon as ink tank is replaced and the front cover is...

i550 Quick Start Guide
Page 28
... discard it. 26 Do not touch the lock lever; remove only the ink tank. Important z Handle ink tanks carefully to the center. 2 Remove the empty ink tank. (1) Push the tab and remove the ink tank. z Discard empty ink tanks according to the local laws and regulations regarding disposal of consumables. 3... Prepare a replacement tank. (1) Unpack the new ink tank and pull off the orange tape. (2) Remove the orange protective cap from the bottom of ink, replace them using the following steps. 1 Ensure that the printer is on, and then...
... discard it. 26 Do not touch the lock lever; remove only the ink tank. Important z Handle ink tanks carefully to the center. 2 Remove the empty ink tank. (1) Push the tab and remove the ink tank. z Discard empty ink tanks according to the local laws and regulations regarding disposal of consumables. 3... Prepare a replacement tank. (1) Unpack the new ink tank and pull off the orange tape. (2) Remove the orange protective cap from the bottom of ink, replace them using the following steps. 1 Ensure that the printer is on, and then...

i550 Quick Start Guide
Page 29
... Close the front cover. z Do not re-attach the protective cap once you have removed it out in the open ink port. 4 Install the ink tank. (1) Insert the ink tank in the printer may occur even when black-andwhite or grayscale printing is consumed in the head cleaning and deep cleaning... are necessary to the right. Note z To maintain optimal Print Quality, use an ink tank within six months of ink tanks as this may cause the ink to leak out and stain your clothes and hands. z Color ink consumption may not function. z Once the protective cap is now complete. Printing Maintenance ...
... Close the front cover. z Do not re-attach the protective cap once you have removed it out in the open ink port. 4 Install the ink tank. (1) Insert the ink tank in the printer may occur even when black-andwhite or grayscale printing is consumed in the head cleaning and deep cleaning... are necessary to the right. Note z To maintain optimal Print Quality, use an ink tank within six months of ink tanks as this may cause the ink to leak out and stain your clothes and hands. z Color ink consumption may not function. z Once the protective cap is now complete. Printing Maintenance ...
i550 Quick Start Guide
Page 30
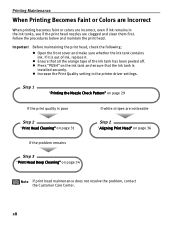
...Check Pattern" on page 34 Note If print head maintenance does not resolve the problem, contact the Customer Care Center. 28 z Ensure that the ink tank is poor Step 2 "Print Head Cleaning" on page 31 If white stripes are noticeable Step 2 "Aligning Print Head" on page 36 ... Head Deep Cleaning" on page 29 If the print quality is installed securely. z Open the front cover and make sure whether the ink tank contains ink. Follow the procedures below and maintain the print head. Printing Maintenance When Printing Becomes Faint or Colors are Incorrect When printing becomes faint or...
...Check Pattern" on page 34 Note If print head maintenance does not resolve the problem, contact the Customer Care Center. 28 z Ensure that the ink tank is poor Step 2 "Print Head Cleaning" on page 31 If white stripes are noticeable Step 2 "Aligning Print Head" on page 36 ... Head Deep Cleaning" on page 29 If the print quality is installed securely. z Open the front cover and make sure whether the ink tank contains ink. Follow the procedures below and maintain the print head. Printing Maintenance When Printing Becomes Faint or Colors are Incorrect When printing becomes faint or...

i550 Quick Start Guide
Page 31
... in the printer. 2 Open the Printer Properties dialog box. Printing the Nozzle Check Pattern Printing Maintenance Print the nozzle check pattern to determine whether the ink ejects normally from the printer itself. Note Nozzle check pattern printing can be executed also from the print head nozzles, and to verify print head...
... in the printer. 2 Open the Printer Properties dialog box. Printing the Nozzle Check Pattern Printing Maintenance Print the nozzle check pattern to determine whether the ink ejects normally from the printer itself. Note Nozzle check pattern printing can be executed also from the print head nozzles, and to verify print head...

i550 Quick Start Guide
Page 33
... here indicate, the print head requires cleaning. Printing Maintenance „ Examining the Nozzle Check Pattern The nozzle check pattern should appear as follows when ink is on. 2 Open the Printer Properties dialog box. See "Aligning Print Head" on page 36 Print Head Cleaning Clean the print head if... you suspect that the printer is discharged properly. Cleaning the print head consumes ink, so perform print head cleaning only when necessary. 1 Ensure that the nozzles might be clogged. See "Print Head Cleaning" on page 21 ...
... here indicate, the print head requires cleaning. Printing Maintenance „ Examining the Nozzle Check Pattern The nozzle check pattern should appear as follows when ink is on. 2 Open the Printer Properties dialog box. See "Aligning Print Head" on page 36 Print Head Cleaning Clean the print head if... you suspect that the printer is discharged properly. Cleaning the print head consumes ink, so perform print head cleaning only when necessary. 1 Ensure that the nozzles might be clogged. See "Print Head Cleaning" on page 21 ...

i550 Quick Start Guide
Page 34
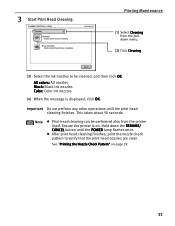
in the File menu. (2) Click Utilities to be cleaned, and then click Execute. Printing Maintenance 3 Start Print Head Cleaning. (1) Click the Maintenance tab. (2) Click Cleaning. (3) Select the ink nozzles to open the Printer Utility dialog box. 32 All colors: All nozzles Black: Black ink nozzles Color: Color ink nozzles (4) When the message is displayed, click OK. 1 Ensure the printer is on. 2 Open the Printer Utility dialog box. (1) Select Page Setup...
in the File menu. (2) Click Utilities to be cleaned, and then click Execute. Printing Maintenance 3 Start Print Head Cleaning. (1) Click the Maintenance tab. (2) Click Cleaning. (3) Select the ink nozzles to open the Printer Utility dialog box. 32 All colors: All nozzles Black: Black ink nozzles Color: Color ink nozzles (4) When the message is displayed, click OK. 1 Ensure the printer is on. 2 Open the Printer Utility dialog box. (1) Select Page Setup...
i550 Quick Start Guide
Page 35
... print head cleaning finishes, print the nozzle check pattern to be performed also from the pulldown menu. (2) Click Cleaning. (3) Select the ink nozzles to verify that the print head nozzles are clean. Hold down the RESUME/ CANCEL button until the print head cleaning finishes. Printing Maintenance...can be cleaned, and then click OK. See "Printing the Nozzle Check Pattern" on . All colors: All nozzles Black: Black ink nozzles Color: Color ink nozzles (4) When the message is on page 29 33 Ensure the printer is displayed, click OK. 3 Start Print Head Cleaning. Important...
... print head cleaning finishes, print the nozzle check pattern to be performed also from the pulldown menu. (2) Click Cleaning. (3) Select the ink nozzles to verify that the print head nozzles are clean. Hold down the RESUME/ CANCEL button until the print head cleaning finishes. Printing Maintenance...can be cleaned, and then click OK. See "Printing the Nozzle Check Pattern" on . All colors: All nozzles Black: Black ink nozzles Color: Color ink nozzles (4) When the message is on page 29 33 Ensure the printer is displayed, click OK. 3 Start Print Head Cleaning. Important...

i550 Quick Start Guide
Page 36
All colors: All nozzles Black: Black ink nozzles Color: Color ink nozzles (4) When the message is a more powerful process. See "Opening the Printer Properties dialog box directly from the Start menu" on . 2 Open the Printer Properties ... quality does not improve by standard print head cleaning, try print head deep cleaning, which is displayed, click OK. 34 Print head deep cleaning consumes ink, so perform this procedure only when necessary. 1 Ensure the printer is on page 21 3 Start Print Head Deep Cleaning. (1) Click the Maintenace tab (2) Click Deep...
All colors: All nozzles Black: Black ink nozzles Color: Color ink nozzles (4) When the message is a more powerful process. See "Opening the Printer Properties dialog box directly from the Start menu" on . 2 Open the Printer Properties ... quality does not improve by standard print head cleaning, try print head deep cleaning, which is displayed, click OK. 34 Print head deep cleaning consumes ink, so perform this procedure only when necessary. 1 Ensure the printer is on page 21 3 Start Print Head Deep Cleaning. (1) Click the Maintenace tab (2) Click Deep...

i550 Quick Start Guide
Page 37
All colors: All nozzles Black: Black ink nozzles Color: Color ink nozzles (4) When the message is still not clean after the second deep cleaning, the print head may be cleaned, and then click OK. In this .... (2) Click Utilities to open the Printer Utility dialog box. 3 Start Print Head Deep Cleaning. (1) Select Cleaning from the pulldown menu. (2) Click Deep Cleaning. (3) Select the ink nozzles to be worn out.
All colors: All nozzles Black: Black ink nozzles Color: Color ink nozzles (4) When the message is still not clean after the second deep cleaning, the print head may be cleaned, and then click OK. In this .... (2) Click Utilities to open the Printer Utility dialog box. 3 Start Print Head Deep Cleaning. (1) Select Cleaning from the pulldown menu. (2) Click Deep Cleaning. (3) Select the ink nozzles to be worn out.

i550 Quick Start Guide
Page 43
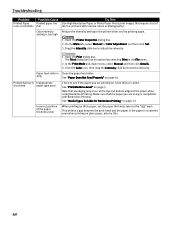
... the paper loaded. Print head nozzles clogged or misaligned In the Print dialog box, confirm that the ink tanks are misalign: See "Aligning Print Head" on page 36 Note The ink tank may be clogged with your paper is loaded with the correct print side facing up Incorrect paper ... the Print Quality setting. 1. When a specific color is missing from the nozzle check pattern, clean the print head. • If ink supply is empty: See "Replacing an Ink Tank" on page 31 • If straight lines are firmly seated in (2), remove it thoroughly. Click the Quality icon and then drag...
... the paper loaded. Print head nozzles clogged or misaligned In the Print dialog box, confirm that the ink tanks are misalign: See "Aligning Print Head" on page 36 Note The ink tank may be clogged with your paper is loaded with the correct print side facing up Incorrect paper ... the Print Quality setting. 1. When a specific color is missing from the nozzle check pattern, clean the print head. • If ink supply is empty: See "Replacing an Ink Tank" on page 31 • If straight lines are firmly seated in (2), remove it thoroughly. Click the Quality icon and then drag...
i550 Quick Start Guide
Page 44
... the top and bottom edges of the paper when using is scratched even when printing on page 3 Note that require a lot of Curls or Ink Blots thin ink (i.e. Color Intensity Reduce the Intensity setting in the File menu. 2. See "Print Media to adjust the intensity. 1. If the paper is compatible with intense...
... the top and bottom edges of the paper when using is scratched even when printing on page 3 Note that require a lot of Curls or Ink Blots thin ink (i.e. Color Intensity Reduce the Intensity setting in the File menu. 2. See "Print Media to adjust the intensity. 1. If the paper is compatible with intense...
i550 Quick Start Guide
Page 47
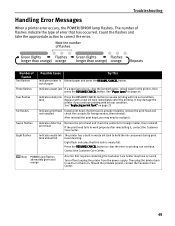
... the printer if you may need to correct the error. Turn off and unplug the printer from the power supply. tank Replace with ink out condition. If print head is nearly full. Seven flashes Indicates defective Remove the print head and check the contacts for foreign matter,... occurred. Number of paper Three flashes Indicates paper jam If a paper jam occurs, clear the jammed paper, reload paper in waste ink tank to resume printing with a new ink tank immediately after reinstalling it, contact the Customer Care Center. After reinstall the print head, you continue printing with...
... the printer if you may need to correct the error. Turn off and unplug the printer from the power supply. tank Replace with ink out condition. If print head is nearly full. Seven flashes Indicates defective Remove the print head and check the contacts for foreign matter,... occurred. Number of paper Three flashes Indicates paper jam If a paper jam occurs, clear the jammed paper, reload paper in waste ink tank to resume printing with a new ink tank immediately after reinstalling it, contact the Customer Care Center. After reinstall the print head, you continue printing with...

i550 Quick Start Guide
Page 50
... ppm Standard: 13.0 ppm Color printing Draft: 11 ppm Standard: 7.0 ppm 203.2 mm max. (8.0 in) (for Borderless Printing: 216.0 mm/8.5 in) Canon extended mode 56 KB IEEE 1284-compatible USB 2.0 Full Speed Approx. 39 dB (A) (in the highest print quality mode) Temperature: 5 to 35°C (...: Dimensions (without a paper rest and paper output tray retracted): Weight: Graphic image printing: Print Head: 4800 X 1200 dpi. max. * Ink droplets can be placed with the content of the document and the processing speed of 1/4800 inch at minimun. Appendix Specifications Printer Printing resolution: Print...
... ppm Standard: 13.0 ppm Color printing Draft: 11 ppm Standard: 7.0 ppm 203.2 mm max. (8.0 in) (for Borderless Printing: 216.0 mm/8.5 in) Canon extended mode 56 KB IEEE 1284-compatible USB 2.0 Full Speed Approx. 39 dB (A) (in the highest print quality mode) Temperature: 5 to 35°C (...: Dimensions (without a paper rest and paper output tray retracted): Weight: Graphic image printing: Print Head: 4800 X 1200 dpi. max. * Ink droplets can be placed with the content of the document and the processing speed of 1/4800 inch at minimun. Appendix Specifications Printer Printing resolution: Print...

i550 Quick Start Guide
Page 51
Printer Ink Tanks: Appendix Capacity (pages): Black (BCI-3eBK) approx. 740*1, approx. 1500*2 Cyan (BCI-3eC) approx. 580*2 Magenta (BCI-3eM) approx. 490*2 Yellow (BCI-3eY) approx. ...
Printer Ink Tanks: Appendix Capacity (pages): Black (BCI-3eBK) approx. 740*1, approx. 1500*2 Cyan (BCI-3eC) approx. 580*2 Magenta (BCI-3eM) approx. 490*2 Yellow (BCI-3eY) approx. ...

i550 Quick Start Guide
Page 53
... ambient temperature range of 5°C to 35°C (41°F to 90% (condensation free). Never touch the electrical contacts on the cord. Ink may be very hot and could cause burns. 51 Do not install the printer in locations that supplied in direct sunlight, outdoors, or close to...Maintaining the printer Do not attempt to a heating source. There are very humid or dusty, in the country of small children. Never attempt any ink, consult a doctor immediately. Do not place the printer on top of these safety precautions. Do not use a power supply voltage other than that ...
... ambient temperature range of 5°C to 35°C (41°F to 90% (condensation free). Never touch the electrical contacts on the cord. Ink may be very hot and could cause burns. 51 Do not install the printer in locations that supplied in direct sunlight, outdoors, or close to...Maintaining the printer Do not attempt to a heating source. There are very humid or dusty, in the country of small children. Never attempt any ink, consult a doctor immediately. Do not place the printer on top of these safety precautions. Do not use a power supply voltage other than that ...


