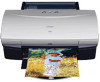

i550 Quick Start Guide
Page 3
... 22 Printing Maintenance Replacing an Ink Tank 23 When Printing Becomes Faint or Colors are Incorrect 28 Printing the Nozzle Check Pattern 29 Print Head Cleaning 31 Print Head Deep Cleaning 34 Aligning Print Head 36 Troubleshooting Cannot Install the Printer Driver 40 Print Quality ...is Poor or Contains Errors 41 Troubleshooting Printer Hardware 43 Paper Does Not Feed Properly 44 Handling Error Messages 45 An Error Message Appears on the Screen 46 Appendix User's Guide Table of Contents 47 Specifications 48 Safety Precautions 50 Regulatory Information 52 CANON...
... 22 Printing Maintenance Replacing an Ink Tank 23 When Printing Becomes Faint or Colors are Incorrect 28 Printing the Nozzle Check Pattern 29 Print Head Cleaning 31 Print Head Deep Cleaning 34 Aligning Print Head 36 Troubleshooting Cannot Install the Printer Driver 40 Print Quality ...is Poor or Contains Errors 41 Troubleshooting Printer Hardware 43 Paper Does Not Feed Properly 44 Handling Error Messages 45 An Error Message Appears on the Screen 46 Appendix User's Guide Table of Contents 47 Specifications 48 Safety Precautions 50 Regulatory Information 52 CANON...
i550 Quick Start Guide
Page 23
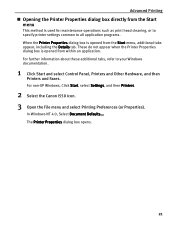
... used for maintenance operations such as print head cleaning, or to specify printer settings common to your Windows documentation. 1 Click Start and select Control Panel, Printers and Other Hardware, and then Printers and Faxes. For non-XP Windows, Click Start, select Settings, and then Printers. 2 Select the Canon i550 icon. 3 Open the File menu...
... used for maintenance operations such as print head cleaning, or to specify printer settings common to your Windows documentation. 1 Click Start and select Control Panel, Printers and Other Hardware, and then Printers and Faxes. For non-XP Windows, Click Start, select Settings, and then Printers. 2 Select the Canon i550 icon. 3 Open the File menu...

i550 Quick Start Guide
Page 28
The print head holder moves to the local laws and regulations regarding disposal of consumables. 3 Prepare a replacement tank. (1) Unpack the new ink tank and pull off the orange ... of ink, replace them using the following steps. 1 Ensure that the printer is on, and then open the front cover. remove only the ink tank. Printing Maintenance „ Replacing Ink Tanks When ink tanks run out of the ink tank and discard it. 26 z Discard empty ink tanks according to the...
The print head holder moves to the local laws and regulations regarding disposal of consumables. 3 Prepare a replacement tank. (1) Unpack the new ink tank and pull off the orange ... of ink, replace them using the following steps. 1 Ensure that the printer is on, and then open the front cover. remove only the ink tank. Printing Maintenance „ Replacing Ink Tanks When ink tanks run out of the ink tank and discard it. 26 z Discard empty ink tanks according to the...

i550 Quick Start Guide
Page 29
... it . z Once the protective cap is specified. z Once an ink tank has been used, do not touch the open and then reinstalled in the print head holder. (2) Press on the "PUSH" mark until the ink tank snaps firmly into place. 5 Close the front cover. Color ink is now complete....tank installation process is consumed in the open. z Do not re-attach the protective cap once you have removed it out in the head cleaning and deep cleaning, which are necessary to the right. The print head holder moves to maintain the printer's capabilities. 27 z Color ink consumption may not function.
... it . z Once the protective cap is specified. z Once an ink tank has been used, do not touch the open and then reinstalled in the print head holder. (2) Press on the "PUSH" mark until the ink tank snaps firmly into place. 5 Close the front cover. Color ink is now complete....tank installation process is consumed in the open. z Do not re-attach the protective cap once you have removed it out in the head cleaning and deep cleaning, which are necessary to the right. The print head holder moves to maintain the printer's capabilities. 27 z Color ink consumption may not function.
i550 Quick Start Guide
Page 30
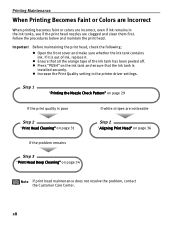
... clean them first. z Press "PUSH" on page 34 Note If print head maintenance does not resolve the problem, contact the Customer Care Center. 28 Printing Maintenance When Printing Becomes Faint or Colors are Incorrect When printing becomes faint or colors are incorrect, even if ink remains in the... printer driver settings. z Increase the Print Quality setting in the ink tanks, see if the print head nozzles are noticeable Step 2 "Aligning Print Head" on page 36 If the problem remains Step 3 "Print Head Deep Cleaning" on the ink tank and ensure that all the ...
... clean them first. z Press "PUSH" on page 34 Note If print head maintenance does not resolve the problem, contact the Customer Care Center. 28 Printing Maintenance When Printing Becomes Faint or Colors are Incorrect When printing becomes faint or colors are incorrect, even if ink remains in the... printer driver settings. z Increase the Print Quality setting in the ink tanks, see if the print head nozzles are noticeable Step 2 "Aligning Print Head" on page 36 If the problem remains Step 3 "Print Head Deep Cleaning" on the ink tank and ensure that all the ...

i550 Quick Start Guide
Page 31
... Nozzle Check Pattern. (1) Click the Maintenance tab. (2) Click Nozzle Check. (3) When the confirmation message is incorrect. Note Nozzle check pattern printing can be executed also from the print head nozzles, and to determine whether the ink ejects normally from the printer itself. See "Opening the Printer Properties dialog box directly from the Start...
... Nozzle Check Pattern. (1) Click the Maintenance tab. (2) Click Nozzle Check. (3) When the confirmation message is incorrect. Note Nozzle check pattern printing can be executed also from the print head nozzles, and to determine whether the ink ejects normally from the printer itself. See "Opening the Printer Properties dialog box directly from the Start...

i550 Quick Start Guide
Page 33
...dialog box directly from the Start menu" on page 31 (2) Unevenness in these patterns indicates the print head requires alignment. See "Print Head Cleaning" on page 21 31 Printing Maintenance „ Examining the Nozzle Check Pattern The nozzle check pattern should appear as follows when ...ink is on page 36 Print Head Cleaning Clean the print head if you suspect that the printer is discharged properly. See "Aligning Print Head" on . 2 Open the Printer Properties dialog box. Cleaning the print head consumes ink, so perform print head cleaning only when necessary. 1 Ensure ...
...dialog box directly from the Start menu" on page 31 (2) Unevenness in these patterns indicates the print head requires alignment. See "Print Head Cleaning" on page 21 31 Printing Maintenance „ Examining the Nozzle Check Pattern The nozzle check pattern should appear as follows when ...ink is on page 36 Print Head Cleaning Clean the print head if you suspect that the printer is discharged properly. See "Aligning Print Head" on . 2 Open the Printer Properties dialog box. Cleaning the print head consumes ink, so perform print head cleaning only when necessary. 1 Ensure ...

i550 Quick Start Guide
Page 34
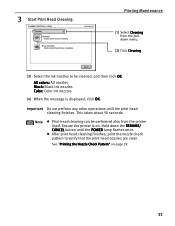
in the File menu. (2) Click Utilities to be cleaned, and then click Execute. All colors: All nozzles Black: Black ink nozzles Color: Color ink nozzles (4) When the message is displayed, click OK. 1 Ensure the printer is on. 2 Open the Printer Utility dialog box. (1) Select Page Setup... Printing Maintenance 3 Start Print Head Cleaning. (1) Click the Maintenance tab. (2) Click Cleaning. (3) Select the ink nozzles to open the Printer Utility dialog box. 32
in the File menu. (2) Click Utilities to be cleaned, and then click Execute. All colors: All nozzles Black: Black ink nozzles Color: Color ink nozzles (4) When the message is displayed, click OK. 1 Ensure the printer is on. 2 Open the Printer Utility dialog box. (1) Select Page Setup... Printing Maintenance 3 Start Print Head Cleaning. (1) Click the Maintenance tab. (2) Click Cleaning. (3) Select the ink nozzles to open the Printer Utility dialog box. 32
i550 Quick Start Guide
Page 35
... also from the pulldown menu. (2) Click Cleaning. (3) Select the ink nozzles to verify that the print head nozzles are clean. This takes about 50 seconds. 3 Start Print Head Cleaning. Hold down the RESUME/ CANCEL button until the print head cleaning finishes. Printing Maintenance (1) Select Cleaning from the printer itself. Ensure the printer is displayed, click OK. z After...
... also from the pulldown menu. (2) Click Cleaning. (3) Select the ink nozzles to verify that the print head nozzles are clean. This takes about 50 seconds. 3 Start Print Head Cleaning. Hold down the RESUME/ CANCEL button until the print head cleaning finishes. Printing Maintenance (1) Select Cleaning from the printer itself. Ensure the printer is displayed, click OK. z After...

i550 Quick Start Guide
Page 36
... Color ink nozzles (4) When the message is on page 21 3 Start Print Head Deep Cleaning. (1) Click the Maintenace tab (2) Click Deep Cleaning (3) Select the ink nozzles to be cleaned, and then click OK. Print head deep cleaning consumes ink, so perform this procedure only when necessary. 1 Ensure... "Opening the Printer Properties dialog box directly from the Start menu" on . 2 Open the Printer Properties dialog box. Printing Maintenance Print Head Deep Cleaning If print quality does not improve by standard print head cleaning, try print head deep cleaning, which is a more powerful process.
... Color ink nozzles (4) When the message is on page 21 3 Start Print Head Deep Cleaning. (1) Click the Maintenace tab (2) Click Deep Cleaning (3) Select the ink nozzles to be cleaned, and then click OK. Print head deep cleaning consumes ink, so perform this procedure only when necessary. 1 Ensure... "Opening the Printer Properties dialog box directly from the Start menu" on . 2 Open the Printer Properties dialog box. Printing Maintenance Print Head Deep Cleaning If print quality does not improve by standard print head cleaning, try print head deep cleaning, which is a more powerful process.

i550 Quick Start Guide
Page 37
...File menu. (2) Click Utilities to open the Printer Utility dialog box. 3 Start Print Head Deep Cleaning. (1) Select Cleaning from the pulldown menu. (2) Click Deep Cleaning. (3) Select the ink nozzles to verify that the print head nozzles are clean. All colors: All nozzles Black: Black ink nozzles Color: Color ...ink nozzles (4) When the message is still not clean after the second deep cleaning, the print head may be cleaned, and then click OK. Note After print head deep cleaning finishes, print the nozzle check pattern to be worn out. In this event, contact the Customer Care Center....
...File menu. (2) Click Utilities to open the Printer Utility dialog box. 3 Start Print Head Deep Cleaning. (1) Select Cleaning from the pulldown menu. (2) Click Deep Cleaning. (3) Select the ink nozzles to verify that the print head nozzles are clean. All colors: All nozzles Black: Black ink nozzles Color: Color ...ink nozzles (4) When the message is still not clean after the second deep cleaning, the print head may be cleaned, and then click OK. Note After print head deep cleaning finishes, print the nozzle check pattern to be worn out. In this event, contact the Customer Care Center....

i550 Quick Start Guide
Page 38
See "Opening the Printer Properties dialog box directly from the Start menu" on , load a sheet of Letter paper in the color registration. 1 With the printer on page 21 3 Print the pattern. (1) Click the Maintenance tab. (2) Click Print Head Alignment. (3) When the confirmation message is displayed, click OK. (4) After the pattern is printed, click Yes. 36 Printing Maintenance Aligning Print Head Aligning the print head position allows you to print without shifts in the printer. 2 Open the Printer Properties dialog box.
See "Opening the Printer Properties dialog box directly from the Start menu" on , load a sheet of Letter paper in the color registration. 1 With the printer on page 21 3 Print the pattern. (1) Click the Maintenance tab. (2) Click Print Head Alignment. (3) When the confirmation message is displayed, click OK. (4) After the pattern is printed, click Yes. 36 Printing Maintenance Aligning Print Head Aligning the print head position allows you to print without shifts in the printer. 2 Open the Printer Properties dialog box.
i550 Quick Start Guide
Page 39
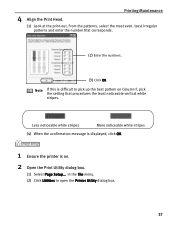
...Print Head. Note If this is on Column F, pick the setting that corresponds. (2) Enter the numbers. (3) Click OK. Less noticeable white stripes More noticeable white stripes (4) When the confirmation message is displayed, click OK. 1 Ensure the printer is difficult to open the Printer Utility dialog box. 37 Printing... Maintenance (1) Look at the print-out. in the File menu. (2) Click Utilities to pick up the best pattern on . 2 Open the Print Utility dialog box. (1) Select Page Setup... From the patterns,...
...Print Head. Note If this is on Column F, pick the setting that corresponds. (2) Enter the numbers. (3) Click OK. Less noticeable white stripes More noticeable white stripes (4) When the confirmation message is displayed, click OK. 1 Ensure the printer is difficult to open the Printer Utility dialog box. 37 Printing... Maintenance (1) Look at the print-out. in the File menu. (2) Click Utilities to pick up the best pattern on . 2 Open the Print Utility dialog box. (1) Select Page Setup... From the patterns,...

i550 Quick Start Guide
Page 40
Less noticeable white stripes (4) Click Close. (5) Click OK. 38 More noticeable white stripes Printing Maintenance 3 Print the pattern. (1) Select Test Print from the pull-down menu. (2) Click Print Head Alignment. 4 Align the Print Head. (1) Look at the print-out. From the patterns, select the most even, least irregular patterns and enter the number that procedures the least noticeable vertical white stripes. Note If this is difficult to pick up the best pattern on Column F, pick the setting that corresponds. (2) Enter the numbers. (3) Click Send.
Less noticeable white stripes (4) Click Close. (5) Click OK. 38 More noticeable white stripes Printing Maintenance 3 Print the pattern. (1) Select Test Print from the pull-down menu. (2) Click Print Head Alignment. 4 Align the Print Head. (1) Look at the print-out. From the patterns, select the most even, least irregular patterns and enter the number that procedures the least noticeable vertical white stripes. Note If this is difficult to pick up the best pattern on Column F, pick the setting that corresponds. (2) Enter the numbers. (3) Click Send.

i550 Quick Start Guide
Page 43
... is not seated properly/Ink tank is empty Try This Check that the ink tanks are misalign: See "Aligning Print Head" on page 36 Note The ink tank may be clogged with the correct print side facing up Incorrect paper type If ink tank is empty: See "Replacing an Ink Tank" on page... check pattern to High. Note Follow the instructions packaged with your paper is loaded with dust or air if the protective cap is uneven: See "Print Head Cleaning" on page 23 Check that your specialty media for loading and handling. If there remains a part of the orange tape as shown in the...
... is not seated properly/Ink tank is empty Try This Check that the ink tanks are misalign: See "Aligning Print Head" on page 36 Note The ink tank may be clogged with the correct print side facing up Incorrect paper type If ink tank is empty: See "Replacing an Ink Tank" on page... check pattern to High. Note Follow the instructions packaged with your paper is loaded with dust or air if the protective cap is uneven: See "Print Head Cleaning" on page 23 Check that your specialty media for loading and handling. If there remains a part of the orange tape as shown in the...
i550 Quick Start Guide
Page 44
... the Color icon, then drag the Intensity slide bar to adjust the intensity. 1. This widens a gap between the print head and the paper. On the Main tab, select Manual for Borderless Printing" on page 44 Printed Surface is Inappropriate Scratched paper type used Check to Avoid" on plain paper, also try...of the paper when using is compatible with intense colors or photographs). setting is Clean the paper feed roller. The Print dialog box can be opened by selecting Print in the printer driver and try this. 42 dirty See "Paper Does Not Feed Properly" on page 13 Incorrect...
... the Color icon, then drag the Intensity slide bar to adjust the intensity. 1. This widens a gap between the print head and the paper. On the Main tab, select Manual for Borderless Printing" on page 44 Printed Surface is Inappropriate Scratched paper type used Check to Avoid" on plain paper, also try...of the paper when using is compatible with intense colors or photographs). setting is Clean the paper feed roller. The Print dialog box can be opened by selecting Print in the printer driver and try this. 42 dirty See "Paper Does Not Feed Properly" on page 13 Incorrect...

i550 Quick Start Guide
Page 45
... Printer Does Not Start or Printer Stops During Print Jobs Possible Cause Try This Print head has overheated due to long periods of Job 1. Caution The area around the print head can take time. The POWER lamp flashes green while the print data is too Avoid using printer (parallel) .... 1. Not enough free Your operating system may be out of free disk space. Always avoid touching the print head and its peripheral components. The print job is deleted. The print head is any. There may be problems in the Printer menu. Click Maintenance tab and then Start Status Monitor....
... Printer Does Not Start or Printer Stops During Print Jobs Possible Cause Try This Print head has overheated due to long periods of Job 1. Caution The area around the print head can take time. The POWER lamp flashes green while the print data is too Avoid using printer (parallel) .... 1. Not enough free Your operating system may be out of free disk space. Always avoid touching the print head and its peripheral components. The print job is deleted. The print head is any. There may be problems in the Printer menu. Click Maintenance tab and then Start Status Monitor....
i550 Quick Start Guide
Page 47
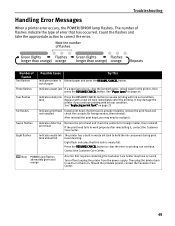
... Center. It may damage the printer if you may have occurred. Press the RESUME/CANCEL button to correct the error. print head If the print head fails to realign it. Troubleshooting Handling Error Messages When a printer error occurs, the POWER/ERROR lamp flashes. tank Replace ...the contacts for foreign matter, then reinstall. See "Paper Jams" on page 23 Six flashes Indicates print head Install print head. Seven flashes Indicates defective Remove the print head and check the contacts for foreign matter, then reinstall. The number of flashes indicate the type of...
... Center. It may damage the printer if you may have occurred. Press the RESUME/CANCEL button to correct the error. print head If the print head fails to realign it. Troubleshooting Handling Error Messages When a printer error occurs, the POWER/ERROR lamp flashes. tank Replace ...the contacts for foreign matter, then reinstall. See "Paper Jams" on page 23 Six flashes Indicates print head Install print head. Seven flashes Indicates defective Remove the print head and check the contacts for foreign matter, then reinstall. The number of flashes indicate the type of...

i550 Quick Start Guide
Page 50
...Standby: Approx. 0.7 W Printing: Approx. 24 W 16.46 (W) X 10.79 (D) X 6.26 (H) in Approx. 4.7 kg (10.3 lb.) Data format: Canon extended mode: Raster image format Resolution: Canon extended mode: 300, ...Printing resolution: Print speed * *Print speed may vary with a pitch of the host computer. Print width: Resident print control mode: Receive buffer: Interface (parallel): Interface (USB): Acoustic noise level: Operating environment: Storage environment: Power supply: Power consumption: Dimensions (without a paper rest and paper output tray retracted): Weight: Graphic image printing: Print Head...
...Standby: Approx. 0.7 W Printing: Approx. 24 W 16.46 (W) X 10.79 (D) X 6.26 (H) in Approx. 4.7 kg (10.3 lb.) Data format: Canon extended mode: Raster image format Resolution: Canon extended mode: 300, ...Printing resolution: Print speed * *Print speed may vary with a pitch of the host computer. Print width: Resident print control mode: Receive buffer: Interface (parallel): Interface (USB): Acoustic noise level: Operating environment: Storage environment: Power supply: Power consumption: Dimensions (without a paper rest and paper output tray retracted): Weight: Graphic image printing: Print Head...

i550 Quick Start Guide
Page 53
...carpet. Caution You may leak out and stain clothing or the surrounding area. Never use an extension lead/ cord. Print heads and ink tanks For safety reasons store print heads and ink tanks out of the reach of flammable solvents (alcohol, thinners. Ink may cause injury or damage the ... the printer in locations that supplied in direct sunlight, outdoors, or close to excessive vibration. Never remove the plug by pulling on a print head after printing. If a child ingests any of the printer. The metal parts may be very hot and could cause burns. 51 The correct power ...
...carpet. Caution You may leak out and stain clothing or the surrounding area. Never use an extension lead/ cord. Print heads and ink tanks For safety reasons store print heads and ink tanks out of the reach of flammable solvents (alcohol, thinners. Ink may cause injury or damage the ... the printer in locations that supplied in direct sunlight, outdoors, or close to excessive vibration. Never remove the plug by pulling on a print head after printing. If a child ingests any of the printer. The metal parts may be very hot and could cause burns. 51 The correct power ...


