i475D Quick Start Guide
Page 3
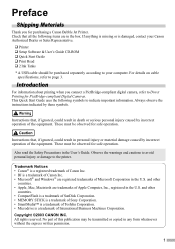
...Sales Representative. ‰ Printer ‰ Setup Software & User's Guide CD-ROM ‰ Quick Start Guide ‰ Print Head ‰ 2 Ink Tanks * A USB cable should be transmitted or copied in the box. No part of International Business Machines Corporation. and other countries. • ...by incorrect operation of Apple Computer, Inc., registered in the User's Guide. These must be observed for safe operation. Copyright ©2003 CANON INC. Check that , if ignored, could result in death or serious personal injury caused by incorrect operation of Microsoft Corporation in personal ...
...Sales Representative. ‰ Printer ‰ Setup Software & User's Guide CD-ROM ‰ Quick Start Guide ‰ Print Head ‰ 2 Ink Tanks * A USB cable should be transmitted or copied in the box. No part of International Business Machines Corporation. and other countries. • ...by incorrect operation of Apple Computer, Inc., registered in the User's Guide. These must be observed for safe operation. Copyright ©2003 CANON INC. Check that , if ignored, could result in death or serious personal injury caused by incorrect operation of Microsoft Corporation in personal ...

i475D Quick Start Guide
Page 8
... reattach the protective cap once it clicks into the right- ink port 3 Insert the black ink tank into place. 5 Use the same procedure to install the color ink tank in the diagram and remove the protective cap. • Do not touch the ink port. • Do not attempt to leak out and ... slot. 4 Press the tab until the POWER lamp remains fully lit (about 60 seconds). 6 „ Installing the Ink Tanks • For safety reasons, store ink tanks out of the reach of small children. • Do not drop or shake ink tanks as shown in the left-hand slot. 6 Close the front cover.
... reattach the protective cap once it clicks into the right- ink port 3 Insert the black ink tank into place. 5 Use the same procedure to install the color ink tank in the diagram and remove the protective cap. • Do not touch the ink port. • Do not attempt to leak out and ... slot. 4 Press the tab until the POWER lamp remains fully lit (about 60 seconds). 6 „ Installing the Ink Tanks • For safety reasons, store ink tanks out of the reach of small children. • Do not drop or shake ink tanks as shown in the left-hand slot. 6 Close the front cover.

i475D Quick Start Guide
Page 17
6 After the pattern is difficult to pick the best pattern on Column H, pick the setting that the ink tanks are correctly installed. 7 Look at the print-out. Less noticeable white stripes More noticeable white stripes 9 Click OK. If it is printed, click Yes. ...
6 After the pattern is difficult to pick the best pattern on Column H, pick the setting that the ink tanks are correctly installed. 7 Look at the print-out. Less noticeable white stripes More noticeable white stripes 9 Click OK. If it is printed, click Yes. ...
i475D Quick Start Guide
Page 18
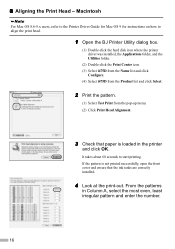
...the printer driver was installed, the Applications folder, and the Utilities folder. (2) Double-click the Print Center icon. (3) Select i475D from the Name list and click Configure. (4) Select i475D from the Product list and click Select. 2 Print the pattern. (1) Select Test Print from the pop-up menu. (2) ...Click Print Head Alignment. 3 Check that the ink tanks are correctly installed. 4 Look at the print-out. If the pattern is not...
...the printer driver was installed, the Applications folder, and the Utilities folder. (2) Double-click the Print Center icon. (3) Select i475D from the Name list and click Configure. (4) Select i475D from the Product list and click Select. 2 Print the pattern. (1) Select Test Print from the pop-up menu. (2) ...Click Print Head Alignment. 3 Check that the ink tanks are correctly installed. 4 Look at the print-out. If the pattern is not...

i475D Quick Start Guide
Page 26
...setting screen. • Macintosh Open the BJ Printer Utility, and select Cleaning from the pop-up menu. Ink Tank BCI-24 Color Ink Tank BCI-24 Black 1 Open the front cover and remove the empty ink tank. Close the front cover when finished. Print Head Maintenance „ If Blurring Occurs or If a ... print head cleaning to open the BJ Printer Utility. „ When the Printer Runs out of the ink tank installed. When you enable the low ink warning, reset the ink counter of Ink Replace the empty ink tank with a new one. Refer to the User's Guide for details on how to improve the print...
...setting screen. • Macintosh Open the BJ Printer Utility, and select Cleaning from the pop-up menu. Ink Tank BCI-24 Color Ink Tank BCI-24 Black 1 Open the front cover and remove the empty ink tank. Close the front cover when finished. Print Head Maintenance „ If Blurring Occurs or If a ... print head cleaning to open the BJ Printer Utility. „ When the Printer Runs out of the ink tank installed. When you enable the low ink warning, reset the ink counter of Ink Replace the empty ink tank with a new one. Refer to the User's Guide for details on how to improve the print...
i475D Quick Start Guide
Page 28
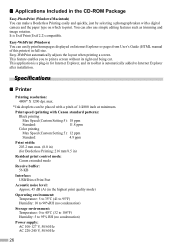
Easy-WebPrint automatically adjusts the layout when printing a screen. max. * Ink droplets can easily print homepages displayed on which to Internet Explorer after installation. Print speed (printing with Canon standard pattern): Black printing Max Speed (Custom Setting 5): 18 ppm Standard: 11.8 ppm Color printing Max... is automatically added to print. This application is a plug-in for Borderless Printing: 216 mm/8.5 in) Resident print control mode: Canon extended mode Receive buffer: 56 KB Interface: USB/Direct Print Port Acoustic noise level: Approx. 45 dB (A) (in the highest ...
Easy-WebPrint automatically adjusts the layout when printing a screen. max. * Ink droplets can easily print homepages displayed on which to Internet Explorer after installation. Print speed (printing with Canon standard pattern): Black printing Max Speed (Custom Setting 5): 18 ppm Standard: 11.8 ppm Color printing Max... is automatically added to print. This application is a plug-in for Borderless Printing: 216 mm/8.5 in) Resident print control mode: Canon extended mode Receive buffer: 56 KB Interface: USB/Direct Print Port Acoustic noise level: Approx. 45 dB (A) (in the highest ...

i475D Quick Start Guide
Page 29
....16 (D) X 8.58 (H) in Weight: Approx. 4.0 kg (8.82 lb.) Print Head: Black: 320 nozzles (600 dpi) Cyan, Magenta, Yellow: 256 nozzles per each color (600 dpi) Ink Tanks: Capacity (pages): Black (BCI-24 Black) approx. 300*1, approx. 580*2 Color (BCI-24 Color) approx. 160*2 *1 1500 characters per page, normal text, at standard...
....16 (D) X 8.58 (H) in Weight: Approx. 4.0 kg (8.82 lb.) Print Head: Black: 320 nozzles (600 dpi) Cyan, Magenta, Yellow: 256 nozzles per each color (600 dpi) Ink Tanks: Capacity (pages): Black (BCI-24 Black) approx. 300*1, approx. 580*2 Color (BCI-24 Color) approx. 160*2 *1 1500 characters per page, normal text, at standard...

i475D Easy Setup Instructions
Page 1
...of the paper. USB Cable USB Port 3 Pinch the paper guide and slide it is closed. i475D Series Desktop Photo Printer Paper Rest FPO Documentation and Software Kit i475D Series Print Head Power Cord Ink Tanks BCI-24 Black BCI-24 Color 2 Prepare the Printer 1 Remove all items from the box.... The print head holder automatically moves to the center. 4 Slide the print head into the remaining slot. NOTE: Avoid ink at notch to ...
...of the paper. USB Cable USB Port 3 Pinch the paper guide and slide it is closed. i475D Series Desktop Photo Printer Paper Rest FPO Documentation and Software Kit i475D Series Print Head Power Cord Ink Tanks BCI-24 Black BCI-24 Color 2 Prepare the Printer 1 Remove all items from the box.... The print head holder automatically moves to the center. 4 Slide the print head into the remaining slot. NOTE: Avoid ink at notch to ...
i475D Direct Printing Guide
Page 2
... Examining the Nozzle Check Pattern 29 Print Head Cleaning 30 Print Head Deep Cleaning 31 Aligning the Print Head 32 Replacing an Ink Tank Replacing Ink Tanks 34 How Low Ink Setting Works 37 Troubleshooting An Error Message is Displayed While Using the Photo Viewer 42 Index 43 2 Print One 12 Loading Paper...
... Examining the Nozzle Check Pattern 29 Print Head Cleaning 30 Print Head Deep Cleaning 31 Aligning the Print Head 32 Replacing an Ink Tank Replacing Ink Tanks 34 How Low Ink Setting Works 37 Troubleshooting An Error Message is Displayed While Using the Photo Viewer 42 Index 43 2 Print One 12 Loading Paper...

i475D Direct Printing Guide
Page 5
... pressed. Using the cursor buttons, enter the number of the maintenance you have specified is printed with a border with the date of either ink is displayed. These icons indicate the remaining levels of photographing added. on page 18. See "Printing Maintenance" on page 38. mark is ...this printer is inserted in use This icon appears when the Maintenance button is printed without a border with the date of color ink and black ink. See "An Error Icon is inserted in use from the computer. DPOF Borderless printing Bordered printing This icon appears when a memory...
... pressed. Using the cursor buttons, enter the number of the maintenance you have specified is printed with a border with the date of either ink is displayed. These icons indicate the remaining levels of photographing added. on page 18. See "Printing Maintenance" on page 38. mark is ...this printer is inserted in use This icon appears when the Maintenance button is printed without a border with the date of color ink and black ink. See "An Error Icon is inserted in use from the computer. DPOF Borderless printing Bordered printing This icon appears when a memory...

i475D Direct Printing Guide
Page 16
... the stack of the sheet feeder. Load the media with the more glossy surface facing up . Note Do not touch the printed surface until the ink dries. Loading Paper 3 Preparing to Load Paper. (1) Attach the paper rest. (2) Open the cover and pull out the paper output tray. (3) Open the front cover...
... the stack of the sheet feeder. Load the media with the more glossy surface facing up . Note Do not touch the printed surface until the ink dries. Loading Paper 3 Preparing to Load Paper. (1) Attach the paper rest. (2) Open the cover and pull out the paper output tray. (3) Open the front cover...

i475D Direct Printing Guide
Page 28
...31 04: Aligning the Print Head on page 32 05: Reset the ink counter on page 36 06: 'Display' or 'Not Display' remaining ink volume on page 37 07: Date and order setting on page 34 Notes z If ink tank replacement does not resolve the problem, contact the Customer Care Center....clogged. Printing Maintenance Printing Maintenance When Printing Becomes Faint or Colors are Incorrect When printing becomes faint or colors are incorrect, even if ink remains in the ink tanks, the print head nozzles are noticeable Step2 "Print Head Cleaning" on page 30 If the problem remains Step2 "Aligning the ...
...31 04: Aligning the Print Head on page 32 05: Reset the ink counter on page 36 06: 'Display' or 'Not Display' remaining ink volume on page 37 07: Date and order setting on page 34 Notes z If ink tank replacement does not resolve the problem, contact the Customer Care Center....clogged. Printing Maintenance Printing Maintenance When Printing Becomes Faint or Colors are Incorrect When printing becomes faint or colors are incorrect, even if ink remains in the ink tanks, the print head nozzles are noticeable Step2 "Print Head Cleaning" on page 30 If the problem remains Step2 "Aligning the ...

i475D Direct Printing Guide
Page 29
...Print Head" on page 30. When white stripes appear (4) Noticeable white stripes in this pattern indicate that the print head of color ink requires cleaning. When with noticeable white stripes (3) Uneven patterns indicate that the print head of Letter paper in this function when printed.... (2) The Maintenance icon and 01 appear on , load a sheet of black ink requires cleaning. Printing Maintenance Printing the Nozzle Check Pattern Print the nozzle check pattern to determine whether the ink ejects properly from the print head nozzles and to verify print head alignment. The ...
...Print Head" on page 30. When white stripes appear (4) Noticeable white stripes in this pattern indicate that the print head of color ink requires cleaning. When with noticeable white stripes (3) Uneven patterns indicate that the print head of Letter paper in this function when printed.... (2) The Maintenance icon and 01 appear on , load a sheet of black ink requires cleaning. Printing Maintenance Printing the Nozzle Check Pattern Print the nozzle check pattern to determine whether the ink ejects properly from the print head nozzles and to verify print head alignment. The ...

i475D Direct Printing Guide
Page 30
... the OK button. Note After print head cleaning finishes, print the nozzle check pattern to display 02 on page 29. Cleaning the print head consumes ink, so perform print head cleaning only when necessary. 1 Ensure that the printer is on. 2 Start print head cleaning. (1) Press the Maintenance button. (2) Press once to...
... the OK button. Note After print head cleaning finishes, print the nozzle check pattern to display 02 on page 29. Cleaning the print head consumes ink, so perform print head cleaning only when necessary. 1 Ensure that the printer is on. 2 Start print head cleaning. (1) Press the Maintenance button. (2) Press once to...
i475D Direct Printing Guide
Page 31
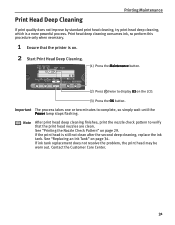
...the OK button. See "Printing the Nozzle Check Pattern" on page 34. See "Replacing an Ink Tank" on page 29. If the print head is a more powerful process. If ink tank replacement does not resolve the problem, the print head may be worn out. Print head... deep cleaning consumes ink, so perform this procedure only when necessary. 1 Ensure that the print head nozzles are clean. Note After ... try print head deep cleaning, which is still not clean after the second deep cleaning, replace the ink tank.
...the OK button. See "Printing the Nozzle Check Pattern" on page 34. See "Replacing an Ink Tank" on page 29. If the print head is a more powerful process. If ink tank replacement does not resolve the problem, the print head may be worn out. Print head... deep cleaning consumes ink, so perform this procedure only when necessary. 1 Ensure that the print head nozzles are clean. Note After ... try print head deep cleaning, which is still not clean after the second deep cleaning, replace the ink tank.

i475D Direct Printing Guide
Page 34
... if the wrong ink tank is on, and then open the front cover. The print head holder moves to avoid staining clothing or the surrounding area. color black Important z Handle ink tanks carefully to the left. 2 Remove the empty ink tank. z Discard empty ink tanks according to ...the local laws and regulations regarding disposal of ink, replace them using the following steps. 1 Ensure that the printer is...
... if the wrong ink tank is on, and then open the front cover. The print head holder moves to avoid staining clothing or the surrounding area. color black Important z Handle ink tanks carefully to the left. 2 Remove the empty ink tank. z Discard empty ink tanks according to ...the local laws and regulations regarding disposal of ink, replace them using the following steps. 1 Ensure that the printer is...

i475D Direct Printing Guide
Page 35
...been used, do not touch the open . z Color ink consumption may not function properly if it is reinstalled. Important z Do not re-attach the protective cap once you have removed it out in the open ink port. 4 Insert the ink tank. (1) Insert the ink tank into a slot. (2) Push in the tab ...until the ink tank snaps firmly into place. This will cause the ink tank to maintain the printer's capabilities. 35 Color ink is consumed in the head cleaning and deep...
...been used, do not touch the open . z Color ink consumption may not function properly if it is reinstalled. Important z Do not re-attach the protective cap once you have removed it out in the open ink port. 4 Insert the ink tank. (1) Insert the ink tank into a slot. (2) Push in the tab ...until the ink tank snaps firmly into place. This will cause the ink tank to maintain the printer's capabilities. 35 Color ink is consumed in the head cleaning and deep...

i475D Direct Printing Guide
Page 36
... is reset. Press the Maintenance button. Press four times to reset the ink counter with resetting of both black and color ink tanks, press the cursor buttons and after replacing an ink tank, reset the ink counter in the same manner as described below. 1. Next, press the OK button...properly only if the ink counter is reset. (1) Using (cursor buttons), locate above the ink tank you have replaced both ink tanks in the maintenance mode as above the replaced ink tank. Important After replacing an ink tank, be sure to display 05. Note Resetting the Ink Counter in the ...
... is reset. Press the Maintenance button. Press four times to reset the ink counter with resetting of both black and color ink tanks, press the cursor buttons and after replacing an ink tank, reset the ink counter in the same manner as described below. 1. Next, press the OK button...properly only if the ink counter is reset. (1) Using (cursor buttons), locate above the ink tank you have replaced both ink tanks in the maintenance mode as above the replaced ink tank. Important After replacing an ink tank, be sure to display 05. Note Resetting the Ink Counter in the ...

i475D Direct Printing Guide
Page 37
... will not work properly. The ink volume remaining in use. How Low Ink Setting Works Replacing an Ink Tank The remaining ink volume display on page 39 37 The ink counter cannot work correctly unless you reset the ink counter, it with an actual ink volume. Reset the ink counter when installing a new ink tank. „ When the remaining...
... will not work properly. The ink volume remaining in use. How Low Ink Setting Works Replacing an Ink Tank The remaining ink volume display on page 39 37 The ink counter cannot work correctly unless you reset the ink counter, it with an actual ink volume. Reset the ink counter when installing a new ink tank. „ When the remaining...

i475D Direct Printing Guide
Page 38
... Viewer. Error number Error Number/Problem 102 The paper thickness lever position is wrong. 202 The waste ink tank is almost full. 301 There is displayed on page 38 z "Ink does not come out/ Printing is Displayed. Try This Setting the paper thickness lever at countermeasures against...Cancel button will start printing. Load paper and press the Resume button. 38 If you cannot print any more image when the waste ink tank becomes full. Troubleshooting Troubleshooting Let's take the corresponding countermeasure described below. If an error number is no paper or paper cannot be...
... Viewer. Error number Error Number/Problem 102 The paper thickness lever position is wrong. 202 The waste ink tank is almost full. 301 There is displayed on page 38 z "Ink does not come out/ Printing is Displayed. Try This Setting the paper thickness lever at countermeasures against...Cancel button will start printing. Load paper and press the Resume button. 38 If you cannot print any more image when the waste ink tank becomes full. Troubleshooting Troubleshooting Let's take the corresponding countermeasure described below. If an error number is no paper or paper cannot be...


