Photo Application Guide(Mac)
Page 4
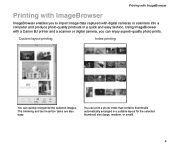
... arranged in a quick and easy fashion. Printing with ImageBrowser Printing with ImageBrowser ImageBrowser enables you to import image data captured with a Canon BJ printer and a scanner or digital camera, you can enjoy superb-quality photo prints. The trimming and text insertion tasks are also easy. Custom layout printing Index printing You can quickly reorganize the selected images...
... arranged in a quick and easy fashion. Printing with ImageBrowser Printing with ImageBrowser ImageBrowser enables you to import image data captured with a Canon BJ printer and a scanner or digital camera, you can enjoy superb-quality photo prints. The trimming and text insertion tasks are also easy. Custom layout printing Index printing You can quickly reorganize the selected images...

Photo Application Guide(Mac)
Page 5
You can print images in the specified photo size. Fixed photo size printing Printing with BJ printers that a single image is printed borderless along the paper edges and multiple images are arranged like tiles with no space between them (available with ImageBrowser Tiled photo printing (Borderless printing) You can print images with no margins around each image, so that support the borderless printing feature). 5
You can print images in the specified photo size. Fixed photo size printing Printing with BJ printers that a single image is printed borderless along the paper edges and multiple images are arranged like tiles with no space between them (available with ImageBrowser Tiled photo printing (Borderless printing) You can print images with no margins around each image, so that support the borderless printing feature). 5

Photo Application Guide(Mac)
Page 11
Borderless printing is also supported. * Some features and paper sizes may not be printed on the models of printers. 11 5 Printing The images can be supported depending on Canon perforated paper (such as Photo Paper Pro or Glossy Photo Cards ).
Borderless printing is also supported. * Some features and paper sizes may not be printed on the models of printers. 11 5 Printing The images can be supported depending on Canon perforated paper (such as Photo Paper Pro or Glossy Photo Cards ).
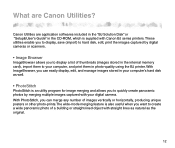
Photo Application Guide(Mac)
Page 12
... utility program for image merging and allows you want to create a wide panoramic photo of images vertically or horizontally, producing unique posters or other photo-prints.The wide-mode merging feature is supplied with Canon BJ series printers. With PhotoStitch, you can easily display, edit, and manage images stored in your computer, and...
... utility program for image merging and allows you want to create a wide panoramic photo of images vertically or horizontally, producing unique posters or other photo-prints.The wide-mode merging feature is supplied with Canon BJ series printers. With PhotoStitch, you can easily display, edit, and manage images stored in your computer, and...

Photo Application Guide(Mac)
Page 72
Specify the paper size and orientation. Custom layout printing 72 3 Click the Page setup button. Select the Borderless Printing check box to print images with no margins. The Page Setup dialog box for the printer selected in the Chooser appears.
Specify the paper size and orientation. Custom layout printing 72 3 Click the Page setup button. Select the Borderless Printing check box to print images with no margins. The Page Setup dialog box for the printer selected in the Chooser appears.
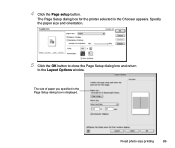
Photo Application Guide(Mac)
Page 86
4 Click the Page setup button. The size of paper you specified in the Chooser appears. The Page Setup dialog box for the printer selected in the Page Setup dialog box is displayed. Fixed photo size printing 86 Specify the paper size and orientation. 5 Click the OK button to close the Page Setup dialog box and return to the Layout Options window.
4 Click the Page setup button. The size of paper you specified in the Chooser appears. The Page Setup dialog box for the printer selected in the Page Setup dialog box is displayed. Fixed photo size printing 86 Specify the paper size and orientation. 5 Click the OK button to close the Page Setup dialog box and return to the Layout Options window.
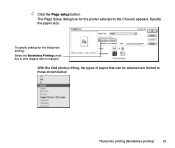
Photo Application Guide(Mac)
Page 91
To specify settings for the printer selected in the Chooser appears. Specify the paper size. With the tiled photo printing, the types of paper that can be selected are limited to print images with no margins. The Page Setup dialog box for the tiled photo printing: Select the Borderless Printing check box to those shown below: Tiled photo printing (Borderless printing) 91 4 Click the Page setup button.
To specify settings for the printer selected in the Chooser appears. Specify the paper size. With the tiled photo printing, the types of paper that can be selected are limited to print images with no margins. The Page Setup dialog box for the tiled photo printing: Select the Borderless Printing check box to those shown below: Tiled photo printing (Borderless printing) 91 4 Click the Page setup button.
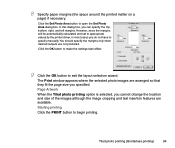
Photo Application Guide(Mac)
Page 94
.... Click the OK button to make the settings take effect. 9 Click the OK button to begin printing. Tiled photo printing (Borderless printing) 94 Page Artwork When the Tiled photo printing option is selected, you can specify the top, bottom, right, and left margins. In this dialog... insertion features are available. Starting printing Click the PRINT button to exit the layout selection wizard. 8 Specify paper margins (the space around the printed matter on a page) if necessary. Click the Set Photo Area button to appropriate values by the printer driver, in most cases you ...
.... Click the OK button to make the settings take effect. 9 Click the OK button to begin printing. Tiled photo printing (Borderless printing) 94 Page Artwork When the Tiled photo printing option is selected, you can specify the top, bottom, right, and left margins. In this dialog... insertion features are available. Starting printing Click the PRINT button to exit the layout selection wizard. 8 Specify paper margins (the space around the printed matter on a page) if necessary. Click the Set Photo Area button to appropriate values by the printer driver, in most cases you ...

Photo Application Guide(Mac)
Page 95
Canon perforated paper printing • Selecting a layout • Starting printing The Canon perforated paper printing feature allows you to About Canon perforated paper for more information on the types of Canon perforated paper. See your printer manuals for more information. Note ➤ Some printer models may not support the printing on Canon perforated paper. Canon perforated paper printing 95 Refer to quickly print images on Canon perforated paper.
Canon perforated paper printing • Selecting a layout • Starting printing The Canon perforated paper printing feature allows you to About Canon perforated paper for more information on the types of Canon perforated paper. See your printer manuals for more information. Note ➤ Some printer models may not support the printing on Canon perforated paper. Canon perforated paper printing 95 Refer to quickly print images on Canon perforated paper.
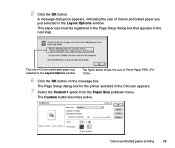
Photo Application Guide(Mac)
Page 98
... paper you just selected in the Layout Options window. Canon perforated paper printing 98 5 Click the OK button. The figure above shows the size of Canon perforated paper you selected in the Layout Options window. The Custom button becomes active. A message dialog box appears, indicating the size of Photo Paper PRO . 6 ... dialog box that appears in the Chooser appears. 7 Select the Custom1 option from the Paper Size pulldown menu. The Page Setup dialog box for the printer selected in the next step.
... paper you just selected in the Layout Options window. Canon perforated paper printing 98 5 Click the OK button. The figure above shows the size of Canon perforated paper you selected in the Layout Options window. The Custom button becomes active. A message dialog box appears, indicating the size of Photo Paper PRO . 6 ... dialog box that appears in the Chooser appears. 7 Select the Custom1 option from the Paper Size pulldown menu. The Page Setup dialog box for the printer selected in the next step.

Photo Application Guide(Mac)
Page 103
Starting printing 103 Starting printing Once you have completed all necessary steps for the page layout, follow the steps below to start printing. The Print dialog box of the printer selected in the Chooser appears. Steps 1 Click the PRINT button.
Starting printing 103 Starting printing Once you have completed all necessary steps for the page layout, follow the steps below to start printing. The Print dialog box of the printer selected in the Chooser appears. Steps 1 Click the PRINT button.
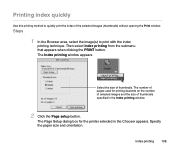
Photo Application Guide(Mac)
Page 108
... of the selected images (thumbnails) without opening the Print window. The Page Setup dialog box for printing depends on the number of selected images and the size of pages used for the printer selected in the Index printing window. 2 Click the Page setup button. Index printing 108 The number of thumbnails specified in...
... of the selected images (thumbnails) without opening the Print window. The Page Setup dialog box for printing depends on the number of selected images and the size of pages used for the printer selected in the Index printing window. 2 Click the Page setup button. Index printing 108 The number of thumbnails specified in...

Photo Application Guide(Mac)
Page 112
4 Click the Page setup button. The Page Setup dialog box for the printer selected in the Page Setup dialog box is displayed. Specify the paper size and orientation. 5 Click the OK button to close the Page Setup dialog box and return to the Layout Options window. The size of paper you specified in the Chooser appears. Index printing 112
4 Click the Page setup button. The Page Setup dialog box for the printer selected in the Page Setup dialog box is displayed. Specify the paper size and orientation. 5 Click the OK button to close the Page Setup dialog box and return to the Layout Options window. The size of paper you specified in the Chooser appears. Index printing 112
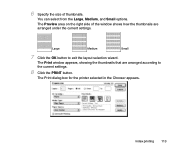
Photo Application Guide(Mac)
Page 113
Large Medium Small 7 Click the OK button to the current settings. 8 Click the PRINT button. The Print dialog box for the printer selected in the Chooser appears. The Preview area on the right side of thumbnails. The Print window appears, showing the thumbnails that are arranged under the current settings. 6 Specify the size of the window shows how the thumbnails are arranged according to exit the layout selection wizard. Index printing 113 You can select from the Large, Medium, and Small options.
Large Medium Small 7 Click the OK button to the current settings. 8 Click the PRINT button. The Print dialog box for the printer selected in the Chooser appears. The Preview area on the right side of thumbnails. The Print window appears, showing the thumbnails that are arranged under the current settings. 6 Specify the size of the window shows how the thumbnails are arranged according to exit the layout selection wizard. Index printing 113 You can select from the Large, Medium, and Small options.

Photo Application Guide(Windows)
Page 4
... in a suitab layout for the selected thumbnail size (large, medium, or small). 4 Printing with ZoomBrowser EX ZoomBrowser EX enables you to import image data captured with a Canon BJ printer and a scanner or digital camera, you can enjoy superb-quality photo prints. Using ZoomBrowser EX with digital cameras or scanners into a computer and produce photo...
... in a suitab layout for the selected thumbnail size (large, medium, or small). 4 Printing with ZoomBrowser EX ZoomBrowser EX enables you to import image data captured with a Canon BJ printer and a scanner or digital camera, you can enjoy superb-quality photo prints. Using ZoomBrowser EX with digital cameras or scanners into a computer and produce photo...

Photo Application Guide(Windows)
Page 5
You can print images in the specified photo size. Printing in a Specified Photo Size (Fixed Photo Size Printing) Printing in the Borderless Printing Mode (Tiled photo) You can print images with no margins around each image, so that a single image is printed borderless along the paper edges and multiple images are arranged like tiles with no space between them (available with BJ printers that support the borderless printing feature). 5
You can print images in the specified photo size. Printing in a Specified Photo Size (Fixed Photo Size Printing) Printing in the Borderless Printing Mode (Tiled photo) You can print images with no margins around each image, so that a single image is printed borderless along the paper edges and multiple images are arranged like tiles with no space between them (available with BJ printers that support the borderless printing feature). 5

Photo Application Guide(Windows)
Page 10
The images can apply artwork including clipping, resizing, adding text, and ornamentation such as Photo Paper Pro or Glossy Photo Card ). Borderless printing is also supported. *Some features and paper sizes may not be printed on the models of printers. 10 STEP 4 Applying artwork STEP 5 Printing You can be supported depending on Canon perforated paper (such as adding photo frames or background to the imported images.
The images can apply artwork including clipping, resizing, adding text, and ornamentation such as Photo Paper Pro or Glossy Photo Card ). Borderless printing is also supported. *Some features and paper sizes may not be printed on the models of printers. 10 STEP 4 Applying artwork STEP 5 Printing You can be supported depending on Canon perforated paper (such as adding photo frames or background to the imported images.
Photo Application Guide(Windows)
Page 11
... camera. You can merge any number of images vertically or horizontally, producing unique posters or other photo-prints. Canon Utilities are Canon Utilities? With ZoomBrowser EX, You can print the specified image in photo-quality using the BJ printer. What are the application softwares included in the BJ Solution Disk or Setup Software & User's Guide...
... camera. You can merge any number of images vertically or horizontally, producing unique posters or other photo-prints. Canon Utilities are Canon Utilities? With ZoomBrowser EX, You can print the specified image in photo-quality using the BJ printer. What are the application softwares included in the BJ Solution Disk or Setup Software & User's Guide...

Photo Application Guide(Windows)
Page 58
...58 The Automation Wizard also starts when you connect a non-Canon digital camera or a memory card reader to your computer after starting ZoomBrowser EX. The Automatiln Wizard starts when you to save a sequence of a BJ printer connected to your computer or insert a memory card (Compact Flush... card) into the memory card slot of actions from importing images into your computer through printing, so that ZoomBrowser EX will automatically repeat the same action ...
...58 The Automation Wizard also starts when you connect a non-Canon digital camera or a memory card reader to your computer after starting ZoomBrowser EX. The Automatiln Wizard starts when you to save a sequence of a BJ printer connected to your computer or insert a memory card (Compact Flush... card) into the memory card slot of actions from importing images into your computer through printing, so that ZoomBrowser EX will automatically repeat the same action ...

Photo Application Guide(Windows)
Page 89
3 Specify the Thumbnail size, Media Type, Paper Size, Orientation, and Print quality options. You can select a thumbnail size from Small, Medium, and Large. The printer starts printing. (Medium) (Small) Printing a Photo Index (Index Printing) 89 Specify an image to open the Change Page Artwork dialog box. If you want to add a background image, click the Set Page Art button to go with your pages. (Large) 4 Click the OK button.
3 Specify the Thumbnail size, Media Type, Paper Size, Orientation, and Print quality options. You can select a thumbnail size from Small, Medium, and Large. The printer starts printing. (Medium) (Small) Printing a Photo Index (Index Printing) 89 Specify an image to open the Change Page Artwork dialog box. If you want to add a background image, click the Set Page Art button to go with your pages. (Large) 4 Click the OK button.


