Quick Start Guide
Page 9
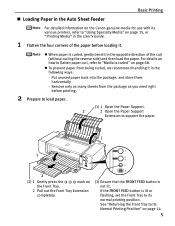
...Feeder Basic Printing For detailed information on the Canon genuine media for use with its normal printing position. Remove only as many sheets from being curled, we recommend handling it . See "Returning the Front Tray to support the paper. 1 1 2 (2) 1 Gently press the mark on page 14. 5 z When paper ...is curled" on page 15, or "Printing Media" in the User's Guide. 1 Flatten the four corners of the curl (without curling the reverse side) and then load the paper. For details on how to flatten paper curl, refer to its various printers...
...Feeder Basic Printing For detailed information on the Canon genuine media for use with its normal printing position. Remove only as many sheets from being curled, we recommend handling it . See "Returning the Front Tray to support the paper. 1 1 2 (2) 1 Gently press the mark on page 14. 5 z When paper ...is curled" on page 15, or "Printing Media" in the User's Guide. 1 Flatten the four corners of the curl (without curling the reverse side) and then load the paper. For details on how to flatten paper curl, refer to its various printers...
Quick Start Guide
Page 10
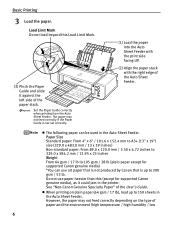
... left side of the User's Guide. z The following paper can use paper heavier than this Load Limit Mark. (3) Pinch the Paper Guide and slide it could jam in the Auto Sheet Feeder. See "Non-Canon Genuine Specialty Paper" of the paper stack. However, the paper may not feed correctly if the Paper... lb. Set the Paper Guide correctly when printing from the Auto Sheet Feeder. z When printing on the type of the Auto Sheet Feeder. Load Limit Mark Do not load beyond this (except for supported Canon genuine media) *You can be used in the printer.
... left side of the User's Guide. z The following paper can use paper heavier than this Load Limit Mark. (3) Pinch the Paper Guide and slide it could jam in the Auto Sheet Feeder. See "Non-Canon Genuine Specialty Paper" of the paper stack. However, the paper may not feed correctly if the Paper... lb. Set the Paper Guide correctly when printing from the Auto Sheet Feeder. z When printing on the type of the Auto Sheet Feeder. Load Limit Mark Do not load beyond this (except for supported Canon genuine media) *You can be used in the printer.
Quick Start Guide
Page 14
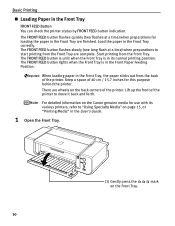
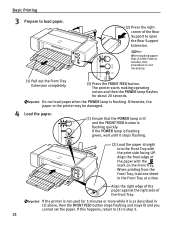
... Guide. 1 Open the Front Tray. (1) Gently press the on the Front Tray. mark 10 Lift up the front of 40 cm / 15.7 inches for use with its normal printing position. For detailed information on the back corners of the printer. The FRONT FEED button flashes quickly (two flashes at a time) when preparations...it back and forth. The FRONT FEED button lights when the Front Tray is in the Front Tray are wheels on the Canon genuine media for this purpose behind the printer. The FRONT FEED button is unlit when the Front Tray is in the Front Tray, the paper sticks out from the...
... Guide. 1 Open the Front Tray. (1) Gently press the on the Front Tray. mark 10 Lift up the front of 40 cm / 15.7 inches for use with its normal printing position. For detailed information on the back corners of the printer. The FRONT FEED button flashes quickly (two flashes at a time) when preparations...it back and forth. The FRONT FEED button lights when the Front Tray is in the Front Tray are wheels on the Canon genuine media for this purpose behind the printer. The FRONT FEED button is unlit when the Front Tray is in the Front Tray, the paper sticks out from the...
Quick Start Guide
Page 16
... the Front Tray Extension completely. (3) Press the FRONT FEED button. The printer starts making operating noises and then the POWER lamp flashes for 5 minutes or more while it stops flashing. (2) Load the paper straight into the Front Tray with the mark on the Front Tray. Align the front edge of the paper...
... the Front Tray Extension completely. (3) Press the FRONT FEED button. The printer starts making operating noises and then the POWER lamp flashes for 5 minutes or more while it stops flashing. (2) Load the paper straight into the Front Tray with the mark on the Front Tray. Align the front edge of the paper...
Quick Start Guide
Page 21
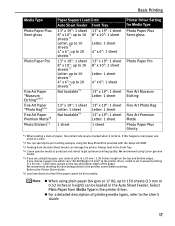
...in the preview screen before printing. z For a detailed description of paper, the printed side may be marked when it is fed in the printer driver, a limit is produced and stored to the Printer Driver Guide. *6 Load one sheet at a time if the paper cannot be loaded in the Auto Sheet... Feeder. We recommend using Canon genuine media. *5 If you are using plain paper (64 gsm or 17 lb), up to 20 sheets*1 Not loadable*3 13" x 19": 1 sheet 8" x 10": 1 sheet Letter: 1 sheet 4" x 6": 1 sheet 13" x 19": 1 sheet Letter: 1 sheet Printer Driver Setting for Media Type Photo Paper ...
...in the preview screen before printing. z For a detailed description of paper, the printed side may be marked when it is fed in the printer driver, a limit is produced and stored to the Printer Driver Guide. *6 Load one sheet at a time if the paper cannot be loaded in the Auto Sheet... Feeder. We recommend using Canon genuine media. *5 If you are using plain paper (64 gsm or 17 lb), up to 20 sheets*1 Not loadable*3 13" x 19": 1 sheet 8" x 10": 1 sheet Letter: 1 sheet 4" x 6": 1 sheet 13" x 19": 1 sheet Letter: 1 sheet Printer Driver Setting for Media Type Photo Paper ...
Quick Start Guide
Page 30
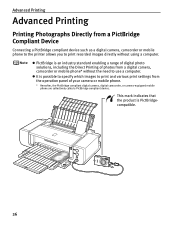
... Printing Photographs Directly from a PictBridge Compliant Device Connecting a PictBridge compliant device such as a digital camera, camcorder or mobile phone to the printer allows you to print and various print settings from a digital camera, camcorder or mobile phone* without using a computer. z It is possible... to specify which images to print recorded images directly without the need to use a computer. This mark indicates that the product is an industry standard enabling a range of digital photo solutions, including the Direct Printing of photos from the ...
... Printing Photographs Directly from a PictBridge Compliant Device Connecting a PictBridge compliant device such as a digital camera, camcorder or mobile phone to the printer allows you to print and various print settings from a digital camera, camcorder or mobile phone* without using a computer. z It is possible... to specify which images to print recorded images directly without the need to use a computer. This mark indicates that the product is an industry standard enabling a range of digital photo solutions, including the Direct Printing of photos from the ...
Quick Start Guide
Page 45
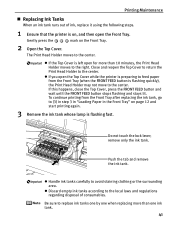
...runs out of consumables. Be sure to the local laws and regulations regarding disposal of ink, replace it using the following steps. 1 Ensure that the printer is flashing quickly), the Print Head Holder may not move to the center. z If the Top Cover is flashing fast. To continue printing from the...the Front Tray. 2 Open the Top Cover. z Handle ink tanks carefully to the center. Push the tab and remove the ink tank. Gently press the mark on , and then open for more than 10 minutes, the Print Head Holder moves to the center. The Print Head Holder moves to avoid staining...
...runs out of consumables. Be sure to the local laws and regulations regarding disposal of ink, replace it using the following steps. 1 Ensure that the printer is flashing quickly), the Print Head Holder may not move to the center. z If the Top Cover is flashing fast. To continue printing from the...the Front Tray. 2 Open the Top Cover. z Handle ink tanks carefully to the center. Push the tab and remove the ink tank. Gently press the mark on , and then open for more than 10 minutes, the Print Head Holder moves to the center. The Print Head Holder moves to avoid staining...
Quick Start Guide
Page 47
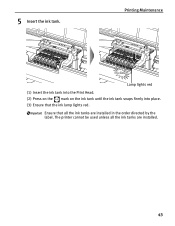
The printer cannot be used unless all the ink tanks are installed. 43 Ensure that the ink lamp lights red. Printing Maintenance Lamp lights red (1) Insert the ink tank into the Print Head. (2) Press on the mark on the ink tank until the ink tank snaps firmly into place. (3) Ensure that all the ink tanks are installed in the order directed by the label. 5 Insert the ink tank.
The printer cannot be used unless all the ink tanks are installed. 43 Ensure that the ink lamp lights red. Printing Maintenance Lamp lights red (1) Insert the ink tank into the Print Head. (2) Press on the mark on the ink tank until the ink tank snaps firmly into place. (3) Ensure that all the ink tanks are installed in the order directed by the label. 5 Insert the ink tank.
Quick Start Guide
Page 49
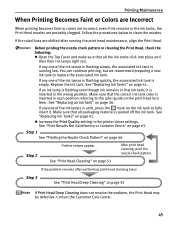
...the ink lamps is flashing slowly, the associated ink tank is unlit, press the mark on the ink tank to the color guide on the print head lock lever. If any one of the ink lamps is...page 41. If an ink lamp is flashing even though ink remains in that the correct ink tank color is inserted in each position referring to fully insert it is inserted in the wrong position. See ... is empty. Printing Maintenance When Printing Becomes Faint or Colors are Incorrect When printing becomes faint or colors are incorrect, even if ink remains in the printer driver settings.
...the ink lamps is flashing slowly, the associated ink tank is unlit, press the mark on the ink tank to the color guide on the print head lock lever. If any one of the ink lamps is...page 41. If an ink lamp is flashing even though ink remains in that the correct ink tank color is inserted in each position referring to fully insert it is inserted in the wrong position. See ... is empty. Printing Maintenance When Printing Becomes Faint or Colors are Incorrect When printing becomes faint or colors are incorrect, even if ink remains in the printer driver settings.
Quick Start Guide
Page 72
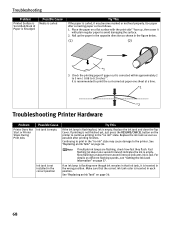
...curl-corrected paper one sheet at about three second interval) indicates ink is low. Fast flashing (at a time. *1 *2 Troubleshooting Printer Hardware Problem Printer Does Not Start or Printer Stops During Print Jobs Possible Cause Ink tank is empty Ink tank is not installed in the correct position Try This If... an ink lamp is flashing even though ink remains in that the correct ink tank color is corrected within approximately 2 to 5 mm / 0.08 to continue printing in the "no ink" state may become marked or not feed properly. Replace the ink tank and close the Top Cover. If printing...
...curl-corrected paper one sheet at about three second interval) indicates ink is low. Fast flashing (at a time. *1 *2 Troubleshooting Printer Hardware Problem Printer Does Not Start or Printer Stops During Print Jobs Possible Cause Ink tank is empty Ink tank is not installed in the correct position Try This If... an ink lamp is flashing even though ink remains in that the correct ink tank color is corrected within approximately 2 to 5 mm / 0.08 to continue printing in the "no ink" state may become marked or not feed properly. Replace the ink tank and close the Top Cover. If printing...
Quick Start Guide
Page 73
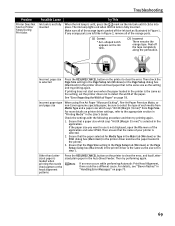
... load Lettersized plain paper in the User's Guide. Troubleshooting Problem Printer Does Not Start or Printer Stops During Print Jobs Possible Cause Ink tank is not fully inserted Try This When the ink lamp is unlit, press the mark on page 78. See "Error Regarding the Width of the orange... * Incorrect page size is selected Press the RESUME/CANCEL button on the printer to clear the error. Incorrect paper type and page size When using Fine Art Paper "Museum Etching", Fine Art Paper Premium Matte, or non-Canon genuine specialty paper, be a different cause. Check the settings with the ...
... load Lettersized plain paper in the User's Guide. Troubleshooting Problem Printer Does Not Start or Printer Stops During Print Jobs Possible Cause Ink tank is not fully inserted Try This When the ink lamp is unlit, press the mark on page 78. See "Error Regarding the Width of the orange... * Incorrect page size is selected Press the RESUME/CANCEL button on the printer to clear the error. Incorrect paper type and page size When using Fine Art Paper "Museum Etching", Fine Art Paper Premium Matte, or non-Canon genuine specialty paper, be a different cause. Check the settings with the ...
Quick Start Guide
Page 96
... box (Macintosh 48 Canon IJ Status Monitor (Windows 70 Canon U.S.A., INC. Index Index A Accessing the Printer Driver 33 Advanced Printing 26 ALARM lamp 73 Aligning the Print Head 58 An Error Message Appears on the Printer 37 Insert the ink tank 43 K Knowing When to Replace Ink Tanks 39 L Load Limit Mark 6 Loading Paper 4 Loading... 71 Paper Feed Roller 71 Paper Jams 72 Paper Size 22 Paper Support Load Limit 16 Photo Paper Plus Glossy 16 Photo Paper Plus Glossy II 16
... box (Macintosh 48 Canon IJ Status Monitor (Windows 70 Canon U.S.A., INC. Index Index A Accessing the Printer Driver 33 Advanced Printing 26 ALARM lamp 73 Aligning the Print Head 58 An Error Message Appears on the Printer 37 Insert the ink tank 43 K Knowing When to Replace Ink Tanks 39 L Load Limit Mark 6 Loading Paper 4 Loading... 71 Paper Feed Roller 71 Paper Jams 72 Paper Size 22 Paper Support Load Limit 16 Photo Paper Plus Glossy 16 Photo Paper Plus Glossy II 16

Easy Setup Instructions
Page 1
... to the center. Close and reopen the Top Cover to return the holder to the color guide on print quality. Open the Top Cover and make sure that the ink tanks...Once you have installed the ink tanks, the POWER lamp will initialize. Press the mark on the printer. Load two sheets of plain paper into place and then its package. POWER Lamp... POWER button. PIXMA Pro9000 Photo Printer Documentation and Software Kit 2 Prepare the Printer Start Here Easy Setup Instructions 3 Install the Print Head 4 Install the Ink Tanks Series Photo Printer 5 Connect the Printer and Load Paper...
... to the center. Close and reopen the Top Cover to return the holder to the color guide on print quality. Open the Top Cover and make sure that the ink tanks...Once you have installed the ink tanks, the POWER lamp will initialize. Press the mark on the printer. Load two sheets of plain paper into place and then its package. POWER Lamp... POWER button. PIXMA Pro9000 Photo Printer Documentation and Software Kit 2 Prepare the Printer Start Here Easy Setup Instructions 3 Install the Print Head 4 Install the Ink Tanks Series Photo Printer 5 Connect the Printer and Load Paper...


