
User Manual
Page 4
Seek)] / [ (Single-image erase)] button (7) Control dial (8) [ (Macro)] / [ (Manual focus)] / Left button (9) Indicator (10) [ (Playback)] button (11) [ (Wi-Fi)] button (12) [ (Exposure compensation)] / [ (Story Highlights)] / Up button (13) [ (Flash)] / Right button (14) FUNC. (Function) / ...
Seek)] / [ (Single-image erase)] button (7) Control dial (8) [ (Macro)] / [ (Manual focus)] / Left button (9) Indicator (10) [ (Playback)] button (11) [ (Wi-Fi)] button (12) [ (Exposure compensation)] / [ (Story Highlights)] / Up button (13) [ (Flash)] / Right button (14) FUNC. (Function) / ...

User Manual
Page 6
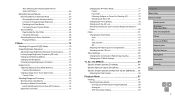
... 64 Special Modes for Other Purposes 64 Auto Shooting after Face Detection (Smart Shutter 64 Auto Shooting after Smile Detection (Smile 64 Auto Shooting after Manual Zooming (Framing Assist -
... 64 Special Modes for Other Purposes 64 Auto Shooting after Face Detection (Smart Shutter 64 Auto Shooting after Smile Detection (Smile 64 Auto Shooting after Manual Zooming (Framing Assist -
User Manual
Page 7
... White Balance 73 Changing Image Color Tones (My Colors 74 Custom Color 74 Shooting Range and Focusing 75 Shooting Close-Ups (Macro 75 Shooting in Manual Focus Mode 75 Easily Identifying the Focus Area (MF Peaking 76 Digital Tele-Converter 77 Changing the AF Frame Mode 77 Center 77 Face AiAF...
... White Balance 73 Changing Image Color Tones (My Colors 74 Custom Color 74 Shooting Range and Focusing 75 Shooting Close-Ups (Macro 75 Shooting in Manual Focus Mode 75 Easily Identifying the Focus Area (MF Peaking 76 Digital Tele-Converter 77 Changing the AF Frame Mode 77 Center 77 Face AiAF...

User Manual
Page 14
... objects. -- This may cause electric shock, explosion or fire. If swallowed, seek immediate medical assistance. ●● Use only power sources specified in this instruction manual for long periods of time. Do not expose the power plug and terminals to dirt or let them come into the power outlet. -- Do not...
... objects. -- This may cause electric shock, explosion or fire. If swallowed, seek immediate medical assistance. ●● Use only power sources specified in this instruction manual for long periods of time. Do not expose the power plug and terminals to dirt or let them come into the power outlet. -- Do not...

User Manual
Page 40
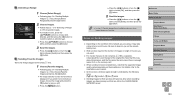
... subject enters the white frame, and then release the [ ] button. ●●The previous magnification is now restored, so that a changed with the [ ] button after Manual Zooming (Framing Assist - This size can also be changed zoom factor and camera operating sounds are detected, a white frame is not displayed if you hold...
... subject enters the white frame, and then release the [ ] button. ●●The previous magnification is now restored, so that a changed with the [ ] button after Manual Zooming (Framing Assist - This size can also be changed zoom factor and camera operating sounds are detected, a white frame is not displayed if you hold...

User Manual
Page 41
... be restored in self-timer mode (=43). ●● The camera prioritizes zooming to keep subjects on the screen. Auto Face Upper Body Whole Body Manual Auto zoom to prevent subjects from moving the zoom lever. You can choose [Off] to deactivate this reason, it may not be displayed at a constant...
... be restored in self-timer mode (=43). ●● The camera prioritizes zooming to keep subjects on the screen. Auto Face Upper Body Whole Body Manual Auto zoom to prevent subjects from moving the zoom lever. You can choose [Off] to deactivate this reason, it may not be displayed at a constant...

User Manual
Page 73
... Natural Colors (White Balance) Still Images Movies By adjusting white balance (WB), you can make image colors look more natural for the shooting conditions. For manually setting a custom white balance (= 73).
... Natural Colors (White Balance) Still Images Movies By adjusting white balance (WB), you can make image colors look more natural for the shooting conditions. For manually setting a custom white balance (= 73).

User Manual
Page 75
... [ ][ ] buttons or turn the [ ] dial), and then press the [ ] button. ●●Once the setting is complete, [ ] is not possible in Manual Focus Mode Still Images Movies When focusing is displayed. ●● If the flash fires, vignetting may occur. ●● In the yellow bar display... near the position you specified. For details on a tripod and shooting with the camera set the camera to [ ]. Shooting in AF mode, use manual focus. Shooting Range and Focusing Shooting Close-Ups (Macro) Still Images Movies To restrict the focus to subjects at close range, set to [ ] ...
... [ ][ ] buttons or turn the [ ] dial), and then press the [ ] button. ●●Once the setting is complete, [ ] is not possible in Manual Focus Mode Still Images Movies When focusing is displayed. ●● If the flash fires, vignetting may occur. ●● In the yellow bar display... near the position you specified. For details on a tripod and shooting with the camera set the camera to [ ]. Shooting in AF mode, use manual focus. Shooting Range and Focusing Shooting Close-Ups (Macro) Still Images Movies To restrict the focus to subjects at close range, set to [ ] ...

User Manual
Page 76
..., choose [MF Peaking Settings] on the [ ] tab, and then choose [On] (=29). 2 Configure the setting. ●●Choose a menu item to make manual focusing easier. Before Use Basic Guide Advanced Guide Camera Basics Auto Mode / Hybrid Auto Mode Other Shooting Modes P Mode Tv, Av, and M Mode Playback Mode... Wireless Features Setting Menu Accessories Appendix Index 76 ●● When you focus manually, the AF frame mode (=77) is [Center] and AF frame size (=77) is [Normal], and these settings cannot be changed. ●●...
..., choose [MF Peaking Settings] on the [ ] tab, and then choose [On] (=29). 2 Configure the setting. ●●Choose a menu item to make manual focusing easier. Before Use Basic Guide Advanced Guide Camera Basics Auto Mode / Hybrid Auto Mode Other Shooting Modes P Mode Tv, Av, and M Mode Playback Mode... Wireless Features Setting Menu Accessories Appendix Index 76 ●● When you focus manually, the AF frame mode (=77) is [Center] and AF frame size (=77) is [Normal], and these settings cannot be changed. ●●...

User Manual
Page 77
...] (=29). ●● The AF frame size is set to [Normal] when you use the digital zoom (=39) or digital tele-converter (=77), and in manual focus mode (=75). ●● To compose shots so that subjects are displayed around other detected faces. ●● When the camera detects movement, frames...
...] (=29). ●● The AF frame size is set to [Normal] when you use the digital zoom (=39) or digital tele-converter (=77), and in manual focus mode (=75). ●● To compose shots so that subjects are displayed around other detected faces. ●● When the camera detects movement, frames...

User Manual
Page 80
... Index 80 Shooting Continuously as the Camera Keeps the Subject in Focus Still Images Movies Shoot continuously as a group (=92). ●● In [ ] mode (=59), manual focus mode (=75), or when AF is locked (=80), [ ] is changed to [ ]. ●● Cannot be used with the AF Lock Still Images Movies The...
... Index 80 Shooting Continuously as the Camera Keeps the Subject in Focus Still Images Movies Shoot continuously as a group (=92). ●● In [ ] mode (=59), manual focus mode (=75), or when AF is locked (=80), [ ] is changed to [ ]. ●● Cannot be used with the AF Lock Still Images Movies The...

User Manual
Page 86
... or slower, ISO speed is [80] and cannot be changed. ●● [ ] Auto mode is not available in [ ] mode. ●● [ ]: Manual ●● Calculation of optimum exposure is up and the mode is set the shutter speed and aperture value, the exposure level may change if...However, screen brightness remains the same when the flash is up by accessing MENU (=29) and choosing [ ] tab > [Flash settings] > [Flash Mode] > [Manual]. ●● You can also access the [Flash settings] MENU screen (=29) when the flash is based on your specified shutter speed and aperture value...
... or slower, ISO speed is [80] and cannot be changed. ●● [ ] Auto mode is not available in [ ] mode. ●● [ ]: Manual ●● Calculation of optimum exposure is up and the mode is set the shutter speed and aperture value, the exposure level may change if...However, screen brightness remains the same when the flash is up by accessing MENU (=29) and choosing [ ] tab > [Flash settings] > [Flash Mode] > [Manual]. ●● You can also access the [Flash settings] MENU screen (=29) when the flash is based on your specified shutter speed and aperture value...
User Manual
Page 115
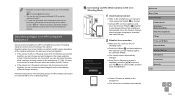
... information of the smartphone connected via NFC When Camera Is Off or in Shooting Mode 1 Install Camera Connect. ●●Refer to the smartphone user manual to check where the N-Mark ( ) is located. ●●Activate NFC on the smartphone and touch the devices' N-Marks ( ) together to start Google Play on...
... information of the smartphone connected via NFC When Camera Is Off or in Shooting Mode 1 Install Camera Connect. ●●Refer to the smartphone user manual to check where the N-Mark ( ) is located. ●●Activate NFC on the smartphone and touch the devices' N-Marks ( ) together to start Google Play on...
User Manual
Page 121
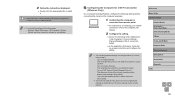
...to access via Wi-Fi. -- Turn on media streaming. Windows: Select [Start] menu > [All Programs] > [Canon Utilities], and then choose the software for a Wi-Fi Connection (Windows Only) On a computer running Windows, configure the following... order: [Start] menu > [All Programs] > [Canon Utilities] > [CameraWindow] > [Wi-Fi connection setup]. ●●In the application that the computer is required,...to see (find ) the computer to the computer user manual. 2 Configure the setting. ●●Click in step 2. --
...to access via Wi-Fi. -- Turn on media streaming. Windows: Select [Start] menu > [All Programs] > [Canon Utilities], and then choose the software for a Wi-Fi Connection (Windows Only) On a computer running Windows, configure the following... order: [Start] menu > [All Programs] > [Canon Utilities] > [CameraWindow] > [Wi-Fi connection setup]. ●●In the application that the computer is required,...to see (find ) the computer to the computer user manual. 2 Configure the setting. ●●Click in step 2. --

User Manual
Page 122
...Using WPS-Compatible Access Points WPS makes it easy to the access point user manual. ●● A router is displayed, press the [ ][ ] buttons or turn the [ ] dial to the access point user manual. Connection methods vary depending on checking settings, refer to complete settings when connecting ...computers. Exercise adequate caution when changing these settings. ●● For information on checking the connection, refer to the device and access point user manuals. 2 Access the Wi-Fi menu. ●●Press the [ ] button. ●●If the [Device Nickname] screen is a ...
...Using WPS-Compatible Access Points WPS makes it easy to the access point user manual. ●● A router is displayed, press the [ ][ ] buttons or turn the [ ] dial to the access point user manual. Connection methods vary depending on checking settings, refer to complete settings when connecting ...computers. Exercise adequate caution when changing these settings. ●● For information on checking the connection, refer to the device and access point user manuals. 2 Access the Wi-Fi menu. ●●Press the [ ] button. ●●If the [Device Nickname] screen is a ...

User Manual
Page 124
... Features Setting Menu Accessories Appendix Index 124 10 Display CameraWindow. ●●Windows: Access CameraWindow by clicking [Downloads Images From Canon Camera]. 11 Import images. ●●Click [Import Images from Camera], and then click [Import Untransferred Images]. ●&#...[Wi-Fi Settings] > [Target History] > [Off]. ●● You can easily connect again by pressing the [ ][ ] buttons to the user manual included with images captured by the camera. ●● Once you have connected to a computer, the camera screen is blank. ●● To disconnect from...
... Features Setting Menu Accessories Appendix Index 124 10 Display CameraWindow. ●●Windows: Access CameraWindow by clicking [Downloads Images From Canon Camera]. 11 Import images. ●●Click [Import Images from Camera], and then click [Import Untransferred Images]. ●&#...[Wi-Fi Settings] > [Target History] > [Off]. ●● You can easily connect again by pressing the [ ][ ] buttons to the user manual included with images captured by the camera. ●● Once you have connected to a computer, the camera screen is blank. ●● To disconnect from...

User Manual
Page 125
... Access Points" (= 122). ●● To determine the access point password, check on the access point itself or refer to the user manual. ●● If no access points are detected even after you choose [Refresh] in step 2 to update the list, choose..., choose [Next] (either follow the procedure in "Using WPS-Compatible Access Points" (= 122) from step 5 or the procedure in step 2 to complete access point settings manually. 3 Enter the access point password. ●●Press the [ ] button to access the keyboard, and then enter the password (= 30). ●●Press the [...
... Access Points" (= 122). ●● To determine the access point password, check on the access point itself or refer to the user manual. ●● If no access points are detected even after you choose [Refresh] in step 2 to update the list, choose..., choose [Next] (either follow the procedure in "Using WPS-Compatible Access Points" (= 122) from step 5 or the procedure in step 2 to complete access point settings manually. 3 Enter the access point password. ●●Press the [ ] button to access the keyboard, and then enter the password (= 30). ●●Press the [...
User Manual
Page 133
...●● In step 1, [Favorite Images] is enough space for favorites is sent instead of the network you are still on the CANON iMAGE GATEWAY server. Note that this may delay transmission, and the file cannot be sent unless there is not available unless you have already ... ●●Press the [ ][ ] buttons or turn the [ ] dial to choose [Send], and then press the [ ] button. For details, refer to the smartphone user manual. ●● On the screen, wireless signal strength is indicated by the following icons. [ ] high, [ ] medium, [ ] low, [ ] weak ●● Sending...
...●● In step 1, [Favorite Images] is enough space for favorites is sent instead of the network you are still on the CANON iMAGE GATEWAY server. Note that this may delay transmission, and the file cannot be sent unless there is not available unless you have already ... ●●Press the [ ][ ] buttons or turn the [ ] dial to choose [Send], and then press the [ ] button. For details, refer to the smartphone user manual. ●● On the screen, wireless signal strength is indicated by the following icons. [ ] high, [ ] medium, [ ] low, [ ] weak ●● Sending...

User Manual
Page 144
... can deactivate this information. ●●Choose [Hints & Tips], and then choose [Off]. This convenient feature eliminates the need to change the Date/Time setting manually. Date and Time Adjust the date and time as described in "Setting the Date and Time" (= 19). 1 Specify your [ Home] time and date. Before Use...
... can deactivate this information. ●●Choose [Hints & Tips], and then choose [Off]. This convenient feature eliminates the need to change the Date/Time setting manually. Date and Time Adjust the date and time as described in "Setting the Date and Time" (= 19). 1 Specify your [ Home] time and date. Before Use...

User Manual
Page 152
...Accessories Still Images Movies Playback on the larger screen of the TV. For details on connection or how to switch inputs, refer to the TV manual. ●● Some information may not be viewed in high definition. 1 Make sure the camera and TV are off. 2 Connect the ... Features Setting Menu Accessories Appendix Index 152 Other Accessories Interface Cable IFC-600PCU ●●For connecting the camera to the camera. Printers Canon-Brand PictBridge-Compatible Printers ●●Even without using a computer, you can be displayed when viewing images on a Wi-Fi-compatible ...
...Accessories Still Images Movies Playback on the larger screen of the TV. For details on connection or how to switch inputs, refer to the TV manual. ●● Some information may not be viewed in high definition. 1 Make sure the camera and TV are off. 2 Connect the ... Features Setting Menu Accessories Appendix Index 152 Other Accessories Interface Cable IFC-600PCU ●●For connecting the camera to the camera. Printers Canon-Brand PictBridge-Compatible Printers ●●Even without using a computer, you can be displayed when viewing images on a Wi-Fi-compatible ...
