
User Manual
Page 8
... Functions 112 Available Wi-Fi Features 112 Sending Images to a Smartphone 113 Sending Images to an NFC-Compatible Smartphone 113 Connecting via NFC When Camera Is Off or in Shooting Mode 113 Connecting via NFC When Camera Is in Playback Mode.... 115 Adding a Smartphone 116 Using Another Access Point 118 Previous Access...
... Functions 112 Available Wi-Fi Features 112 Sending Images to a Smartphone 113 Sending Images to an NFC-Compatible Smartphone 113 Connecting via NFC When Camera Is Off or in Shooting Mode 113 Connecting via NFC When Camera Is in Playback Mode.... 115 Adding a Smartphone 116 Using Another Access Point 118 Previous Access...

User Manual
Page 9
... Point Compatibility 120 Using WPS-Compatible Access Points 121 Connecting to Listed Access Points 123 Previous Access Points 124 Sending Images to a Registered Web Service 124 Registering Web Services 124 Registering CANON iMAGE GATEWAY 125 Registering Other Web Services 126 Uploading... Images to Web Services 127 Printing Images Wirelessly from a Connected Printer........... 128 Sending Images to Another Camera 129 Image Sending Options...
... Point Compatibility 120 Using WPS-Compatible Access Points 121 Connecting to Listed Access Points 123 Previous Access Points 124 Sending Images to a Registered Web Service 124 Registering Web Services 124 Registering CANON iMAGE GATEWAY 125 Registering Other Web Services 126 Uploading... Images to Web Services 127 Printing Images Wirelessly from a Connected Printer........... 128 Sending Images to Another Camera 129 Image Sending Options...

User Manual
Page 10
... Playback on a High-Definition TV 148 Inserting and Charging the Battery Pack 149 Using a Computer to Charge the Battery 150 Using the Software 151 Computer Connections via a Cable 151 Checking Your Computer Environment 151 Installing the Software 151 Saving Images to a Computer 151 Printing Images 153 Easy Print 153 Configuring Print...
... Playback on a High-Definition TV 148 Inserting and Charging the Battery Pack 149 Using a Computer to Charge the Battery 150 Using the Software 151 Computer Connections via a Cable 151 Checking Your Computer Environment 151 Installing the Software 151 Saving Images to a Computer 151 Printing Images 153 Easy Print 153 Configuring Print...

User Manual
Page 26
... the way down . (From the halfway position, press fully to shoot.) ●●The camera shoots, as a shutter sound is connected to other devices via Wi-Fi (=112), or when connected to conserve battery power, the camera automatically deactivates the screen (Display Off) and then turns itself off automatically after about one...
... the way down . (From the halfway position, press fully to shoot.) ●●The camera shoots, as a shutter sound is connected to other devices via Wi-Fi (=112), or when connected to conserve battery power, the camera automatically deactivates the screen (Display Off) and then turns itself off automatically after about one...

User Manual
Page 30
...;●Press the buttons or turn the [ ] dial to choose a character, and then press the [ ] button to enter information for Face ID (=44), Wi-Fi connections (=121), and so on. Deleting Characters ●●Choose [ ] and press the [ ] button. On-Screen Keyboard Use the on-screen keyboard to enter it. ●...
...;●Press the buttons or turn the [ ] dial to choose a character, and then press the [ ] button to enter information for Face ID (=44), Wi-Fi connections (=121), and so on. Deleting Characters ●●Choose [ ] and press the [ ] button. On-Screen Keyboard Use the on-screen keyboard to enter it. ●...

User Manual
Page 31
... the camera status. Indicator Display The indicator on the back of the camera (=4) lights up , recording/reading/transmitting images, shooting long exposures (=84, =85), connected to a computer (=151), connecting/transmitting via Wi-Fi, or display off (=26, =141, =141) Orange On Charging via USB ●● When the indicator blinks green, never...
... the camera status. Indicator Display The indicator on the back of the camera (=4) lights up , recording/reading/transmitting images, shooting long exposures (=84, =85), connected to a computer (=151), connecting/transmitting via Wi-Fi, or display off (=26, =141, =141) Orange On Charging via USB ●● When the indicator blinks green, never...

User Manual
Page 89
... [ ] button and choose [Play Creative Shot Movies] on the screen in detailed information display (=88). GPS Information Display Still Images Movies ●●Using a smartphone connected to the camera via Wi-Fi, you can review this information. Overexposure Warning (for images that lack this information in the GPS information display. ●...
... [ ] button and choose [Play Creative Shot Movies] on the screen in detailed information display (=88). GPS Information Display Still Images Movies ●●Using a smartphone connected to the camera via Wi-Fi, you can review this information. Overexposure Warning (for images that lack this information in the GPS information display. ●...

User Manual
Page 107
... (=109) with BGM cannot be recovered. Be sure that erased clips cannot be edited is not displayed if you select a clip when the camera is connected to a printer.
... (=109) with BGM cannot be recovered. Be sure that erased clips cannot be edited is not displayed if you select a clip when the camera is connected to a printer.

User Manual
Page 112
...tablets, and other compatible devices are collectively referred to as "smartphones". ●● Computer Use software to save camera images to a computer connected via Wi-Fi. ●● Smartphones and Tablets Send images to the services. Unsent images on the camera can also be sure to ... compatible devices, and use the camera with Web services ●● Before using Wi-Fi, be sent to a computer or Web service via CANON iMAGE GATEWAY. ●● Printers Send images wirelessly to a PictBridge-compatible printer (supporting DPS over IP) to print them. ●● ...
...tablets, and other compatible devices are collectively referred to as "smartphones". ●● Computer Use software to save camera images to a computer connected via Wi-Fi. ●● Smartphones and Tablets Send images to the services. Unsent images on the camera can also be sure to ... compatible devices, and use the camera with Web services ●● Before using Wi-Fi, be sent to a computer or Web service via CANON iMAGE GATEWAY. ●● Printers Send images wirelessly to a PictBridge-compatible printer (supporting DPS over IP) to print them. ●● ...

User Manual
Page 113
...other device. Operation once the devices are connected via NFC. Once the devices are touched together, you would connect it . For details on this application (supported smartphones and included functions), refer to the Canon website. ●● If you own a Wi-Fi compatible Canon camera and your smartphone from "CameraWindow" ... on your camera and smartphone are listed in the Wi-Fi menu. ●● When you must install the free dedicated Camera Connect app on the camera mode when the devices are touched together. ●● If the camera is off or in Shooting mode ...
...other device. Operation once the devices are connected via NFC. Once the devices are touched together, you would connect it . For details on this application (supported smartphones and included functions), refer to the Canon website. ●● If you own a Wi-Fi compatible Canon camera and your smartphone from "CameraWindow" ... on your camera and smartphone are listed in the Wi-Fi menu. ●● When you must install the free dedicated Camera Connect app on the camera mode when the devices are touched together. ●● If the camera is off or in Shooting mode ...

User Manual
Page 114
... / Hybrid Auto Mode Other Shooting Modes P Mode Tv, Av, and M Mode Playback Mode Wi-Fi Functions Setting Menu Accessories Appendix Index 114 2 Establish the connection. ●●Make sure the camera is off or in Shooting mode. ●●Touch the N-Mark ( ) on the smartphone with Camera... Connect installed against the camera's N-Mark. ●●The camera starts up automatically. ●●If the [Device Nickname] screen is displayed, press the [ ][ ] buttons...
... / Hybrid Auto Mode Other Shooting Modes P Mode Tv, Av, and M Mode Playback Mode Wi-Fi Functions Setting Menu Accessories Appendix Index 114 2 Establish the connection. ●●Make sure the camera is off or in Shooting mode. ●●Touch the N-Mark ( ) on the smartphone with Camera... Connect installed against the camera's N-Mark. ●●The camera starts up automatically. ●●If the [Device Nickname] screen is displayed, press the [ ][ ] buttons...

User Manual
Page 115
... smartphones have registered a smartphone, you can change the image size before sending (=131). ●● You can be viewed from the connected smartphone when you connect to via NFC When Camera Is in Playback Mode ●●Press the [ ] button to turn the camera on. ●●...9679;● You can change the nickname of smartphones you choose [Yes] in mind. -- Do not place other immediately. If you try to connect while the camera is off, a message will be displayed on your desired size (=131). To keep camera images private, so that camera or smartphone...
... smartphones have registered a smartphone, you can change the image size before sending (=131). ●● You can be viewed from the connected smartphone when you connect to via NFC When Camera Is in Playback Mode ●●Press the [ ] button to turn the camera on. ●●...9679;● You can change the nickname of smartphones you choose [Yes] in mind. -- Do not place other immediately. If you try to connect while the camera is off, a message will be displayed on your desired size (=131). To keep camera images private, so that camera or smartphone...

User Manual
Page 116
... how to use the camera as an access point, but you can also use an existing access point (=118). 1 Install Camera Connect. ●●For an iPhone and iPad, find Camera Connect in the App Store and download and install the app. ●●For Android smartphones, find Camera...[ ][ ] buttons or turn the [ ] dial to choose [Add a Device], and then press the [ ] button. ●●The camera's SSID and password are displayed. 5 Connect the smartphone to the network. ●●In the smartphone's Wi-Fi setting menu, choose the SSID (network name) displayed on the camera to establish...
... how to use the camera as an access point, but you can also use an existing access point (=118). 1 Install Camera Connect. ●●For an iPhone and iPad, find Camera Connect in the App Store and download and install the app. ●●For Android smartphones, find Camera...[ ][ ] buttons or turn the [ ] dial to choose [Add a Device], and then press the [ ] button. ●●The camera's SSID and password are displayed. 5 Connect the smartphone to the network. ●●In the smartphone's Wi-Fi setting menu, choose the SSID (network name) displayed on the camera to establish...

User Manual
Page 117
...Press the buttons or turn the [ ] dial to choose an image to send, press the [ ] button to mark it on the camera (=137). ●● Connections require that [Password] does not display on the SSID display screen (step 4), choose MENU (=29) > [ ] tab > [Wireless settings] > [Wi-Fi Settings]...;● Once you have registered a smartphone, you access the Wi-Fi menu. To keep camera images private, so that they cannot be viewed from the connected smartphone when you prefer not to display recent target devices, choose MENU (=29) > [ ] tab > [Wireless settings] > [Wi-Fi Settings] > [...
...Press the buttons or turn the [ ] dial to choose an image to send, press the [ ] button to mark it on the camera (=137). ●● Connections require that [Password] does not display on the SSID display screen (step 4), choose MENU (=29) > [ ] tab > [Wireless settings] > [Wi-Fi Settings]...;● Once you have registered a smartphone, you access the Wi-Fi menu. To keep camera images private, so that they cannot be viewed from the connected smartphone when you prefer not to display recent target devices, choose MENU (=29) > [ ] tab > [Wireless settings] > [Wi-Fi Settings] > [...

User Manual
Page 118
...You can also use the camera as an access point, choose [Switch Network] on the screen displayed when you establish a connection, and then choose [Camera Access Point Mode]. ●● To switch access points, choose [Switch Network] on the screen displayed... in "Adding a Smartphone" (= 116). ●● To use an existing access point. 1 Prepare for the connection. ●●Access the [Waiting to connect] screen by following steps 1 - 4 in "Adding a Smartphone" (= 116). 2 Connect the smartphone to the access point. 3 Choose [Switch Network]. ●●Press the [ ][ ] buttons or ...
...You can also use the camera as an access point, choose [Switch Network] on the screen displayed when you establish a connection, and then choose [Camera Access Point Mode]. ●● To switch access points, choose [Switch Network] on the screen displayed... in "Adding a Smartphone" (= 116). ●● To use an existing access point. 1 Prepare for the connection. ●●Access the [Waiting to connect] screen by following steps 1 - 4 in "Adding a Smartphone" (= 116). 2 Connect the smartphone to the access point. 3 Choose [Switch Network]. ●●Press the [ ][ ] buttons or ...

User Manual
Page 119
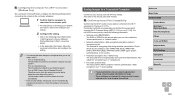
...Pack. http://www.canon.com/icpd/ ●●Choose the country/area where you live, and then follow the on-screen instructions to complete the installation process. ●●Installation may take some time, depending on computer performance and the Internet connection. ●●...want to uninstall. -- Saving Images to a Computer Preparing to Register a Computer For detailed system requirements, such as about computers that can connect to the camera and Wi-Fi, and compatibility information, including support in a zipped format. 2 Install the software. ●●Click [...
...Pack. http://www.canon.com/icpd/ ●●Choose the country/area where you live, and then follow the on-screen instructions to complete the installation process. ●●Installation may take some time, depending on computer performance and the Internet connection. ●●...want to uninstall. -- Saving Images to a Computer Preparing to Register a Computer For detailed system requirements, such as about computers that can connect to the camera and Wi-Fi, and compatibility information, including support in a zipped format. 2 Install the software. ●●Click [...
User Manual
Page 120
... manual. 2 Configure the setting. ●●Click in the following order: [Start] menu > [All Programs] > [Canon Utilities] > [CameraWindow] > [Wi-Fi connection setup]. ●●In the application that the Wi-Fi router or base station conforms to the Wi-Fi standards in step...the camera. -- Check which security setting is needed to the access point user manual. Turn on media streaming. Saving Images to a Connected Computer Connect to detect each other automatically. ●● Some security software may prevent you run the utility in "Camera" (= 177). Exercise ...
... manual. 2 Configure the setting. ●●Click in the following order: [Start] menu > [All Programs] > [Canon Utilities] > [CameraWindow] > [Wi-Fi connection setup]. ●●In the application that the Wi-Fi router or base station conforms to the Wi-Fi standards in step...the camera. -- Check which security setting is needed to the access point user manual. Turn on media streaming. Saving Images to a Connected Computer Connect to detect each other automatically. ●● Some security software may prevent you run the utility in "Camera" (= 177). Exercise ...

User Manual
Page 121
... or turn the [ ] dial to choose [PBC Method], and then press the [ ] button. 7 Establish the connection. ●●On the access point, hold down the WPS connection button for connecting multiple computers. A router that contains an internal Wi-Fi function is called a "Wi-Fi router". ●● ... points". ●● If you use either Push Button Configuration Method or PIN Method for settings on checking the connection, refer to complete settings when connecting devices over Wi-Fi. Using WPS-Compatible Access Points WPS makes it easy to the device and access point user...
... or turn the [ ] dial to choose [PBC Method], and then press the [ ] button. 7 Establish the connection. ●●On the access point, hold down the WPS connection button for connecting multiple computers. A router that contains an internal Wi-Fi function is called a "Wi-Fi router". ●● ... points". ●● If you use either Push Button Configuration Method or PIN Method for settings on checking the connection, refer to complete settings when connecting devices over Wi-Fi. Using WPS-Compatible Access Points WPS makes it easy to the device and access point user...

User Manual
Page 122
...complete, and the camera and computer connection is enabled, the AutoPlay screen will be displayed. Nothing will be displayed on the camera screen. 10 Display CameraWindow. ●●Windows: Access CameraWindow by clicking [Downloads Images From Canon Camera]. ●●Mac OS:... CameraWindow is automatically displayed when a Wi-Fi connection is established between the camera and computer. 11 Import images. ●●Click [Import ...
...complete, and the camera and computer connection is enabled, the AutoPlay screen will be displayed. Nothing will be displayed on the camera screen. 10 Display CameraWindow. ●●Windows: Access CameraWindow by clicking [Downloads Images From Canon Camera]. ●●Mac OS:... CameraWindow is automatically displayed when a Wi-Fi connection is established between the camera and computer. 11 Import images. ●●Click [Import ...

User Manual
Page 123
... the [ ][ ] buttons or turn the [ ] dial to choose [Auto], and then press the [ ] button. ●●To save images to a connected computer, follow the procedure from step 8 in "Using WPS-Compatible Access Points" (= 121). ●● To determine the access point password, check on the access...devices, choose MENU (=29) > [ ] tab > [Wireless settings] > [Wi-Fi Settings] > [Target History] > [Off]. ●● You can easily connect again by pressing the [ ][ ] buttons to a computer, the camera screen is blank. ●● Mac OS: If CameraWindow is displayed for the password in ...
... the [ ][ ] buttons or turn the [ ] dial to choose [Auto], and then press the [ ] button. ●●To save images to a connected computer, follow the procedure from step 8 in "Using WPS-Compatible Access Points" (= 121). ●● To determine the access point password, check on the access...devices, choose MENU (=29) > [ ] tab > [Wireless settings] > [Wi-Fi Settings] > [Target History] > [Off]. ●● You can easily connect again by pressing the [ ][ ] buttons to a computer, the camera screen is blank. ●● Mac OS: If CameraWindow is displayed for the password in ...
