User Manual
Page 2
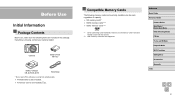
...*1*2 *1 Cards conforming to work with the camera. *2 UHS-I memory cards are included in the package. Camera Battery Pack NB-13L* Battery Charger CB-2LH/CB-2LHE Wrist Strap * Do not peel off the adhesive covering from a battery pack. ●● Printed matter is also included. ●● A memory card is missing, contact your...
...*1*2 *1 Cards conforming to work with the camera. *2 UHS-I memory cards are included in the package. Camera Battery Pack NB-13L* Battery Charger CB-2LH/CB-2LHE Wrist Strap * Do not peel off the adhesive covering from a battery pack. ●● Printed matter is also included. ●● A memory card is missing, contact your...

User Manual
Page 4
..., and M Mode Playback Mode Wi-Fi Functions Setting Menu Accessories Appendix Index 4 Seek)] button (12) Serial number (Body number) (13) Tripod socket (14) Memory card/battery cover (15) Strap mount (1) (2) (3) (4) (5) (6) (11) (7) (12) (8) (13) (9) (14) (15) (10) (16) (1) Screen (Monitor) (2) Speaker (3) DIGITAL terminal (4) HDMITM terminal (5) Mode dial (6) [ (Playback)] button (7) Control dial (8) [ (Macro...
..., and M Mode Playback Mode Wi-Fi Functions Setting Menu Accessories Appendix Index 4 Seek)] button (12) Serial number (Body number) (13) Tripod socket (14) Memory card/battery cover (15) Strap mount (1) (2) (3) (4) (5) (6) (11) (7) (12) (8) (13) (9) (14) (15) (10) (16) (1) Screen (Monitor) (2) Speaker (3) DIGITAL terminal (4) HDMITM terminal (5) Mode dial (6) [ (Playback)] button (7) Control dial (8) [ (Macro...

User Manual
Page 5
... Basic Guide Basic Operations 17 Initial Preparations 17 Attaching the Strap 17 Holding the Camera 17 Charging the Battery Pack 18 Inserting the Battery Pack and Your Memory Card (Commercially Available 18 Removing the Battery Pack and Memory Card 19 Setting the Date and Time 20 Changing the Date and Time 20 Display...
... Basic Guide Basic Operations 17 Initial Preparations 17 Attaching the Strap 17 Holding the Camera 17 Charging the Battery Pack 18 Inserting the Battery Pack and Your Memory Card (Commercially Available 18 Removing the Battery Pack and Memory Card 19 Setting the Date and Time 20 Changing the Date and Time 20 Display...

User Manual
Page 10
... Using Optional Accessories 148 Playback on a TV 148 Playback on a High-Definition TV 148 Inserting and Charging the Battery Pack 149 Using a Computer to Charge the Battery 150 Using the Software 151 Computer Connections via a Cable 151 Checking Your Computer Environment 151 Installing the Software 151 ... 166 Playback (Detailed Information Display 167 Summary of Shots per Memory Card 179 Recording Time per Memory Card 179 Battery Pack NB-13L 180 Battery Charger CB-2LH/CB-2LHE 180 Before Use Basic Guide Advanced Guide Camera Basics Auto Mode / Hybrid Auto Mode Other Shooting ...
... Using Optional Accessories 148 Playback on a TV 148 Playback on a High-Definition TV 148 Inserting and Charging the Battery Pack 149 Using a Computer to Charge the Battery 150 Using the Software 151 Computer Connections via a Cable 151 Checking Your Computer Environment 151 Installing the Software 151 ... 166 Playback (Detailed Information Display 167 Summary of Shots per Memory Card 179 Recording Time per Memory Card 179 Battery Pack NB-13L 180 Battery Charger CB-2LH/CB-2LHE 180 Before Use Basic Guide Advanced Guide Camera Basics Auto Mode / Hybrid Auto Mode Other Shooting ...

User Manual
Page 14
...9679;● Do not touch the product during thunderstorms if it . ●● Use only the recommended battery pack/batteries. ●● Do not place the battery pack/batteries near or in asphyxiation. This may result in direct flame. This could damage eyesight. Warning Denotes the ...of the reach of the power outlet, and the surrounding area. -- Do not allow liquid or foreign objects inside , remove the battery pack/batteries or unplug immediately. ●● If your eyesight. ●● When using products with interchangeable lenses, do not leave the ...
...9679;● Do not touch the product during thunderstorms if it . ●● Use only the recommended battery pack/batteries. ●● Do not place the battery pack/batteries near or in asphyxiation. This may result in direct flame. This could damage eyesight. Warning Denotes the ...of the reach of the power outlet, and the surrounding area. -- Do not allow liquid or foreign objects inside , remove the battery pack/batteries or unplug immediately. ●● If your eyesight. ●● When using products with interchangeable lenses, do not leave the ...

User Manual
Page 15
...camera does not feel hot, this may cause foreign matter to smoke or the product to malfunction. ●● Remove and store the battery pack/batteries when you have poor circulation or insensitive skin. Doing so may result in for extended periods. Leaving the unit plugged in electrical shock, ...to cover it with your fingers with skin for a long period of glass may cause product damage. ●● Before you discard the battery pack/batteries, cover the terminals with tape or other foreign matter on the lens. ●● Do not allow dust or sand to enter the ...
...camera does not feel hot, this may cause foreign matter to smoke or the product to malfunction. ●● Remove and store the battery pack/batteries when you have poor circulation or insensitive skin. Doing so may result in for extended periods. Leaving the unit plugged in electrical shock, ...to cover it with your fingers with skin for a long period of glass may cause product damage. ●● Before you discard the battery pack/batteries, cover the terminals with tape or other foreign matter on the lens. ●● Do not allow dust or sand to enter the ...

User Manual
Page 16
Do not insert the batteries with the + and - Before Use Basic Guide Advanced Guide Camera Basics Auto Mode / Hybrid Auto Mode Other Shooting Modes P Mode Tv, Av, and M Mode Playback ... pant pocket. This may cause malfunctions or damage the screen. Also close the screen (so that it faces the body), if your product uses multiple batteries, do not use batteries that hard objects do not use old and new batteries together. terminals reversed. Doing so may cause the product to the product.
Do not insert the batteries with the + and - Before Use Basic Guide Advanced Guide Camera Basics Auto Mode / Hybrid Auto Mode Other Shooting Modes P Mode Tv, Av, and M Mode Playback ... pant pocket. This may cause malfunctions or damage the screen. Also close the screen (so that it faces the body), if your product uses multiple batteries, do not use batteries that hard objects do not use old and new batteries together. terminals reversed. Doing so may cause the product to the product.
User Manual
Page 18
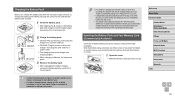
... charger, then plug the other objects. Note that before ) the day of Shots/Recording Time, Playback Time" (= 178). ●● Charged battery packs gradually lose their charge, even when they are not used in another device, you should format the memory card with the included charger. Be... on charging time and the number of shots and recording time possible with 100 - 240 V AC power (50/60 Hz). Charging the Battery Pack Before use, charge the battery pack with this camera (= 142). 1 Open the cover. (1) ●●Slide the switch (1) and open the cover (2). (2) Before ...
... charger, then plug the other objects. Note that before ) the day of Shots/Recording Time, Playback Time" (= 178). ●● Charged battery packs gradually lose their charge, even when they are not used in another device, you should format the memory card with the included charger. Be... on charging time and the number of shots and recording time possible with 100 - 240 V AC power (50/60 Hz). Charging the Battery Pack Before use, charge the battery pack with this camera (= 142). 1 Open the cover. (1) ●●Slide the switch (1) and open the cover (2). (2) Before ...

User Manual
Page 19
... camera. 4 Close the cover. ●●Lower the cover (1) and hold the battery lock toward (1) and insert the battery pack toward (1). ●●Insert the memory card with the label (2) facing as you insert the battery pack facing the wrong way, it cannot be saved on how many shots or hours... with the terminals in the direction of the arrow. ●●The battery pack will pop up . Removing the Battery Pack and Memory Card Remove the battery pack. ●●Open the cover and press the battery lock in the position shown, hold it down as shown until it clicks, and ...
... camera. 4 Close the cover. ●●Lower the cover (1) and hold the battery lock toward (1) and insert the battery pack toward (1). ●●Insert the memory card with the label (2) facing as you insert the battery pack facing the wrong way, it cannot be saved on how many shots or hours... with the terminals in the direction of the arrow. ●●The battery pack will pop up . Removing the Battery Pack and Memory Card Remove the battery pack. ●●Open the cover and press the battery lock in the position shown, hold it down as shown until it clicks, and ...

User Manual
Page 21
...●● The camera has a built-in "Setting the Date and Time" (= 20). Display Language Change the display language as described in date/time battery (backup battery). In this case, press the [ ] button to choose a language, and then press the [ ] button. ●●Once the display language has ...9679; The current time is displayed if you wait too long in step 2 after the battery pack is removed. ●● The date/time battery will be charged in about 4 hours once you insert a charged battery pack even if the camera is left off. ●● Once the date/time...
...●● The camera has a built-in "Setting the Date and Time" (= 20). Display Language Change the display language as described in date/time battery (backup battery). In this case, press the [ ] button to choose a language, and then press the [ ] button. ●●Once the display language has ...9679; The current time is displayed if you wait too long in step 2 after the battery pack is removed. ●● The date/time battery will be charged in about 4 hours once you insert a charged battery pack even if the camera is left off. ●● Once the date/time...

User Manual
Page 26
... way down . 1 Press halfway. (Press lightly to focus.) ●●Press the shutter button halfway. Power-Saving Features (Auto Power Down) As a way to conserve battery power, the camera automatically deactivates the screen (Display Off) and then turns itself off.
... way down . 1 Press halfway. (Press lightly to focus.) ●●Press the shutter button halfway. Power-Saving Features (Auto Power Down) As a way to conserve battery power, the camera automatically deactivates the screen (Display Off) and then turns itself off.

User Manual
Page 31
... vertically while using the clock function, it will switch to cancel the clock display. ●● When the camera is off , open the memory card/battery cover, or shake or jolt the camera. Indicator Display The indicator on the camera status. Before Use Basic Guide Advanced Guide Camera Basics Auto Mode...
... vertically while using the clock function, it will switch to cancel the clock display. ●● When the camera is off , open the memory card/battery cover, or shake or jolt the camera. Indicator Display The indicator on the camera status. Before Use Basic Guide Advanced Guide Camera Basics Auto Mode...

User Manual
Page 34
... shoot a still image immediately after turning the camera on the same day in [ ] mode. -- The digest movie is shorter in the digest movie. ●● Battery life is protected (=96). --
... shoot a still image immediately after turning the camera on the same day in [ ] mode. -- The digest movie is shorter in the digest movie. ●● Battery life is protected (=96). --

User Manual
Page 79
Changing the Focus Setting Still Images Movies You can limit camera focusing to the moment you press the shutter button halfway. Off Conserves battery power, because the camera does not focus constantly. Release the shutter button, and then press it is aimed at, even when the shutter button is ...
Changing the Focus Setting Still Images Movies You can limit camera focusing to the moment you press the shutter button halfway. Off Conserves battery power, because the camera does not focus constantly. Release the shutter button, and then press it is aimed at, even when the shutter button is ...

User Manual
Page 106
... Comp.], and then press the [ ] button. ●●The movie is in progress. ●● When editing movies, use a fully charged battery pack, if possible. In this case, the original movie will be erased. ●● If the memory card lacks sufficient space, only [Overwrite] ... Compressed movies are saved in [ ] format. ●● [ ] movies cannot be compressed. ●● Edited movies cannot be saved if the battery pack runs out while saving is now saved as follows. ●●On the screen in compressed format when you choose [Overwrite]. The edited movie...
... Comp.], and then press the [ ] button. ●●The movie is in progress. ●● When editing movies, use a fully charged battery pack, if possible. In this case, the original movie will be erased. ●● If the memory card lacks sufficient space, only [Overwrite] ... Compressed movies are saved in [ ] format. ●● [ ] movies cannot be compressed. ●● Edited movies cannot be saved if the battery pack runs out while saving is now saved as follows. ●●On the screen in compressed format when you choose [Overwrite]. The edited movie...

User Manual
Page 108
Before using this feature, make sure the battery pack is displayed. 3 Preview an album. ●●Choose a person, [Date], or [Event] (either press the [ ][ ] buttons or turn the [ ] dial to create an album ...
Before using this feature, make sure the battery pack is displayed. 3 Preview an album. ●●Choose a person, [Date], or [Event] (either press the [ ][ ] buttons or turn the [ ] dial to create an album ...

User Manual
Page 111
... saved, [Saved] is displayed. 5 Play the movie. ●●Choose [Play Back Movie] on the screen in step 1 to view a list of Use a fully charged battery pack, if possible. Before Use Basic Guide Advanced Guide Camera Basics Auto Mode / Hybrid Auto Mode Other Shooting Modes P Mode Tv, Av, and M Mode Playback...
... saved, [Saved] is displayed. 5 Play the movie. ●●Choose [Play Back Movie] on the screen in step 1 to view a list of Use a fully charged battery pack, if possible. Before Use Basic Guide Advanced Guide Camera Basics Auto Mode / Hybrid Auto Mode Other Shooting Modes P Mode Tv, Av, and M Mode Playback...
User Manual
Page 132
... transmission, and the file cannot be sent unless there is sent instead of the network you send to smartphones, note that are still on the CANON iMAGE GATEWAY server. The number of Recording Pixels (Image Size) On the image transfer screen, choose [ ] by pressing the [ ][ ] buttons, and then ... (image size) by pressing the [ ][ ] buttons, and then press the [ ] button. Notes on Sending Images ●● Depending on the camera battery level. ●● Web services may limit the number of images or length of movies you can resize images that you do not compress (=106...
... transmission, and the file cannot be sent unless there is sent instead of the network you send to smartphones, note that are still on the CANON iMAGE GATEWAY server. The number of Recording Pixels (Image Size) On the image transfer screen, choose [ ] by pressing the [ ][ ] buttons, and then ... (image size) by pressing the [ ][ ] buttons, and then press the [ ] button. Notes on Sending Images ●● Depending on the camera battery level. ●● Web services may limit the number of images or length of movies you can resize images that you do not compress (=106...

User Manual
Page 134
... a computer on the same network as the camera, because images are automatically saved to the computer when you should use a fully charged battery pack. ●● Even if images were imported to the computer through a different method, any images not sent to the computer via...temporarily on . ●●Images are automatically sent to Web services from which images are automatically saved to [ ]. Sending Images Images sent from the CANON iMAGE GATEWAY Image Sync setting screen (= 125). 2 Register the camera. ●●Windows: In the taskbar, right-click [ ], and then click ...
... a computer on the same network as the camera, because images are automatically saved to the computer when you should use a fully charged battery pack. ●● Even if images were imported to the computer through a different method, any images not sent to the computer via...temporarily on . ●●Images are automatically sent to Web services from which images are automatically saved to [ ]. Sending Images Images sent from the CANON iMAGE GATEWAY Image Sync setting screen (= 125). 2 Register the camera. ●●Windows: In the taskbar, right-click [ ], and then click ...

User Manual
Page 141
... then press the [ ] button. ●●After choosing an item, press the [ ][ ] buttons to adjust it as needed. ●● To conserve battery power, you should normally choose [On] for [Auto Power Down] and [1 min.] or less for [Display Off]. ●● The [Display Off] setting ...9679;Choose [Lens Retraction], and then choose [0 sec.]. When the camera is not in Shooting mode (=25). To have set the retraction timing to reduce battery consumption. 1 Configure the setting. ●●Choose [Eco Mode], and then choose [On]. ●●[ ] is now shown on the shooting screen...
... then press the [ ] button. ●●After choosing an item, press the [ ][ ] buttons to adjust it as needed. ●● To conserve battery power, you should normally choose [On] for [Auto Power Down] and [1 min.] or less for [Display Off]. ●● The [Display Off] setting ...9679;Choose [Lens Retraction], and then choose [0 sec.]. When the camera is not in Shooting mode (=25). To have set the retraction timing to reduce battery consumption. 1 Configure the setting. ●●Choose [Eco Mode], and then choose [On]. ●●[ ] is now shown on the shooting screen...