User Guide
Page 1
... / Hybrid Auto Mode 3 Other Shooting Modes 4 P Mode 5 Tv, Av, M, C1, and C2 Mode 6 Playback Mode 7 Wi-Fi Functions 8 Setting Menu 9 Accessories 10 Appendix Index ©CANON INC. 2014 CDD-E598-010 1 Camera User Guide ENGLISH ●● Make sure you read this guide, including the "Safety Precautions" (= 14) section, before using...
... / Hybrid Auto Mode 3 Other Shooting Modes 4 P Mode 5 Tv, Av, M, C1, and C2 Mode 6 Playback Mode 7 Wi-Fi Functions 8 Setting Menu 9 Accessories 10 Appendix Index ©CANON INC. 2014 CDD-E598-010 1 Camera User Guide ENGLISH ●● Make sure you read this guide, including the "Safety Precautions" (= 14) section, before using...
User Guide
Page 2
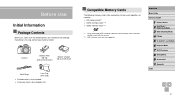
Before Use Basic Guide Advanced Guide 1 Camera Basics 2 Auto Mode / Hybrid Auto Mode 3 Other Shooting Modes 4 P Mode 5 Tv, Av, M, C1, and C2 Mode 6 Playback Mode 7 Wi-Fi Functions 8 Setting Menu 9 Accessories 10 Appendix Index 2 If anything is not included (=2). Before Use Initial Information Package Contents Before use, make sure the following memory cards (sold separately) can be used, regardless of capacity. ●● SD memory cards*1 ●● SDHC memory cards *1*2 ●● SDXC memory cards*1*2 *1 Cards conforming to work with cord) ●● Printed ...
Before Use Basic Guide Advanced Guide 1 Camera Basics 2 Auto Mode / Hybrid Auto Mode 3 Other Shooting Modes 4 P Mode 5 Tv, Av, M, C1, and C2 Mode 6 Playback Mode 7 Wi-Fi Functions 8 Setting Menu 9 Accessories 10 Appendix Index 2 If anything is not included (=2). Before Use Initial Information Package Contents Before use, make sure the following memory cards (sold separately) can be used, regardless of capacity. ●● SD memory cards*1 ●● SDHC memory cards *1*2 ●● SDXC memory cards*1*2 *1 Cards conforming to work with cord) ●● Printed ...
User Guide
Page 3
... (approx.) (12) Lens (13) Lens hood/filter adapter mount (14) [ (Framing Assist - If covered, remove the film before contacting a Canon Customer Support Help Desk. ●● Although the LCD monitor and viewfinder are not liable for any malfunction of a camera or accessory, including memory ...; The camera warranty is machine readable. ●● Images recorded by the camera shall be for personal use . Please note that Canon Inc., its subsidiaries and affiliates, and its distributors are produced under extremely high-precision manufacturing conditions and more than 99.99% of the...
... (approx.) (12) Lens (13) Lens hood/filter adapter mount (14) [ (Framing Assist - If covered, remove the film before contacting a Canon Customer Support Help Desk. ●● Although the LCD monitor and viewfinder are not liable for any malfunction of a camera or accessory, including memory ...; The camera warranty is machine readable. ●● Images recorded by the camera shall be for personal use . Please note that Canon Inc., its subsidiaries and affiliates, and its distributors are produced under extremely high-precision manufacturing conditions and more than 99.99% of the...

User Guide
Page 4
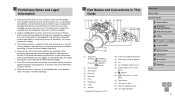
Before Use Basic Guide Advanced Guide 1 Camera Basics 2 Auto Mode / Hybrid Auto Mode 3 Other Shooting Modes 4 P Mode 5 Tv, Av, M, C1, and C2 Mode 6 Playback Mode 7 Wi-Fi Functions 8 Setting Menu 9 Accessories 10 Appendix Index 4 (4) (5) (6) (7) (8) (9) (13) (3) (14) (15) (2) (16) (1) (17) (18) (19) (10)(11) (12) (22) (21) (20) (1) Screen (LCD monitor) (2) Wi-Fi antenna area (3) Diopter adjustment dial (4) Viewfinder (5) Hot shoe (6) Power button (7) [ (Shortcut)] button (8) Remote terminal (9) AV OUT (Audio/video output) / DIGITAL terminal (10) Indicator (11) [ (Playback)] button...
Before Use Basic Guide Advanced Guide 1 Camera Basics 2 Auto Mode / Hybrid Auto Mode 3 Other Shooting Modes 4 P Mode 5 Tv, Av, M, C1, and C2 Mode 6 Playback Mode 7 Wi-Fi Functions 8 Setting Menu 9 Accessories 10 Appendix Index 4 (4) (5) (6) (7) (8) (9) (13) (3) (14) (15) (2) (16) (1) (17) (18) (19) (10)(11) (12) (22) (21) (20) (1) Screen (LCD monitor) (2) Wi-Fi antenna area (3) Diopter adjustment dial (4) Viewfinder (5) Hot shoe (6) Power button (7) [ (Shortcut)] button (8) Remote terminal (9) AV OUT (Audio/video output) / DIGITAL terminal (10) Indicator (11) [ (Playback)] button...
User Guide
Page 5
Table of Contents Before Use Initial Information 2 Package Contents 2 Compatible Memory Cards 2 Preliminary Notes and Legal Information 3 Part Names and Conventions in This Guide 3 Common Camera Operations 12 Safety Precautions 14 Basic Guide Basic Operations 17 Initial Preparations 17 Attaching Accessories 17 Holding the Camera 18 Charging the Battery Pack 18 Inserting the Battery Pack and Memory Card 19 Using the Screen 20 Adjusting the Screen Angle and Orientation 20 Setting the Date and Time 20 Changing the Date and Time 21 Display Language 21 Trying the Camera Out 22 ...
Table of Contents Before Use Initial Information 2 Package Contents 2 Compatible Memory Cards 2 Preliminary Notes and Legal Information 3 Part Names and Conventions in This Guide 3 Common Camera Operations 12 Safety Precautions 14 Basic Guide Basic Operations 17 Initial Preparations 17 Attaching Accessories 17 Holding the Camera 18 Charging the Battery Pack 18 Inserting the Battery Pack and Memory Card 19 Using the Screen 20 Adjusting the Screen Angle and Orientation 20 Setting the Date and Time 20 Changing the Date and Time 21 Display Language 21 Trying the Camera Out 22 ...

User Guide
Page 6
Seek 40 Easily Composing Shots after Manual Zooming (Framing Assist - Easily Reacquiring Subjects after Manual Zooming (Framing Assist - Lock 41 Auto Zooming to Keep Faces at a Constant Size 42 Adjusting the Constant Face Display Size 42 Easily Reacquiring Subjects with Auto Zooming (Seek Assist 43 Using the Self-Timer 44 Using the Self-Timer to Avoid Camera Shake 44 Customizing the Self-Timer 44 Adding a Date Stamp 45 Continuous Shooting 46 Image Display during Playback 46 Using Face ID 47 Personal Information 47 Registering Face ID Information 47 Shooting 48 Checking and ...
Seek 40 Easily Composing Shots after Manual Zooming (Framing Assist - Easily Reacquiring Subjects after Manual Zooming (Framing Assist - Lock 41 Auto Zooming to Keep Faces at a Constant Size 42 Adjusting the Constant Face Display Size 42 Easily Reacquiring Subjects with Auto Zooming (Seek Assist 43 Using the Self-Timer 44 Using the Self-Timer to Avoid Camera Shake 44 Customizing the Self-Timer 44 Adding a Date Stamp 45 Continuous Shooting 46 Image Display during Playback 46 Using Face ID 47 Personal Information 47 Registering Face ID Information 47 Shooting 48 Checking and ...
User Guide
Page 7
Sound Settings 68 Adjusting the Recording Volume 68 Deactivating the Wind Filter 69 Using the Attenuator 69 Shooting iFrame Movies 69 Shooting Super Slow Motion Movies 70 4 P Mode 71 Shooting in Program AE ([P] Mode 71 Image Brightness (Exposure 72 Adjusting Image Brightness (Exposure Compensation 72 Locking Image Brightness / Exposure (AE Lock 72 Changing the Metering Method 72 Linking the Spot AE Point Frame to the AF Frame 73 Changing the ISO Speed 73 Adjusting ISO Auto Settings 74 Changing the Noise Reduction Level (High ISO NR 74 Auto Exposure Bracketing (AEB Shooting 74 ...
Sound Settings 68 Adjusting the Recording Volume 68 Deactivating the Wind Filter 69 Using the Attenuator 69 Shooting iFrame Movies 69 Shooting Super Slow Motion Movies 70 4 P Mode 71 Shooting in Program AE ([P] Mode 71 Image Brightness (Exposure 72 Adjusting Image Brightness (Exposure Compensation 72 Locking Image Brightness / Exposure (AE Lock 72 Changing the Metering Method 72 Linking the Spot AE Point Frame to the AF Frame 73 Changing the ISO Speed 73 Adjusting ISO Auto Settings 74 Changing the Noise Reduction Level (High ISO NR 74 Auto Exposure Bracketing (AEB Shooting 74 ...
User Guide
Page 8
Menu Layout 97 Choosing Items to Buttons 96 Customizing the FUNC. Menu (FUNC. 5 Tv, Av, M, C1, and C2 Mode 92 Specific Shutter Speeds ([Tv] Mode 92 Specific Aperture Values ([Av] Mode 93 Specific Shutter Speeds and Aperture Values ([M] Mode)...... 93 Adjusting the Flash Output 94 Recording Movies at Specific Shutter Speeds and Aperture Values 95 Changing Settings during Recording 95 Customization for Image Highlights 103 Histogram 103 RGB Histogram, GPS Information Display 103 Viewing Short Movies Created When Shooting Still Images (Digest Movies 104 Viewing by Date 104 ...
Menu Layout 97 Choosing Items to Buttons 96 Customizing the FUNC. Menu (FUNC. 5 Tv, Av, M, C1, and C2 Mode 92 Specific Shutter Speeds ([Tv] Mode 92 Specific Aperture Values ([Av] Mode 93 Specific Shutter Speeds and Aperture Values ([M] Mode)...... 93 Adjusting the Flash Output 94 Recording Movies at Specific Shutter Speeds and Aperture Values 95 Changing Settings during Recording 95 Customization for Image Highlights 103 Histogram 103 RGB Histogram, GPS Information Display 103 Viewing Short Movies Created When Shooting Still Images (Digest Movies 104 Viewing by Date 104 ...
User Guide
Page 9
... Access Points 130 Connecting to Listed Access Points 132 Previous Access Points 132 Sending Images to a Registered Web Service 133 Registering Web Services 133 Registering CANON iMAGE GATEWAY 133 Registering Other Web Services 135 Uploading Images to Web Services 135 Printing Images Wirelessly from a Connected Printer........... 136 Sending Images to Another...
... Access Points 130 Connecting to Listed Access Points 132 Previous Access Points 132 Sending Images to a Registered Web Service 133 Registering Web Services 133 Registering CANON iMAGE GATEWAY 133 Registering Other Web Services 135 Uploading Images to Web Services 135 Printing Images Wirelessly from a Connected Printer........... 136 Sending Images to Another...
User Guide
Page 10
Electronic Level Calibration 150 Resetting the Electronic Level 150 Setting Copyright Information to Record in Images 151 Deleting All Copyright Information 151 Checking Certification Logos 151 Display Language 152 Adjusting Other Settings 152 Restoring Defaults 152 9 Accessories 153 System Map 154 Optional Accessories 155 Power Supplies 155 Flash Units 155 Other Accessories 155 Printers 156 Using Optional Accessories 157 Playback on a TV 157 Playback on a High-Definition TV 157 Playback on a Standard-Definition TV 158 Powering the Camera with Household Power 158 Using an ...
Electronic Level Calibration 150 Resetting the Electronic Level 150 Setting Copyright Information to Record in Images 151 Deleting All Copyright Information 151 Checking Certification Logos 151 Display Language 152 Adjusting Other Settings 152 Restoring Defaults 152 9 Accessories 153 System Map 154 Optional Accessories 155 Power Supplies 155 Flash Units 155 Other Accessories 155 Printers 156 Using Optional Accessories 157 Playback on a TV 157 Playback on a High-Definition TV 157 Playback on a Standard-Definition TV 158 Powering the Camera with Household Power 158 Using an ...

User Guide
Page 11
Playback (Detailed Information Display 181 Summary of Shots per Memory Card 197 Recording Time per Memory Card 198 Flash Range 198 Shooting Range 198 Continuous Shooting Speed 198 Shutter Speed 199 Aperture 199 Battery Pack NB-10L 199 Battery Charger CB-2LC/CB-2LCE 199 Lens Hood LH-DC90 199 Index 200 Wi-Fi (Wireless LAN) Precautions 202 Radio Wave Interference Precautions 202 Security Precautions 202 Trademarks and Licensing 203 Disclaimer 203 Before Use Basic Guide Advanced Guide 1 Camera Basics 2 Auto Mode / Hybrid Auto Mode 3 Other Shooting Modes 4 P Mode 5 Tv, Av, M, C1,...
Playback (Detailed Information Display 181 Summary of Shots per Memory Card 197 Recording Time per Memory Card 198 Flash Range 198 Shooting Range 198 Continuous Shooting Speed 198 Shutter Speed 199 Aperture 199 Battery Pack NB-10L 199 Battery Charger CB-2LC/CB-2LCE 199 Lens Hood LH-DC90 199 Index 200 Wi-Fi (Wireless LAN) Precautions 202 Radio Wave Interference Precautions 202 Security Precautions 202 Trademarks and Licensing 203 Disclaimer 203 Before Use Basic Guide Advanced Guide 1 Camera Basics 2 Auto Mode / Hybrid Auto Mode 3 Other Shooting Modes 4 P Mode 5 Tv, Av, M, C1,...
User Guide
Page 12
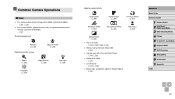
Common Camera Operations Shoot ●● Use camera-determined settings (Auto Mode, Hybrid Auto Mode) -- =33, =35 ●● See several effects applied to each shot, using camera-determined settings (Creative Shot Mode) -- =57 Shooting people well Portraits (= 59) Matching specific scenes Against Snow (= 59) Sports (= 58) Fireworks (= 59) Night Scenes (= 59) Low Light (= 59) Applying special effects Vivid Colors (= 60) Poster Effect (= 60) Fish-Eye Effect (= 62) Miniature Effect (= 62) Toy Camera Effect (= 63) Soft Focus (= 64) Monochrome (= 64) ●● Focus on ...
Common Camera Operations Shoot ●● Use camera-determined settings (Auto Mode, Hybrid Auto Mode) -- =33, =35 ●● See several effects applied to each shot, using camera-determined settings (Creative Shot Mode) -- =57 Shooting people well Portraits (= 59) Matching specific scenes Against Snow (= 59) Sports (= 58) Fireworks (= 59) Night Scenes (= 59) Low Light (= 59) Applying special effects Vivid Colors (= 60) Poster Effect (= 60) Fish-Eye Effect (= 62) Miniature Effect (= 62) Toy Camera Effect (= 63) Soft Focus (= 64) Monochrome (= 64) ●● Focus on ...

User Guide
Page 13
View ●● View images (Playback Mode) -- =101 ●● Automatic playback (Slideshow) -- =109 ●● On a TV -- =157 ●● On a computer -- =164 ●● Browse through images quickly -- =105 ●● Erase images -- =112 Shoot/View Movies ●● Shoot movies -- =33, =67 ●● View movies (Playback Mode) -- =101 ●● Fast-moving subjects, slow-motion playback -- =70 Print ●● Print pictures -- =166 Save ●● Save images to a computer via a cable -- =165 ●● Save images to a computer -- =165...
View ●● View images (Playback Mode) -- =101 ●● Automatic playback (Slideshow) -- =109 ●● On a TV -- =157 ●● On a computer -- =164 ●● Browse through images quickly -- =105 ●● Erase images -- =112 Shoot/View Movies ●● Shoot movies -- =33, =67 ●● View movies (Playback Mode) -- =101 ●● Fast-moving subjects, slow-motion playback -- =70 Print ●● Print pictures -- =166 Save ●● Save images to a computer via a cable -- =165 ●● Save images to a computer -- =165...

User Guide
Page 14
Exposure to the intense light produced by the flash could result in asphyxiation. ●● Use only recommended power sources. ●● Do not disassemble, alter, or apply heat to the product. ●● Do not peel off the label, if the battery pack has one. ●● Avoid dropping or subjecting the product to severe impacts. ●● Do not touch the interior of the product if it is damaged or not fully inserted in asphyxiation. If leaking battery electrolyte comes into contact with eyes, mouth, skin, or clothing, immediately flush with wet hands. -- Do ...
Exposure to the intense light produced by the flash could result in asphyxiation. ●● Use only recommended power sources. ●● Do not disassemble, alter, or apply heat to the product. ●● Do not peel off the label, if the battery pack has one. ●● Avoid dropping or subjecting the product to severe impacts. ●● Do not touch the interior of the product if it is damaged or not fully inserted in asphyxiation. If leaking battery electrolyte comes into contact with eyes, mouth, skin, or clothing, immediately flush with wet hands. -- Do ...

User Guide
Page 15
Caution Denotes the possibility of property damage. ●● Do not aim the camera at a windy location, be careful not to enter the camera. ●● On products that raise and lower the flash automatically, do not push the flash down or pry it with a cotton swab or cloth. This could result in burns or damage to malfunction. ●● Remove and store the battery pack/batteries when you discard the battery pack/batteries, cover the terminals with a cloth or other objects when in use of the battery pack/batteries, resulting in electrical shock, fire, burns...
Caution Denotes the possibility of property damage. ●● Do not aim the camera at a windy location, be careful not to enter the camera. ●● On products that raise and lower the flash automatically, do not push the flash down or pry it with a cotton swab or cloth. This could result in burns or damage to malfunction. ●● Remove and store the battery pack/batteries when you discard the battery pack/batteries, cover the terminals with a cloth or other objects when in use of the battery pack/batteries, resulting in electrical shock, fire, burns...
User Guide
Page 16
Doing so may cause malfunctions or damage the screen. ●● When putting the camera in your product uses multiple batteries, do not use batteries that have different levels of charge together, and do not come into contact with the + and - This may cause malfunctions or damage the screen. Doing so may cause the product to the product. Pets biting the battery pack could cause leakage, overheating, or explosion, resulting in your pant pocket. terminals reversed. Before Use Basic Guide Advanced Guide 1 Camera Basics 2 Auto Mode / Hybrid Auto Mode 3 Other Shooting ...
Doing so may cause malfunctions or damage the screen. ●● When putting the camera in your product uses multiple batteries, do not use batteries that have different levels of charge together, and do not come into contact with the + and - This may cause malfunctions or damage the screen. Doing so may cause the product to the product. Pets biting the battery pack could cause leakage, overheating, or explosion, resulting in your pant pocket. terminals reversed. Before Use Basic Guide Advanced Guide 1 Camera Basics 2 Auto Mode / Hybrid Auto Mode 3 Other Shooting ...
User Guide
Page 17
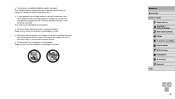
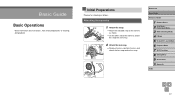
Basic Guide Basic Operations Basic information and instructions, from the lens and attach the lens cap cord to shooting and playback Initial Preparations Prepare for shooting as shown. ●●On the other side of the camera, attach the strap the same way. 2 Attach the lens cap. ●●Remove the lens cap from initial preparations to the strap. (2) (1) Before Use Basic Guide Advanced Guide 1 Camera Basics 2 Auto Mode / Hybrid Auto Mode 3 Other Shooting Modes 4 P Mode 5 Tv, Av, M, C1, and C2 Mode 6 Playback Mode 7 Wi-Fi Functions 8 Setting Menu 9 Accessories 10 Appendix ...
Basic Guide Basic Operations Basic information and instructions, from the lens and attach the lens cap cord to shooting and playback Initial Preparations Prepare for shooting as shown. ●●On the other side of the camera, attach the strap the same way. 2 Attach the lens cap. ●●Remove the lens cap from initial preparations to the strap. (2) (1) Before Use Basic Guide Advanced Guide 1 Camera Basics 2 Auto Mode / Hybrid Auto Mode 3 Other Shooting Modes 4 P Mode 5 Tv, Av, M, C1, and C2 Mode 6 Playback Mode 7 Wi-Fi Functions 8 Setting Menu 9 Accessories 10 Appendix ...
User Guide
Page 18
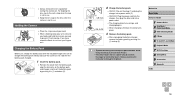
●●Always remove the lens cap before turning the camera on it. If you have raised the flash, do not attach the charger or cord to the product. Be sure to prevent it from the battery pack, align the marks on the lens when the camera is finished, the lamp turns green. 3 Remove the battery pack. ●●After unplugging the battery charger, remove the battery pack by pushing it in (1) and up (2). ●● To protect the battery pack and keep it continuously for more than 24 hours. ●● For battery chargers that use . Doing so could result in ...
●●Always remove the lens cap before turning the camera on it. If you have raised the flash, do not attach the charger or cord to the product. Be sure to prevent it from the battery pack, align the marks on the lens when the camera is finished, the lamp turns green. 3 Remove the battery pack. ●●After unplugging the battery charger, remove the battery pack by pushing it in (1) and up (2). ●● To protect the battery pack and keep it continuously for more than 24 hours. ●● For battery chargers that use . Doing so could result in ...

User Guide
Page 19
Charge the battery pack on (or immediately before using a new memory card (or a memory card formatted in another device), you insert the battery pack facing the (1) wrong way, it cannot be saved on one . ●● The charger can be locked into place. ●●Make sure the memory card is facing the right way when you insert it clicks into the closed position. ●● For guidelines on memory cards with 100 - 240 V AC power (50/60 Hz). Inserting the Battery Pack and Memory Card Insert the included battery pack and a memory card (sold separately). Inserting ...
Charge the battery pack on (or immediately before using a new memory card (or a memory card formatted in another device), you insert the battery pack facing the (1) wrong way, it cannot be saved on one . ●● The charger can be locked into place. ●●Make sure the memory card is facing the right way when you insert it clicks into the closed position. ●● For guidelines on memory cards with 100 - 240 V AC power (50/60 Hz). Inserting the Battery Pack and Memory Card Insert the included battery pack and a memory card (sold separately). Inserting ...

User Guide
Page 20
Using the Screen (2) ●●Open the screen (1) and rotate it toward the front of the screen as it and activate the viewfinder. ●● When including yourself in shots, you can also add a date stamp to shots, if you specify this , as needed, to suit shooting conditions. ●●To protect the screen when the camera is not in use, always keep it closed and facing the camera body. ●● Open the screen to activate it when the camera is no longer displayed. ●●To turn the camera on . Be careful not to open to choose your home time zone. 4 ...
Using the Screen (2) ●●Open the screen (1) and rotate it toward the front of the screen as it and activate the viewfinder. ●● When including yourself in shots, you can also add a date stamp to shots, if you specify this , as needed, to suit shooting conditions. ●●To protect the screen when the camera is not in use, always keep it closed and facing the camera body. ●● Open the screen to activate it when the camera is no longer displayed. ●●To turn the camera on . Be careful not to open to choose your home time zone. 4 ...
