Instruction Manual
Page 4
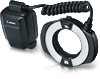
.... * This instruction manual assumes that the MR-14EX II is equipped with various functions suitable for easy macro flash shooting by autoflash control in the same way as a camera's built-in flash. Introduction The Canon Macro Ring Lite MR-14EX II is a flash unit for shooting close-ups with Canon EOS cameras, compatible with E-TTL II/E-TTL/ TTL autoflash systems. The flash unit is used with a Type...
.... * This instruction manual assumes that the MR-14EX II is equipped with various functions suitable for easy macro flash shooting by autoflash control in the same way as a camera's built-in flash. Introduction The Canon Macro Ring Lite MR-14EX II is a flash unit for shooting close-ups with Canon EOS cameras, compatible with E-TTL II/E-TTL/ TTL autoflash systems. The flash unit is used with a Type...

Instruction Manual
Page 7
Chapters Introduction 2 1 Getting Started with Macro Flash Shooting Preparations for macro flash shooting and basic shooting 13 2 Setting Flash Functions with Camera Operations Setting the flash functions from the camera's menu screen 37 Wireless Multiple Flash Shooting 3 Wireless multiple flash shooting using additional slave units with 43 optical transmission 4 Customizing the MR-14EX II Customizing with Custom Functions and Personal Functions 57 5 Reference System map, FAQ, use with a type-B camera 67 5
Chapters Introduction 2 1 Getting Started with Macro Flash Shooting Preparations for macro flash shooting and basic shooting 13 2 Setting Flash Functions with Camera Operations Setting the flash functions from the camera's menu screen 37 Wireless Multiple Flash Shooting 3 Wireless multiple flash shooting using additional slave units with 43 optical transmission 4 Customizing the MR-14EX II Customizing with Custom Functions and Personal Functions 57 5 Reference System map, FAQ, use with a type-B camera 67 5
Instruction Manual
Page 8
... with Macro Flash Shooting 13 Installing the Batteries 14 Attaching the Control Unit to the Camera 15 Attaching the Flash Unit to the Lens 16 Turning on the Power 18 Fully Automatic Flash Shooting 20 Using E-TTL II and ...E-TTL Autoflash by Shooting Mode 21 Effective Flash Range (Reference 24 l Setting the Flash Ratio 25 f Flash Exposure Compensation 27 g FEB 28 7: FE Lock 29 c High-speed Sync 30 r Second-curtain Sync 31 q: Manual Flash 32 Clearing MR-14EX II Settings 36 2 Setting Flash Functions with Camera Operations 37 Flash...
... with Macro Flash Shooting 13 Installing the Batteries 14 Attaching the Control Unit to the Camera 15 Attaching the Flash Unit to the Lens 16 Turning on the Power 18 Fully Automatic Flash Shooting 20 Using E-TTL II and ...E-TTL Autoflash by Shooting Mode 21 Effective Flash Range (Reference 24 l Setting the Flash Ratio 25 f Flash Exposure Compensation 27 g FEB 28 7: FE Lock 29 c High-speed Sync 30 r Second-curtain Sync 31 q: Manual Flash 32 Clearing MR-14EX II Settings 36 2 Setting Flash Functions with Camera Operations 37 Flash...
Instruction Manual
Page 9
... C Added 53 q: Wireless Multiple Flash Shooting with Manual Flash Output .... 55 4 Customizing the MR-14EX II 57 C / >: Setting Custom and Personal Functions 58 C: Setting Custom Functions 61 >: Setting Personal Functions 65 Memory Function 66 65 Reference 67 MR-14EX II System 68 Flash Firing Restriction due to Temperature Increase 69 Troubleshooting Guide 71 Specifications 73 Using MR-14EX II with a Type-B Camera...
... C Added 53 q: Wireless Multiple Flash Shooting with Manual Flash Output .... 55 4 Customizing the MR-14EX II 57 C / >: Setting Custom and Personal Functions 58 C: Setting Custom Functions 61 >: Setting Personal Functions 65 Memory Function 66 65 Reference 67 MR-14EX II System 68 Flash Firing Restriction due to Temperature Increase 69 Troubleshooting Guide 71 Specifications 73 Using MR-14EX II with a Type-B Camera...

Instruction Manual
Page 10
Nomenclature Flash Unit Release button (p.16) Flash tube B Front Lens cap/ Filter thread (p.16-17) Focusing lamp (p.22) Rear Indicator Connecting cord Focusing lamp (p.22) Flash tube A Indicator 8
Nomenclature Flash Unit Release button (p.16) Flash tube B Front Lens cap/ Filter thread (p.16-17) Focusing lamp (p.22) Rear Indicator Connecting cord Focusing lamp (p.22) Flash tube A Indicator 8

Instruction Manual
Page 12
... , displayed above function buttons 1 to 4, change according to the settings. Nomenclature LCD Panel E-TTL II/E-TTL/TTL autoflash (p.21) G : Battery indicator (p.18) a : E-TTL II/E-TTL autoflash b : TTL autoflash j: Normal shooting t: Temperature increase (Firing restriction/p.69) f : Flash exposure compensation (p.27, 40) Flash exposure compensation amount c : High-speed sync (p.30, 40) r : Second-curtain sync (p.31, 40...
... , displayed above function buttons 1 to 4, change according to the settings. Nomenclature LCD Panel E-TTL II/E-TTL/TTL autoflash (p.21) G : Battery indicator (p.18) a : E-TTL II/E-TTL autoflash b : TTL autoflash j: Normal shooting t: Temperature increase (Firing restriction/p.69) f : Flash exposure compensation (p.27, 40) Flash exposure compensation amount c : High-speed sync (p.30, 40) r : Second-curtain sync (p.31, 40...

Instruction Manual
Page 13
Manual flash (p.32) q : Manual flash Nomenclature Manual flash output Firing group 4 : Fire A 5 : Fire B Wireless multiple flash shooting with optical transmission (p.43) M : Master g : Wireless shooting (master) Firing group l : Fire A:B (flash ratio control) 4 : Fire A 5 : Fire B 6 : Fire C (slave C) j : Fire A, B, and C (only when C.Fn-15 is set to 1) : : Optical transmission wireless shooting * : Transmission channel 11
Manual flash (p.32) q : Manual flash Nomenclature Manual flash output Firing group 4 : Fire A 5 : Fire B Wireless multiple flash shooting with optical transmission (p.43) M : Master g : Wireless shooting (master) Firing group l : Fire A:B (flash ratio control) 4 : Fire A 5 : Fire B 6 : Fire C (slave C) j : Fire A, B, and C (only when C.Fn-15 is set to 1) : : Optical transmission wireless shooting * : Transmission channel 11

Instruction Manual
Page 14
... in short intervals, the safety function may activate and restrict flash firing. After 20 continuous flashes, allow a rest time of at least 10 min. If this happens, allow a rest time of at least 10 min. While flash firing is restricted, the firing interval is automatically set to Temperature... Increase" on page 69. 12 For details, see "Flash Firing Restriction due to a time between approx. 8 and 15 sec. Cautions for firing...
... in short intervals, the safety function may activate and restrict flash firing. After 20 continuous flashes, allow a rest time of at least 10 min. If this happens, allow a rest time of at least 10 min. While flash firing is restricted, the firing interval is automatically set to Temperature... Increase" on page 69. 12 For details, see "Flash Firing Restriction due to a time between approx. 8 and 15 sec. Cautions for firing...

Instruction Manual
Page 15
... recommended to enable all the operations in this chapter. 13 Set the camera's shooting mode to d/s/f/a/F (Creative Zone mode) to shoot the same subject with Macro Flash Shooting This chapter describes the preparations before starting macro flash shooting and the basic shooting operations.
... recommended to enable all the operations in this chapter. 13 Set the camera's shooting mode to d/s/f/a/F (Creative Zone mode) to shoot the same subject with Macro Flash Shooting This chapter describes the preparations before starting macro flash shooting and the basic shooting operations.

Instruction Manual
Page 16
... sides firing, and Canon's testing standards. The Quick flash function enables flash shooting before the flash is locked. Be aware that the batteries may cause improper battery contact due to 3.3 sec. X When it up. Approx. 100 to 700 Based on the side surfaces of Flashes Approx. 0.1 to the... 2 Install the batteries. Slide the lock-release lever to 5.5 sec. Make sure the "+" and "-" battery contacts are required by the flash unit even when an external power source (p.68) is convenient when replacing the batteries in place, the battery compartment cover is fully charged (p....
... sides firing, and Canon's testing standards. The Quick flash function enables flash shooting before the flash is locked. Be aware that the batteries may cause improper battery contact due to 3.3 sec. X When it up. Approx. 100 to 700 Based on the side surfaces of Flashes Approx. 0.1 to the... 2 Install the batteries. Slide the lock-release lever to 5.5 sec. Make sure the "+" and "-" battery contacts are required by the flash unit even when an external power source (p.68) is convenient when replacing the batteries in place, the battery compartment cover is fully charged (p....

Instruction Manual
Page 18
... lenses, attach the Macrolite Adapter (sold separately) to the front of the macro lens. A 67 mm diameter filter can also be attached to the lens when shooting. Shooting while holding the flash unit in your hand may result in a low temperature burn. Attaching the Lens...and then attach the flash unit. • EF100mm f/2.8L Macro IS USM: Macrolite Adapter 67 • EF180mm f/3.5L Macro USM: Macrolite Adapter 72C 16 Detach the flash unit while holding down the release button. Make sure that the flash unit has cooled before detaching the flash unit or replacing batteries....
... lenses, attach the Macrolite Adapter (sold separately) to the front of the macro lens. A 67 mm diameter filter can also be attached to the lens when shooting. Shooting while holding the flash unit in your hand may result in a low temperature burn. Attaching the Lens...and then attach the flash unit. • EF100mm f/2.8L Macro IS USM: Macrolite Adapter 67 • EF180mm f/3.5L Macro USM: Macrolite Adapter 72C 16 Detach the flash unit while holding down the release button. Make sure that the flash unit has cooled before detaching the flash unit or replacing batteries....

Instruction Manual
Page 19
... after attaching the hood to the front of the lens. Macro Lens Filter Compatibility (1) (2) EF50mm f/2.5 Compact Macro No* EF100mm f/2.8 Macro EF100mm f/2.8 Macro USM EF100mm f/2.8L Macro IS USM EF180mm f/3.5L Macro USM Yes Yes EF-S60mm f/2.8 Macro USM MP-E65mm f/2.8 1-5x Macro Photo * The lens cannot be used during flash shooting. Also, filter may be damaged or the lens...
... after attaching the hood to the front of the lens. Macro Lens Filter Compatibility (1) (2) EF50mm f/2.5 Compact Macro No* EF100mm f/2.8 Macro EF100mm f/2.8 Macro USM EF100mm f/2.8L Macro IS USM EF180mm f/3.5L Macro USM Yes Yes EF-S60mm f/2.8 Macro USM MP-E65mm f/2.8 1-5x Macro Photo * The lens cannot be used during flash shooting. Also, filter may be damaged or the lens...
Instruction Manual
Page 20
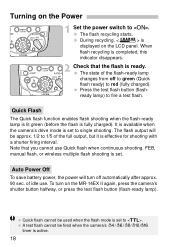
... timer is ready. The state of the flash-ready lamp changes from off automatically after approx. 90 sec. The flash output will turn on the MR-14EX II again, press the camera's shutter button halfway, or press the test flash button (flash-ready lamp). It is available when the camera...'s drive mode is set . Quick flash cannot be approx. 1/2 to single shooting....
... timer is ready. The state of the flash-ready lamp changes from off automatically after approx. 90 sec. The flash output will turn on the MR-14EX II again, press the camera's shutter button halfway, or press the test flash button (flash-ready lamp). It is available when the camera...'s drive mode is set . Quick flash cannot be approx. 1/2 to single shooting....

Instruction Manual
Page 21
...removing the batteries. Also, when a button or dial is operated, the LCD panel illuminates. Auto power off takes effect may increase. You can fire a test flash or turn on the LCD panel. (The functions displayed above function buttons 1 to 4, such as and , are not displayed.) LCD Panel Illumination When a ... You can change the color of the LCD panel illumination (C.Fn-22/p.64). If you set to the position. If you can fire Quick flash during continuous shooting (C.Fn-06/p.62). You can change the setting of the LCD panel illumination (P.Fn-03/p.65). 19 You can disable the...
...removing the batteries. Also, when a button or dial is operated, the LCD panel illuminates. Auto power off takes effect may increase. You can fire a test flash or turn on the LCD panel. (The functions displayed above function buttons 1 to 4, such as and , are not displayed.) LCD Panel Illumination When a ... You can change the color of the LCD panel illumination (C.Fn-22/p.64). If you set to the position. If you can fire Quick flash during continuous shooting (C.Fn-06/p.62). You can change the setting of the LCD panel illumination (P.Fn-03/p.65). 19 You can disable the...

Instruction Manual
Page 22
...shutter button halfway to , , and shooting modes. 20 X If a standard flash exposure was obtained, the flash exposure confirmation lamp lights for 3 sec. You can shoot in the E-TTL II/E-TTL fully automatic flash mode. 1 Set the flash mode to . X The shutter speed and aperture are displayed in the viewfinder.... 3 Take the picture. Check that supports the E-TTL II autoflash, is not displayed. 2 Focus on the camera's...
...shutter button halfway to , , and shooting modes. 20 X If a standard flash exposure was obtained, the flash exposure confirmation lamp lights for 3 sec. You can shoot in the E-TTL II/E-TTL fully automatic flash mode. 1 Set the flash mode to . X The shutter speed and aperture are displayed in the viewfinder.... 3 Take the picture. Check that supports the E-TTL II autoflash, is not displayed. 2 Focus on the camera's...

Instruction Manual
Page 23
... set Manually set Manually set (1/X sec. Select this mode if you can perform flash shooting while obtaining a standard exposure of field. If the scene is dark, a...Bulb) 1/X sec. Flash Sync Speeds and Apertures Used Shutter Speed d Automatically set the aperture manually. is... obtained with the flash, while a standard exposure of the main subject is manually set with the flash. Select this mode when you... and background. a Standard exposure of the background is the camera's maximum flash sync speed. to obtain a standard exposure for low-light scenes, using ...
... set Manually set Manually set (1/X sec. Select this mode if you can perform flash shooting while obtaining a standard exposure of field. If the scene is dark, a...Bulb) 1/X sec. Flash Sync Speeds and Apertures Used Shutter Speed d Automatically set the aperture manually. is... obtained with the flash, while a standard exposure of the main subject is manually set with the flash. Select this mode when you... and background. a Standard exposure of the background is the camera's maximum flash sync speed. to obtain a standard exposure for low-light scenes, using ...

Instruction Manual
Page 24
...brightness of the focusing lamp (C.Fn-18/p.64). Note that looking closely at the focusing lamp may occur. Under conditions where the flash is lit, underexposure may cause vision damage. You can change the lighting method of the focusing lamp (P.Fn-01/p.65). 22 If ... focusing lamp turns off automatically even if you press the shutter button completely. If necessary, set the exposure compensation or flash exposure compensation. Using E-TTL II and E-TTL Autoflash by Shooting Mode Focusing Lamp Press the button to turn off automatically when you press the shutter button...
...brightness of the focusing lamp (C.Fn-18/p.64). Note that looking closely at the focusing lamp may occur. Under conditions where the flash is lit, underexposure may cause vision damage. You can change the lighting method of the focusing lamp (P.Fn-01/p.65). 22 If ... focusing lamp turns off automatically even if you press the shutter button completely. If necessary, set the exposure compensation or flash exposure compensation. Using E-TTL II and E-TTL Autoflash by Shooting Mode Focusing Lamp Press the button to turn off automatically when you press the shutter button...

Instruction Manual
Page 25
... (p.44) as well. If the modeling flash is compatible with EOS M2, EOS M, EOS Elan II/Elan II E/50/50E, EOS REBEL K2/ 3000V, EOS REBEL XS N/REBEL G II/3000N/66, EOS REBEL 2000/300, EOS REBEL G/500N, EOS IX, or EOS IX Lite/IX 7. See the specifications in your camera's instruction manual to... find out if it 20 times continuously, allow a rest time for at least 10 min. Modeling flash can be fired during flash shooting by Shooting...
... (p.44) as well. If the modeling flash is compatible with EOS M2, EOS M, EOS Elan II/Elan II E/50/50E, EOS REBEL K2/ 3000V, EOS REBEL XS N/REBEL G II/3000N/66, EOS REBEL 2000/300, EOS REBEL G/500N, EOS IX, or EOS IX Lite/IX 7. See the specifications in your camera's instruction manual to... find out if it 20 times continuously, allow a rest time for at least 10 min. Modeling flash can be fired during flash shooting by Shooting...

Instruction Manual
Page 26
Effective Flash Range (Reference) Aperture EF50mm f/2.5 Compact Macro ISO100 45 32 22 16 11 8 5.6 4 3.2 2.8 2.5 ISO400 0.13 0.2 0.3 0.5 0.13 0.2 0.3 0.5 +Life-Size Converter EF 0.5 0.67 1 0.5 0.67 1 Magnification EF100mm f/2.8 Macro/ EF100mm f/2.8 Macro USM/ EF100mm f/2.8L Macro IS USM Aperture ISO100 32 22 16 11 8 5.6 4 2.8 ISO400 0.33 0.5 0.7 1 0.33 0.5 0.7 1 Magnification MP-E65mm f/2.8 1-5x Macro Photo ISO100 16 ISO400 Aperture 11 8 5.6 4 2.8 1 2 3 4 51 2 3 4 5 Magnification Aperture...
Effective Flash Range (Reference) Aperture EF50mm f/2.5 Compact Macro ISO100 45 32 22 16 11 8 5.6 4 3.2 2.8 2.5 ISO400 0.13 0.2 0.3 0.5 0.13 0.2 0.3 0.5 +Life-Size Converter EF 0.5 0.67 1 0.5 0.67 1 Magnification EF100mm f/2.8 Macro/ EF100mm f/2.8 Macro USM/ EF100mm f/2.8L Macro IS USM Aperture ISO100 32 22 16 11 8 5.6 4 2.8 ISO400 0.33 0.5 0.7 1 0.33 0.5 0.7 1 Magnification MP-E65mm f/2.8 1-5x Macro Photo ISO100 16 ISO400 Aperture 11 8 5.6 4 2.8 1 2 3 4 51 2 3 4 5 Magnification Aperture...

Instruction Manual
Page 27
A:B = 4:1 Flash tube B only Flash with the A:B Flash Ratio Set 1 Set to set in half-stop increments as follows: 8:1 to 1:1 to display and . 2 Press the button. Turn to . The flash ratio can be set the A:B flash ratio, then press . 25 Press function button 3 . X The flash ratio is highlighted. 3 Set the flash ratio. Press the button to 1:8 (13 settings). l Setting the Flash RatioN You can create shadows on the subject to give a more sculptural look. This can adjust the flash ratio between flash tubes A and B, or fire only one of them.
A:B = 4:1 Flash tube B only Flash with the A:B Flash Ratio Set 1 Set to set in half-stop increments as follows: 8:1 to 1:1 to display and . 2 Press the button. Turn to . The flash ratio can be set the A:B flash ratio, then press . 25 Press function button 3 . X The flash ratio is highlighted. 3 Set the flash ratio. Press the button to 1:8 (13 settings). l Setting the Flash RatioN You can create shadows on the subject to give a more sculptural look. This can adjust the flash ratio between flash tubes A and B, or fire only one of them.


