

User Manual
Page 2
...://web.canon.jp/Imaging/enjoydslr/index.html 2 While reading this manual, take pictures as advanced users, and direct printing. This is a highperformance, digital single-lens reflex camera with a 10.10-megapixel imaging sensor. Copyrights Copyright laws in your country may prohibit photography even for private enjoyment. Web site to the sensor. The EOS DIGITAL REBEL XTi/EOS 400D DIGITAL...
...://web.canon.jp/Imaging/enjoydslr/index.html 2 While reading this manual, take pictures as advanced users, and direct printing. This is a highperformance, digital single-lens reflex camera with a 10.10-megapixel imaging sensor. Copyrights Copyright laws in your country may prohibit photography even for private enjoyment. Web site to the sensor. The EOS DIGITAL REBEL XTi/EOS 400D DIGITAL...

User Manual
Page 3
... Guide Quick start guide to shooting. ‰ EOS DIGITAL REBEL XTi/EOS 400D DIGITAL Instruction Manual (this booklet) ‰ Software Guide Gives an overview of the bundled software and explains the software installation procedure. ‰ Warranty Card of Camera ‰ Warranty Card of Lens *Lens Kit ... The CF card (for recording images) is missing, contact your camera. If anything is not included. The accessories included can also be checked in the System Map (p.164). ‰ Camera: EOS DIGITAL REBEL XTi/EOS 400D DIGITAL (includes eyecup, body cap, and installed battery for the date/...
... Guide Quick start guide to shooting. ‰ EOS DIGITAL REBEL XTi/EOS 400D DIGITAL Instruction Manual (this booklet) ‰ Software Guide Gives an overview of the bundled software and explains the software installation procedure. ‰ Warranty Card of Camera ‰ Warranty Card of Lens *Lens Kit ... The CF card (for recording images) is missing, contact your camera. If anything is not included. The accessories included can also be checked in the System Map (p.164). ‰ Camera: EOS DIGITAL REBEL XTi/EOS 400D DIGITAL (includes eyecup, body cap, and installed battery for the date/...

User Manual
Page 4
...function is assumed that all the menu settings and Custom Functions are set to the default. * For explanatory purposes, the instructions show the camera attached with an EF-S18-55mm f/3.5-5.6 II lens. 4 The M icon on the LCD monitor. In this manual, the icons and markings indicating ...the camera's buttons, dials, and settings correspond to the icons and markings on the camera and on the upper right of the button. Basic Assumptions * All operations explained in this Manual The icon indicates...
...function is assumed that all the menu settings and Custom Functions are set to the default. * For explanatory purposes, the instructions show the camera attached with an EF-S18-55mm f/3.5-5.6 II lens. 4 The M icon on the LCD monitor. In this manual, the icons and markings indicating ...the camera's buttons, dials, and settings correspond to the icons and markings on the camera and on the upper right of the button. Basic Assumptions * All operations explained in this Manual The icon indicates...

User Manual
Page 6
... 81 Setting the Color Space 83 AE Lock ...84 FE Lock ...85 Setting the White Balance 86 White Balance Correction 88 Preventing Camera Shake 90 5 Handy Features 93 Handy Features 94 Silencing the Beeper 94 CF Card Reminder 94 Setting the Image Review Time 94 ...off Time 95 Setting the LCD Monitor Brightness 95 File Numbering Method 96 Auto Rotate of Vertical Images 98 Checking Camera Function Settings 99 Reverting the Camera to the Default Settings 100 Preventing the LCD Monitor from Turning off Automatically 101 Setting Custom Functions 101 Transferring ...
... 81 Setting the Color Space 83 AE Lock ...84 FE Lock ...85 Setting the White Balance 86 White Balance Correction 88 Preventing Camera Shake 90 5 Handy Features 93 Handy Features 94 Silencing the Beeper 94 CF Card Reminder 94 Setting the Image Review Time 94 ...off Time 95 Setting the LCD Monitor Brightness 95 File Numbering Method 96 Auto Rotate of Vertical Images 98 Checking Camera Function Settings 99 Reverting the Camera to the Default Settings 100 Preventing the LCD Monitor from Turning off Automatically 101 Setting Custom Functions 101 Transferring ...
User Manual
Page 9
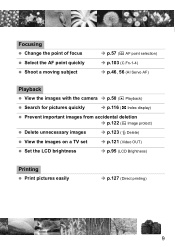
... point quickly Shoot a moving subject Î p.57 (S AF point selection) Î p.103 (C.Fn-1-4) Î p.46, 56 (AI Servo AF) Playback View the images with the camera Î p.50 (x Playback) Search for pictures quickly Î p.116 (H Index display) Prevent important images from accidental deletion Î p.122 (K Image protect) Delete unnecessary images Î...
... point quickly Shoot a moving subject Î p.57 (S AF point selection) Î p.103 (C.Fn-1-4) Î p.46, 56 (AI Servo AF) Playback View the images with the camera Î p.50 (x Playback) Search for pictures quickly Î p.116 (H Index display) Prevent important images from accidental deletion Î p.122 (K Image protect) Delete unnecessary images Î...
User Manual
Page 10
... melt the insulation and cause a fire or electrical shock. • Do not fire the flash at least 1 meter away. • Before storing the camera or accessory when not in use any batteries, power sources, and accessories not specified in this booklet. It may cause an accident. • Do not... back-up battery leaks, changes color, deforms, or emits smoke or fumes, remove it . Do not mix new and old or different types of the camera, accessories, connecting cables, etc. • Keep the back-up battery away from the power outlet to get burned in reversed polarity (+ -). Safety Warnings ...
... melt the insulation and cause a fire or electrical shock. • Do not fire the flash at least 1 meter away. • Before storing the camera or accessory when not in use any batteries, power sources, and accessories not specified in this booklet. It may cause an accident. • Do not... back-up battery leaks, changes color, deforms, or emits smoke or fumes, remove it . Do not mix new and old or different types of the camera, accessories, connecting cables, etc. • Keep the back-up battery away from the power outlet to get burned in reversed polarity (+ -). Safety Warnings ...

User Manual
Page 11
...voltage internal parts can accidentally choke the child. • Do not store the equipment in dusty or humid places. Electromagnetic waves emitted by the camera may concentrate the sun's rays and cause a fire. • Do not cover or wrap the battery-recharging apparatus with the plane's instruments..., or other organic solvents to a tripod. Doing so may cause battery leakage or a shorter battery life. Doing so may damage your nearest Canon Service Center. 11 The battery pack or back-up battery. This is to expose the internal parts, do not twist or tie the cords....
...voltage internal parts can accidentally choke the child. • Do not store the equipment in dusty or humid places. Electromagnetic waves emitted by the camera may concentrate the sun's rays and cause a fire. • Do not cover or wrap the battery-recharging apparatus with the plane's instruments..., or other organic solvents to a tripod. Doing so may cause battery leakage or a shorter battery life. Doing so may damage your nearest Canon Service Center. 11 The battery pack or back-up battery. This is to expose the internal parts, do not twist or tie the cords....
User Manual
Page 12
...it or subject it to malfunction. If you have not used the camera for some time or if there is an important shoot coming up, have the camera checked by your Canon dealer or check the camera yourself and make sure it is suddenly brought in a sealed plastic ...used underwater. Wipe off any water droplets with a well-wrung wet cloth. The camera contains precision electronic circuitry. Do not touch the camera's electrical contacts with your nearest Canon Service Center. If you accidentally drop the camera into a warm room, condensation may form on the lens, viewfinder, reflex mirror...
...it or subject it to malfunction. If you have not used the camera for some time or if there is an important shoot coming up, have the camera checked by your Canon dealer or check the camera yourself and make sure it is suddenly brought in a sealed plastic ...used underwater. Wipe off any water droplets with a well-wrung wet cloth. The camera contains precision electronic circuitry. Do not touch the camera's electrical contacts with your nearest Canon Service Center. If you accidentally drop the camera into a warm room, condensation may form on the lens, viewfinder, reflex mirror...
User Manual
Page 13
... . Do not drop the CF card or subject it to any liquid onto the CF card. Lens Electrical Contacts After detaching the lens from the camera, attach the lens caps or put down the lens with over 99.99% effective pixels, there might be a few days. CF Card The CF card... so could damage the images recorded on the CF card might be lost. Contacts 13 However, this is only temporarily and will disappear when the camera is left on them unusable. Handling Precautions LCD Monitor Although the LCD monitor is manufactured with very high precision technology with the rear end up...
... . Do not drop the CF card or subject it to any liquid onto the CF card. Lens Electrical Contacts After detaching the lens from the camera, attach the lens caps or put down the lens with over 99.99% effective pixels, there might be a few days. CF Card The CF card... so could damage the images recorded on the CF card might be lost. Contacts 13 However, this is only temporarily and will disappear when the camera is left on them unusable. Handling Precautions LCD Monitor Although the LCD monitor is manufactured with very high precision technology with the rear end up...
User Manual
Page 14
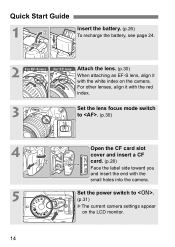
Quick Start Guide 1 Insert the battery. (p.26) To recharge the battery, see page 24. 2 For EF-S lens For EF l ens Attach the lens. (p.30) When attaching an EF-S lens, align it with the red index. 3 Set the lens focus mode switch to . (p.31) XThe current camera settings appear on the camera. For other lenses, align it with the small holes into the camera. Set the power switch to . (p.30) 4 5 14 Open the CF card slot cover and insert a CF card. (p.28) Face the label side toward you and insert the end with the white index on the LCD monitor.
Quick Start Guide 1 Insert the battery. (p.26) To recharge the battery, see page 24. 2 For EF-S lens For EF l ens Attach the lens. (p.30) When attaching an EF-S lens, align it with the red index. 3 Set the lens focus mode switch to . (p.31) XThe current camera settings appear on the camera. For other lenses, align it with the small holes into the camera. Set the power switch to . (p.30) 4 5 14 Open the CF card slot cover and insert a CF card. (p.28) Face the label side toward you and insert the end with the white index on the LCD monitor.
User Manual
Page 15
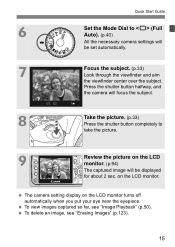
... focus the subject. 8 Take the picture. (p.33) Press the shutter button completely to (Full Auto). (p.40) All the necessary camera settings will be set automatically. 7 Focus the subject. (p.33) Look through the viewfinder and aim the viewfinder center over the subject. Quick Start Guide 6 Set ...the Mode Dial to take the picture. 9 Review the picture on the LCD monitor. (p.94) The captured image will be displayed for about 2 sec. The camera setting display on the LCD monitor. on the LCD monitor turns off automatically when you put your eye near the eyepiece.
... focus the subject. 8 Take the picture. (p.33) Press the shutter button completely to (Full Auto). (p.40) All the necessary camera settings will be set automatically. 7 Focus the subject. (p.33) Look through the viewfinder and aim the viewfinder center over the subject. Quick Start Guide 6 Set ...the Mode Dial to take the picture. 9 Review the picture on the LCD monitor. (p.94) The captured image will be displayed for about 2 sec. The camera setting display on the LCD monitor. on the LCD monitor turns off automatically when you put your eye near the eyepiece.
User Manual
Page 17
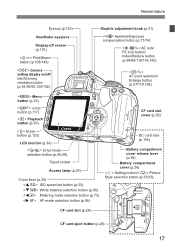
Nomenclature Eyecup (p.153) Viewfinder eyepiece Display-off sensor (p.101) Print/Share button (p.108/143) Camera setting display on/off/ Info/Trimming orientation button (p.34,99/50,124/142) Dioptric adjustment knob (p.31) Aperture/Exposure compensation button (p.71/74) AE lock/ ...
Nomenclature Eyecup (p.153) Viewfinder eyepiece Display-off sensor (p.101) Print/Share button (p.108/143) Camera setting display on/off/ Info/Trimming orientation button (p.34,99/50,124/142) Dioptric adjustment knob (p.31) Aperture/Exposure compensation button (p.71/74) AE lock/ ...
User Manual
Page 18
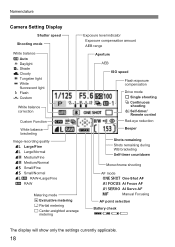
Nomenclature Camera Setting Display Shutter speed Shooting mode Exposure level indicator Exposure compensation amount AEB range White balance Q Auto W Daylight E Shade R Cloudy Y Tungsten light U White fluorescent light I ...
Nomenclature Camera Setting Display Shutter speed Shooting mode Exposure level indicator Exposure compensation amount AEB range White balance Q Auto W Daylight E Shade R Cloudy Y Tungsten light U White fluorescent light I ...

User Manual
Page 22
...through the strap's buckle as shown in the United States and other countries. Then pass it through the camera's strap mount eyelet from the buckle. Windows is a trademark of SanDisk Corporation. Exif Print is a ...strap. (p.153) Eyepiece cover Adobe is a trademark or registered trademark of their respective owners. * This digital camera supports Design rule for Camera File System 2.0 and Exif 2.21 (also called "Exif Print"). CompactFlash is also attached to optimize the...other countries. Macintosh is a standard that enhances compatibility between digital cameras and printers.
...through the strap's buckle as shown in the United States and other countries. Then pass it through the camera's strap mount eyelet from the buckle. Windows is a trademark of SanDisk Corporation. Exif Print is a ...strap. (p.153) Eyepiece cover Adobe is a trademark or registered trademark of their respective owners. * This digital camera supports Design rule for Camera File System 2.0 and Exif 2.21 (also called "Exif Print"). CompactFlash is also attached to optimize the...other countries. Macintosh is a standard that enhances compatibility between digital cameras and printers.

User Manual
Page 23
1 Getting Started This chapter explains preliminary steps and basic camera operations. 23
1 Getting Started This chapter explains preliminary steps and basic camera operations. 23
User Manual
Page 25
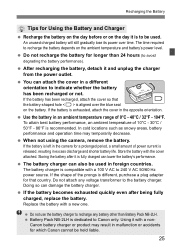
... cold locations such as snowy areas, battery performance and operation time may result in malfunction or accidents for which Canon cannot be held liable. 25 If the battery is left in the camera for a prolonged period, a small amount of 10°C - 30°C / 50°F - 86°F is released,... countries. The battery charger can damage the battery charger. If the battery has been recharged, attach the cover so that country. When not using the camera, remove the battery. If the shape of 0°C - 40°C / 32°F - 104°F. The time required to avoid degrading the...
... cold locations such as snowy areas, battery performance and operation time may result in malfunction or accidents for which Canon cannot be held liable. 25 If the battery is left in the camera for a prolonged period, a small amount of 10°C - 30°C / 50°F - 86°F is released,... countries. The battery charger can damage the battery charger. If the battery has been recharged, attach the cover so that country. When not using the camera, remove the battery. If the shape of 0°C - 40°C / 32°F - 104°F. The time required to avoid degrading the...
User Manual
Page 27
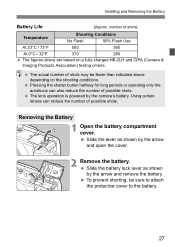
...°C / 73°F 500 360 At 0°C / 32°F 370 280 The figures above depending on a fully-charged NB-2LH and CIPA (Camera & Imaging Products Association) testing criteria. Slide the battery lock lever as shown by the arrow and remove the battery. Pressing the shutter button halfway for... the number of possible shots. Using certain lenses can also reduce the number of possible shots. The lens operation is powered by the camera's battery. Installing and Removing the Battery Battery Life [Approx. number of shots may be sure to attach the protective cover to the battery....
...°C / 73°F 500 360 At 0°C / 32°F 370 280 The figures above depending on a fully-charged NB-2LH and CIPA (Camera & Imaging Products Association) testing criteria. Slide the battery lock lever as shown by the arrow and remove the battery. Pressing the shutter button halfway for... the number of possible shots. Using certain lenses can also reduce the number of possible shots. The lens operation is powered by the camera's battery. Installing and Removing the Battery Battery Life [Approx. number of shots may be sure to attach the protective cover to the battery....
User Manual
Page 28
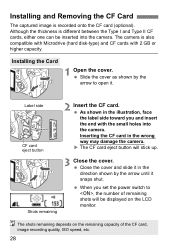
...is also compatible with Microdrive (hard disk-type) and CF cards with the small holes into the camera. Label side CF card eject button 2 Insert the CF card. Close the cover and slide it... image recording quality, ISO speed, etc. 28 As shown in the wrong way may damage the camera. Inserting the CF card in the illustration, face the label side toward you set the power switch ... the end with 2 GB or higher capacity. The shots remaining depends on the LCD monitor. The camera is recorded onto the CF card (optional). Although the thickness is different between the Type I and ...
...is also compatible with Microdrive (hard disk-type) and CF cards with the small holes into the camera. Label side CF card eject button 2 Insert the CF card. Close the cover and slide it... image recording quality, ISO speed, etc. 28 As shown in the wrong way may damage the camera. Inserting the CF card in the illustration, face the label side toward you set the power switch ... the end with 2 GB or higher capacity. The shots remaining depends on the LCD monitor. The camera is recorded onto the CF card (optional). Although the thickness is different between the Type I and ...
User Manual
Page 29
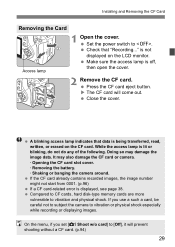
...then open the cover. 2 Remove the CF card. Doing so may also damage the CF card or camera. · Opening the CF card slot cover. · Removing the battery. · Shaking or banging the camera around. If you set [z Shoot w/o card] to vibration and physical shock. Installing and Removing the .... Close the cover. A blinking access lamp indicates that "Recording..." On the menu, if you use a such a card, be careful not to subject the camera to . If the CF card already contains recorded images, the image number might not start from 0001. (p.96) If a CF card-related error is not...
...then open the cover. 2 Remove the CF card. Doing so may also damage the CF card or camera. · Opening the CF card slot cover. · Removing the battery. · Shaking or banging the camera around. If you set [z Shoot w/o card] to vibration and physical shock. Installing and Removing the .... Close the cover. A blinking access lamp indicates that "Recording..." On the menu, if you use a such a card, be careful not to subject the camera to . If the CF card already contains recorded images, the image number might not start from 0001. (p.96) If a CF card-related error is not...
User Manual
Page 30
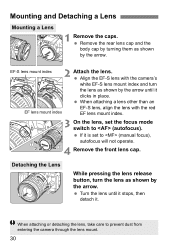
Align the EF-S lens with the red EF lens mount index. 3 On the lens, set to prevent dust from entering the camera through the lens mount. 30 When attaching or detaching the lens, take care to (manual focus), autofocus will not operate. 4 Remove the front lens cap. ..., turn the lens as shown by the arrow. When attaching a lens other than an EF lens mount index EF-S lens, align the lens with the camera's white EF-S lens mount index and turn the lens as shown by the arrow. EF-S lens mount index 2 Attach the lens.
Align the EF-S lens with the red EF lens mount index. 3 On the lens, set to prevent dust from entering the camera through the lens mount. 30 When attaching or detaching the lens, take care to (manual focus), autofocus will not operate. 4 Remove the front lens cap. ..., turn the lens as shown by the arrow. When attaching a lens other than an EF lens mount index EF-S lens, align the lens with the camera's white EF-S lens mount index and turn the lens as shown by the arrow. EF-S lens mount index 2 Attach the lens.
