
Basic Instruction Manual
Page 4
... they have been properly recorded. may prohibit the use the camera correctly. You can refer to it again when necessary. Introduction The EOS 6D Mark II is faulty and the images cannot be recorded or downloaded to a computer, Canon cannot be aware that certain public performances, exhibitions,... etc. Testing the Camera Before Use and Liability After shooting, play images back and ...
... they have been properly recorded. may prohibit the use the camera correctly. You can refer to it again when necessary. Introduction The EOS 6D Mark II is faulty and the images cannot be recorded or downloaded to a computer, Canon cannot be aware that certain public performances, exhibitions,... etc. Testing the Camera Before Use and Liability After shooting, play images back and ...

Basic Instruction Manual
Page 6
... computer or the like . 4 To learn how to use PDF viewing software, refer to your computer or the like. Downloading the Instruction Manuals (PDF Files) The Instruction Manuals (PDF files) can be downloaded from the Canon Web site to the software's Help section or the like... Camera Instruction Manual • Wi-Fi (Wireless Communication) Function Instruction Manual • Lens Instruction Manual • Software Instruction Manual X www.canon.com/icpd To view the Instruction Manuals (PDF files), Adobe Acrobat Reader DC or other Adobe PDF viewer (most recent version recommended) is the...
... computer or the like . 4 To learn how to use PDF viewing software, refer to your computer or the like. Downloading the Instruction Manuals (PDF Files) The Instruction Manuals (PDF files) can be downloaded from the Canon Web site to the software's Help section or the like... Camera Instruction Manual • Wi-Fi (Wireless Communication) Function Instruction Manual • Lens Instruction Manual • Software Instruction Manual X www.canon.com/icpd To view the Instruction Manuals (PDF files), Adobe Acrobat Reader DC or other Adobe PDF viewer (most recent version recommended) is the...

Basic Instruction Manual
Page 7
X www.canon.com/icpd A software application is new or was previously formatted (initialized) by another.../ movies. For details, see page 179. Cards that Can Record Movies When shooting movies, use a large-capacity card with the camera regardless of residence, then download the Instruction Manuals. Compatible Cards The following cards ... SD/SDHC*/SDXC* memory cards * UHS-I cards supported. In this camera (p.63). Compatible Cards Downloading Instruction Manuals Using QR Code The Instruction Manuals (PDF files) can be downloaded to your country or region of capacity. If the ...
X www.canon.com/icpd A software application is new or was previously formatted (initialized) by another.../ movies. For details, see page 179. Cards that Can Record Movies When shooting movies, use a large-capacity card with the camera regardless of residence, then download the Instruction Manuals. Compatible Cards The following cards ... SD/SDHC*/SDXC* memory cards * UHS-I cards supported. In this camera (p.63). Compatible Cards Downloading Instruction Manuals Using QR Code The Instruction Manuals (PDF files) can be downloaded to your country or region of capacity. If the ...

Basic Instruction Manual
Page 8
... mount index on the camera to attach the lens. 4 Set the lens's focus mode switch to (p.46). 22 22 m 5 Set the power switch to start using (p.34). 2 Insert the card (p.37). Quick Start Guide 1 Insert the battery (p.36).
... mount index on the camera to attach the lens. 4 Set the lens's focus mode switch to (p.46). 22 22 m 5 Set the power switch to start using (p.34). 2 Insert the card (p.37). Quick Start Guide 1 Insert the battery (p.36).

Basic Instruction Manual
Page 10
... in this manual are set to the downward (Multi function lock released) (p.40, 52). The sample photos displayed on the camera and used in this manual when discussing relevant operations and functionality. 3 : Indicates a function that all the menu settings and Custom Functions are for ... operation button, this indicates how long (in seconds) the respective setting will be changed by pressing the button to change its settings. Conventions Used in this Manual Icons in this Manual 0/9/4/ 7/8 : Indicates the Main Dial. : Indicates the Quick Control Dial. : Indicates the Multi-...
... in this manual are set to the downward (Multi function lock released) (p.40, 52). The sample photos displayed on the camera and used in this manual when discussing relevant operations and functionality. 3 : Indicates a function that all the menu settings and Custom Functions are for ... operation button, this indicates how long (in seconds) the respective setting will be changed by pressing the button to change its settings. Conventions Used in this Manual Icons in this Manual 0/9/4/ 7/8 : Indicates the Main Dial. : Indicates the Quick Control Dial. : Indicates the Multi-...

Basic Instruction Manual
Page 12
... Nomenclature 21 1 Getting Started and Basic Camera Operations 33 Charging the Battery 34 Installing and Removing the Battery 36 Installing and Removing the Card 37 Using the LCD Monitor 39 Turning on the Power 40 Setting the Date, Time, and Zone 42 Selecting the Interface Language 45 Attaching and Detaching a Lens...
... Nomenclature 21 1 Getting Started and Basic Camera Operations 33 Charging the Battery 34 Installing and Removing the Battery 36 Installing and Removing the Card 37 Using the LCD Monitor 39 Turning on the Power 40 Setting the Date, Time, and Zone 42 Selecting the Interface Language 45 Attaching and Detaching a Lens...

Basic Instruction Manual
Page 13
... AF Operation 106 S Selecting the AF Area and AF Point 109 AF Area Selection Mode 113 MF: Manual Focus 115 i Selecting the Drive Mode 116 j Using the Self-timer 118 11
... AF Operation 106 S Selecting the AF Area and AF Point 109 AF Area Selection Mode 113 MF: Manual Focus 115 i Selecting the Drive Mode 116 j Using the Self-timer 118 11

Basic Instruction Manual
Page 17
... shock. Do not leave any malfunctions, problems, or damage to the product, contact the nearest Canon Service Center or the dealer from whom you purchased the product. If you keep using the product. Do not apply heat or solder to fire or water. Prevent any foreign metallic ...with your eyes, skin, and clothing. If excessive heat, smoke, or fumes are provided to prevent harm or injury to get burned in use any batteries, power sources, or accessories not specified in temperatures outside the allowable charging (working) temperature range. If the battery leaks, changes ...
... shock. Do not leave any malfunctions, problems, or damage to the product, contact the nearest Canon Service Center or the dealer from whom you purchased the product. If you keep using the product. Do not apply heat or solder to fire or water. Prevent any foreign metallic ...with your eyes, skin, and clothing. If excessive heat, smoke, or fumes are provided to prevent harm or injury to get burned in use any batteries, power sources, or accessories not specified in temperatures outside the allowable charging (working) temperature range. If the battery leaks, changes ...

Basic Instruction Manual
Page 18
...sun without the lens cap attached. Incorrect usage may become moist and short-circuit the outlet, causing a fire. Doing so may interfere with a cloth when using the product. Doing so may concentrate the sun's rays and cause a fire. If a child or infant swallows a part or accessory, consult a physician...; Always insert the power plug all the way in dusty or humid places. Keep equipment out of the reach of an electrical shock. Before using the camera inside the product, promptly remove the battery. This is to prevent an explosion or a fire. There is to prevent fire, excessive...
...sun without the lens cap attached. Incorrect usage may become moist and short-circuit the outlet, causing a fire. Doing so may interfere with a cloth when using the product. Doing so may concentrate the sun's rays and cause a fire. If a child or infant swallows a part or accessory, consult a physician...; Always insert the power plug all the way in dusty or humid places. Keep equipment out of the reach of an electrical shock. Before using the camera inside the product, promptly remove the battery. This is to prevent an explosion or a fire. There is to prevent fire, excessive...

Basic Instruction Manual
Page 19
.... Doing so may also cause battery leakage or explosion, which will become hot and cause burns. Doing so may hurt the eyes. 17 Do not use or store the product in a low-temperature environment for an extended period of the product. The product may become cold and may result. Do not...
.... Doing so may also cause battery leakage or explosion, which will become hot and cause burns. Doing so may hurt the eyes. 17 Do not use or store the product in a low-temperature environment for an extended period of the product. The product may become cold and may result. Do not...

Basic Instruction Manual
Page 20
... a strong magnetic field such as possible, do not allow dirt, dust, water, or salt to malfunction. The camera is recommended. Also, avoid using or leaving the camera near anything emitting strong radio waves, such as in a car in a location with a dry and clean cloth. High temperatures...cloth. If you accidentally drop the camera into water or are concerned that falls on the camera, wipe it , promptly consult the nearest Canon Service Center. The camera contains precision electronic circuitry. Do not leave the camera in order to prevent dirt, dust, water, or salt from...
... a strong magnetic field such as possible, do not allow dirt, dust, water, or salt to malfunction. The camera is recommended. Also, avoid using or leaving the camera near anything emitting strong radio waves, such as in a car in a location with a dry and clean cloth. High temperatures...cloth. If you accidentally drop the camera into water or are concerned that falls on the camera, wipe it , promptly consult the nearest Canon Service Center. The camera contains precision electronic circuitry. Do not leave the camera in order to prevent dirt, dust, water, or salt from...

Basic Instruction Manual
Page 21
... the image area, ghosting may cause a malfunction. If you have the camera checked by your nearest Canon Service Center or check the camera yourself and make sure it is to the warmer temperature before using the camera. Handling Precautions Do not block the mirror operation with your fingers. For stubborn dirt, take... dust when it out of the bag. If the camera will not be used for some time or if there is an important shoot such as in a while to the nearest Canon Service Center. If the camera has not been used for an extended period, remove the battery and store the camera in...
... the image area, ghosting may cause a malfunction. If you have the camera checked by your nearest Canon Service Center or check the camera yourself and make sure it is to the warmer temperature before using the camera. Handling Precautions Do not block the mirror operation with your fingers. For stubborn dirt, take... dust when it out of the bag. If the camera will not be used for some time or if there is an important shoot such as in a while to the nearest Canon Service Center. If the camera has not been used for an extended period, remove the battery and store the camera in...

Basic Instruction Manual
Page 22
..., physical shock, or vibration. Do not leave the card in high temperatures. If the LCD monitor is left on the card. Do not store or use the card near a heat source. Lens After detaching the lens from the camera, put down the lens with your fingers or anything that has a strong...
..., physical shock, or vibration. Do not leave the card in high temperatures. If the LCD monitor is left on the card. Do not store or use the card near a heat source. Lens After detaching the lens from the camera, put down the lens with your fingers or anything that has a strong...

Basic Instruction Manual
Page 24
Nomenclature LCD panel (p.26, 27) Eyecup Viewfinder eyepiece Info button (p.53, 67, 69, 73, 160, 176, 182) Power switch (p.40) Speaker Terminal cover P (N-Mark)* AF start button AE lock/ FE lock button (p.154, 155) AF point selection button (p.111, 112) Quick Control button (p.54) Menu button (p.57) Erase button (p.190) External microphone IN terminal Digital terminal (p.196) HDMI mini OUT terminal Setting button (p.57) * Used for Wi-Fi connections via the NFC function. 22
Nomenclature LCD panel (p.26, 27) Eyecup Viewfinder eyepiece Info button (p.53, 67, 69, 73, 160, 176, 182) Power switch (p.40) Speaker Terminal cover P (N-Mark)* AF start button AE lock/ FE lock button (p.154, 155) AF point selection button (p.111, 112) Quick Control button (p.54) Menu button (p.57) Erase button (p.190) External microphone IN terminal Digital terminal (p.196) HDMI mini OUT terminal Setting button (p.57) * Used for Wi-Fi connections via the NFC function. 22

Basic Instruction Manual
Page 32
Charge lamp Power cord Battery pack slot Power cord socket 30 Battery pack slot Charge lamp Power plug IMPORTANT SAFETY INSTRUCTIONS-SAVE THESE INSTRUCTIONS. Battery Charger LC-E6E Charger for the power outlet, if needed. DANGER-TO REDUCE THE RISK OF FIRE OR ELECTRIC SHOCK, CAREFULLY FOLLOW THESE INSTRUCTIONS. For connection to a supply not in the U.S.A., use an attachment plug adapter of the proper configuration for Battery Pack LP-E6N/LP-E6 (p.34). Nomenclature Battery Charger LC-E6 Charger for Battery Pack LP-E6N/LP-E6 (p.34).
Charge lamp Power cord Battery pack slot Power cord socket 30 Battery pack slot Charge lamp Power plug IMPORTANT SAFETY INSTRUCTIONS-SAVE THESE INSTRUCTIONS. Battery Charger LC-E6E Charger for the power outlet, if needed. DANGER-TO REDUCE THE RISK OF FIRE OR ELECTRIC SHOCK, CAREFULLY FOLLOW THESE INSTRUCTIONS. For connection to a supply not in the U.S.A., use an attachment plug adapter of the proper configuration for Battery Pack LP-E6N/LP-E6 (p.34). Nomenclature Battery Charger LC-E6 Charger for Battery Pack LP-E6N/LP-E6 (p.34).

Basic Instruction Manual
Page 37
...is not fully charged. The battery charger is left in excess discharge and shorter battery life. Even during storage, a charged battery will not be used . If the battery is compatible with the protective cover attached. Do not attach any battery other than Battery Pack LP-E6N/LP-E6. 35 Charge... the battery before or on the day before use. If necessary, attach a commercially-available plug adapter for approx. 10 sec. Storing the battery when it is to the battery charger. Recharge...
...is not fully charged. The battery charger is left in excess discharge and shorter battery life. Even during storage, a charged battery will not be used . If the battery is compatible with the protective cover attached. Do not attach any battery other than Battery Pack LP-E6N/LP-E6. 35 Charge... the battery before or on the day before use. If necessary, attach a commercially-available plug adapter for approx. 10 sec. Storing the battery when it is to the battery charger. Recharge...

Basic Instruction Manual
Page 38
Installing the Battery 1 Open the cover. Insert the battery until it locks in the viewfinder becomes blurred and you cannot perform focusing. You cannot use batteries other than the Battery Pack LP-E6N or LP-E6. If the battery is removed. To prevent short circuiting, be sure to attach the ...
Installing the Battery 1 Open the cover. Insert the battery until it locks in the viewfinder becomes blurred and you cannot perform focusing. You cannot use batteries other than the Battery Pack LP-E6N or LP-E6. If the battery is removed. To prevent short circuiting, be sure to attach the ...

Basic Instruction Manual
Page 39
... erasing. Close the cover and slide it in place. 3 Close the cover. Write-protect switch 2 Insert the card. Installing and Removing the Card You can use an SD, SDHC, or SDXC memory card (sold separately) with the camera. Possible shots 37 The captured images are recorded onto the card. Installing the...
... erasing. Close the cover and slide it in place. 3 Close the cover. Write-protect switch 2 Insert the card. Installing and Removing the Card You can use an SD, SDHC, or SDXC memory card (sold separately) with the camera. Possible shots 37 The captured images are recorded onto the card. Installing the...

Basic Instruction Manual
Page 40
... or blinking. Set the power switch to eject. Installing and Removing the Card Removing the Card Access lamp 1 Open the cover. Check that images are used). 38 Do not open the cover.
... or blinking. Set the power switch to eject. Installing and Removing the Card Removing the Card Access lamp 1 Open the cover. Check that images are used). 38 Do not open the cover.

Basic Instruction Manual
Page 41
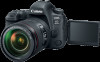
You can change the direction and angle of the LCD monitor. 1 Flip out the LCD monitor. 180° 90° 175° 2 Rotate the LCD monitor. Normally, use Live View shooting, shoot movies, or play back photos and movies. The indicated angle is swung out, you can set menu functions, use the camera with the LCD monitor facing you . Using the LCD Monitor After you flip out the LCD monitor, you can rotate it toward you . 39 When the LCD monitor is only approximate. 3 Face it up, down, or over 180° to face the subject.
You can change the direction and angle of the LCD monitor. 1 Flip out the LCD monitor. 180° 90° 175° 2 Rotate the LCD monitor. Normally, use Live View shooting, shoot movies, or play back photos and movies. The indicated angle is swung out, you can set menu functions, use the camera with the LCD monitor facing you . Using the LCD Monitor After you flip out the LCD monitor, you can rotate it toward you . 39 When the LCD monitor is only approximate. 3 Face it up, down, or over 180° to face the subject.
