
Instruction Manual
Page 3
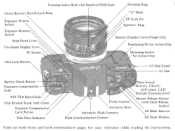
... Grip 1.1Ot.re $ _ O Cv ...0 Frame Counter Accessory Shoe Automatic Huh Contacts Mash Synchronisation Contact AT Dial Guard AT Dial Switch Battery Check/ Self-timer LED Multiple Exposure Lever Shutter Release Button (with Cable Release Socket) AE Mode Selector AE Mode Window Fold out both .... z . .$? 0c. , ASA Film Speed Scale Film Rewind Knob with Dcpth-of.Fteld Scale Focusing Ring Canon Bayonet &cech.Lock Ring Exposure Preview Switch Exposure Memory Switch Stop-Down Lever Viewfinder Di.PUY Lem' PC Socket ASA Lock Button Battery Cheek Button Exposure Compensation Scak tt -
... Grip 1.1Ot.re $ _ O Cv ...0 Frame Counter Accessory Shoe Automatic Huh Contacts Mash Synchronisation Contact AT Dial Guard AT Dial Switch Battery Check/ Self-timer LED Multiple Exposure Lever Shutter Release Button (with Cable Release Socket) AE Mode Selector AE Mode Window Fold out both .... z . .$? 0c. , ASA Film Speed Scale Film Rewind Knob with Dcpth-of.Fteld Scale Focusing Ring Canon Bayonet &cech.Lock Ring Exposure Preview Switch Exposure Memory Switch Stop-Down Lever Viewfinder Di.PUY Lem' PC Socket ASA Lock Button Battery Cheek Button Exposure Compensation Scak tt -

Instruction Manual
Page 4
... 69 Multiple Exposures 73 Film Plane Indicator 75 Distance Scale 75 Infrared Index Mark 75 Checking the Depth of the Camera . . 4 ... . .. . 95 Using the Camera in Action 79 Automatic Diaphragm Control 80 Manual Diaphragm Control 80 Unusable Lenses 81 Flash Photography with the A•1 ... Manual Override 12 Preliminary Preparations 14 Handling the Lens 16 NORMAL PROCEDURES 18 Loading the Battery 19 Checking the Battery 20 Film Advance and Shutter Release 22 Holding the Camera 25 Loading the Film 26 Setting the ASA Film Speed 28 The Basics of Exposure ...
... 69 Multiple Exposures 73 Film Plane Indicator 75 Distance Scale 75 Infrared Index Mark 75 Checking the Depth of the Camera . . 4 ... . .. . 95 Using the Camera in Action 79 Automatic Diaphragm Control 80 Manual Diaphragm Control 80 Unusable Lenses 81 Flash Photography with the A•1 ... Manual Override 12 Preliminary Preparations 14 Handling the Lens 16 NORMAL PROCEDURES 18 Loading the Battery 19 Checking the Battery 20 Film Advance and Shutter Release 22 Holding the Camera 25 Loading the Film 26 Setting the ASA Film Speed 28 The Basics of Exposure ...
Instruction Manual
Page 6
... makes sure that it established with a digital. rather than an analog, computer. It is designed to be the first camera with...of this electronic circuitry which normally lasts about one year. Canon is the first camera to a new system of this contribution to have a ...program unit with its sequence circuitry, where the power is sequentially switched on the special production technology system it is not limited to operate. Other benefits deriving from the lesign concept of power, the A-1 requires only one small battery...
... makes sure that it established with a digital. rather than an analog, computer. It is designed to be the first camera with...of this electronic circuitry which normally lasts about one year. Canon is the first camera to a new system of this contribution to have a ...program unit with its sequence circuitry, where the power is sequentially switched on the special production technology system it is not limited to operate. Other benefits deriving from the lesign concept of power, the A-1 requires only one small battery...

Instruction Manual
Page 14
... as indicated in the photo. D • -se Action Grip The A•I has a handy, built'in finger grip, but to the bottom, slide it into the camera. The screw in the direction of the case screws into the action grip mounting socket guided by removing the top cover. Then, using a coin, screw... semi-hard case by the positioning pin on the front of the camera body. Semi•hard Case To protect the camera, particularly when carrying it, insert it straight up in the bottom of the arrow and pull it out as well, Before attaching the grip, load the battery into its semihard case.
... as indicated in the photo. D • -se Action Grip The A•I has a handy, built'in finger grip, but to the bottom, slide it into the camera. The screw in the direction of the case screws into the action grip mounting socket guided by removing the top cover. Then, using a coin, screw... semi-hard case by the positioning pin on the front of the camera body. Semi•hard Case To protect the camera, particularly when carrying it, insert it straight up in the bottom of the arrow and pull it out as well, Before attaching the grip, load the battery into its semihard case.

Instruction Manual
Page 18
...; cloth before the lens is mounted, and,of die battery chamber, load the battery negative pole first, pushing it out from the top. 1 Sp e Loading the Battery This camera will not function unless a battery is attached, it must be removed while loading. Use one... brand•new silver oxide or alkaline•manganese battery as spedBed in the correct directions. Usable Batteries Silver Oxide Battery (6V) F.veready (UCAR) No.544 IJIS 4GI3 .Mallory PX 28 I . Make sure...
...; cloth before the lens is mounted, and,of die battery chamber, load the battery negative pole first, pushing it out from the top. 1 Sp e Loading the Battery This camera will not function unless a battery is attached, it must be removed while loading. Use one... brand•new silver oxide or alkaline•manganese battery as spedBed in the correct directions. Usable Batteries Silver Oxide Battery (6V) F.veready (UCAR) No.544 IJIS 4GI3 .Mallory PX 28 I . Make sure...

Instruction Manual
Page 19
... frequently made. 4. To check the power level of time. 6. If, while pressing the battery check button, the LED on the top of the camera blinks on the top of the battery in extremely cold conditions. It should be replaced if the flashing frequency changes during the few ... check button is depressed, indicating the battery is used very frequently. 5. S. Then press the battery check button on and off rapidly, battery power is used in very cold conditions. -20- The battery requires checking under the following circumstances: I . When the camera is sufficient. If it has been ...
... frequently made. 4. To check the power level of time. 6. If, while pressing the battery check button, the LED on the top of the camera blinks on the top of the battery in extremely cold conditions. It should be replaced if the flashing frequency changes during the few ... check button is depressed, indicating the battery is used very frequently. 5. S. Then press the battery check button on and off rapidly, battery power is used in very cold conditions. -20- The battery requires checking under the following circumstances: I . When the camera is sufficient. If it has been ...

Instruction Manual
Page 20
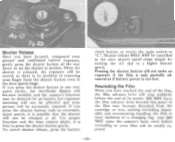
...released if you press the shutter button while pressing the battery check button. The shutter will function. Before loading the film or doing anything else, play with a new camera before using it on a shooting expedition or on a trip to make sure you press the button. Shoot and develop at least ...and the second shutter curtain will close when your fingers. Getting a Feel for Your A-1 Now that everything ix in long exposures. ki' The battery check button also serves to cancel the self-timer or to operate it a little. The circuit is removed from the button. Operate the shutter ...
...released if you press the shutter button while pressing the battery check button. The shutter will function. Before loading the film or doing anything else, play with a new camera before using it on a shooting expedition or on a trip to make sure you press the button. Shoot and develop at least ...and the second shutter curtain will close when your fingers. Getting a Feel for Your A-1 Now that everything ix in long exposures. ki' The battery check button also serves to cancel the self-timer or to operate it a little. The circuit is removed from the button. Operate the shutter ...

Instruction Manual
Page 21
...in a single, short 120 throw to be easily operated with the tip of your thumb, lightly push the film advance 'Tsar away from the camera body to activate both a very smooth shutter release as well as immediate meter response when shooting in the frame counter, indicating the number of ... release. After shutter release. The shutter button serves to its 90 stand-off and the shutter button is locked to prevent battery consumption and film wastage when the camera is the main switch of your thumb. Each winding will also advance the number in quick succession. When it gently all ...
...in a single, short 120 throw to be easily operated with the tip of your thumb, lightly push the film advance 'Tsar away from the camera body to activate both a very smooth shutter release as well as immediate meter response when shooting in the frame counter, indicating the number of ... release. After shutter release. The shutter button serves to its 90 stand-off and the shutter button is locked to prevent battery consumption and film wastage when the camera is the main switch of your thumb. Each winding will also advance the number in quick succession. When it gently all ...

Instruction Manual
Page 35
fat6-,4?? Above the highest speed of 1/2 sec. The dial will be wise to confuse the slower orange range with specified Canon flash units (see page 33). This shutter speed need not be set manually. ex. The white numbers on the AT Dial There is intended for ... long as you accidentally set at "A". white a white 1000 indicates a speed of 16 click-stop settings ranging from 1/1000 (sec.) to 30 (sec.) on the battery, it is very important to use a tripod and a able release, preferably with a lock, in long exposures to 1/1000 (sec.) are in orange while shutter speeds...
fat6-,4?? Above the highest speed of 1/2 sec. The dial will be wise to confuse the slower orange range with specified Canon flash units (see page 33). This shutter speed need not be set manually. ex. The white numbers on the AT Dial There is intended for ... long as you accidentally set at "A". white a white 1000 indicates a speed of 16 click-stop settings ranging from 1/1000 (sec.) to 30 (sec.) on the battery, it is very important to use a tripod and a able release, preferably with a lock, in long exposures to 1/1000 (sec.) are in orange while shutter speeds...

Instruction Manual
Page 48
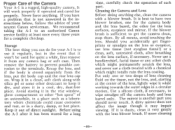
... an almost consistent degree of turning off , but it is switched off the viewfinder display altogether. When the subject is slightly higher. and it saves battery power and gives you have the option of brightness to focus and compose the image undisturbed, you absolute freedom to the human eye. Metering is...
... an almost consistent degree of turning off , but it is switched off the viewfinder display altogether. When the subject is slightly higher. and it saves battery power and gives you have the option of brightness to focus and compose the image undisturbed, you absolute freedom to the human eye. Metering is...

Instruction Manual
Page 52
... Double-Check Before Shooting 1. When the data flashes on and off in use the rewind knob as an indicator that mode unless you of the camera. the shutter button is essential to a more appropriate film. 3. N .\ - 1000--1 6- ~2_540 - 10't- 8 . \ 4/ - In ...taking exposure readings, the shutter speed and aperture combination changes as underexposure. Did you checked the battery power level? 3. Is the aperture ring of the lens set to produce correct exposure. Every time yen, advance the film. This is locked. In programmed...
... Double-Check Before Shooting 1. When the data flashes on and off in use the rewind knob as an indicator that mode unless you of the camera. the shutter button is essential to a more appropriate film. 3. N .\ - 1000--1 6- ~2_540 - 10't- 8 . \ 4/ - In ...taking exposure readings, the shutter speed and aperture combination changes as underexposure. Did you checked the battery power level? 3. Is the aperture ring of the lens set to produce correct exposure. Every time yen, advance the film. This is locked. In programmed...
Instruction Manual
Page 53
...lever will stop suddenly before rewinding or your picture will not make an exposure if the film is only partially ad• vaned or if battery power is best to "I.". Rewinding the Film When you press the shutter button in the slow speed range. DO NOT force the film ...button even in one very quick stroke, the viewfinder display will be accurately exposed. Also DO NOT open the camera's back cover before the end of the film. NOT be stored. To cancel shutter release, press the battery check button or return the main switch to press the shutter button gently.
...lever will stop suddenly before rewinding or your picture will not make an exposure if the film is only partially ad• vaned or if battery power is best to "I.". Rewinding the Film When you press the shutter button in the slow speed range. DO NOT force the film ...button even in one very quick stroke, the viewfinder display will be accurately exposed. Also DO NOT open the camera's back cover before the end of the film. NOT be stored. To cancel shutter release, press the battery check button or return the main switch to press the shutter button gently.

Instruction Manual
Page 61
... not to the eyepiece. After completing sclf.timer photography, return the main switch to either switch the main switch to the "L" position or press the battery check button. AE mode, it suits to flash eight times per second. The moment you press the shutter button, the self-timer lamp starts to...
... not to the eyepiece. After completing sclf.timer photography, return the main switch to either switch the main switch to the "L" position or press the battery check button. AE mode, it suits to flash eight times per second. The moment you press the shutter button, the self-timer lamp starts to...
Instruction Manual
Page 80
...to wind the film. the unusually high speed (H) is hand-held. They mount onto the A-I , and the Canon Motor Drive MA, specially developed as a natural ex- With the Battery Pack MA. It offers a selection of the film at which time an LED glows steadily to touch the film advance...film and rccock the shutter without your subject: you have to wind the film manually. Both the miniaturized Canon Power Winder A. tension of three shutter buttons depending on how the camera is instantly accessible for those fast-breaking situations. &Mt MOTORIZED FILM WINDING There remains one last mechanical ...
...to wind the film. the unusually high speed (H) is hand-held. They mount onto the A-I , and the Canon Motor Drive MA, specially developed as a natural ex- With the Battery Pack MA. It offers a selection of the film at which time an LED glows steadily to touch the film advance...film and rccock the shutter without your subject: you have to wind the film manually. Both the miniaturized Canon Power Winder A. tension of three shutter buttons depending on how the camera is instantly accessible for those fast-breaking situations. &Mt MOTORIZED FILM WINDING There remains one last mechanical ...

Instruction Manual
Page 83
Extender FD 2x-A 33. Speedlite 199A 38. Action Case A 44. 27. Auto Bellows 30. Extension Tube FD 25-U and FD 50-U 34. Battery Pack MA 40. Copy Stand 5 28. Copy Stand 4 29. Bellows M 31. Power Winder A 42. Bellows FL 2S IOU 32. Speedlitc I55A 37. Ni•Cd Pack MA 41. Data Back A 43. Dioptric Adjustment Lens S (10 kinds) 36. Wireless Controller LC-I ;I G 1'4 Extension Tube M Set 33. Motor Drive MA 39. Holder for Gelatin Filter with Filter Holder Adapter and Hoods 45.
Extender FD 2x-A 33. Speedlite 199A 38. Action Case A 44. 27. Auto Bellows 30. Extension Tube FD 25-U and FD 50-U 34. Battery Pack MA 40. Copy Stand 5 28. Copy Stand 4 29. Bellows M 31. Power Winder A 42. Bellows FL 2S IOU 32. Speedlitc I55A 37. Ni•Cd Pack MA 41. Data Back A 43. Dioptric Adjustment Lens S (10 kinds) 36. Wireless Controller LC-I ;I G 1'4 Extension Tube M Set 33. Motor Drive MA 39. Holder for Gelatin Filter with Filter Holder Adapter and Hoods 45.
Instruction Manual
Page 85
... facility at the center of each part. We recommend taking the A•1 to have a problem that it won't be used for your nearest Canon serviceman. Wrap it from the lens, put the body cap and the rear lens cap on the tissue, not the lens, and, starting at least ... on the lens or eyepiece, use it may impair viewing. If you should never touch. By all means, avoid touching the lens. Then remove the battery to prevent possible cos• rosion to wipe smudges off the camera body and lens barrel only.
... facility at the center of each part. We recommend taking the A•1 to have a problem that it won't be used for your nearest Canon serviceman. Wrap it from the lens, put the body cap and the rear lens cap on the tissue, not the lens, and, starting at least ... on the lens or eyepiece, use it may impair viewing. If you should never touch. By all means, avoid touching the lens. Then remove the battery to prevent possible cos• rosion to wipe smudges off the camera body and lens barrel only.
Instruction Manual
Page 86
...the temperature change by placing it in the water, it may be affected, so you may cause corrosion. Although the battery may work perfectly again when you are your body or in warmer temperatures. Let the camera grad- ually adjust to remove accumulated film dust... in a completely sealed plastic bag for a while. 96_ Keep the camera and spare battery close to your camera's worst enemies. Avoid extreme temperature changes. When doing this, take special care NEVER to an authonzed Canon service facility. Condensation forming on a beach, clean it thoroughly. is ...
...the temperature change by placing it in the water, it may be affected, so you may cause corrosion. Although the battery may work perfectly again when you are your body or in warmer temperatures. Let the camera grad- ually adjust to remove accumulated film dust... in a completely sealed plastic bag for a while. 96_ Keep the camera and spare battery close to your camera's worst enemies. Avoid extreme temperature changes. When doing this, take special care NEVER to an authonzed Canon service facility. Condensation forming on a beach, clean it thoroughly. is ...

Instruction Manual
Page 89
... for automatic exposure. Frame Counter: Additive type. Battery Check: A red LED on top of Camera Circuit: Shutter and self-timer operation cancelled by setting main switch to recock shutter. Cancellation of camera flashes on and off and shutter button is fully charged. tivated by mounting Canon Motor Drive MA or Power Winder A. minal with...
... for automatic exposure. Frame Counter: Additive type. Battery Check: A red LED on top of Camera Circuit: Shutter and self-timer operation cancelled by setting main switch to recock shutter. Cancellation of camera flashes on and off and shutter button is fully charged. tivated by mounting Canon Motor Drive MA or Power Winder A. minal with...

