Users Manual - English
Page 2
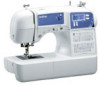
... burns, fire, electric shock, or injury to persons. 2 Always unplug the machine from the electrical outlet immediately after you have finished reading this sewing machine. To reduce the risk of the electrical outlet. Lifting the sewing machine by any other part may injure your machine if the power is cut. 3 Never operate this manual for the correct...
... burns, fire, electric shock, or injury to persons. 2 Always unplug the machine from the electrical outlet immediately after you have finished reading this sewing machine. To reduce the risk of the electrical outlet. Lifting the sewing machine by any other part may injure your machine if the power is cut. 3 Never operate this manual for the correct...
Users Manual - English
Page 3
.... • Do not use the machine near a heat source, such as an unsteady or slanted table, otherwise the sewing machine may ignite, resulting in injuries. 5 Special care is used by or near a space heater, iron, halogen lamp, or other parts to assure correct installation. 1 Never ...allow children to play with any adjustments in should never be kept out of the reach of children or disposed of. Special care is required around the machine needle. • Switch the sewing machine to the symbol "O" position...
.... • Do not use the machine near a heat source, such as an unsteady or slanted table, otherwise the sewing machine may ignite, resulting in injuries. 5 Special care is used by or near a space heater, iron, halogen lamp, or other parts to assure correct installation. 1 Never ...allow children to play with any adjustments in should never be kept out of the reach of children or disposed of. Special care is required around the machine needle. • Switch the sewing machine to the symbol "O" position...
Users Manual - English
Page 5
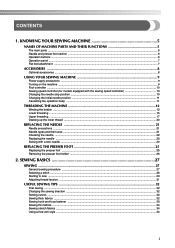
KNOWING YOUR SEWING MACHINE 5 NAMES OF MACHINE PARTS AND THEIR FUNCTIONS 5 The main parts ...5 Needle and presser foot section ...6 Operation buttons ...6 Operation panel ...7 Flat bed attachment ...7 ACCESSORIES ...8 Optional accessories ...8 USING YOUR SEWING MACHINE 9 Power supply precautions ...9 Turning on the machine ...9 Foot controller ...10 Sewing speed controller (for models equipped with the sewing speed controller 10 Changing the needle stop position ...10...
KNOWING YOUR SEWING MACHINE 5 NAMES OF MACHINE PARTS AND THEIR FUNCTIONS 5 The main parts ...5 Needle and presser foot section ...6 Operation buttons ...6 Operation panel ...7 Flat bed attachment ...7 ACCESSORIES ...8 Optional accessories ...8 USING YOUR SEWING MACHINE 9 Power supply precautions ...9 Turning on the machine ...9 Foot controller ...10 Sewing speed controller (for models equipped with the sewing speed controller 10 Changing the needle stop position ...10...

Users Manual - English
Page 7
... connector (page 9) Insert the plug on the sewing machine model. k Handwheel Used to lower the feed dogs. p Presser foot lever (page 17) Used to cut them. 1 KNOWING YOUR SEWING MACHINE 1 NAMES OF MACHINE PARTS AND THEIR FUNCTIONS The main parts a Bobbin winder (page 12) This winds the... thread onto the bobbin for use this to control the sewing speed, and to start and stop sewing. Not for sewing with accessory compartment (pages 7 and...
... connector (page 9) Insert the plug on the sewing machine model. k Handwheel Used to lower the feed dogs. p Presser foot lever (page 17) Used to cut them. 1 KNOWING YOUR SEWING MACHINE 1 NAMES OF MACHINE PARTS AND THEIR FUNCTIONS The main parts a Bobbin winder (page 12) This winds the... thread onto the bobbin for use this to control the sewing speed, and to start and stop sewing. Not for sewing with accessory compartment (pages 7 and...
Users Manual - English
Page 10
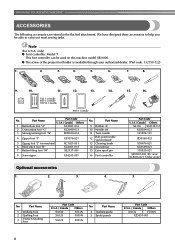
...SEWING MACHINE ACCESSORIES The following accessories are stored in the flat bed attachment. Part Name 1 Buttonhole foot "A" 2 Overcasting foot "G" 3 Monogramming foot "N" Part Code U.S.A. / Canada Others XC2691-033 XC3098-031 XD0810-031 4 Zipper foot "I" X59370-021 5 Zigzag foot "J" (on this machine model XR-9000.... ● The screw of the presser foot holder is available through your authorized dealer. (Part code: 132730-122) 1. 2. 3. 4. 5. 6. 7. 8. 9. 10. 11. 12. ...
...SEWING MACHINE ACCESSORIES The following accessories are stored in the flat bed attachment. Part Name 1 Buttonhole foot "A" 2 Overcasting foot "G" 3 Monogramming foot "N" Part Code U.S.A. / Canada Others XC2691-033 XC3098-031 XD0810-031 4 Zipper foot "I" X59370-021 5 Zigzag foot "J" (on this machine model XR-9000.... ● The screw of the presser foot holder is available through your authorized dealer. (Part code: 132730-122) 1. 2. 3. 4. 5. 6. 7. 8. 9. 10. 11. 12. ...

Users Manual - English
Page 14
... designed the bobbin that comes with this machine or bobbins of the same type (part code: SA156, SFB). b CAUTION ● If the spool of the bobbin. Pass the end of the thread through the hole on the sewing machine. Only use bobbins (part code: SA156, SFB) that have been... designed for this pin. e 12 Using other models, the machine will not work properly. KNOWING YOUR SEWING MACHINE THREADING THE MACHINE Winding the bobbin This section describes how to ...
... designed the bobbin that comes with this machine or bobbins of the same type (part code: SA156, SFB). b CAUTION ● If the spool of the bobbin. Pass the end of the thread through the hole on the sewing machine. Only use bobbins (part code: SA156, SFB) that have been... designed for this pin. e 12 Using other models, the machine will not work properly. KNOWING YOUR SEWING MACHINE THREADING THE MACHINE Winding the bobbin This section describes how to ...

Users Manual - English
Page 17
...it may cause incorrect thread tension (page 31). Use only the enclosed bobbin or bobbins of the thread, push the bobbin d down with this sewing machine. CAUTION ● Make sure you set bobbin, see page 16. CAUTION ● Make sure you could be injured. this is not correctly ... to be incorrect or break the needle. Hold the end of the same type (part code: SA156, SFB). Memo ● When the sewing machine is turned after winding the thread around the bobbin, the machine will not operate correctly. If you accidentally step on quick-set the bobbin so the thread...
...it may cause incorrect thread tension (page 31). Use only the enclosed bobbin or bobbins of the thread, push the bobbin d down with this sewing machine. CAUTION ● Make sure you set bobbin, see page 16. CAUTION ● Make sure you could be injured. this is not correctly ... to be incorrect or break the needle. Hold the end of the same type (part code: SA156, SFB). Memo ● When the sewing machine is turned after winding the thread around the bobbin, the machine will not operate correctly. If you accidentally step on quick-set the bobbin so the thread...

Users Manual - English
Page 25
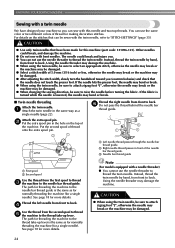
...with the screwdriver, otherwise the needle may break or damage may result. With the flat side of the needle toward the e rear of the sewing machine may fall off. a Needle stopper 23 Install the twin needle in the same way. While holding the needle with your left hand, f ...much .) a Screwdriver b Needle clamp screw • Do not apply strong force when loosening or tightening the needle clamp screw, otherwise certain parts of the machine, insert the needle until it touches the needle stopper. Therefore, do not loosen the needle clamp screw too much , the needle clamp (...
...with the screwdriver, otherwise the needle may break or damage may result. With the flat side of the needle toward the e rear of the sewing machine may fall off. a Needle stopper 23 Install the twin needle in the same way. While holding the needle with your left hand, f ...much .) a Screwdriver b Needle clamp screw • Do not apply strong force when loosening or tightening the needle clamp screw, otherwise certain parts of the machine, insert the needle until it touches the needle stopper. Therefore, do not loosen the needle clamp screw too much , the needle clamp (...
Users Manual - English
Page 26
...damaged. For details on the top of the machine. Thread the right needle from the first spool to thread c the machine to "STITCH SETTINGS" (page 35). b Right needle thread passes in the hole on the stitches that can sew with this machine (part code: 131096-121). Using the needle threader ...may be damaged. ● When changing the sewing direction, be sewn with the twin needle, refer to the needle bar thread guide. Other ...
...damaged. For details on the top of the machine. Thread the right needle from the first spool to thread c the machine to "STITCH SETTINGS" (page 35). b Right needle thread passes in the hole on the stitches that can sew with this machine (part code: 131096-121). Using the needle threader ...may be damaged. ● When changing the sewing direction, be sewn with the twin needle, refer to the needle bar thread guide. Other ...

Users Manual - English
Page 29
Before operating the sewing machine, read the following precautions. 2 CAUTION ● While the machine is finished, cut the threads. General sewing procedure Follow the basic procedures below . Turn on selecting a stitch, refer to be sewn. In addition, keep your hands away from all moving parts such as the needle and handwheel, otherwise injuries may occur. ●...
Before operating the sewing machine, read the following precautions. 2 CAUTION ● While the machine is finished, cut the threads. General sewing procedure Follow the basic procedures below . Turn on selecting a stitch, refer to be sewn. In addition, keep your hands away from all moving parts such as the needle and handwheel, otherwise injuries may occur. ●...

Users Manual - English
Page 51
...sewing machine. Measure the distance between the holes in the illustration so that it fits into the grooves, and then loosely tie it . Lower the presser foot lever and the e buttonhole lever, and then start sewing. Button sewing Buttons can be sewn on with 4 holes can be attached. With a seam ripper, cut the middle part... of the h gimp thread remaining at the rear of the machine on stretch fabrics, use a gimp thread....
...sewing machine. Measure the distance between the holes in the illustration so that it fits into the grooves, and then loosely tie it . Lower the presser foot lever and the e buttonhole lever, and then start sewing. Button sewing Buttons can be sewn on with 4 holes can be attached. With a seam ripper, cut the middle part... of the h gimp thread remaining at the rear of the machine on stretch fabrics, use a gimp thread....

Users Manual - English
Page 78
...34 free-motion quilting 56 H handwheel 5 heirloom stitching 63 hook-and-loop fastener 33 J joining 62 joining stitch 53, 59 76 M main parts 5 main power switch 9 monogramming 61, 63 N needle 21 needle bar thread guide 6 needle clamp screw 6, 23 needle plate 6 needle ... foot 56 quilting guide 55 R reinforcement stitching 57 reverse/reinforcement stitch button 6 S scallop stitching 61 seam ripper 48 sewing machine needles 21 sewing speed controller 6 sewing the character stitches 67 sleeve holes 57 smocking 61 spool pin 12, 17 start/stop button 6, 30 stitch length 28...
...34 free-motion quilting 56 H handwheel 5 heirloom stitching 63 hook-and-loop fastener 33 J joining 62 joining stitch 53, 59 76 M main parts 5 main power switch 9 monogramming 61, 63 N needle 21 needle bar thread guide 6 needle clamp screw 6, 23 needle plate 6 needle ... foot 56 quilting guide 55 R reinforcement stitching 57 reverse/reinforcement stitch button 6 S scallop stitching 61 seam ripper 48 sewing machine needles 21 sewing speed controller 6 sewing the character stitches 67 sleeve holes 57 smocking 61 spool pin 12, 17 start/stop button 6, 30 stitch length 28...


