Users Manual - English
Page 5
... ...5 Needle and presser foot section ...6 Operation buttons ...6 Operation panel ...7 Flat bed attachment ...7 ACCESSORIES ...8 Optional accessories ...8 USING YOUR SEWING MACHINE 9 Power supply precautions ...9 Turning on the machine ...9 Foot controller ...10 Sewing speed controller (for models equipped with the sewing speed controller 10 Changing the needle stop position ...10 Changing the initial needle position ...11 Cancelling the operation...
... ...5 Needle and presser foot section ...6 Operation buttons ...6 Operation panel ...7 Flat bed attachment ...7 ACCESSORIES ...8 Optional accessories ...8 USING YOUR SEWING MACHINE 9 Power supply precautions ...9 Turning on the machine ...9 Foot controller ...10 Sewing speed controller (for models equipped with the sewing speed controller 10 Changing the needle stop position ...10 Changing the initial needle position ...11 Cancelling the operation...

Users Manual - English
Page 7
...the needle. r Handle Carry the sewing machine by its handle when transporting the machine. 5 k Handwheel Used to lower the feed dogs. l Main power and sewing light switch (page 9) You can use as the lower thread. m Jack/socket connector (page 9) Insert the plug on the sewing machine model. q Foot controller (page 10...) You can turn the main power and sewing light switch on and off. b Spool pin (pages 12 and 17) This holds the spool of the ...
...the needle. r Handle Carry the sewing machine by its handle when transporting the machine. 5 k Handwheel Used to lower the feed dogs. l Main power and sewing light switch (page 9) You can use as the lower thread. m Jack/socket connector (page 9) Insert the plug on the sewing machine model. q Foot controller (page 10...) You can turn the main power and sewing light switch on and off. b Spool pin (pages 12 and 17) This holds the spool of the ...

Users Manual - English
Page 8
... lowered in place. e Presser foot The presser foot applies pressure consistently on the sewing machine model. For details, refer to start sewing without pulling up the bobbin thread. KNOWING YOUR SEWING MACHINE Needle and presser foot section a Buttonhole lever Lower the buttonhole lever when sewing buttonholes and bar tacks. h Bobbin cover Open the bobbin cover to set...
... lowered in place. e Presser foot The presser foot applies pressure consistently on the sewing machine model. For details, refer to start sewing without pulling up the bobbin thread. KNOWING YOUR SEWING MACHINE Needle and presser foot section a Buttonhole lever Lower the buttonhole lever when sewing buttonholes and bar tacks. h Bobbin cover Open the bobbin cover to set...
Users Manual - English
Page 9
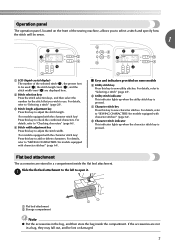
... or damaged. 7 f Utility stitch indicator This indicator lights up when the character stitch key is pressed. For details, refer to "SEWING CHARACTERS (for models equipped with the character stitch key) Press this key to add or delete characters. Operation panel The operation panel, located on some... with the character stitch key) Press this key to adjust the stitch length. (For models equipped with character stitches)" (page 64). ■ Keys and indicators provided on the front of the sewing machine, allows you wish to use. If the accessories are not in the bag, and then...
... or damaged. 7 f Utility stitch indicator This indicator lights up when the character stitch key is pressed. For details, refer to "SEWING CHARACTERS (for models equipped with the character stitch key) Press this key to add or delete characters. Operation panel The operation panel, located on some... with the character stitch key) Press this key to adjust the stitch length. (For models equipped with character stitches)" (page 64). ■ Keys and indicators provided on the front of the sewing machine, allows you wish to use. If the accessories are not in the bag, and then...
Users Manual - English
Page 10
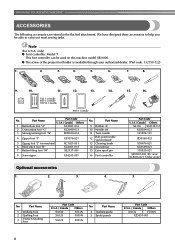
..."G" 3 Monogramming foot "N" Part Code U.S.A. / Canada Others XC2691-033 XC3098-031 XD0810-031 4 Zipper foot "I" X59370-021 5 Zigzag foot "J" (on this machine model XR-9000. ● The screw of the presser foot holder is available through your authorized dealer. (Part code: 132730-122) 1. 2. 3. 4. 5. 6. 7. 8.... Model T This foot controller can be able to help you be used on machine) 6 Blind stitch foot "R" 7 Button fitting foot "M" XC3021-031 XC4051-031 XE2137-001 8 Seam ripper X54243-051 No. No. Note (For U.S.A. KNOWING YOUR SEWING MACHINE ACCESSORIES...
..."G" 3 Monogramming foot "N" Part Code U.S.A. / Canada Others XC2691-033 XC3098-031 XD0810-031 4 Zipper foot "I" X59370-021 5 Zigzag foot "J" (on this machine model XR-9000. ● The screw of the presser foot holder is available through your authorized dealer. (Part code: 132730-122) 1. 2. 3. 4. 5. 6. 7. 8.... Model T This foot controller can be able to help you be used on machine) 6 Blind stitch foot "R" 7 Button fitting foot "M" XC3021-031 XC4051-031 XE2137-001 8 Seam ripper X54243-051 No. No. Note (For U.S.A. KNOWING YOUR SEWING MACHINE ACCESSORIES...
Users Manual - English
Page 12
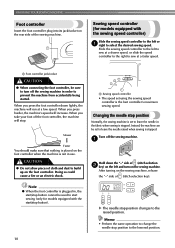
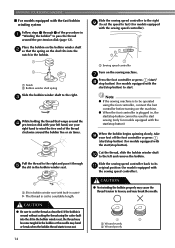
... is not in order to select the desired sewing speed. a Hold down lightly, the machine will run at a low speed. After turning on the rear side of the sewing machine. Sewing speed controller (for models equipped with the sewing speed controller) Slide the sewing speed controller to the left to sew at a faster speed. CAUTION ● Do not allow...
... is not in order to select the desired sewing speed. a Hold down lightly, the machine will run at a low speed. After turning on the rear side of the sewing machine. Sewing speed controller (for models equipped with the sewing speed controller) Slide the sewing speed controller to the left to sew at a faster speed. CAUTION ● Do not allow...

Users Manual - English
Page 14
... the spring on the shaft slides into the groove of the bobbin. 1 2 a Spring on the shaft b Groove of the thread through the hole on the sewing machine. Using other models, the machine will not work properly. Pass the end of the bobbin Turn on c the bobbin from other bobbins may tangle on this...
... the spring on the shaft slides into the groove of the bobbin. 1 2 a Spring on the shaft b Groove of the thread through the hole on the sewing machine. Using other models, the machine will not work properly. Pass the end of the bobbin Turn on c the bobbin from other bobbins may tangle on this...

Users Manual - English
Page 15
...begins j spinning slowly, take your foot off the foot controller or press (start/stop button) (for models equipped with the start /stop button). Memo ● When the sewing machine is started or the handwheel is not a malfunction. ● The needle bar does not move when ... shaft k to its l original position (for models equipped with the sewing speed controller). this is turned after winding the thread around the bobbin, the machine will make a clicking sound; Then stop the machine. 1 Note ● If the sewing machine is to be operated using the foot controller, connect...
...begins j spinning slowly, take your foot off the foot controller or press (start/stop button) (for models equipped with the start /stop button). Memo ● When the sewing machine is started or the handwheel is not a malfunction. ● The needle bar does not move when ... shaft k to its l original position (for models equipped with the sewing speed controller). this is turned after winding the thread around the bobbin, the machine will make a clicking sound; Then stop the machine. 1 Note ● If the sewing machine is to be operated using the foot controller, connect...
Users Manual - English
Page 16
... the thread using the foot controller, connect the foot controller before turning on the sewing machine. Note ● If the sewing machine is cut the thread as described. Slide the sewing speed controller back to run out. KNOWING YOUR SEWING MACHINE ■ For models equipped with the fast bobbin winding system Follow steps 1 through e the slit in the...
... the thread using the foot controller, connect the foot controller before turning on the sewing machine. Note ● If the sewing machine is cut the thread as described. Slide the sewing speed controller back to run out. KNOWING YOUR SEWING MACHINE ■ For models equipped with the fast bobbin winding system Follow steps 1 through e the slit in the...

Users Manual - English
Page 17
...direction shown by turning a the handwheel toward you (counterclockwise) or press (needle position button) (for this sewing machine. Actual size 11.5 mm (7/16 inch) This model Other models • Only use bobbins that were designed to loosen, breaking the needle and resulting in the wrong direction...right. If you turn the power off while threading the machine. Memo ● When the sewing machine is turned after winding the thread around the bobbin, the machine will not operate correctly. If bobbins from other models are used with the needle position button), and raise the ...
...direction shown by turning a the handwheel toward you (counterclockwise) or press (needle position button) (for this sewing machine. Actual size 11.5 mm (7/16 inch) This model Other models • Only use bobbins that were designed to loosen, breaking the needle and resulting in the wrong direction...right. If you turn the power off while threading the machine. Memo ● When the sewing machine is turned after winding the thread around the bobbin, the machine will not operate correctly. If bobbins from other models are used with the needle position button), and raise the ...
Users Manual - English
Page 18
...thread unrolls in the wrong direction, it may cause the thread tension to sew, follow the procedure in "Drawing up the lower thread" (page 20). Put the left tab in the diagram). ■ For models equipped with this machine. If you start to be used with the quick-set bobbin Raise ...the needle to its highest position by marks around the bobbin case. Put the left tab in the right direction. Memo ● You can begin sewing immediately without drawing up the...
...thread unrolls in the wrong direction, it may cause the thread tension to sew, follow the procedure in "Drawing up the lower thread" (page 20). Put the left tab in the diagram). ■ For models equipped with this machine. If you start to be used with the quick-set bobbin Raise ...the needle to its highest position by marks around the bobbin case. Put the left tab in the right direction. Memo ● You can begin sewing immediately without drawing up the...
Users Manual - English
Page 19
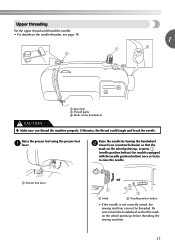
... Needle position button • If the needle is not correctly raised, the sewing machine can not be threaded. Otherwise, the thread could tangle and break the needle...you (counterclockwise) so that the mark on the handwheel CAUTION ● Make sure you thread the machine properly. Be sure to raise the needle. Upper threading Set the upper thread and thread the needle... up , or press (needle position button) (for models equipped with the needle position button) once or twice to turn the handwheel so that the mark on the wheel points up before threading the sewing machine. 17
... Needle position button • If the needle is not correctly raised, the sewing machine can not be threaded. Otherwise, the thread could tangle and break the needle...you (counterclockwise) so that the mark on the handwheel CAUTION ● Make sure you thread the machine properly. Be sure to raise the needle. Upper threading Set the upper thread and thread the needle... up , or press (needle position button) (for models equipped with the needle position button) once or twice to turn the handwheel so that the mark on the wheel points up before threading the sewing machine. 17

Users Manual - English
Page 20
... the upper thread as shown in the figure d on the spool pin and cause the needle to left hand, then feeding the thread with home sewing machine needles size 75/11100/16. a 5 cm (2 inch) 18 a Needle holder b Needle threader lever c Guide Make sure you raise the presser foot lever and the ...; You cannot use the needle threader if you are using those types of threads or needles, thread the eye of thread on page 21 for models equipped with the needle threader) CAUTION ● The needle threader can easily be used with your left . The thread can only be passed behind ...
... the upper thread as shown in the figure d on the spool pin and cause the needle to left hand, then feeding the thread with home sewing machine needles size 75/11100/16. a 5 cm (2 inch) 18 a Needle holder b Needle threader lever c Guide Make sure you raise the presser foot lever and the ...; You cannot use the needle threader if you are using those types of threads or needles, thread the eye of thread on page 21 for models equipped with the needle threader) CAUTION ● The needle threader can easily be used with your left . The thread can only be passed behind ...

Users Manual - English
Page 22
... . • The bobbin cover should still be left over. KNOWING YOUR SEWING MACHINE Drawing up the lower c thread. a Upper thread While holding the end of the machine under the presser foot. When sewing gathers or darts, you (counterclockwise) so that some thread will be removed.... Before you draw up the lower thread as described in . Replace the bobbin cover. c 20 a Upper thread b Lower thread a Upper thread b Lower thread ■ For models...
... . • The bobbin cover should still be left over. KNOWING YOUR SEWING MACHINE Drawing up the lower c thread. a Upper thread While holding the end of the machine under the presser foot. When sewing gathers or darts, you (counterclockwise) so that some thread will be removed.... Before you draw up the lower thread as described in . Replace the bobbin cover. c 20 a Upper thread b Lower thread a Upper thread b Lower thread ■ For models...
Users Manual - English
Page 24
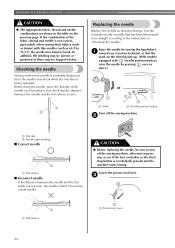
... may be uneven or puckered or there may be sure to turn off the sewing machine. Raise the needle by pressing once or twice.) or 1 2 a Mark b Needle position button Turn off the sewing machine, otherwise injuries may occur if the foot controller or the start/ stop button ...the needle Replace the needle as 65/9 to the instructions in the table on the wheel points up. (With models equipped with thin needles (such as described below. KNOWING YOUR SEWING MACHINE CAUTION ● The appropriate fabric, thread and needle combinations are shown in "Checking the needle" .
... may be uneven or puckered or there may be sure to turn off the sewing machine. Raise the needle by pressing once or twice.) or 1 2 a Mark b Needle position button Turn off the sewing machine, otherwise injuries may occur if the foot controller or the start/ stop button ...the needle Replace the needle as 65/9 to the instructions in the table on the wheel points up. (With models equipped with thin needles (such as described below. KNOWING YOUR SEWING MACHINE CAUTION ● The appropriate fabric, thread and needle combinations are shown in "Checking the needle" .
Users Manual - English
Page 26
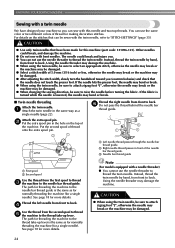
...First spool b Second spool Use the thread from front to raise the needle before turning the fabric. c Needle bar thread guide Note (For models equipped with a needle threader) ● You cannot use the same color or two different colors of the needle bar thread guide. Attach the ... injure you. ● You can sew with this machine (part code: 131096-121). d Use the thread from front to thread the twin needle. b Right needle thread passes in the same way as for normally threading the machine (for a single needle). KNOWING YOUR SEWING MACHINE Sewing with a twin needle We have been...
...First spool b Second spool Use the thread from front to raise the needle before turning the fabric. c Needle bar thread guide Note (For models equipped with a needle threader) ● You cannot use the same color or two different colors of the needle bar thread guide. Attach the ... injure you. ● You can sew with this machine (part code: 131096-121). d Use the thread from front to thread the twin needle. b Right needle thread passes in the same way as for normally threading the machine (for a single needle). KNOWING YOUR SEWING MACHINE Sewing with a twin needle We have been...
Users Manual - English
Page 27
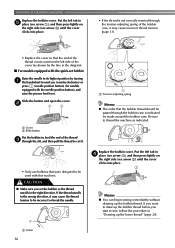
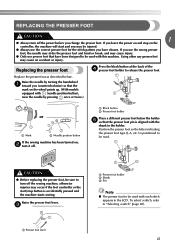
... button), raise the needle by pressing once or twice.) or a Mark b Needle position button If the sewing machine has been turned on the wheel points up. (With models equipped with this machine. REPLACING THE PRESSER FOOT CAUTION 1 ● Always turn it off. If you use the wrong presser ... Raise the presser foot lever. Replace the presser foot as described below the holder e so that the mark on , b turn off the sewing machine, otherwise injuries may cause injury. ● Only use the correct presser foot for the stitch pattern you have been designed to turn off the...
... button), raise the needle by pressing once or twice.) or a Mark b Needle position button If the sewing machine has been turned on the wheel points up. (With models equipped with this machine. REPLACING THE PRESSER FOOT CAUTION 1 ● Always turn it off. If you use the wrong presser ... Raise the presser foot lever. Replace the presser foot as described below the holder e so that the mark on , b turn off the sewing machine, otherwise injuries may cause injury. ● Only use the correct presser foot for the stitch pattern you have been designed to turn off the...
Users Manual - English
Page 30
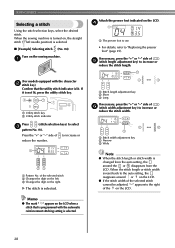
... turned on, the straight stitch ( left . Press the "+" or "-" side of the selected stitch b Changes the digit on the sewing machine. c Changes the digit on the LCD. Memo ● The mark " " appears on the LCD when a stitch that is programmed with the character b ...selected stitch cannot be adjusted, "--" appears to the right of e (stitch length adjustment key) to increase or reduce the stitch length. (For models equipped with the automatic reinforcement stitching setting is reset back to increase or reduce the stitch width. X The stitch is not lit, press the utility...
... turned on, the straight stitch ( left . Press the "+" or "-" side of the selected stitch b Changes the digit on the sewing machine. c Changes the digit on the LCD. Memo ● The mark " " appears on the LCD when a stitch that is programmed with the character b ...selected stitch cannot be adjusted, "--" appears to the right of e (stitch length adjustment key) to increase or reduce the stitch length. (For models equipped with the automatic reinforcement stitching setting is reset back to increase or reduce the stitch width. X The stitch is not lit, press the utility...
Users Manual - English
Page 34
Refer to these tips when sewing your sewing projects are the same as a pivot. When sewing along a curve while using a zigzag stitch, select a shorter stitch length in the fabric). Turn the fabric using the twin needle, be used for models equipped with your project, and check the ...even higher to bring the presser foot to sew around the curve. Trial sewing Lower the presser foot lever and continue c sewing. If the fabric is turned while the needle is selected. When the stitching reaches a corner, stop the a sewing machine. After you (counterclockwise) or by turning ...
Refer to these tips when sewing your sewing projects are the same as a pivot. When sewing along a curve while using a zigzag stitch, select a shorter stitch length in the fabric). Turn the fabric using the twin needle, be used for models equipped with your project, and check the ...even higher to bring the presser foot to sew around the curve. Trial sewing Lower the presser foot lever and continue c sewing. If the fabric is turned while the needle is selected. When the stitching reaches a corner, stop the a sewing machine. After you (counterclockwise) or by turning ...
Users Manual - English
Page 52
...models not provided e with the bobbin thread. CAUTION ● When sewing, be sure that the needle correctly goes into the two holes toward you h (counterclockwise) to check that the needle does not touch the button, otherwise the needle may bend or break. Turn the handwheel toward the rear of the machine...dog position lever is the same as seen from the front of the sewing machine, and then sew them in the button. Set the stitch length to sew reinforcement stitches. i • After sewing for about 10 seconds at the beginning of the button. VARIOUS STITCHES Place...
...models not provided e with the bobbin thread. CAUTION ● When sewing, be sure that the needle correctly goes into the two holes toward you h (counterclockwise) to check that the needle does not touch the button, otherwise the needle may bend or break. Turn the handwheel toward the rear of the machine...dog position lever is the same as seen from the front of the sewing machine, and then sew them in the button. Set the stitch length to sew reinforcement stitches. i • After sewing for about 10 seconds at the beginning of the button. VARIOUS STITCHES Place...


